
Project 26 – Dual Servo Control
You'll now create another simple project, but this time you'll control two servos using commands from the serial monitor. You learned about serial control in Project 10 when you were changing the colors on an RGB lamp with serial commands. So let's cannibalize the code from Project 10 to make this one.
Parts Required
This project requires two servos. You will not need the potentiometer.
| Standard RC Servo × 2 |  |
Connect It Up
The circuit for Project 26 is again extremely simple. Connect it as shown in Figure 9-5. Basically, you remove the potentiometer from the last project and wire a second servo up to Digital Pin 6.
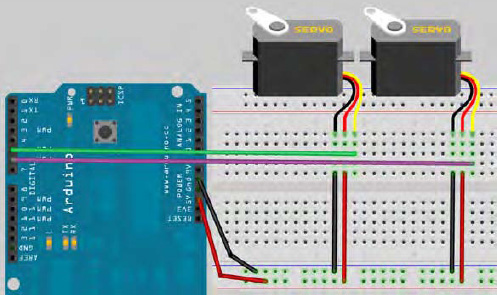
Figure 9-5. The circuit for Project 26 – Dual Servo Control (see insert for color version)
Enter The Code
Enter the code in Listing 9-2.
Listing 9-2. Code for Project 26
// Project 26

#include <Servo.h>


char buffer[10];
Servo servo1;  // Create a servo object

Servo servo2;  // Create a second servo object


void setup()
{

        servo1.attach(5);  // Attaches the servo on pin 5 to the servo1 object

        servo2.attach(6);  // Attaches the servo on pin 6 to the servo2 object

        Serial.begin(9600);

        Serial.flush();

        servo1.write(90);  // Put servo1 at home position

        servo2.write(90);  // Put servo2 at home postion

        Serial.println("STARTING...");

}


void loop()

{

        if (Serial.available() > 0) { // Check if data has been entered

                int index=0;

                delay(100); // Let the buffer fill up

                int numChar = Serial.available(); // Find the string length
if (numChar>10) {
numChar=10;
}
while (numChar--) {
// Fill the buffer with the string
buffer[index++] = Serial.read();
}
splitString(buffer); // Run splitString function
}
}
void splitString(char* data) {
Serial.print("Data entered: ");
Serial.println(data);
char* parameter;
parameter = strtok (data, " ,"); //String to token
while (parameter != NULL) { // If we haven't reached the end of the string...
setServo(parameter); // ...run the setServo function
parameter = strtok (NULL, " ,");
}
// Clear the text and serial buffers
for (int x=0; x<9; x++) {
buffer[x]='�';
}
Serial.flush();
}
void setServo(char* data) {
if ((data[0] == 'L') || (data[0] == 'l')) {
int firstVal = strtol(data+1, NULL, 10); // String to long integer
firstVal = constrain(firstVal,0,180); // Constrain values
servo1.write(firstVal);
Serial.print("Servo1 is set to: ");
Serial.println(firstVal);
}
if ((data[0] == 'R') || (data[0] == 'r')) {
int secondVal = strtol(data+1, NULL, 10); // String to long integer
secondVal = constrain(secondVal,0,255); // Constrain the values
servo2.write(secondVal);
Serial.print("Servo2 is set to: ");
Serial.println(secondVal);
}
}
To run the code, open up the Serial Monitor window. The Arduino will reset, and the servos will move to their central locations. You can now use the Serial Monitor to send commands to the Arduino.
The left servo is controlled by sending an L and then a number between 0 and 180 for the angle. The right servo is controlled by sending an R and the number. You can send individual commands to each servo or send them both commands at the same time by separating the commands with a space or comma, like so:
This is a simple example of how you could send commands down a wire to an Arduino-controlled robot arm or an animatronic toy. Note that the serial commands don't have to come from the Arduino Serial Monitor. You can use any program that is capable of communicating over serial or write your own in Python or C++.
Project 26 – Dual Servo Control – Code Overview
The code for this project is basically unchanged from that of Project 10. I will therefore not go into each command in detail. Instead, I will give an overview if it is something already covered. Read up on Project 10 for a refresher on how the string manipulation commands work.
First the Servo.h library is included:
#include <Servo.h>
Then an array of type char is created to hold the text string you enter as a command into the serial monitor:
char buffer[10];
Two servo objects are created:
Servo servo1;  // Create a servo object

Servo servo2;  // Create a second servo object
In the setup routine, attach the servo objects to Pins 5 and 6:
servo1.attach(5);  // Attaches the servo on pin 5 to the servo1 object

servo2.attach(6);  // Attaches the servo on pin 6 to the servo2 object
Then begin serial communications and carry out a Serial.flush() command, which flushes any characters out of the serial buffer so it is empty and ready to receive commands for the servos:
Serial.begin(9600);

Serial.flush();
Both servos have a value of 90, which is the centre point, written to them so that they start off in the central position:
servo1.write(90);  // Put servo1 at home position

servo2.write(90);  // Put servo2 at home position
Then the word “STARTING......” is displayed in the Serial Monitor window so you know the device is ready to receive commands:
Serial.println("STARTING...");
In the main loop, check if any data has been sent down the serial line
if (Serial.available() > 0) { // check if data has been entered
and if so, let the buffer fill up and obtain the length of the string, ensuring it does not overflow above the maximum of 10 characters. Once the buffer is full, you call the splitString routine sending the buffer array to the function:
int index=0;

delay(100); // Let the buffer fill up

int numChar = Serial.available(); // Find the string length

if (numChar>10) {

        numChar=10;

}

while (numChar--) {

        // Fill the buffer with the string

        buffer[index++] = Serial.read();

}

splitString(buffer); // Run splitString function
The splitString function receives the buffer array, splits it into separate commands if more than one is entered, and calls the setServo routine with the parameter stripped from the command string received over the serial line:
void splitString(char* data) {
Serial.print("Data entered: ");
Serial.println(data);
char* parameter;
parameter = strtok (data, " ,"); //String to token
while (parameter != NULL) { // If we haven't reached the end of the string...
setServo(parameter); // ...run the setServo function
parameter = strtok (NULL, " ,");
}
// Clear the text and serial buffers
for (int x=0; x<9; x++) {
buffer[x]='�';
}
Serial.flush();
}
The setServo routine receives the smaller string sent from the splitString function and checks if an L or R is entered, and if so, moves either the left or right servo by the amount specified in the string:
void setServo(char* data) {

        if ((data[0] == 'L') || (data[0] == 'l')) {

                int firstVal = strtol(data+1, NULL, 10); // String to long integer

                firstVal = constrain(firstVal,0,180); // Constrain values

                servo1.write(firstVal);

                Serial.print("Servo1 is set to: ");

                Serial.println(firstVal);

        }

        if ((data[0] == 'R') || (data[0] == 'r')) {

                int secondVal = strtol(data+1, NULL, 10); // String to long integer

                secondVal = constrain(secondVal,0,255); // Constrain the values

                servo2.write(secondVal);

                Serial.print("Servo2 is set to: ");

                Serial.println(secondVal);
I've glossed over these last two functions as they are almost identical to those in Project 10. If you cannot remember what was covered in Project 10, feel free to go back and reread it.