
Project 38 – Simple Ultrasonic Rangefinder
The LV-MaxSonar ultrasonic range finder comes in EZ1, EZ2, EZ3, and EZ4 models. All have the same range, but they come in progressively narrower beam angles to allow you to match your sensor to your particular application. I used an EZ3 in the creation of this chapter, but you can choose any model.
Parts Required
LV-MaxSonar EZ3* 
100µF Electrolytic Capacitor ![]()
100 ohm Resistor ![]()
*or any from the LV range (image courtesy of Sparkfun)
Connect It Up
Connect everything as shown in Figure 14-1.

Figure 14-1. The circuit for Project 38 – Simple Ultrasonic Rangefinder (see insert for color version)
As Fritzing (the software used to create the breadboard diagrams in this book) does not have a LV-MaxSonar in its parts library, I have used a “mystery part” as a substitute. Connect the +5v and Ground to the two power rails on the breadboard. Place a 100µF electrolytic capacitor across the power rails, ensuring you get the longer leg connected to the +5v and the shorter leg (also with a white band and minus signs across it) to the ground rail. Then connect a jumper wire between ground and the Gnd pin on the sensor. It is essential you get the polarity correct as they can explode if connected the wrong way around! Then connect a 100 ohm resistor between the +5v rail and the +5v pin on the sensor. Finally, connect a wire between the PW pin on the sensor and Digital Pin 9.
Enter the Code
Once you have checked that your wiring is correct, enter the code in Listing 14-1 and upload it to your Arduino.
Listing 14-1. Code for Project 38
// Project 38


#define sensorPin 9

long pwmRange, inch, cm;


void setup() {

  // Start serial communications

  Serial.begin(115200);

  pinMode(sensorPin, INPUT);

}


void loop() {
pwmRange = pulseIn(sensorPin, HIGH);


  // 147uS per inch according to datasheet

  inch = pwmRange / 147;

  // convert inch to cm

  cm = inch * 2.54;


  Serial.print(inch);

  Serial.print(" inches    ");

  Serial.print(cm);

  Serial.println(" cm");

}
Once you have uploaded the code, power the Arduino down for a second. Then make sure that your ultrasonic sensor is still and pointing at something that is not moving. Putting it flat on a table and pointing it at your ceiling will work best. Make sure that nothing is near the sensor when you power the Arduino back up. When the device is first powered up, it runs through a calibration routine for the first read cycle. Make sure nothing is moving around in its beam while this takes place, otherwise you will get inaccurate readings. This information is then used to determine the range to objects in the line of sight of the sensor. Measure the distance between the sensor and the ceiling, and this distance (roughly) will be output from the serial monitor when you open it up. If the distance is inaccurate, power the Arduino down and back up, allowing the device to calibrate without obstacles. By moving the sensor around or by raising and lowering your hand over the sensor, the distance to the object placed in its path will be displayed on the serial monitor.
Project 38 – Simple Ultrasonic Range Finder – Code Overview
Again, you have a short and simple piece of code to use this sensor. First, you start of by defining the pin you will use to detect the pulse. You are using Digital Pin 9:
#define sensorPin 9
Then three variables of type long are declared:
long pwmRange, inch, cm;
These will be used to store the range read back from the sensor, the range converted into inches, and then into centimeters, respectively.
In the setup routine, you simply begin serial communications at 115200 baud and set the sensor pin to an input:
Serial.begin(115200);

pinMode(sensorPin, INPUT);
In the main loop, you start by reading the pulse from the sensor pin and storing it in pwmRange:
pwmRange = pulseIn(sensorPin, HIGH);
To accomplish this, you use the new command, pulseIn. This new command is tailor made for this use as it is designed to measure the length of a pulse, in microseconds, on a pin. The PW pin of the sensor sends a HIGH signal when the ultrasonic pulse is sent from the device, and then a LOW signal once that pulse is received back. The time in-between the pin going high and low will give you the distance, after conversion. The pulseIn command requires two parameters. The first is the pin you want to listen to and the second is either a HIGH or a LOW to define at what state the pulseIn command will commence timing the pulse. In your case, you have this set to HIGH, so as soon as the sensor pin goes HIGH, the pulseIn command will start timing; once it goes LOW, it will stop timing and then return the time in microseconds.
According to the datasheet for the LV-MaxSonar range of sensors, the device will detect distances from 0 inches to 254 inches (6.45 meters) with distances below 6 inches being output as 6 inches. Each 147µS (micro-seconds) equates to one inch. So, to convert the value returned from the pulseIn command to inches, you simply need to divide it by 147. This value is then stored in inch.
inch = pwmRange / 147;
Next, that value is multiplied by 2.54 to give you the distance in centimeters:
cm = inch * 2.54;
Finally, the values in inches and centimeters are printed to the serial monitor:
Serial.print(inch);

Serial.print(" inches    ");

Serial.print(cm);

Serial.println(" cm");
Project 38 – Simple Ultrasonic Range Finder – Hardware Overview
The new component introduced in this project is the ultrasonic range finder. This device uses ultrasound, which is a very high frequency sound above the upper limit of human hearing. In the case of the MaxSonar, it sends a pulse at 42KHz. The average human has an upper hearing limit of around 20KHz, so the sensor is way above the range of human hearing. A pulse of ultrasonic sound is sent out by the device from a transducer and is then picked up again, by the same transducer, when it reflects off an object. By calculating the time it takes for the pulse to return, you can work out the distance to the reflected object (See Figure 14-2). Sound waves travel at the speed of sound which, in dry air at 20 ºC (68 ºF) is 343 meters per second, or 1125 feet per second. Knowing this, you can work out the speed, in microseconds, that the sound wave takes to return to the sensor. As it happens, the datasheet tells you that every inch takes 147µS for the pulse to return. So taking the time in microseconds and dividing it by 147 gives us the distance in inches, and then you can convert that to centimeters if necessary.
This principle is also called SONAR (sound navigation and ranging) and is used in submarines to detect distances to other marine craft or nearby hazards. It is also used by bats to detect their prey.
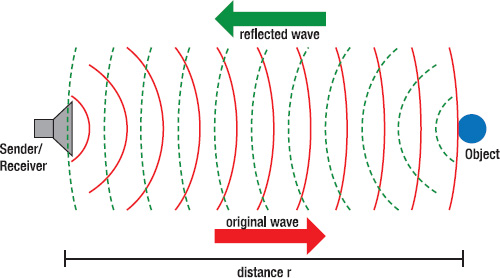
Figure 14-2. The principle of sonar or radar distance measurement (Image by Georg Wiora)
The MaxSonar devices have three ways to read the data from the sensor. One is an analog input, the second is a PWM input, and the final one is a serial interface. The PWM input is probably the easiest to use with the most reliable data, hence this is what I have used here. Feel free to research and use the other two pins if you wish, although there will be no real benefit from doing so unless you specifically need to have an analog or serial data stream.
Now you know how the sensor works, let's put it to a practical use and make an ultrasonic tape measure or distance display.