In this recipe, we'll set the character's templates by using Image Empties.
For this and the following recipes, there is no need for any particular preparations. Anyway, it is handy to prepare the two Empties to have markers in the 3D view for the 2.5 meters height of the character; so we'll do the following:
- Start a brand new Blender session and delete the already selected Cube primitive.
- Select the Lamp and Camera and move them on a different layer; I usually have them on the sixth layer, in order to keep free and empty both the first and second rows of the left layer's block.
- Add an Empty to the scene (Shift + A | Empty | Plain Axes).
- Duplicate it and move it 2.5 units up on the z axis (Shift + D | Z | 2.5 | Enter).
- Go to the Outliner and click on the arrows on the side of the names of the two Empties (Empty and Empty.001), in order to make them gray and the Empties not selectable.
- Save the file as
Gidiosaurus_base_mesh.blend.
So, now we are going to place the first Image Empty in the scene:
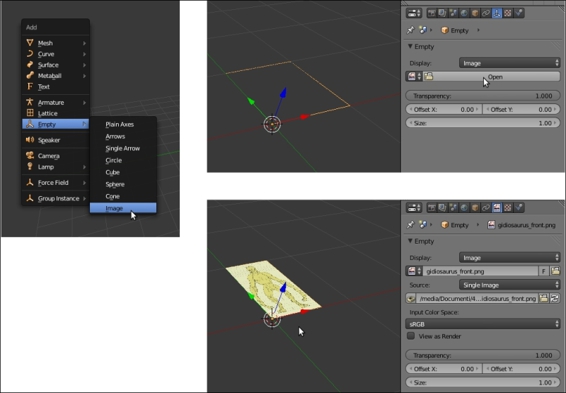
- Add an Empty to the scene (Shift + A | Empty | Image; it's the last item in the list).
- Go to the Object Data window in the main Properties panel on the right-hand side of the Blender UI; under the Empty subpanel, click on the Open button.
- Browse to the
templatesfolder and load thegidiosaurus_front.pngimage.
The Add pop-up menu and the Image Empty added to the 3D scene, with the settings to load and set the image
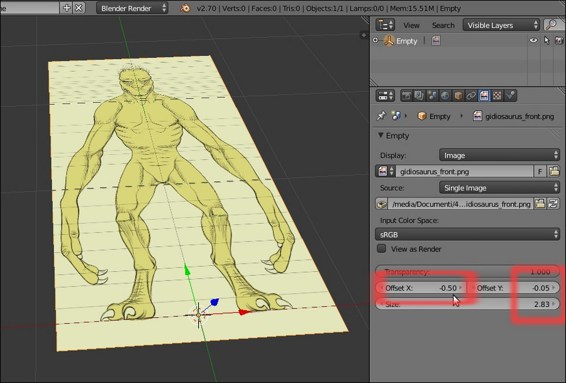
- Set the Offset X value to -0.50 and Offset Y to -0.05. Set the Size value to 2.830:

The Offset and Size settings
- Rotate the Empty 90 degrees on the x axis (R | X | 90 | Enter).
- Go to the Outliner and rename it
Empty_gidiosaurus_front. - Duplicate it (Shift + D), rotate it 90 degrees on the z axis, and in the Outliner, rename it as
Empty_gidiosaurus_side. - In the Empty subpanel under the Object Data window, click on the little icon (showing 3 users for that data block) on the right-hand side of the image name under Display, in order to make it a single user. Then, click on the little folder icon on the right-hand side of the image path to go inside the
templatesfolder again, and load thegidiosaurus_side.pngimage. - Reselect Empty_gidiosaurus_front and press Shift + D to duplicate it.
- Go to the Empty subpanel under the Object Data window, click on the little icon (showing 3 users for that datablock) on the right-hand side of the image name under Display, in order to make it a single user. Then, click on the little folder icon on the right-hand side of the image path to go inside the
templatesfolder again, and this time load thegidiosaurus_back.pngimage. - Go to the Outliner and rename it
Empty_gidiosaurus_back.
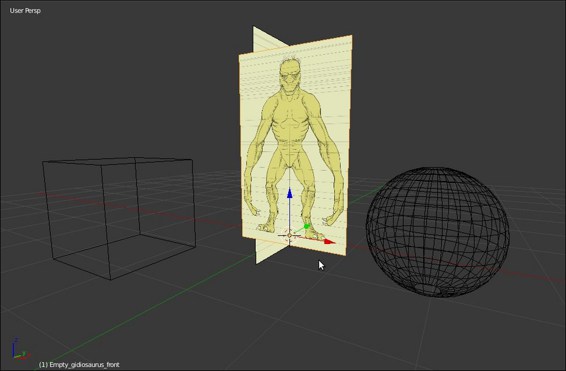
We have used one of the most underrated (well, in my opinion) tools in Blender: Empties, which can show images! Compared to the Images as Planes add-on, this has some advantages: these are not 3D geometry and the images are also visible in the 3D view without the Textured Solid option enabled (under Shading) and in Wireframe mode.

The Image Empties appear as textured also in Wireframe viewport shading mode
Exactly, as for the imported Planes of the former recipe, the visibility in the 3D view of the Image Empties can be toggled on and off by clicking on the eye icon in the Outliner.
