In Chapter 3, Polygonal Modeling of the Character's Accessories, in the Using the Mesh to Curve technique to add details recipe, you already saw how to use this technique as a modeling tool. In this recipe, we'll use the same technique but in the opposite direction—to add rivets around the perimeter of the borders of the different Armor parts.
Re-open the Gidiosaurus_limits.blend file; the first thing to do is to model a very lowpoly rivet object to be duplicated on the Armor surface:
- Switch to an empty scene layer, press Shift + C to place the 3D Cursor at the center of the grid, and add a Cube primitive mesh. Enter Edit Mode and delete the bottom face, then scale the remaining faces by a value of 0.100 twice, then one last time by 0.500. Move the top face downward to flatten the overall shape a bit and scale the same face by 0.700.
- Press A to select all the vertices and W to choose the Subdivide Smooth item from the Specials pop-up menu, then delete the middle horizontal edgeloop.
- Put the pivot on the 3D Cursor and while still in Edit Mode, rotate all the vertices by 90° on the x axis.
- Select the bottom edgeloop and press Shift + S | Cursor to Selected. Exit Edit Mode and click on the Set Origin button under the Tool tab to select the Origin to 3D Cursor item.
- Click on the Smooth button under the Shading item and in the Outliner, rename the rivet object. Once again, place the 3D Cursor at the center of the grid and the rivet at the Cursor location; press Ctrl + A to apply the Rotation & Scale option.
- Enable the scene layer with the Armor on it, and in the Outliner, hide the rig.
Now, let's create the guides to duplicate the rivets on:
- Select the Armor object and press Shift + D to duplicate it, then place the duplicate Armor.001 object on the scene layer of the rivet. Go to the Shape Keys sidepanel under the Object Data window and delete the Armor_fix first and then the Basis shape keys.
- Go to the Object Modifiers window, remove the Armature modifier, and apply the Subdivision Surface modifier with a Subdivision level of 2.
- Enter Edit Mode and start to select the edgeloops on the different Armor parts in areas where you want to add the rivet rows (Alt + right-click for the first one, then Alt + Shift + right-click). As usual, it's enough to work only on one half of the mesh:
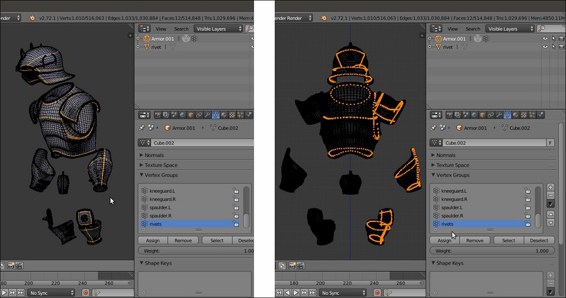
The Armor mesh in Edit Mode with the selected edge-loops
- Press Shift + D and soon after, click the right mouse button to duplicate the selected edgeloops without moving them, then press the P key to separate them from the Armor.001 object (in the Separate pop-up menu, choose the Selection item).
- Exit Edit Mode and delete the Armor.001 object, or if you don't have problems with big file sizes, move it to a different scene layer to keep it for future refinements. In this case, you can save the edge-loops selection as a vertex group named rivets.
- Select the Armor.002 object (the duplicated and separated edgeloops) and enter Edit Mode; make the necessary adjustments to the edgeloops by deleting the unnecessary vertices, for example the backsides of the plates, and disconnect the welded edgeloops by deleting the common vertices or connecting them where required edges are missing:
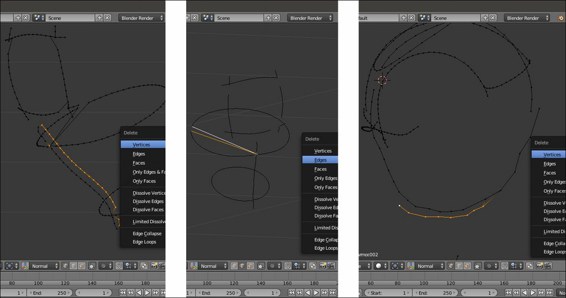
Cleaning the edge-loops of the duplicated Armor.002 mesh
- Press A to select all the vertices and then go to the Tools tab under the Tool Shelf. Go to the LoopTools subpanel and press the Space button to evenly space the vertices along the edgeloops.
- Exit Edit Mode and press Alt + C; in the Convert to pop-up menu, select the first item, Curve from Mesh/Text. The mesh edgeloops actually get converted into a Curve object, as you can see in the Object Data window under the main Properties panel to the right of the UI. Click on the Fill slot to select the Full item.
- Now the tedious part (but not difficult, just a little tedious); in Edit Mode again, put the mouse on one of the points and by pressing the L key, select each separate part of the Curve, then press P to separate the whole selected part. This way, you are going to obtain 16 separated Curve objects.
- Select the rivet object and go to the Object Modifiers window; assign an Array modifier with Fit Type = Fit Length, Length = 0.50, and Relative Offset X = 3.000. Collapse the panel.
- Assign a Curve modifier, then in the Object field select the Armor.002 curve. Leave the panel expanded.
- Assign a Mirror modifier and collapse the panel:
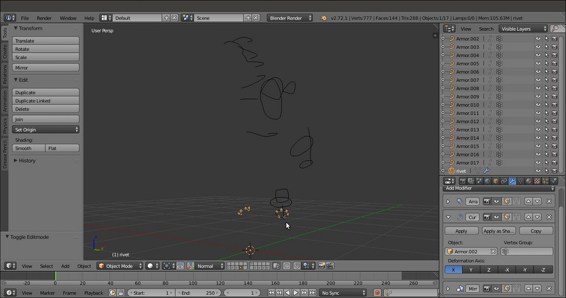
The rivet object instanced on the mirrored curve object
- In the viewport area, zoom to each curve to check for the correct tilting of the points; if necessary, select the curve, enter Edit Mode, select all the points, press Ctrl + T, and move the mouse to rotate the tilting of the curve's points until the instanced rivets are correctly rotated/aligned with the surface of the main Armor mesh:
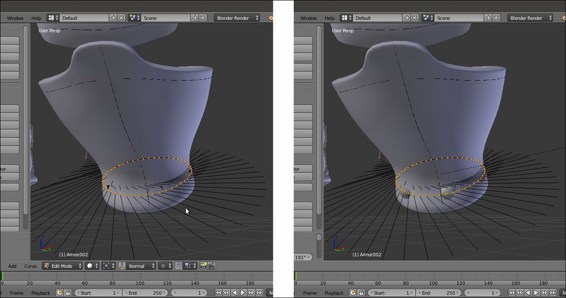
Tilting the curve's points
If necessary, you can also select individual points of the curve to tweak the orientation of only a part of the instanced rivets, even of single rivets at once; this has been done for part of the helm and for the spaulders, especially.
- In the Outliner, re-select the rivet and press Shift + D to duplicate it, then in the Object Modifiers window, under the Curve modifier panel, select the Armor.003 item in the Object field.
- Once again, zoom to the curve and if necessary, fix the curve tilting and also adjust the Length value of the Array modifier (for the Armor.003 curve it has been raised to 0.59) and the Relative Offset value. By selecting all the points and pressing W, you can also select the Switch Direction item in the Specials menu.
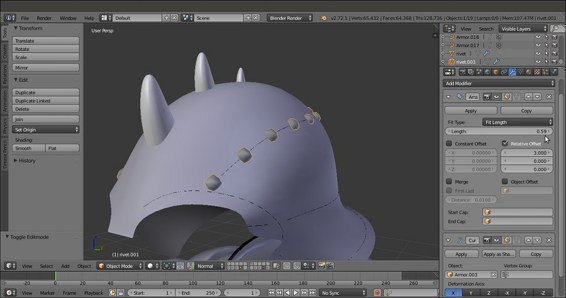
The rivets on the helm object
- Duplicate the rivet and repeat the procedure changing the curve name in the modifier for each curve object and so on. At the end, you should have 16 copies of the rivet as well.
At this point, if required, we can still make some modification to the rivet mesh; in my case, I just subdivided it a bit more, then deleted some useless edgeloop, made it rounder, and extruded the open side a bit more.
Now that the rivet is ready, select all the rivet copies (so that the modified one is the active object, that is the last selected) and press Ctrl + L | Object Data to share the modifications between them.
Leaving everything selected, press U | Object & Data to make them single users again (this is necessary for the next step with the modifiers).
- When you are done, select all the rivets one at a time in the Outliner and apply all the Array and the Curve modifiers.
- Join all the rivets into a single object (select all and press Ctrl + J) and in Edit Mode, delete the unnecessary or overlapping ones, keeping only the rivets that really add to the Armor look. Then, apply all the Mirror modifiers:
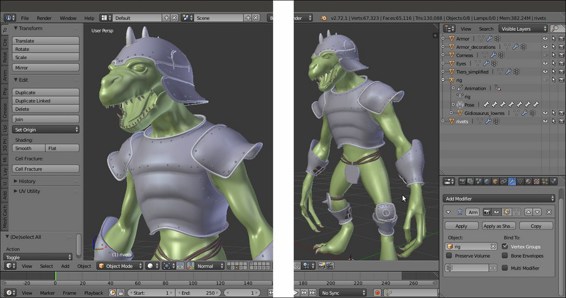
The completed rivets
- Select the Armor object and then Shift-select the rivets object, press Ctrl + Tab to go in Weight Paint mode and click on the Transfer Weights button under the Tools tab.
- Exit Weight Paint mode and assign an Armature modifier to the rivets object, select rig in the Object field.
- Save the file as
Gidiosaurus_final_detailing.blend.
At this point, the Gidiosaurus model is ready to be animated, but some minor adjustments are still missing and can be added.
I won't go into the details about these additions, they are all processes you have already seen in the previous chapters and recipes, so this is simply a showcase:
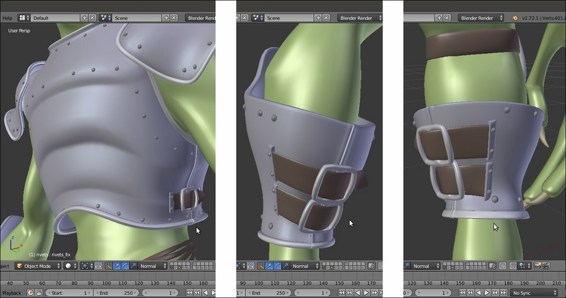
The modeled tiers and the rivets
- The tier attachments on the Armor's vambraces and on the greaves have been refined by adding smaller rivets, and new tiers have been added to the sides of the Armor chest plate. Also, the opening seams in the Armor parts have been modeled under each tier location.
- The Armor decorations have been separated as a new object (the Armor_decorations item in the Outliner) and simplified by deleting as many edgeloops as possible without altering their basic shape:
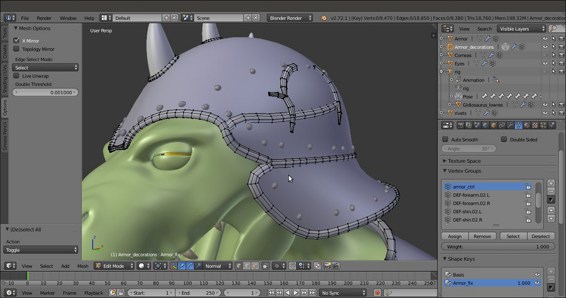
The simplified decorations in Edit Mode
- The Armor's shape also has been tweaked even further through the Armor_fix shape key to adjust some overlaps that were occurring during the movements of the spaulders and in the stomach area too. The same shape key has been repeated also on the decorations and on the rivets objects for the areas of interest.
- A bit of asymmetry has been introduced in the Gidiosaurus mesh by assigning a Lattice modifier to the character, and slightly modifying the shape on the left side, then applying the modifier as a shape key (the Apply as Shape Key button):
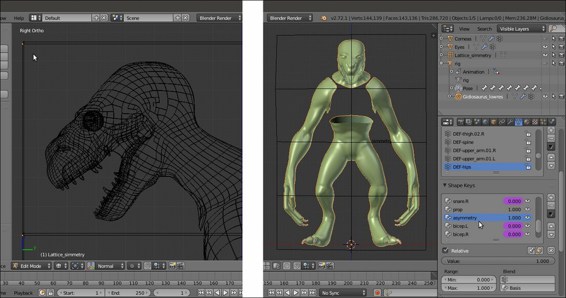
The asymmetry lattice
- Finally, after some test renders, I realized that the teeth and the inside of the mouth of the Gidiosaurus still needed refinements, so I made some more adjustments to the prop shape key by making the teeth bigger and bolder, and the inner mouth more organic-looking and smooth:
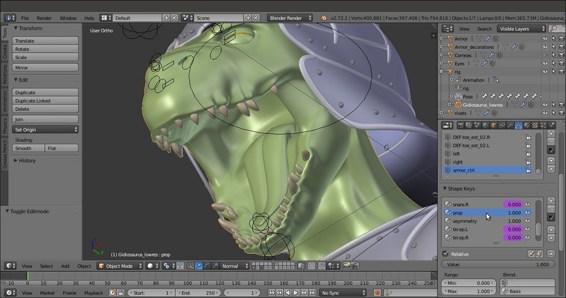
The modified teeth and inner mouth
Be aware that almost in every modeled object there is still room for improvement, and that's okay, it's not a sign of a bad job! This sort of improvement is done all the time and is simply part of the working experience.
