In this recipe, we'll use the Snap tool to start to re-topologize the sculpted high resolution mesh.
First, let's prepare both, the mesh to be traced, which is the high resolution mesh, and the tool itself:
- Go to the Outliner and click on the Restrict viewport selection icon, which is the arrow one, to the side of the Gidiosaurus item to make it not selectable.
- Be sure that the 3D Cursor is at the center of the scene (Shift + C) and add a Plane primitive.
- Click on the Snap during transform button, the little icon with the magnet, on the 3D view toolbar, or else press Shift + Tab to activate the tool.
- Click on the Snap Element button (Type of element to snap to) on the close right to select the Face item, or else press Shift + Ctrl + Tab to make the Snap Element pop-up menu appear in order to select the item from:
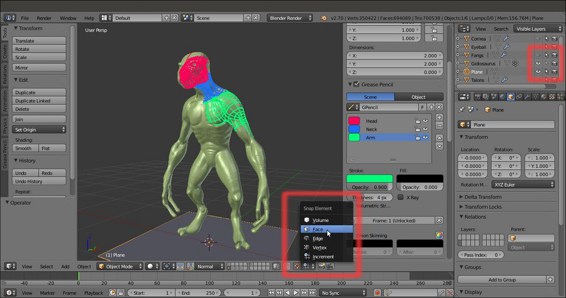
The Snap Element menu
Now, we are going to start the re-topology:
- With the Plane object selected, press Tab to go into Edit Mode; with all the vertices already selected by default, by pressing Shift + right-click, deselect just one vertex (anyone of them, it doesn't matter which one).
- Press X to delete the other three vertices that are still selected.
- Select the single remaining vertex and move it onto the head of the sculpted mesh, close to the left eye socket; as the Snap tool is enabled, the vertex stays on the mesh surface.
- Press the period (.) key on the numpad to zoom the 3D view centered on the selected vertex:
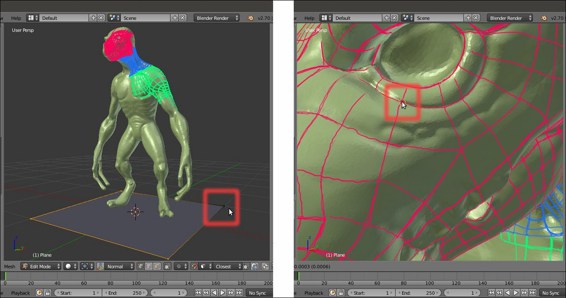
Starting the re-topology process
- Go to the Object Data window and check the X-Ray item under the Display subpanel in the main Properties panel to the right of the screen.
- Start to extrude the vertex, building an edge-loop around the eye socket and following the Grease Pencil guideline, both by pressing the E key or Ctrl + left-click to add vertices; if needed, press G to move them at the right location (that is, at the intersections of the guidelines).
- When you have almost completed the edge-loop around the eye socket, select the last and the first vertices and press the F key to close it.
- Select the bottom row of vertices of the edge-loop and extrude them; adjust the position of each vertex on the ground of the strokes guideline:
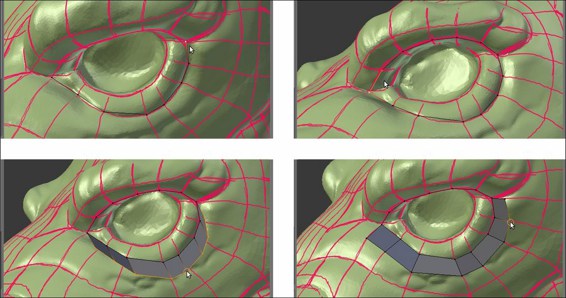
The first re-topology around the eye socket
- Do the same with the upper row of vertices and then select the free vertices on the right-hand side of the edge-loops and press Alt + M to merge them at the center (At Center):
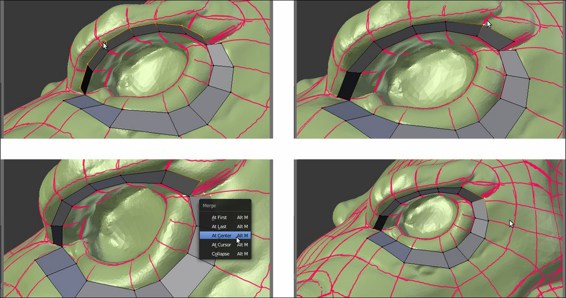
Building the eye edge-loop
- While still in Edit Mode, select all the vertices and press Ctrl + N to recalculate the normals.
- Keep on extruding the edge-loops to build the faces around the eye socket. Select the inner edge-loop and extrude it; then, scale it inside and adjust the vertices position as usual.
- Cut a new edge-loop in the middle of the eye socket by pressing Ctrl + R and then select each vertex; press G and, immediately after, click with the left button of the mouse. This way the newly added vertex stays in place, but is snapped to the underlying surface (sadly, it doesn't work automatically as you cut or add vertices; they must be moved in some way to make the Snap tool work).
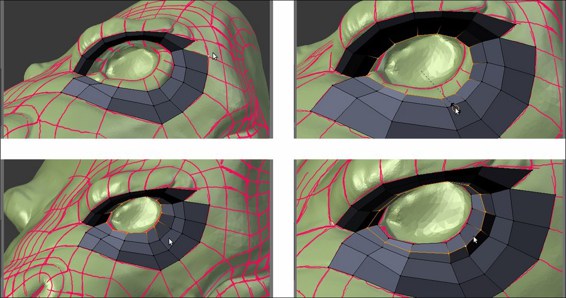
Adding geometry and snapping the vertices to the surface
- Keep on adding geometry to the mesh, extruding or Ctrl + left-clicking, and switch between edges and vertices selection mode to make the workflow faster. Press 5 on the numpad to go into Ortho view when necessary. Following the strokes guideline, build faces going towards the median line of the object.
- As you are arrived to the median line of the object, go to the Object Modifiers window under the Properties panel and assign a Mirror modifier.
- Click on the Adjust edit cage to modifier result icon (the last one in the row to the side of the modifier's name), to activate the modifier during the editing, and check the Clipping item.
- Adjust the vertices you just added to the median line of the mesh to stay on the y axis and recalculate the normals.
- Go to the Outliner and rename the Plane item as Gidiosaurus_lowres.
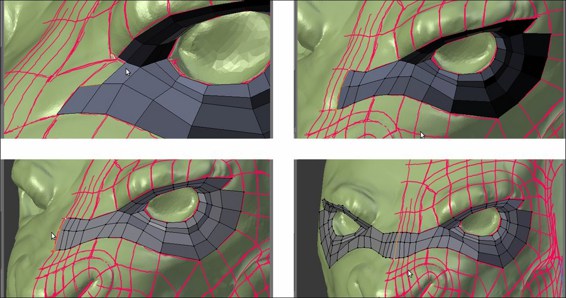
Going towards the median line
- Build the remainder of the faces the same way, extruding edges or vertices, moving them to react to the Snap tool, and adding cuts and edge-loops where needed to keep all quads. N-gons faces can be split into quads by dividing an edge to add a vertex in the middle, selecting the new vertex and its opposite one and pressing the J key to connect them (see the two screenshots at the bottom row):
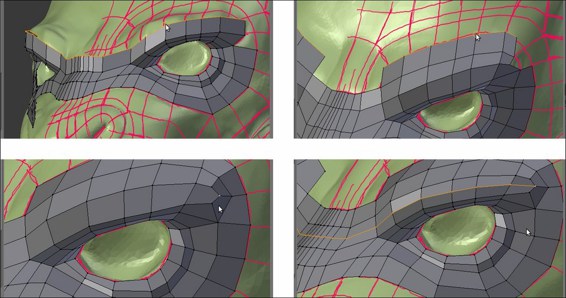
Building the eyebrows and dividing N-gons into two quad faces
- Assign a Subdivision Surface modifier to the low resolution mesh and set Subdivisions to 2. Check the Optimal Display item; if you want, click on the Adjust edit cage to modifier result icon, which is the last one in the row to the side of the modifier's name. To work with an already smoothed mesh (in the end, the mesh will be subdivided in any case) is a usual workflow; by the way, it depends on your preferences. If you prefer to work without the modifier, occasionally go out of Edit Mode to verify how the geometry behaves under the Subdivision Surface modifier.
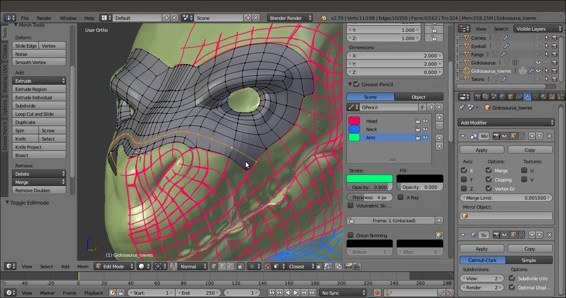
The created geometry in the Subdivision Surface visualization mode
- Around the eyebrows, it is important to have continuous edge-loops to allow for better mesh deformation; often, it is enough to merge (Alt + M) two vertices to obtain the right flow. Note that this creates a pole (check out the screenshot at the top right) that can later be eliminated by a cut and then merges the two tris faces into a quad (Alt + J; the two screenshots at the bottom):
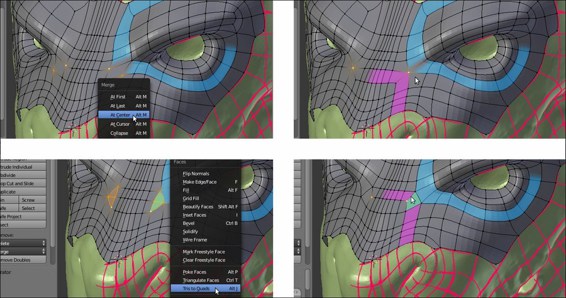
Closing two edge-loops
- We have almost completed the Gidiosaurus' face. Select the vertices of the lower jaw and press the H key to hide them; select the upper mouth rim and extrude it and then adjust the vertices' position.
- Deselect the vertices, press Alt + H to unhide the mandible, and press Shift + H to hide the unselected vertices (in this case, the upper face). Select the mouth rim of the mandible and extrude and then tweak the position of the vertices.
- Connect the upper and the lower jaws by connecting the last vertices, as shown in the bottom-left of screenshot and then build a face. Tweak the vertices' position:
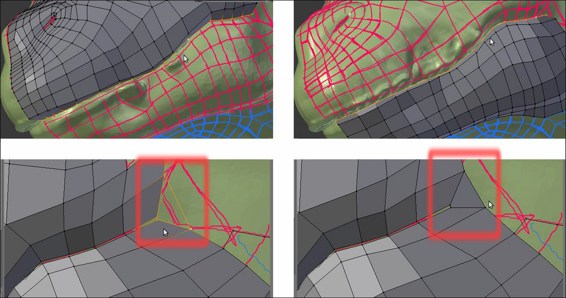
Connecting the jaw to the upper mouth
We can stop using the Snap tool at this point and continue with the re-topologizing by using different tools; we'll see this in the upcoming recipes.
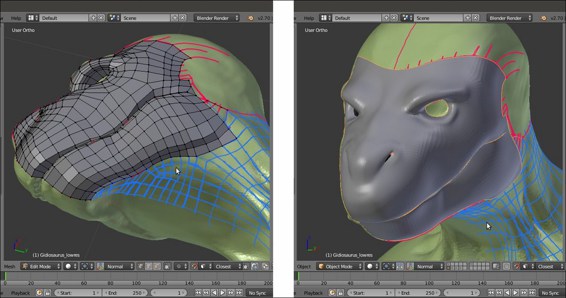
The re-topologized face of the character
The main requirement for a re-topology tool is the ability to trace the shape and volume of the high resolution mesh as easily as possible. In this recipe, we used the Blender Snap tool that, once set to Face, guarantees that every added vertex lies on the faces of any directly underlying object; this way, it is quite simple to concentrate on the flow of the polygons, while their vertices stay anchored to the mesh's surface.
To remark that the strokes are there only as a generic indication, note that in certain areas we are doubling the number of faces sketched with the Grease Pencil tool as well as to try to keep the density of the mesh as even as possible.
