In this recipe, we'll fix the last details such as the position of some of the character's parts (for instance, the closed mouth) and in general, anything that is needed to facilitate the unwrapping.
To be more precise, before the unwrapping, we must perform the following tasks in the right order:
- Join the teeth and talons to the body.
- Create the vertex group for the mandible.
- Open the mouth.
- Mark the seams to unwrap the body.
So, open the Gidiosaurus_retopology.blend file and deactivate the layer with the armor to hide it; select the
Gidiosaurus object and save the file as Gidiosaurus_unwrap.blend.
The simplest of the four tasks just so happens to be the first, joining the body with the teeth and talons.
To join the body parts, follow these steps:
- Select the Talons item in the Outliner, and then hold Shift and select the Fangs_bottom, Fangs_upper, and Gidiosaurus_lowres items.
- Press Ctrl + J to join them.
- Right away we will notice that, because the retopologized mesh didn't have any material assigned, the whole object gets the only material available, which is the
Enamelmaterial we had assigned to the talons and teeth earlier. - To fix this, assign a new material, or you can also assign the already existing
Bodymaterial, to the retopologized mesh before the joining operation. - Alternatively, after the joining, click on the + icon to the side of the material names, and then select the New button in the Material window to create a new material. Now, enter Edit Mode, put the mouse pointer on the Gidiosaurus mesh, and press the L key to select all the connected vertices. Because the talons and teeth vertices are joined, but not connected to the face vertices, they don't get selected; for the same reason, you have to repeat the operation three times to select the head, arm, hips, and leg vertices:
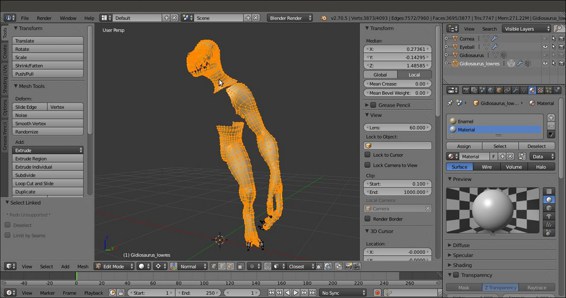
The head, arm and hip/leg vertices selected in Edit Mode
- Click on the Assign button and go out of the Edit Mode. Now, edit the name and color of the new material or whatever, or else switch it with the
Bodyone.The second task is a bit more complex and is covered in more detail in Chapter 7, Skinning the Low Resolution Mesh, which is about the skinning process. However, we need to explore this subject a little bit now, as it will help us operate on a small portion of the mesh easily.
To create a vertex group to open the mouth, follow these steps:
- Go to the Side view and zoom in on the head of the character.
- Go to the Object Data window; under the Vertex Groups subpanel, add a new group and rename it
mand(short for mandible). - Press Ctrl + Tab to go into Weight Paint mode (or left-click on the mode button on the 3D window toolbar to switch from Edit Mode to Weight Paint mode); press Z to go into Wireframe viewport shading mode so that you can see the edges of the topology.
- By using a combination of vertex selection mode, both in Edit Mode and by painting with Weight and Strength as 1.000 in the Weight Paint mode, assign vertices to the group of the mandible area and the part of the neck; obviously, you have to include the vertices of the inner bottom jaw, as well as the tongue and bottom teeth:
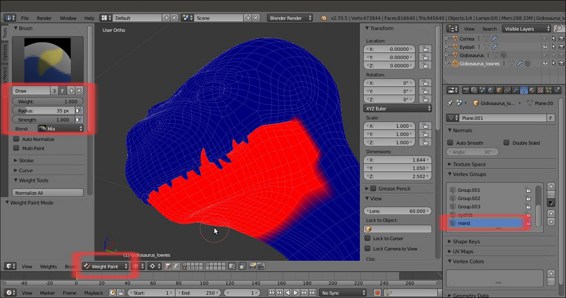
The visualization of the mand vertex group
- Press Ctrl + Tab to exit the Weight Paint mode.
Note that a vertex group can be edited at a later time, so it will be easier to set the exact amount of weight on the vertices by looking at the Lattice modifier feedback, which is the next step.
So, to open the mouth, perform the following steps:
- Add an Empty object to the center of the scene (Shift + A | Empty | Plain Axes).
- Go to the Side view (press the 3 key on the numpad). Move the Empty to the position where the mandible should join the skull (to be precise, I placed it at this location: X = 0.0000, Y = -0.3206, and Z = 2.2644; go to the Properties 3D view sidepanel, and under the Transform subpanel, enter the values in the first three slots under the Location item).
- To ensure that the Empty cannot be moved anymore, click on the lock icon on the right-hand side of its slot in the Outliner and also rename it to
Empty_rot_mand: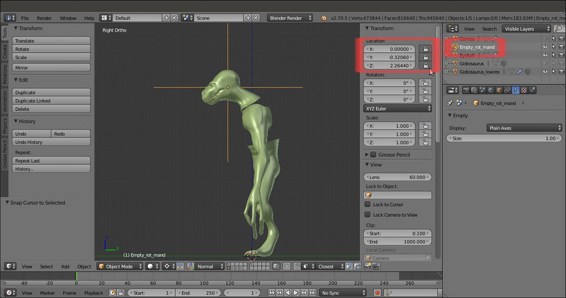
The Empty_rot_mand in place
- With the Empty still selected, press Shift + S | Cursor to Selected.
- Add a Lattice object to the scene (Shift + A | Lattice), and in the Object Data window, set Interpolation Type for U, V, and W to Linear; select the Gidiosaurus object and go to the Objects Modifier window; assign a Lattice modifier. Move it before the Subdivision Surface modifier.
- In the Object field, select the Lattice item; in the Vertex Group field, select the mand item.
- In the Side view, select the Lattice object, go into Edit Mode, and select all the vertices and rotate them 35 degrees counterclockwise around the x axis:
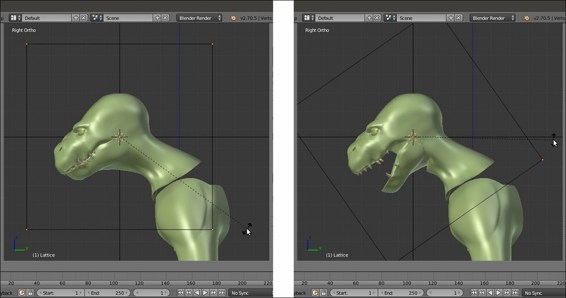
Rotating the Lattice to open the mouth
As you can see, the Lattice only affects the vertices inside the mand vertex group; however, there is a clear indentation on the throat where the mand vertex group ends abruptly, so now we must blur this boundary to keep the smooth curved transition from the bottom jaw to the neck, and remove the abrupt edge.
- Go back into the Weight Paint mode (Ctrl + Tab) and click on the Brush icon at the top of the Tools tab to switch the Draw brush with the Blur brush, and then start to blur the boundaries of the mand vertex group.
- Sometimes, blurring the edge weights is not enough, so go back to the Draw brush, set the Strength to 0.500 (or whatever value you find works best), and paint on the vertices; then refine the transition again with the Blur brush:
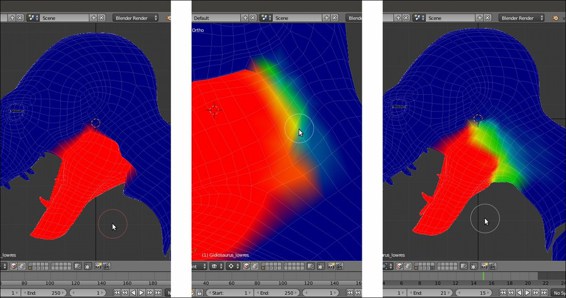
Blurring and painting the weights
- To make the job easier and faster, you can temporarily disable the Lattice modifier, as well as the Subdivision Surface modifier.
- When you are done, go out of the Weight Paint mode, apply the Lattice modifier, and delete the Lattice object.
- Make sure to keep the Empty_rot_mand, which that will turn out to be useful when rigging the character. For now, just hide or move it onto a different layer.
At this point, we can obviously edit the throat area vertices as usual: relaxing and tweaking them and so on. Actually, this is the right moment to tweak all the vertices and any areas that couldn't be done before, such as the inside of the mouth, the inner cheeks, and so forth, because now we are going to do the last preparation task before the unwrapping.
To mark seams for the unwrapping of the body, we have to perform the following steps. Because our low resolution mesh is actually still only one half side, we don't need to place seams as median cuts, we only need to divide different areas (for example, the inside of the mouth from the outside of the mouth) and unroll cylindrical parts such as the arms, fingers, and teeth:
- Go into Edit Mode and zoom in to the character's head; press Ctrl + Tab to call the Mesh Select Mode pop-up menu and select the Edge item, and then start to select the edge-loop inside the mouth (Alt + right-click to select an edge-loop); start from the bottom jaw, switching direction at the end of the mouth rim to go upward, and finish on the inside of the upper jaw:
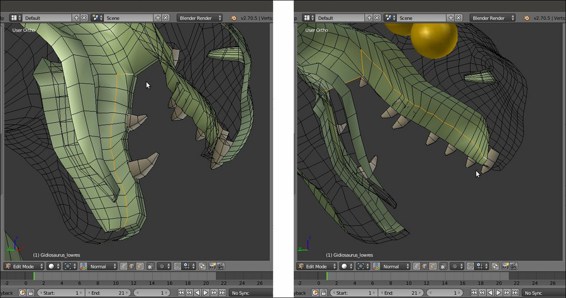
The selected edge-loops inside the mouth
- Press Ctrl + E to open the Edges pop-up menu and select the Mark Seam item. Alternatively, click on the Shading / UVs tab in the Tool Shelf, to the left-hand side of the screen, and in the UVs subpanel, click on the Mark Seam button under the UV Mapping item:
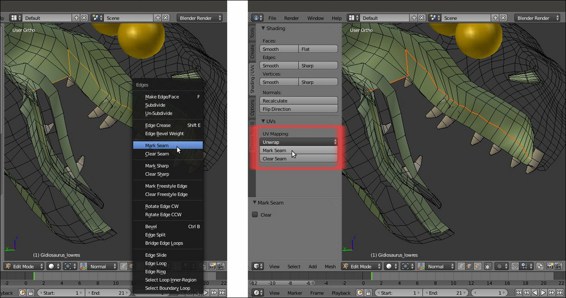
Marking the seams
- Repeat the procedure for the arm; try to place the seams in the less visible areas:
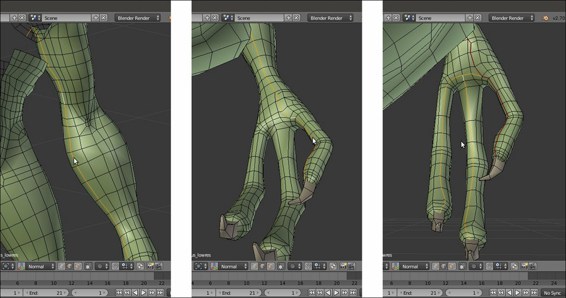
The seams on the arm
- Do the same for the pelvis and leg; divide them into two parts with the seams and also try to place the seams inside the natural body folds, if possible:
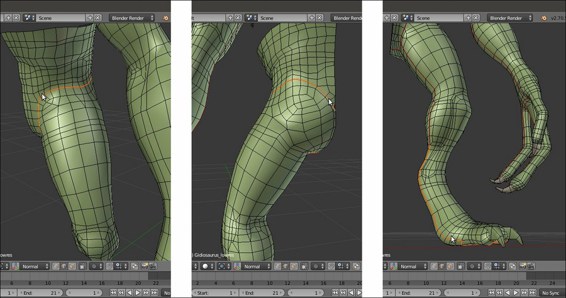
The seams on the pelvis/leg parts
- It is important to try to place the seams to divide parts that would get unwrapped badly if treated as a single object; for example, the inner nostril and tongue from the inner mouth:
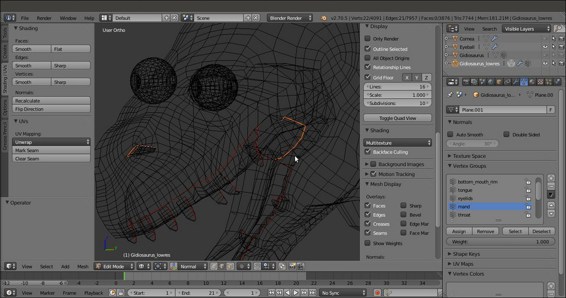
The seams inside the head
- The final seams to add are for the teeth and talons, which would otherwise get badly unwrapped as squares:
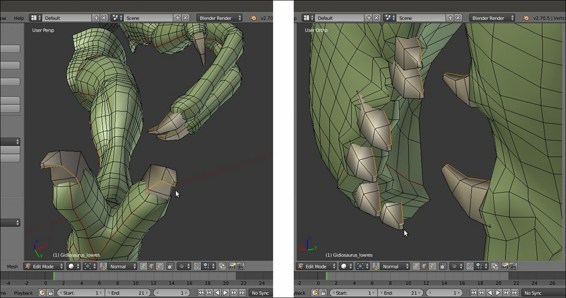
The seams of the small parts
- Save the file.
