We have already seen the LoopTools add-on in Chapter 3, Polygonal Modeling of the Character's Accessories. This incredibly useful Python script can even be used for the re-topology!
If the LoopTools add-on isn't enabled yet, perform the following steps:
- Start Blender and call the Blender User Preferences panel (Ctrl + Alt + U); go to the Addons tab.
- Under the Categories item on the left-hand side of the panel, click on Mesh.
- Check the empty little box to the right of the Mesh: LoopTools add-on to enable it.
- Click on the Save User Settings button at the bottom-left of the panel to save your preferences and close the panel:
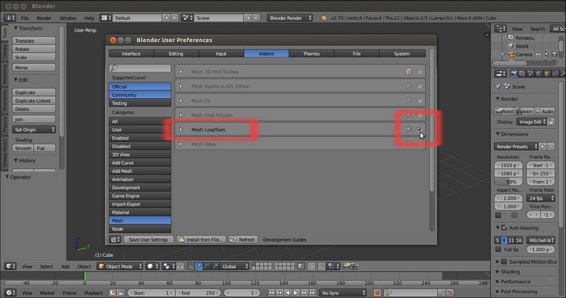
The User Preferences panel and the LoopTools add-on enabled
- Load the
Gidiosaurus_retopology.blendfile. - Click on the Snap during transform button on the 3D view toolbar (or else, press Shift + Tab) to enable the Snap tool again.
In the LoopTools add-on, there are at least three tools that can be used for the re-topology: Gstretch, Bridge, and Loft (the last two seem to have almost the same effect so, at least for our present goal, we can consider them to be interchangeable).
Let's first see the Gstretch tool:
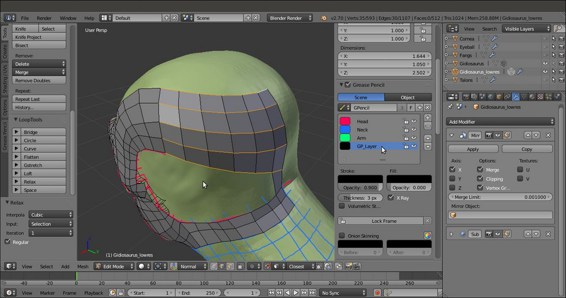
- Go to the Grease Pencil subpanel under the Properties 3D view sidepanel to the right. Be sure that the Grease Pencil checkbox is checked and click on the + icon button to add a fourth layer after the Arm layer (actually, you can also delete the preexisting GPencil data block and start with a brand new one, or in any case disable the visibility of the other layers); leave the strokes color as it is by default—that is, pure black.
- In Edit Mode, press D and sketch one edge-loop stroke.
- Select the edges of the low resolution mesh and press E to extrude them and then right-click; click on the Gstretch button (or press W | Specials | LoopTools | Gstretch).
- In the last operator panel at the bottom of the Tool Shelf (or else, press F6 to make the pop-up window appear at the mouse cursor location), check the Delete strokes item.
- Press Ctrl + R to cut the required edge-loops in the new faces:
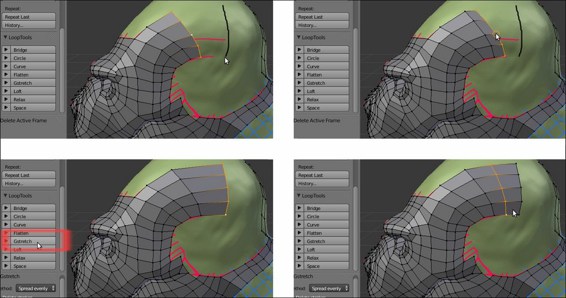
Using the Gstretch tool in conjunction with the Grease Pencil tool
Yes, it's that simple; it's enough to stroke the target position line and the new extruded vertices will be moved to that target position.
Also, now let's see the Bridge and the Loft tools:
- Select a group of edges and press Shift + D to duplicate them.
- Move them into a new position and adjust the vertices as required.
- Select both the new edges as the previous group.
- Go to the LoopTools panel and click on the Bridge button (or again, through the W key to call the Specials menu).
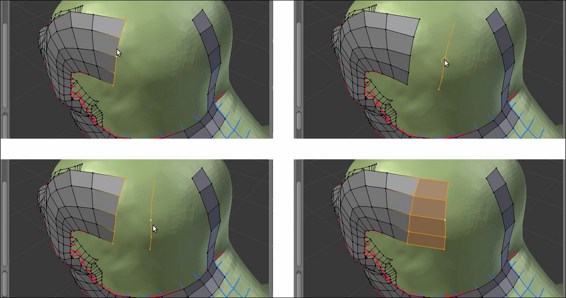
Using the Bridge tool
- If you need to add cuts, instead of the usual Ctrl + R shortcut, go to the last operator panel (F6) and change the value of the Segments slot to the number required.
It's not mandatory to duplicate new edges, it's enough to select the same number of vertices in the two edge-loops to be connected; here, after the Bridge tool operation, we have set the Segments value to 3:
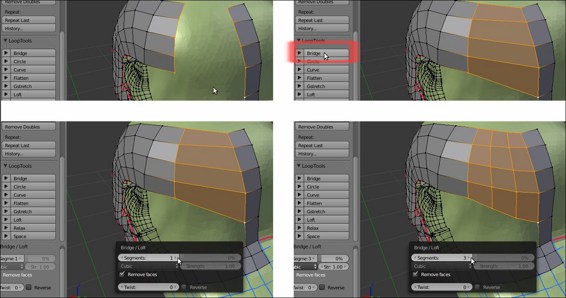
Adding cuts to the bridge operation
You can repeat the operation and the add-on will keep the last values you entered.
Repeat the steps, and this time click on the Loft button. The effect is almost the same, but if the new faces come out really messy, just click twice on the Reverse checkbox in the last operator panel; this should fix the issue.
You can then use all the other buttons to refine the added geometry; in the following screenshots, I tweaked the new geometry a little bit by selecting the horizontal edges and clicking on the Space, Flatten, and Relax buttons:
Completing the Gidiosaurus head
Using a mix of all the previous methods, in a short time, we have completed the head and the joining of the neck of our Gidiosaurus_lowres mesh; as you can see, particularly in the second screenshot at the bottom, the technique of following the main features and folders of the sculpted surface with the edge-loops can highlight the organic shapes even with a low resolution mesh:
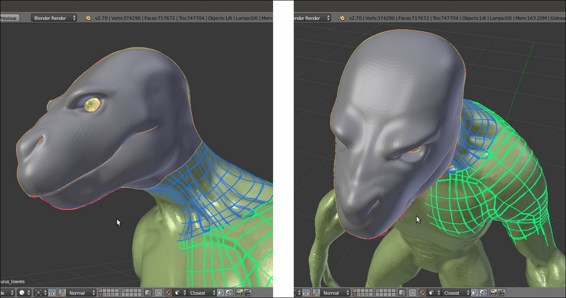
The completed head
