In the previous recipe, we made the scales image texture seamless, ready to be seamlessly mapped on our model. If you go back to Chapter 5, Unwrapping the Low Resolution Mesh, you'll remember that we assigned two different sets of UV coordinate layers to it: the UVMap layer, divided into 5 different tiles (this is called UDIM UV Mapping; it's a popular standard in the industry and means U-Dimension), and the UVMap_scales layer, set up to repeat the scales_tiles.png image pattern at the right size on the model:
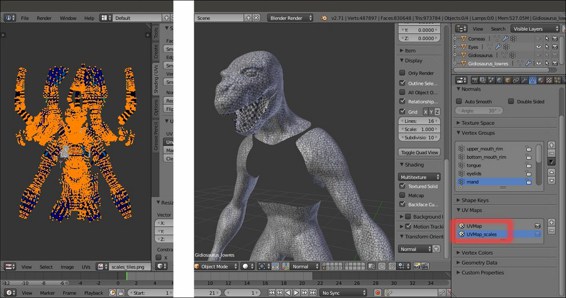
The two UV coordinates layers in the UV Maps subpanel
By zooming in and looking carefully at the result of the tiling (in Textured Solid mode, which is enabled under the Shading subpanel of the N viewport sidepanel), you can see that although we used a tileable scales image, we still have seams in some areas. This is obviously due to the fact that the UVMap_scales layer (as you can see in UV/Image Editor in the Edit Mode after selecting all the mesh's vertices) is made up of separated and overlapping islands to obtain a randomly distributed mapping of the scales on the Gidiosaurus skin:
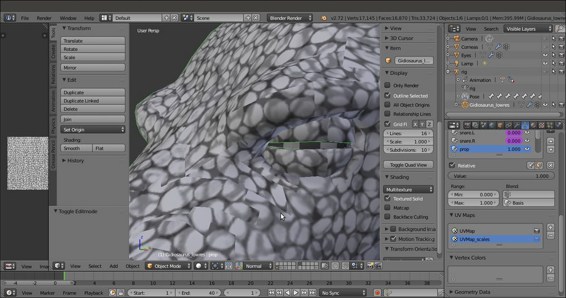
The seams on the Gidiosaurus scales skin
A simple solution to fix these seams is to bake the random scales pattern on the 5 tiles of the UVMap layer and then use the Paint Tool to adjust the gaps. This a step that we have to do in any case to allow further texture modifications such as the painting of befitting facial scales around the eyebrows, the eyes, the nostrils, and so on, but let's go in order.
To be able to bake and then paint on the different tiles in real time through the 3D viewport, we must prepare the file a bit.
Start Blender and open the Gidiosaurus_library.blend file; save it as Gidiosaurus_baking_scales_01.blend:
- Shift-click on the 13th scene layer to disable it and hide the Armor object, then enable the 6th scene layer to show Camera and Lamp. Split the 3D view into two windows and change the left one into a UV/Image Editor window (if it shows the Render Result image datablock, just click on the X icon button to unlink it).
- Put the mouse in the 3D viewport and press the T key to hide the Tool Shelf panel, and then maximize the UV/Image Editor window as much as possible. Go to the Outliner and click on the eye icon to the side of the Camera item to disable its visibility in the viewport.
- Go to the UV Maps subpanel under the Object Data window and be sure to have the UVMap layer selected (the one with the 5 different space tiles); if necessary, click on the camera icon to the right to enable it as the active UV coordinates layer.
Now, let's prepare the materials; remember that, at the moment, we are under the Blender Render engine and not under Cycles:
- Go to the Material window and out of Edit Mode, click on the – icon button to the right of the materials datablock window (Remove the selected material slot) to unlink both the
Enameland theBodymaterial datablocks. - Now click on the + icon button to add 5 material slots, and then add 5 materials by selecting each slot and clicking on the New button.
- Starting from the top one, rename the 5 materials as
Material_U0V0,Material_U1V0,Material_U2V0,Material_U0V1, andMaterial_U1V1.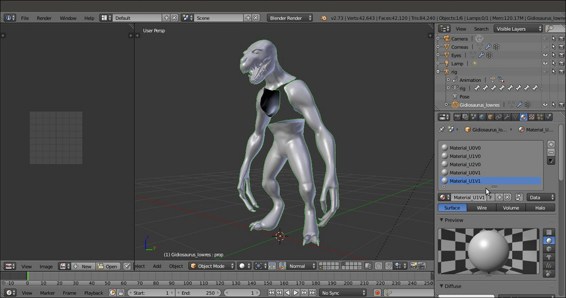
Adding the 5 materials to the Gidiosaurus object
- Select the
Material U0V0slot and go to the Textures window to click on the New button and add a texture. - Scroll down the vertical panel by rotating the middle mouse wheel and click on the New button under the Image subpanel; in the New Image pop-up panel, click on the Color slot to set the Alpha (A) value to 0.000, then Ctrl + click on the Width slot and right after the default value of 1024, type
*3, then press Enter (in Blender, you can do a math calculation for any parameter like this anywhere). Copy and paste (Ctrl + C and Ctrl + V) the result of the multiplication, 3072, into the Height slot; click on the Name slot to write the texture name asblank_U0V0, then press the OK button at the bottom of the panel: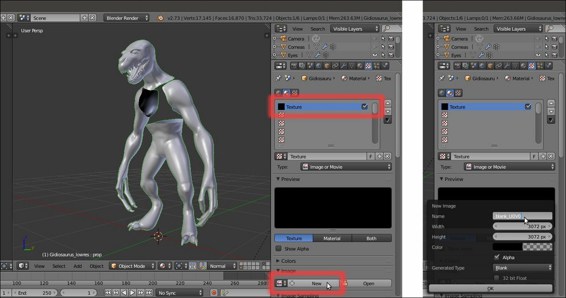
Adding a blank image texture to the first material
This adds a blank (alpha background) 3072 x 3072 pixels image as a texture on the material.
- Ctrl + left-click on the Unique datablock ID name slot right above the Type (Image or Movie) slot, and rename the default Texture name as
U0V0. Go down to the Mapping subpanel and click on the Map slot to select the UVMap item: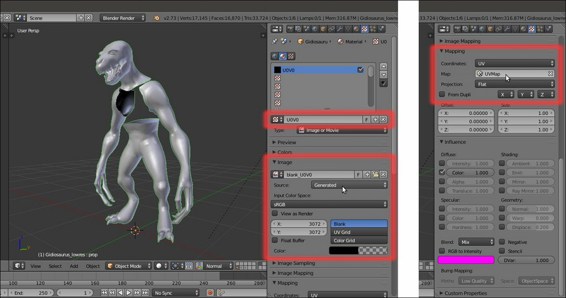
The "Unique datablock ID name" slot, the Image subpanel, and the Mapping subpanel
- Go to the UV/Image Editor to the left side of the screen and click on the double arrows to the side of the New button in the toolbar; from the pop-up menu select the blank_U0V0 item. Slide the toolbar to the right and click on the Image item. In the pop-up menu, select the Save as Image item (or press the F3 key) and save the image in the
texture_makingfolder asblank_U0V0.png, then click on the pin icon button to the right to activate it (Display current image regardless of object selection):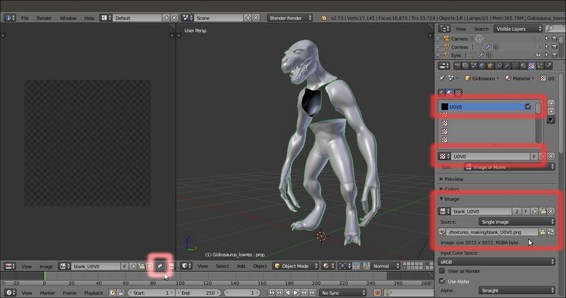
The assigned blank image loaded in the UV/Image Editor window and pinned to be displayed regardless of the object selection
As the image is saved under the Image subpanel, the Source slot caption changes from Generated to Single Image.
- Repeat the procedure for all the remaining four materials, assigning and saving a blank image texture for each material. So inside the
texture_makingfolder, you have saved the images:blank_U0V0,blank_U1V0,blank_U2V0,blank_U0V1, andblank_U1V1. - Start to split the UV/Image Editor window until you have 5 UV/Image Editor windows. Press the Tab key to go into Edit Mode with the mesh; put the mouse in the 3D viewport and press the A key to select all the mesh's vertices and therefore show the UV islands in all the UV/Image Editor windows.
- Enlarge one UV/Image Editor window as much as possible and enable the Keep UV and edit mode mesh selection in sync button on the toolbar.
- If it's the case, deselect everything, then box-select the islands (B key then left-click and drag the mouse) in the U1V0 tile space. In the Material window, select the
Material_U1V0slot and click on the Assign button. Go to the top right UV/Image Editor window and click on the X icon button on the toolbar to unlink the current image datablock (which is still blank_U0V0). Then click on the Image item on the toolbar and from the drop-down list, select theblank_U1V0image. - Press the A key to deselect everything and box-select the islands in the U2V0 tile; select the
Material_U2V0slot and again click on the Assign button. Go to the following image editor and unlink the current image datablock to load theblank_U2V0image. - Repeat for the other two missing tiles and material slots (note that this is not necessary for the U0V0 ones, which are, by default, first assigned to the whole mesh and the first created material and so still remain associated to
Material_U0V0). Then go out of Edit Mode.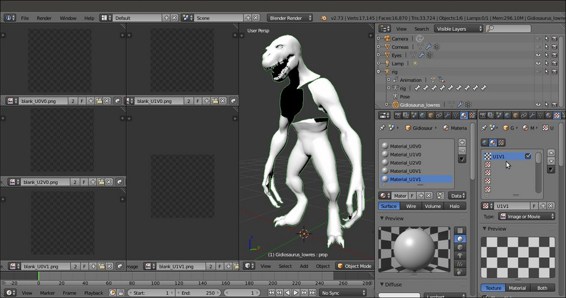
The work-space prepared with the 5 UV/Image Editor windows with their respective blank images
As you can see, by selecting the vertices of the UV islands in UV/Image Editor, the corresponding vertices on the mesh are also selected. Moreover, this makes all the UV islands visible in the image editor, even though, we haven't selected a single vertex on the mesh yet (normally, you see only the islands of the selected vertices in the image editor). This way, it's simple to associate a certain UV island with a certain material and a certain group of vertices on the mesh.
- Go to the Material window and select the
Material_U0V0slot. Go to the Texture window and click on the second texture slot right under the U0V0 one. Click on the New button, scroll down to the Image subpanel, and click on the Open button to browse to thetexture_makingfolder and load thescales_tiles.pngimage. - Go to the Mapping subpanel and in the Map slot, select the UVMap_scales UV coordinates layer. Rename the
Unique datablock ID nameslot asscales_tiles. Click on the checkbox to the side of the U0V0 texture slot to disable it (this is just temporary but mandatory for the baking, otherwise it would create a dependency loop, that is, the Circular reference in texture stack message in the top main header and in the Terminal panel as well):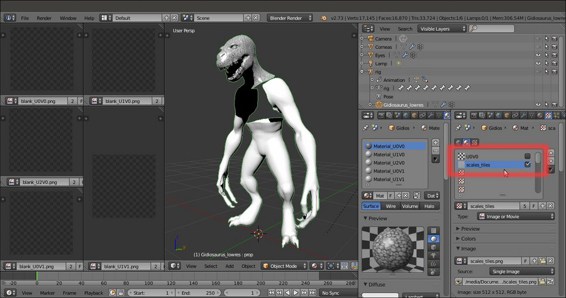
Disabling the blank texture image and loading the "scales_tiles.png" image in the first material
- Click on the button with a black arrow pointing downward, right after the + and –icon buttons, and from the pop-up menu, select the Copy Texture Slot Setting item. Select the
Material_U1V0slot and then click on the second texture slot right under the U1V0 one and click on the New button. Click again on the black arrow button and this time, select Paste Texture Slot Setting: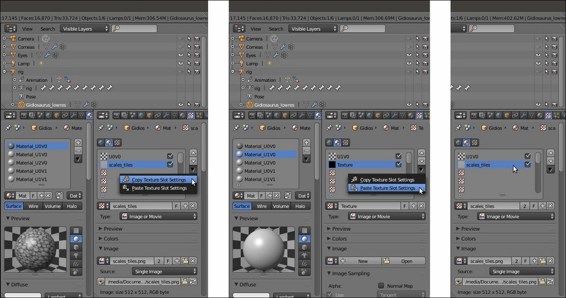
Copying and pasting the "scales_tiles" texture slot to the other materials
- Repeat this copy and paste for the other three materials, and also remember to disable the first texture slot for all the materials.
- Press Tab to go out of the Edit Mode and save the file.
Thanks to the pin icon button that is enabled for each loaded image, it's possible to keep the different images visible at the same time. At this moment, the 5 different PNG images are blank, so this isn't particularly evident; it will be a lot more clear when we start to actually paint on the model through the 3D viewport.
