The character's eyes are made up of two UV Spheres, the Corneas and the Eyes objects: the bigger Corneas one enveloping a smaller Eyes sphere, which in turn is made up of three parts: the eyeballs, the irises, and the pupils.
The Corneas sphere was first painted with a totally black Vertex Color layer, then painted with a white color only to the vertices corresponding to the front crystalline lens.
The Eyes sphere has three different materials assigned to the three different parts:
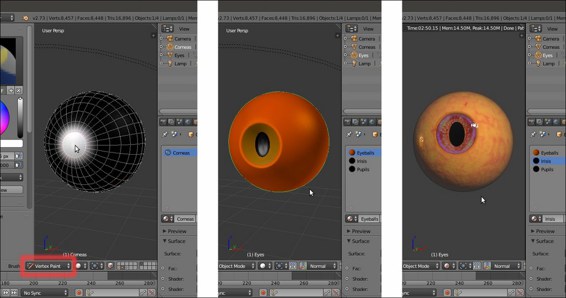
The Corneas object in Vertex Paint mode, the Eyes object with its three materials and the Rendered preview of the textured objects together
Start Blender and open the Gidiosaurus_skin_Cycle_02.blend file; save it as Gidiosaurus_shaders_Cycles.blend.
- Enable only the 6th and the 12th scene layer, in order to have visible only the Corneas, the Eyes and the Lamp objects (actually the Camera is also on the 6th scene layer, but it's hidden and at the moment we don't need it).
- Zoom the 3D view onto the Corneas and Eyes objects, and press Shift + Z to start the Rendered preview.
- In the Outliner, disable the Restrict view-port visibility button of the Eyes object to hide it.
- Select the Corneas object and go to the Material window.
So, let's start with the Corneas material, first:
- In the Material window, click on the New button in the Surface subpanel. Rename the material as
Corneas. - In the Material window, switch the Diffuse BSDF shader node with a Mix Shader node (label it as Mix Shader_1). In the first Shader slot, select a Diffuse BSDF shader node and in the second one select a Glossy BSDF shader (label it as Glossy BSDF1).
- Go to the Node Editor window and set the Roughness of the Glossy BSDF1 shader to 0.150, the Color to pure white and the Distribution to Sharp.
- Select the Mix Shader_1 node and press Shift + D to duplicate it. Label the duplicate as Mix Shader_2, then add a Subsurface Scattering node (Shift + A | Shader | Subsurface Scattering). Connect the output of the Mix Shader_1 node to the first Shader input socket of the Mix Shader_2 node and the output of the Subsurface Scattering shader node to the second Shader input socket.
- Change the Subsurface Scattering falloff from Cubic to Gaussian, set the Scale to 0.001 and the Radius to R 9.436, G 3.348, B 1.790.
- Add a Fresnel node (Shift + A | Input | Fresnel) and connect its output to the Fac input socket of the Mix Shader_2 node; set the IOR to 1.340:
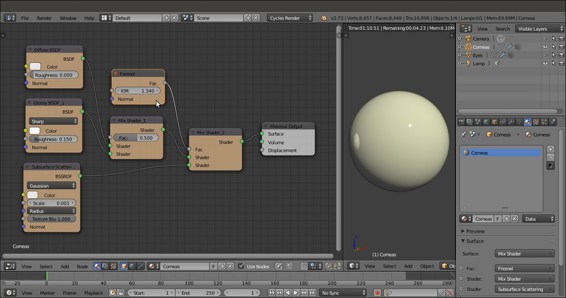
The basic starting "Corneas" shader
- Add a new Mix Shader node (Shift + A | Shader | Mix Shader), label it as Mix Shader_3 and paste it between the Mix Shader_2 and the Material Output node.
- Add a new Mix Shader node (Shift + A | Shader | Mix Shader), label it as Mix Shader_4 and connect its output to the second Shader input socket of the Mix Shader_3 node.
- Add a Transparent BSDF shader (Shift + A | Shader | Transparent BSDF) and connect it to the first Shader input socket of the Mix Shader_4 node.
- Select and press Shift + D to duplicate the Glossy BSDF1 node; label the duplicate as Glossy BSDF2 and connect its output to the second Shader input socket of the Mix Shader_4 node:
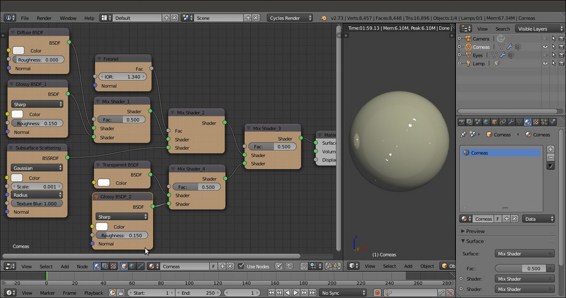
The "Corneas" shader with the added transparency nodes
- Add a Layer Weight node (Shift + A | Input | Layer Weight) and a Math node (Shift + A | Converter | Math); set the Blend factor of the Layer Weight to 0.300 and connect its Facing output to the first Value input socket of the Math node, then set the second Value to 0.100 and check the Clamp item.
- Connect the Math (labeled as Add) output to the Fac input sockets of the Mix Shader_1 and Mix Shader_4 nodes.
- Add an Attribute node (Shift + A | Input | Attribute) and a ColorRamp node (Shift + A | Converter | ColorRamp). In the Name slot of the Attribute node, type Col, then connect its Color output to the Fac input socket of the ColorRamp node.
- In the ColorRamp node, set the Interpolation to B-Spline and move the white color stop to position 0.100. Connect its Color output to the Fac input socket of the Mix Shader_3 node.
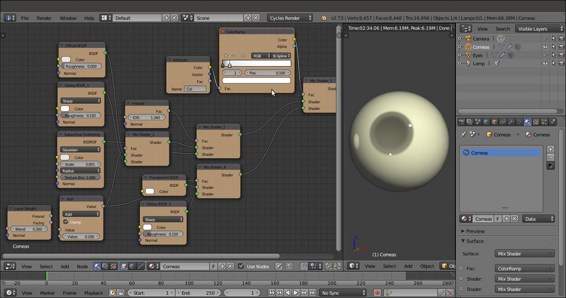
The "Corneas" shader with the transparency area located by the Vertex Color layer
- Add two Image Textures nodes (Shift + A | Texture | Image Texture) and label them respectively as COL and BUMP.
- Add an Attribute node (Shift + A | Input | Attribute); in the Name slot type UVMap.001 and connect its Vector output to the Vector input sockets of the two image texture nodes.
- Add an RGB node (Shift + A | Input | RGB), a MixRGB node (Shift + A | Input | MixRGB) and a Hue Saturation Value node (Shift + A | Input | Hue/Saturation).
- Click on the Open button of the COL node to browse to the
texturesfolder and load the imageeyeball_col.jpg. - Connect the Color output of the COL node to the Color2 input socket of the MixRGB node and the output of the RGB node to the Color1 input socket; set the Blend Type to Burn and the Fac value to 0.800.
- Connect the Color output of the MixRGB node to the Color input socket of the Hue Saturation Value node, and the output of this latter node to the Color input sockets of the Diffuse BSDF and Subsurface Scattering nodes.
- Set the RGB node color to R 0.800, G 0.466, B 0.000; set the Saturation value of the Hue Saturation Value node to 0.900.
- Click on the Open button of the BUMP node to browse to the
texturesfolder and load the imageeyeball_bump.jpg; set Color Space to Non-Color Data. - Add a Bump node (Shift + A | Vector | Bump) and connect the Color output of the BUMP node to the Height input socket of the Bump node. Connect the Normal output of this latter node to the Normal input sockets of the Diffuse BSDF, Glossy BSDF1, and Subsurface Scattering nodes, and set the Strength to 0.050.
- If you wish, add frames and colors to the different components to make the shader more easily readable:
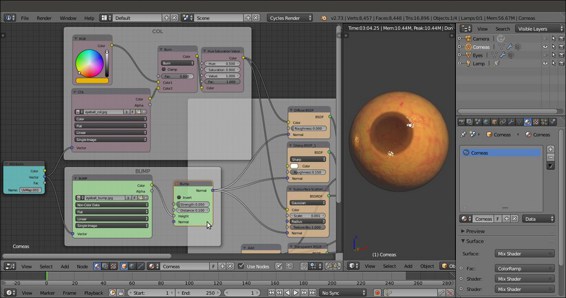
The textured "Corneas" material
Now let's quickly see the materials for the Eyes object:
- As you can see in the following screenshot, the
Eyeballsmaterial is essentially the same as we just made for the Corneas except for the transparent part; this material, by the way, is obsolete because it's hidden behind the Corneas' opaque surface, so can be safely omitted (but I left it in place in case you want to try the totally transparent Cornea):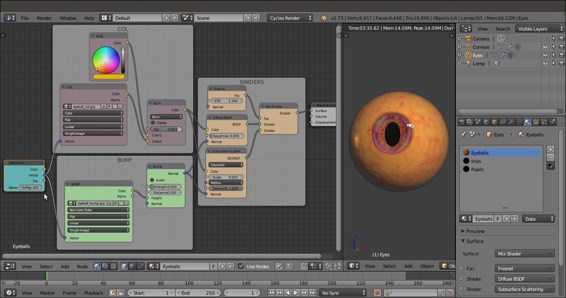
The "Eyeballs" material and the completed rendered eye
- The
Irisesmaterial follows the same scheme; the only differences are in the fact that it uses different image textures (iris_col.jpgandiris_bump.jpg) and that a contrasted (by a ColorRamp node) version of the bump image is used as a factor for the mixing of an Emission shader; note that the color map is also connected to this Emission shader: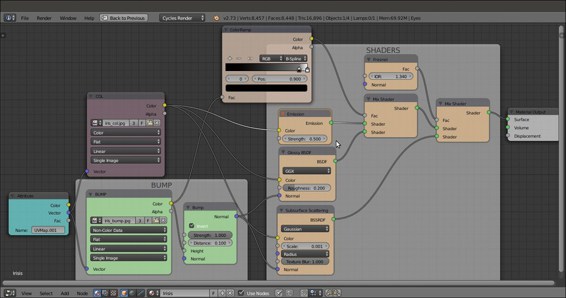
The "Irises" material network
- The Pupils are a simple, basic, black diffuse material.
To have a look at these materials, open the Gidiosaurus_shaders_Cycles.blend file and select the Corneas and Eyes objects in the Outliner.
These shaders are quite simple; the more complex one is the shader for the Corneas, essentially because it's made up of two materials, one with a slight bump effect and one totally smooth, mixed on the ground of the black and white Vertex Color layer that takes care also of the distribution of the transparent and opaque materials on the Corneas object itself.
If you are wondering why we didn't use the Eyeball material on the underlying Eyes sphere, leaving the Corneas object totally transparent, the reason is simple: in Cycles, to have a material transparent but also reflecting the environment, you need to use a Transparent shader mixed with a Glass or a Glossy shader node, that inevitably will make whatever material is behind appear darker; sometimes this can look right, in this case I preferred to use a different approach.
