Both the Automatic Weights parenting as well as the Weight Groups created and assigned by hand must, at a certain point, inevitably be edited for several reasons. As we have already seen, the parenting tool didn't do a perfect job, or maybe the transition between different weights is too sharp and must be blurred to smoothly deform the mesh. In any case, the ideal tool for this editing work is the Weight Paint tool.
As usual, let's first prepare the scene to work on:
- Open the
Gidiosaurus_skinning_01.blendfile and hide the 13th scene layer. - Enable the 3rd Armature layer and then deselect the Shapes item.
- Press the 3 key on the numpad to go in to Side view; if necessary, press the 5 key on the numpad to go in to Ortho view and the Z key to go in to Wireframe viewport shading mode.
- Save the file as
Gidiosaurus_skinning_02.blend.
Also, now let's start with the Weight Paint tool itself:
- Select the Gidiosaurus mesh and go in to Weight Paint mode; the tabs under the Tool Shelf on the left-hand side of the 3D window (press the T key in case they are not already present), change to show the Weight Paint tools.
- In the viewport, right-click on the head bone to show the head vertex group on the mesh's surface.
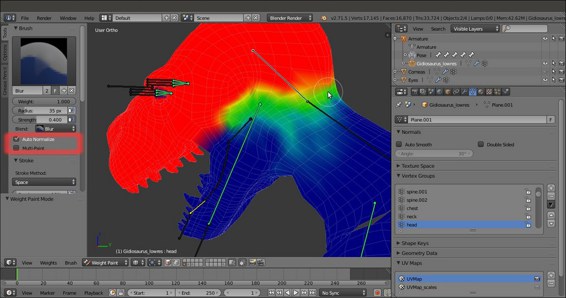
- Go to the Tool Shelf and click on the Options tab to verify that the X Mirror item in the Options subpanel is activated. Then, go back to the Tools tab and click on the big Brush window at the top to select a Blur brush; set Weight to 1.000 and Strength to 0.400.
- Select the Auto Normalize item at the bottom of the Brush subpanel.
- Start to paint on the borderline of the vertex group, blurring the separation between the red and blue colors and trying to obtain, in general, a transition as smooth as possible:

Blurring the edges of the vertex group
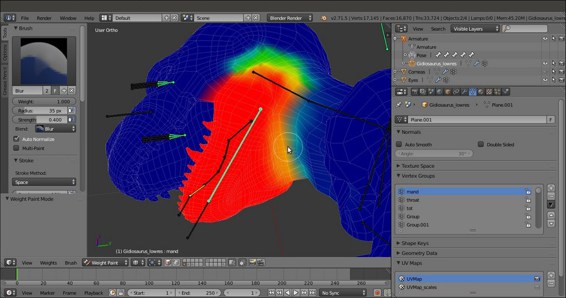
- Switch to the mand vertex group by selecting the corresponding bone and smooth the transition again:

Smoothing the transition of the "mand" vertex group
- If you need to reduce the weight of a vertex, switch the Blur brush with a Subtract one, and with a low Strength (0.100 or even less) paint on it. Then, if necessary, blur the area again.
- Alternatively, instead of using a Subtract brush, you can paint on the mesh with a Mix brush set with Strength = 1.000 and Weight = 0.000.
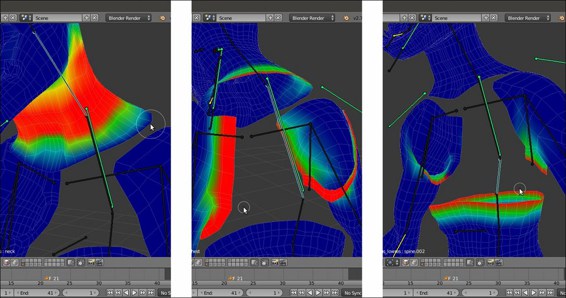
- Select the neck bone and reduce the weight of the vertices at the neck edges to 0.000.
- Select the chest bone and paint the vertices at the chest edges to 1.000.
- Repeat the last step also for the spine.001 and .002 bones:

Other vertex groups
To look at exactly how the weights have been edited by the Weight Paint tool, open the
Gidiosaurus_skinning_03.blendfile, hide the Armor, select the Gidiosaurus mesh and press Ctrl + Tab to go in to Weight Paint mode, and then right-click to select the different bones.One last thing still remains to be done: we must also skin the Tiers_simplified object.
- Enable the 13th scene layer to show the Armor and the Tiers; temporarily hide both the Armature and the Armor object by clicking on the respective eye icon in the Outliner.
- Select the Gidiosaurus mesh, then, Shift-select the Tiers object and press Ctrl + Tab to go in to Weight Paint mode.
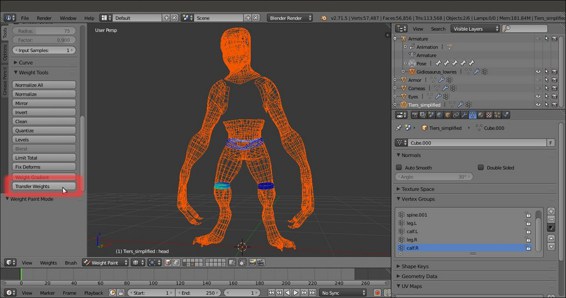
- Go to the Weight Tool subpanel under the Tool Shelf and click on the Transfer Weight button, which is the last button at the bottom. After a bit of calculation, the weights of the vertices for the underlying Gidiosaurus mesh have been transferred to the corresponding overlaid vertices of the Tiers object and the vertex groups as well:

Transferring the vertex group weights from the Gidiosaurus mesh to the tiers object
- Go out of Weight Paint mode and select the sole Tiers object. In the Object Modifiers window, assign an Armature modifier or, if you prefer, just join it to the Armor object (Armor as an active object and then press Ctrl + J). In both cases, just remember to enable the Preserve Volume item.
- Save the file.
