Because we want to keep the materials we already created for Cycles in the same blend file (and the reason will be clear in the next chapter), before we start with the creation of the Blender Internal shaders, we must prepare the file a bit.
The first thing to do is to open the last saved blend file, add Frames to each material in the Node Editor window, and label them with the material name followed by the suffix _Cycles; this is to later distinguish them from the material we will build for BI.
Therefore:
- Start Blender and load the
Gidiosaurus_shaders_Cycles.blendfile. - In the Outliner, select the Gidiosaurus_lowres mesh, go to the Material window and click on the
Material_skin_U0V0slot; put the mouse pointer inside the Node Editor window and press Shift + A to add a Frame (Shift + A | Layout | Frame). - Press A to select all the nodes (the added Frame, already selected, becomes the active one) and then press Ctrl + P to parent them to the active Frame.
- Select only the Frame and press N to call the Properties sidepanel; in the Label slot under the Name subpanel, type Material_skin_U0V0_Cycles, then go down to the Properties subpanel and increase the Label Size to 40.
- Repeat the procedure for all the Cycles' Gidiosaurus_lowres materials, for the Eyes and Corneas and for the Armor materials.
So, for example, the
Material_skin_U0V0, in the Node Editor window, becomes this: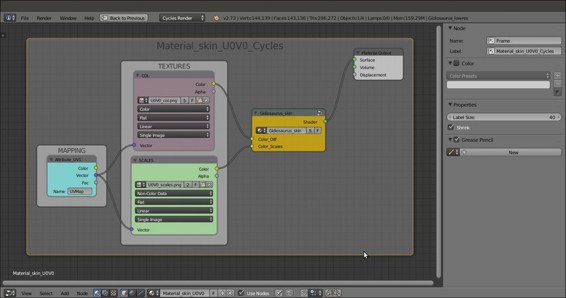
A "framed" Cycles material
Also, the
Material_wet_U0V0, becomes this: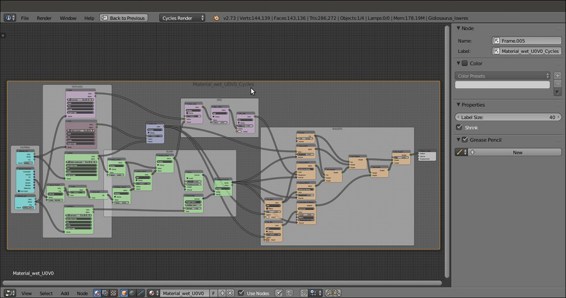
Another "framed" Cycles material
Note that the name of the material is the same as before, the only difference is that a Frame labeled with the _Cycles suffix has been added in the Node Editor window to visually group all the Cycles' nodes that are a constituent of the shader.
- Now go to the Scene data block button on the main top header; left-click on it and rename the Scene label as Cycles:
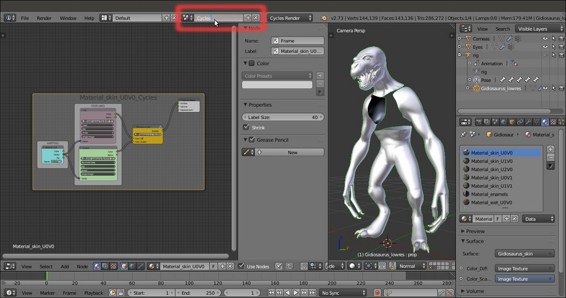
Renaming the Scene label
- Click on the + icon button to the right of the datablock name; in the pop-up little New Scene panel, select the Link Objects item:
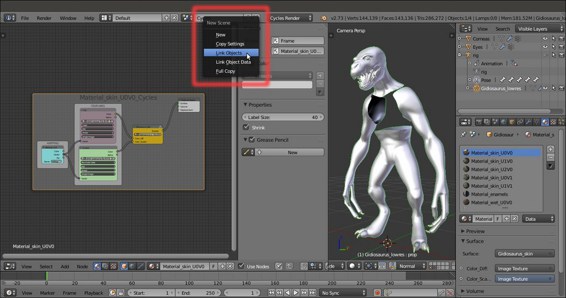
Adding a new scene with linked objects
At this point we have created a new scene (automatically labeled as Cycles.001) that is sharing the same objects of the other (Cycles) scene (be aware of this: the objects in one scene are not a copy of the others, they are the same objects shared/linked between the two scenes); you can say which objects are actually linked from one scene to another, by their blue pivot point (for example, look at the highlighted pivot point of the Gidiosaurus_lowres object in the following screenshot):
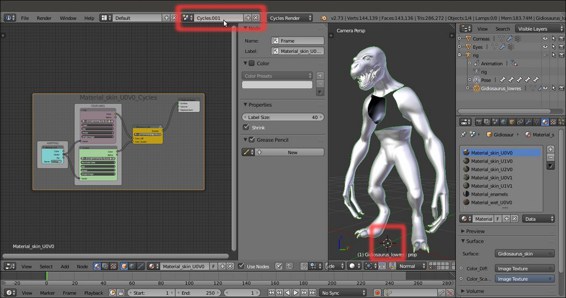
A new scene with linked objects
The advantages of creating new scenes with linked objects are obvious: we can have totally different rendering engines, or different worlds or lamps, in the different scenes and use the same objects and meshes data; so, for example, any modification to a linked object in one scene will automatically be transferred to the other scenes.
Furthermore, avoid duplicating the objects for each scene; this will help to keep a small file size.
- Rename the scene from Cycles.001 to BI, then move to the Engine to use for rendering button a bit to the right and switch from Cycles Render to Blender Render.
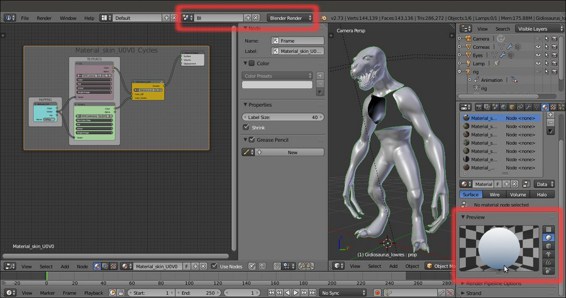
Switching to the Blender Render engine and the "empty material" preview
- In the Outliner, select the Lamp (be sure to have enabled both the 11th and the 6th scene layers); go to the Object Data window, set the energy to 14.000 and the color to R 1.000, G 1.000, B 0.650; under the Shadow subpanel, enable the Buffer Shadow item, Filter Type to Gauss, Soft = 12.000, Size = 4000, and Samples = 16. Set Clip Start = 9.000 and Clip End = 19.000.
- Go to the World window and enable the Ambient Occlusion by checking the item in the subpanel of the same name; leave the Blend Mode to Add and set the Factor to 0.35.
- Go further down to the Gather subpanel and click on the Approximate button: check the Pixel Cache item and then check also the Falloff checkbox under the Attenuation item; set the Strength to 0.900.
- Enable the Indirect Lighting item just above and set the Factor to 0.65.
These World settings are to obtain a sort of Global Illumination effect in the Blender Render engine; to learn more, have a look at http://www.blender.org/manual/render/blender_render/world/index.html.
- Save the file as
Gidiosaurus_shaders_Blender_Internal.blend.
Let's start with the first top Gidiosaurus skin material, so:
- Be sure to have the Gidiosaurus_lowres object selected and, back in the Material window, click on the
Material_skin_U0V0slot. - Put the mouse pointer inside the Node Editor window and press Shift + A (Shift + A | Input | Material) to add a Material node to the window; then press again Shift + A and add an Output node (Shift + A | Output | Output):
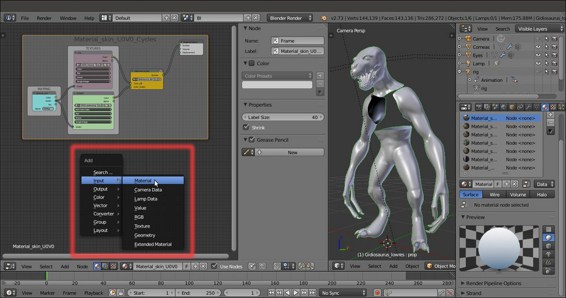
Adding a first material node in the Node Editor window
- Connect the Color output of the Material node to the Color input socket of the Output node:
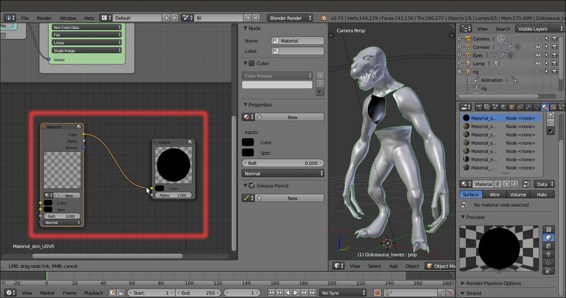
Connecting the material node to the output node
- Now click on the New button on the Material node to create a new default Blender Internal material:
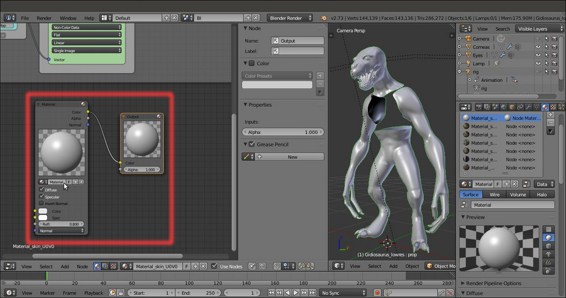
Creating a default "mono" material by clicking on the New button in the material node
- In the Properties sidepanel of the Node Editor window (N key to call it) label the Material node as COL and assign a color.
If you look now at the Material window, close to the right side of the material datablock (the name of the material), there is an already enabled and squared button with the symbol of the nodes.
In our case, that button is already enabled because we are already using material nodes; because it's enabled, a second material datablock slot has appeared just further down: that's the datablock slot for any node selected inside the Node Editor window and that is part of a material node.
The purpose of this second datablock slot is to let us know which material is the selected one and we are therefore going to edit it by tweaking all the values in the subpanels below.
- Go to the Material window to find the second material name slot: rename the material selected in the Node Editor window as
Material_U0V0_Col; you can do the same thing by clicking on the name datablock on the COL node interface.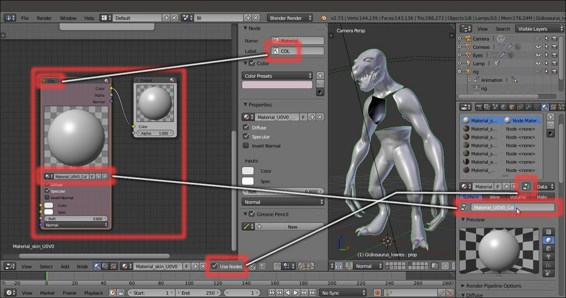
The corresponding datablock slots in the node interface and in the Material window
- In the Node Editor window, or in the N Properties sidepanel, deselect the Specular item.
- Go to the top of the Material window and click on the pin icon to the left of the contest; by doing this only the selected material is shown in the window.
- Go to the Diffuse sidepanel and click on the Diffuse Shader Model button to select the Oren-Nayar item; then go down to the Shading subpanel and enable the Cubic Interpolation item:
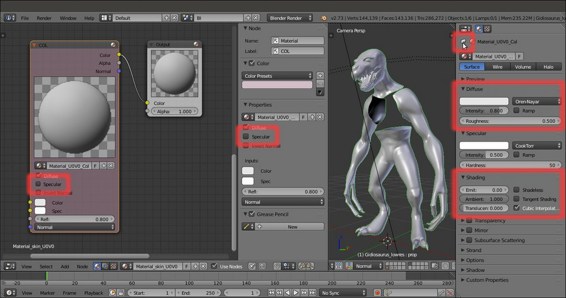
The Specular item to be disabled in the Node Editor window and the shader's parameters to be tweaked in the Material window
- At this point, press Shift + B to draw a box around the character's head in the Camera view and then zoom to it. If your computer is powerful enough to allow you to work without slowing down, put the mouse pointer inside the 3D viewport and press Shift + Z to start the Rendered preview; in any case, you can easily enable or disable the preview every time you need it:
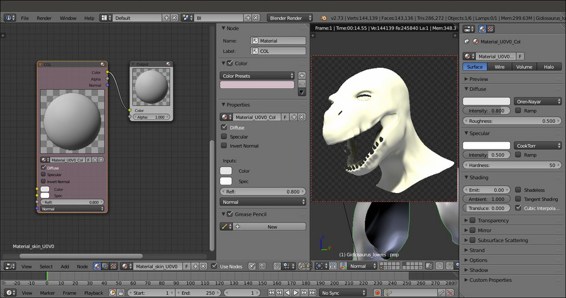
Cropping and starting the rendered preview
- Click on the Texture window icon at the top right of the main Properties panel, just above the contest, be sure to have the first top texture slot selected and click on the New button to automatically load a default Image or Movie texture panel:
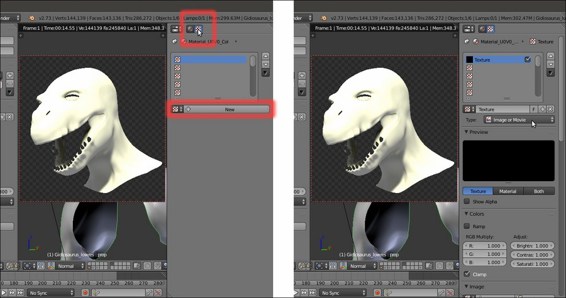
Adding a first texture slot to the material
- Collapse the Preview and the Colors subpanels, which at this moment we don't need, and click on the double little arrows to the left side of the New/Open buttons in the Image subpanel (remember that we have already loaded inside the blend file all the image textures we need, because of the Cycles shaders!): in the pop-up menu, select the
U0V0_col.pngitem: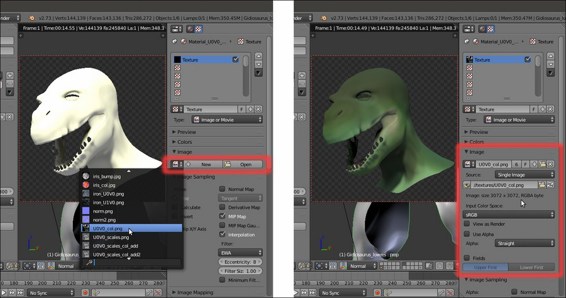
Selecting the right image texture from the drop-down list
- Go further down to find the Mapping subpanel: be sure to have the Coordinates set to UV, the Projection to Flat (default settings) and click on the Map empty slot to select the UVMap item.
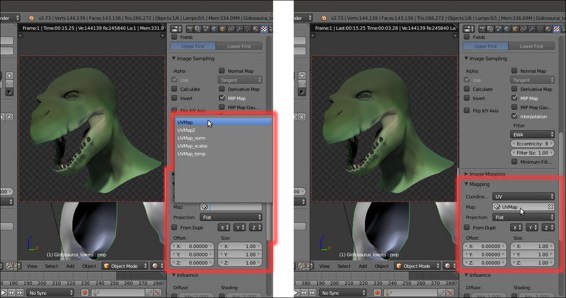
Selecting the right UV coordinates mapping
- Go even further down to find the Influence subpanel: be sure that the diffuse Color channel is the one enabled and that the slider is set to 1.000 (again, default settings):
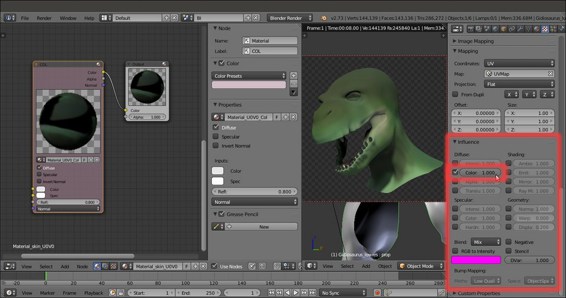
The Influence settings subpanel for the texture
- Scroll back to the top of the Texture window and click on the Unique datablock ID name slot, where the generic Texture name is written; rename it as
U0V0(as you can see in the following screenshot, this is the name that also appears in the textures list window):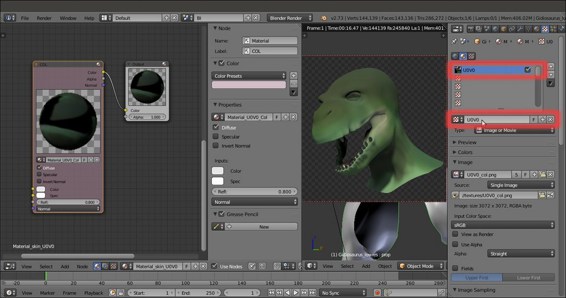
Renaming the texture datablock
- Now click on the empty second slot: again, click on the New button, click on the double arrows and this time load the image
U0V0_scales.png. - In the Unique datablock ID name slot, rename it as
U0V0_scales_col_add1.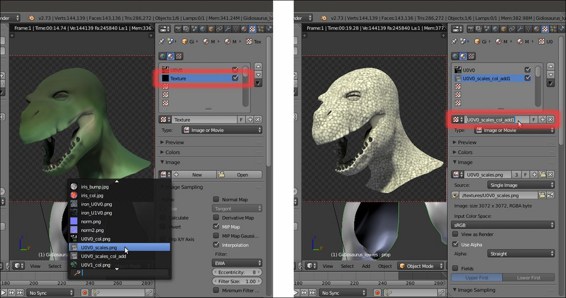
Adding a new texture slot, loading a new image texture and renaming it accordingly
- In the Input Color Space slot under the Image subpanel, change the default sRGB to Non-Color; then, scroll down to the Mapping panel to set the UVMap coordinates item and then go to the Influence subpanel: leave the Color channel enabled but move the slider to the lower value of 0.350, then change the Blend Type to Linear Light (for the Blender Internal materials, the Blend Type works as the layer system of a 2D image editor such as Photoshop or Gimp); enable the RGB to Intensity item and change the pink color to R 0.130, G 0.051, B 0.030.
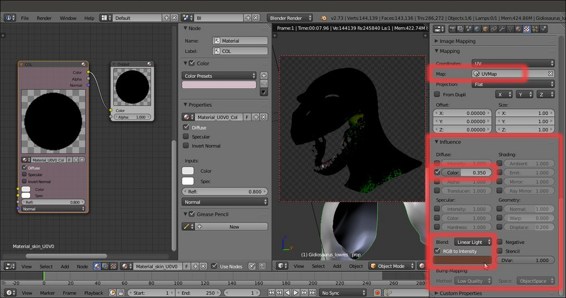
Tweaking the Influence settings for the second texture
- Go up to expand the Colors subpanel: set the Brightness and the Contrast to 0.500, to make the texture less bright and less contrasted. Go down to the Image Sampling subpanel and set the Filter Size to 3.00, to blur the image (values beyond 1.00 start to blur the image more and more):
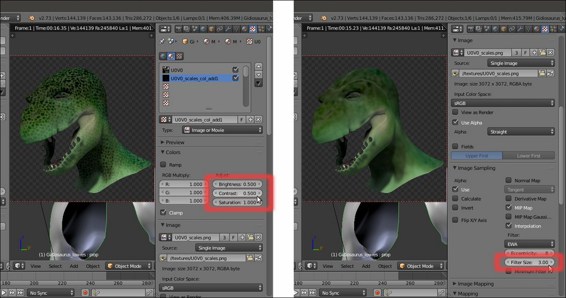
Modifying the appearance of the second image texture
- Select the third empty texture slot and repeat the procedure, again loading the
U0V0_scales.pngimage; in the Unique datablock ID name slot, rename it asU0V0_scales_col_add2. - Scroll down to the Mapping panel to set the UVMap coordinates item and then in the Influence subpanel, leave the Color channel enabled at value 1.000 but change the Blend Type to Subtract. Set the Brightness to 0.100 and the Contrast to 1.500. Again, set the Filter Size to 3.00.
- Select the fourth texture slot, load again the
U0V0_scales.pngimage, rename itU0V0_scales_col, set the UVMap coordinates layer, Color = 1.000 and Blend Type = Divide: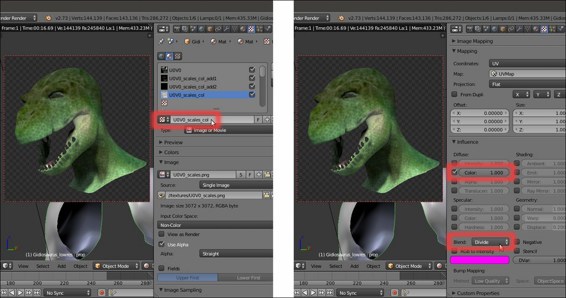
Adding more texture slots with different settings
- Select the fifth texture slot, load the
vcol.pngimage again, rename itvcol, set the UVMap_norm coordinates layer, Color = 0.800 and Blend Type = Screen: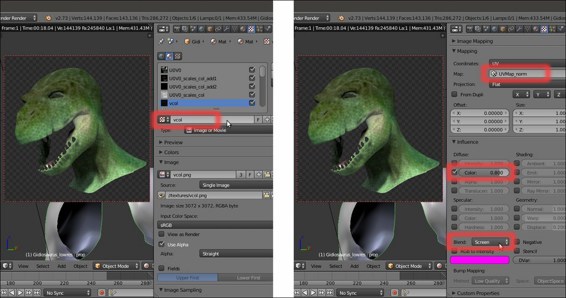
Adding the baked Vertex Color image texture as well
At this point we have completed the first component of the skin shader, that is, the diffuse color component; in the following F12 render you can see the final result:
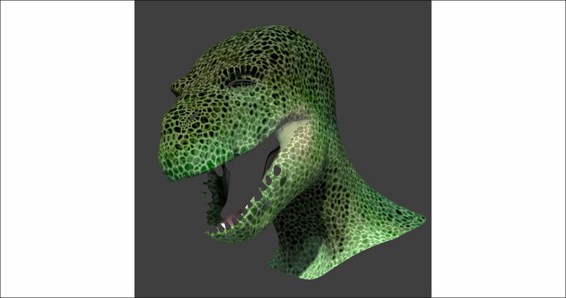
The completed diffuse color component of the Blender Internal skin material
Note that this F12 render result is quite different from the Rendered real-time preview; this is probably due to the complexity of using several textures inside a node material system with the (sadly) bad real-time viewport performances of Blender.
Now, we can carry on with building the second component of the shader, the glossy component.
- Put the mouse pointer inside the Node Editor window and add a new Material node (Shift + A | Input | Material); label it as SPEC and then click on the New button to create a new material: rename it
Material_U0V0_Spec. - Go to the Material window; in the Diffuse sidepanel, change the shader model to Oren-Nayar, then change the color to a deep blue R 0.020, G 0.051, B 0.089.
- Enable the Ramp item: in the slider, switch the positions of the two color stops (that is: white color stop to position 0.000 and black color stop to position 1.000), then select the white color stop; put the mouse on the deep blue color slot of the Diffuse subpanel and press Ctrl + C to copy it; put the mouse pointer on the color slot of the selected color stop and press Ctrl + V to paste the deep blue color.
- Click on the Diffuse Ramp Input button at the bottom of the subpanel to select the Normal item and on the Diffuse Ramp Blend button to the right to select the Multiply item:
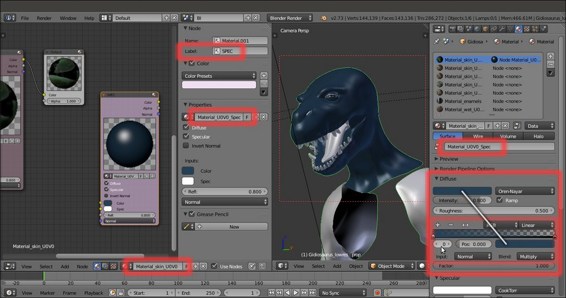
The "Material_U0V0_Spec", to be used inside the "Material_skin_U0V0" node material
- Scroll down to the Specular subpanel: change the color to a light blue R 0.474, G 0.642, B 0.683; set the Intensity to 0.600 and the Hardness to 10.
- Enable the Ramp item: select the white color stop and change the color to R 0.761, G 1.000, B 0.708, then set the Diffuse Ramp Input button to Normal and the Diffuse Ramp Blend to Color.
- Go to the Shading subpanel and enable the Cubic Interpolation item:
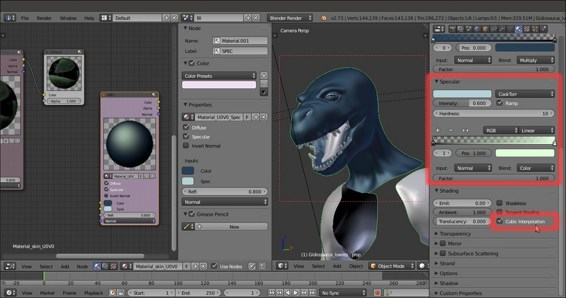
Setting the parameters of the specularity component
- Go to the Textures window; select the top first empty texture slot and click on the New button. Load the image
vcol.png, rename the ID datablock asvcol_lightand go to the Colors subpanel: set the Brightness to 1.150 and the Contrast to 0.850. Go down to the Mapping subpanel and set the UVMap_norm coordinates layer, then in the Influence subpanel disable the diffuse Color channel and enable both the Intensity and the Hardness channels under Specular; set the Blend Type to Value: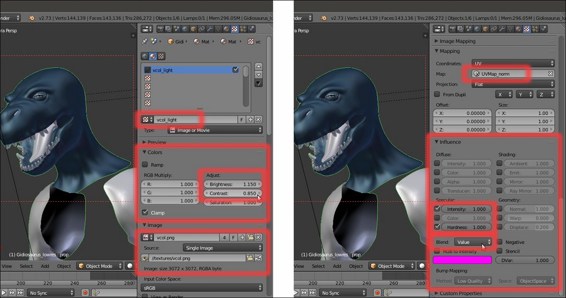
The settings for the specularity first texture
- Go to the second slot and load the image
U0V0_scales.png; rename it asU0V0_scales_hardness, in the Mapping subpanel, set the UVMap coordinates layer, in the Influence subpanel disable the diffuse Color and enable the Hardness channel under Specular to 0.125. In the Image Sampling subpanel set the Filter Size to 5.00.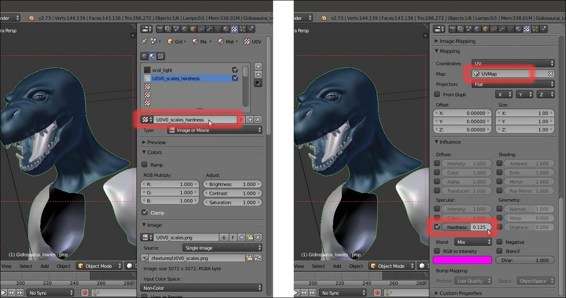
Re-using the "U0V0_scales.png" image texture for the specularity hardness
- In the third slot load the image
Ice_Lake_Ref.hdr, a free high dynamic range image licensed under the Creative Commons Attribution-Noncommercial-Share Alike 3.0 License from the sIBL Archive (http://www.hdrlabs.com/sibl/archive.html); there is a reason we are now using the hdr image, and it's explained in the How it works… section. - Rename the image ID datablock as
env_refl_skinand in the Colors subpanel, set the Brightness to 1.200 and the Contrast to 1.500; go to the Mapping subpanel and set the Texture Coordinates to Reflection. Down in the Influence subpanel, enable both the Intensity channel under Diffuse and Specular and set their sliders to 0.500; enable also, the Color channel under Specular and set the sliders of both the Color channels to 0.500 as well. Set the Blend Type to Screen, enable the RGB to Intensity item and set the color to the same deep blue of the diffuse color (R 0.020, G 0.051, B 0.089):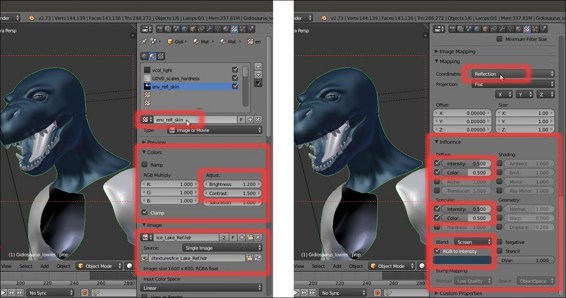
Using the environment hdr image as reflection map
If you want to see the effect of the single components in the Rendered preview as we build the shader, just temporarily disconnect the COL node link to the Output node and replace it with the Color output of the SPEC node (in this case):
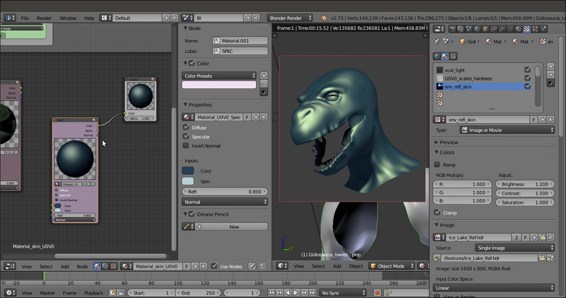
Testing the specularity component material in the rendered preview
- At this point, add a MixRGB node (Shift + A | Color | MixRGB) and move it on the link connecting the COL node to the Output node, to automatically paste it between them; then connect the Color output of the SPEC node to the Color2 input socket of the MixRGB node, set the Blend Type of this latter node to Add and its Fac value to 1.000:
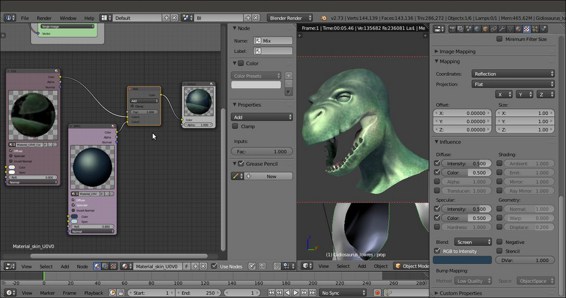
Finally adding the specularity component to the diffuse component
- Add a RGB Curves node (Shift + A | Color | RGB Curves) and a ColorRamp node (Shift + A | Converter | ColorRamp); paste the RGB Curves node between the SPEC and the MixRGB node, then connect the Color output of the SPEC node also to the ColorRamp input socket:
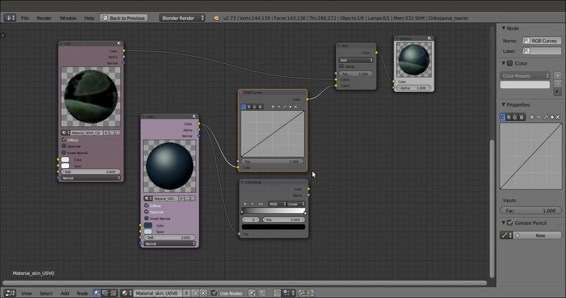
Adding new nodes
- Press Shift + D to duplicate the MixRGB node, change the Blend Type of the duplicate to Multiply and paste it between the RGB Curves and the first Add-MixRGB nodes: set the Fac value to 0.500. Connect the Color output of the ColorRamp node to the Color2 input socket of the Multiply-MixRGB node.
- Press Shift + D to duplicate the Multiply-MixRGB node and paste the duplicate between the first Multiply-MixRGB node and the Add-MixRGB node. Set the Fac value of the last Multiply-MixRGB node to 0.600 and the Color2 to R 0.347, G 0.462, B 0.386.
- Go to the RGB Curves node and left-click inside the interface window to add a point; set its coordinates to X = 0.38636 and Y = 0.36875. Add a second point and set its coordinates to X = 0.64545 and Y = 0.84375.
- Go to the ColorRamp node and set the Interpolation to B-Spline, then move the black color stop to position 0.195 and the white color stop to position 0.800:
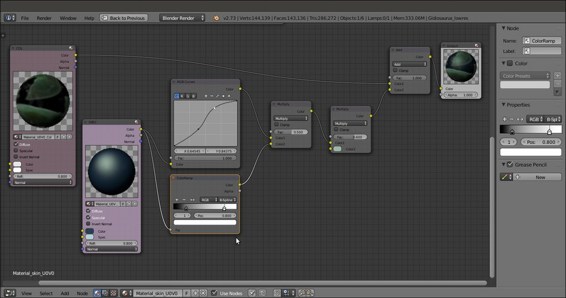
Tweaking the specularity component through the new nodes
- Add a Geometry node (Shift + A | Input | Geometry), a Vector Math node (Shift + A | Converter | Vector Math), a Math node (Shift + A | Converter | Math), and a ColorRamp node (Shift + A | Converter | ColorRamp).
- Add a Frame (Shift + A | Layout | Frame), label it as FAKE_FRESNEL and parent the last four added nodes to it.
- Set the Operation of the Vector Math node to Dot Product, then connect the View output of the Geometry node to the first Vector input socket of the Vector Math node, and the Normal output of the Geometry node to the second Vector input socket of the Vector Math node.
- Connect the Value output of the Dot Product node to the first Value input socket of the Math node; set the Operation of this latter node to Multiply and the second Value to 0.100.
- Connect the output of the Math node to the Fac input socket of the ColorRamp node; set the Interpolation of this latter node to B-Spline, then move the black color stop to position 0.150 and the white color stop to position 0.000.
- Connect the Color output of the ColorRamp node to the Fac input socket of the Add-MixRGB node:
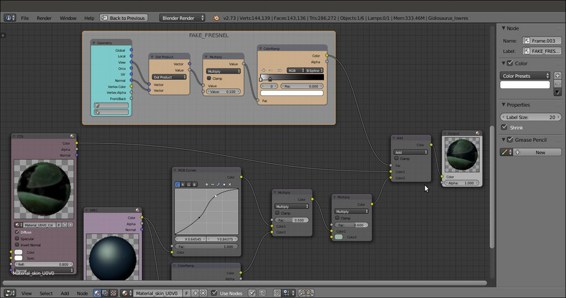
Adding the output of a fake Fresnel as factor for the blending of the two components
Let's do a F12 rendering to see the result so far:
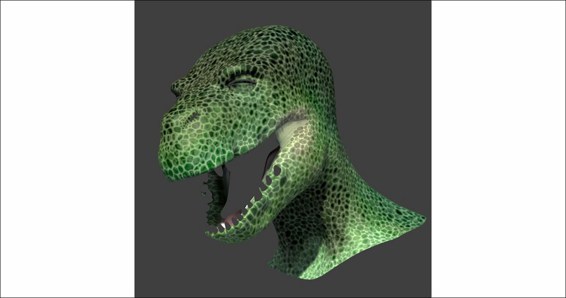
The F12 rendered result so far
- Now, select the COL material node and press Shift + D to duplicate it. Label the duplicated one as SSS, then through the Node Editor window, enable the Specular item. Click on the 2 icon button to the right side of the material name datablock to make it single user and rename the new copy of the material as
Material_U0V0_SSS. - Go to the Material window and change the Diffuse Shader Model to Minnaert and the Diffuse color to R 0.439, G 0.216, B 0.141. Move down to the Specular subpanel and change the color to the same R 0.439, G 0.216, B 0.141 brownish hue (copy and paste), then set the Intensity to 0.600 and the Hardness to 12.
- Go down to the Subsurface Scattering subpanel and enable it by checking the checkbox: set the IOR value to 3.840, the Scale to 0.001, copy and paste the brownish color also in the scattering color slot, set the Color slider to 0.000 and the Texture slider to 1.000. Set the RGB Radius: R 9.436, G 3.348, B 1.790.
- Go to the Texture window and set to 0.300 the Color channel sliders of the
U0V0,U0V0_scales_col_add2, andU0V0_scales_coltexture slots, then set to 0.117 the Color channel slider of theU0V0_scales_col_add1texture slot. - Select the last
vcoltexture slot and click on the X icon (Unlink datablock) button to clear it; click on the double little arrows to the left side of the New button and select thevcol_lightitem from the pop-up menu. Set the Mapping to UVMap_norm, and under the Influence subpanel, the Color of Diffuse to 0.267 and the Blend Type to Screen.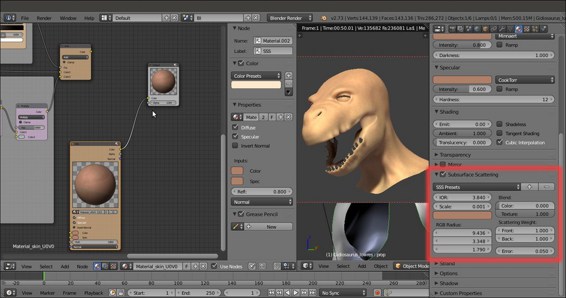
Testing the output of the SSS component material
- Add a new MixRGB node (Shift + A | Color | MixRGB), paste it between the Add-MixRGB and the Output node and set the Fac value to 0.250.
- Press Shift + D to duplicate this Mix-MixRGB node; change the Blend Type of the duplicated one to Screen, set the Fac value to 1.000 and connect the output of the Add-MixRGB also to the Color1 input socket of the Screen-MixRGB node; connect the output of the SSS node to the Color2 input socket of the Screen-MixRGB node.
- Connect the output of the Screen-MixRGB node to the Color2 input socket of the first Mix-MixRGB node.
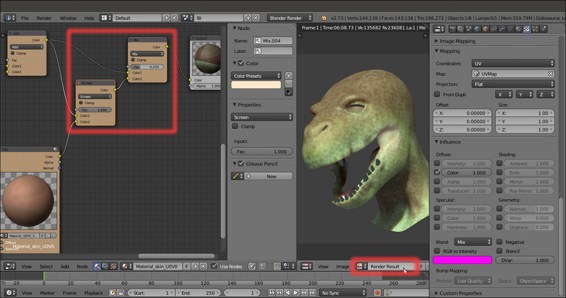
Adding the SSS component to the rest of the shader
- Add a new Material node (Shift + A | Input | Material) and click on the New button to create a new material; label the node as Scales_bump and rename the material as
Material_U0V0_Scales_bump. - In the Material window set the Diffuse Shader Model to Oren-Nayar and the Specular Shader Model to Blinn, Intensity = 0.100 and Hardness = 5. In the Shading subpanel enable the Cubic Interpolation item.
- Go to the Texture window and in the first slot load the
U0V0_scales.pngimage; rename the ID datablock asU0V0_scales_bump1. In the Image Sampling subpanel set the Filter Size to 5.00, the Mapping to UVMap and in the Influence subpanel disable the Color channel and enable the Normal channel under Geometry: set the slider to 0.100 and go to the bottom to click on the Bump Method slot and select Best Quality: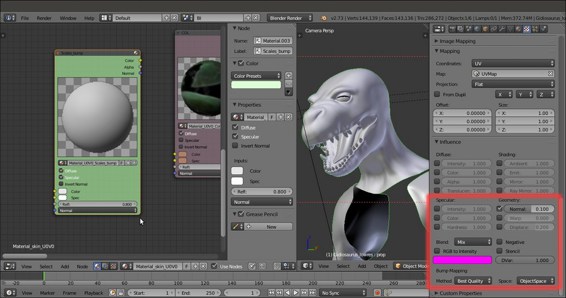
The bump material node
- Go back to the top of the panel and click on the big black arrow to the right of the texture window; select the Copy Texture Slot Settings item.
- Select the empty second texture slot and click on New to add a generic texture, then click again on the black arrow to select the Paste Texture Slot Settings item.
- In the ID datablock slot, click on the 2 icon button to make it single user and rename it
U0V0_scales_bump2. - Go down to the Image Sampling subpanel and set the Filter Size to 1.00, then go down to the Influence subpanel and set the Normal slider to 0.200.
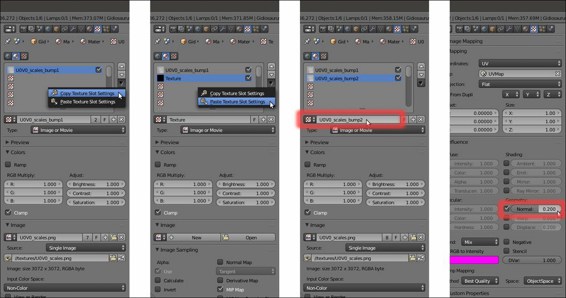
Copying and pasting a texture slot
- Press Shift + D to duplicate the node; make the material of the duplicated one single user and rename it as
Material_Clouds_noise, then label the node as Clouds_noise. - In the Texture window, delete (unlink)
U0V0_scales_bump1andU0V0_scales_bump2, and then select the first slot and click on the New button: change the automaticTexture.001ID datablock name withClouds_noise, click on the Type button and in the pop-up menu select the Clouds item. - In the Colors subpanel set the Brightness to 0.500 and the Contrast to 1.500, in the Mapping subpanel set the UVMap_scales coordinates layer, in the Clouds subpanel switch from Grayscale to Color, set the Size to 0.20, the Depth to 0.3 and the Nabla to 0.05.
- In the Influence subpanel disable the Color channel and enable the Normal channel under Geometry: set the slider to 0.250 and go to the bottom to click on the Bump Method slot and select Best Quality:
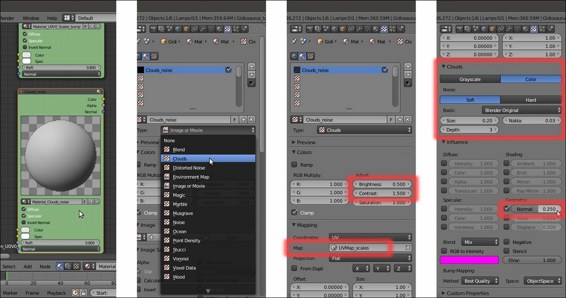
The second bump material node
- Press Shift + D to duplicate the Scales_bump node; make the material of the duplicated one single user and rename it as
Material_Normal_map, then label the node as Normal_map as well. - In the Texture window, delete (unlink) the
U0V0_scales_bump1andU0V0_scales_bump2; select the first slot and click on the New button: change the automaticTexture.001ID datablock name tonormaland then load thenorm.pngimage. - In the Mapping subpanel set the UVMap_norm coordinates layer, then go to the Image Sampling subpanel and enable the Normal Map item; go to the Influence subpanel, disable the Color channel and enable the Normal channel: set the slider to 1.000 (higher values don't have an effect with normal maps in Blender Internal).
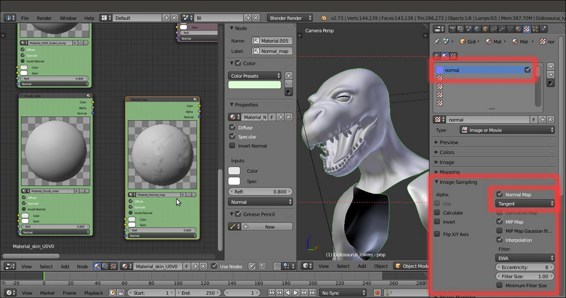
The normal map material node
- Add a Vector Math node (Shift + A | Converter | Vector Math) and connect the Normal (blue) output of the Scales_bump node to the first Vector input socket of the Vector Math node, and the Normal output of the Clouds_noise node to the second Vector input socket.
- Press Shift + D to duplicate the Vector Math node, set the Operation of the duplicate to Average and connect the Vector output of the Add-Vector Math node to the first Vector input socket of the Average-Vector Math node, and the Normal output of the Normal_map node to the second Vector input socket.
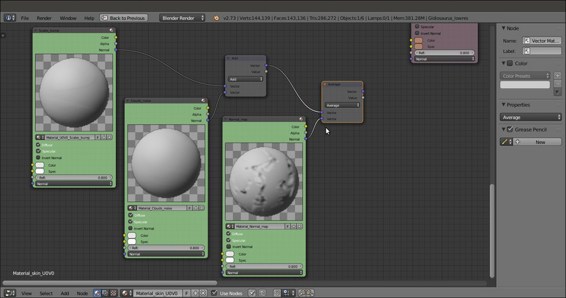
Connecting the outputs of the three bump nodes
- Connect the Vector output of the Average-Vector Math node to the Normal input sockets of the COL, SPEC, and SSS material nodes.
- Add frames everywhere to make things clear but especially to visually group and separate the nodes of the Blender Internal material from the Cycles ones.
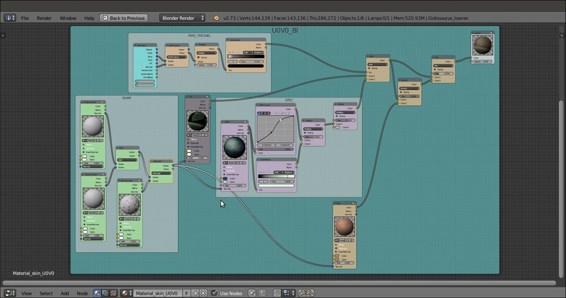
The completed "U0V0_BI" node material
- Save the file.
You have probably noticed that a few of the nodes we can find in the Cycles material system are also available for the material nodes in Blender Internal; sadly, some are still missing (and probably forever will be), as, for example, a Fresnel node that, in fact, we had to approximate with a combination of other different nodes.
Anyway, although not all the same nodes are at our disposal, we had enough of them to try to obtain a result as close as possible as the result we obtained in the Cycles material (in the previous Chapter 12, Creating the Materials in Cycles).
Having said that, let's see the steps:
- From step 1 to step 9 we created a basic Blender Internal material node by using both the Node Editor and the Material window.
- From step 10 to step 23 we assigned the proper textures to the basic material node that becomes, in this case, the
Material_U0V0_Col, the basic diffuse color component of the shader.These steps have been described in the most detailed way possible because they are the same steps for all the textures added to the materials; of course, the values and the settings can be different, but basically:
- We add a texture (image or procedural)
- We set a mapping orientation
- We set the influence value on the selected channel (also more than one at a time)
- Because the same texture can be used (with different settings) more than once, we always rename the Unique datablock ID name to make them easily recognizable in the pop-up menu list.
- The Filter Size value in the Image Sampling subpanel is really useful for blurring an image texture: a value of 1.00 is the default sharpness, while a higher value makes the image more and more blurred.
- From step 24 to step 30 we created the glossy/specular
Material_U0V0_Specnode. - From step 31 to step 34 we added the textures to the
Material_U0V0_Specmaterial. This material should represent the glossy/specular/mirror component of the shader, that is probably the most important thing for obtaining a correct visual result; in Cycles the Glossy BSDF shader node provides the result perfectly, while in Blender Internal, we have two options: one, by enabling the (slow and imperfect) internal ray-tracing Mirror item, or by faking it. We faked it by setting an image (the same hdr we'll use in the next chapter in the World both for Cycles and BI) on the Reflection channel of the shader, hence giving the impression of an environment (slightly) mirrored by the character's skin. - At step 35 we added together the outputs of the COL and of the SPEC nodes.
- From step 36 to step 40 we tweaked the output of the SPEC nodes to obtain a more realistic output/distribution of the glossiness on the mesh's surface, trying to mimic, as much as possible, the glossy output of the Cycles shader version.
- From step 41 to step 46 we built a fake Fresnel to work as a factor for the blending of the glossy and the diffuse components; this works by calculating the dot product of the vectors of the point of view and the mesh's normals. Be aware that it isn't actually working as the real Fresnel node that you find in Cycles, and that it has several limitations. By varying the second Value of the Math node and/or the black color stop position of the ColorRamp node, we can obtain several nice effects in some way visually similar to the real output. If you are wondering why we don't use the output of a BI material with a Fresnel diffuse shader model, sadly it doesn't seem to work correctly (actually, it doesn't seem to work at all).
- From step 47 to step 51 we built the SSS material node by duplicating the COL node, making a new copy of the material and renaming it as
Material_U0V0_SSS, then enabling Subsurface Scattering and modifying the influence values of the textures; the values of the subsurface scattering (IOR, Scale, RGB Radius), instead, were borrowed from the Cycles version of the shader. - From step 52 to step 54 we added the output of the SSS node to the rest of the shader by using a Blend Type set to Screen plus a Mix one set to a low Fac value; basically, the exact copy of what we did in Cycles.
- From step 55 to step 71 we created the bump pattern, divided into three different material nodes to give us more flexibility in adding and averaging them together in a way that is as similar as possible to Cycles:
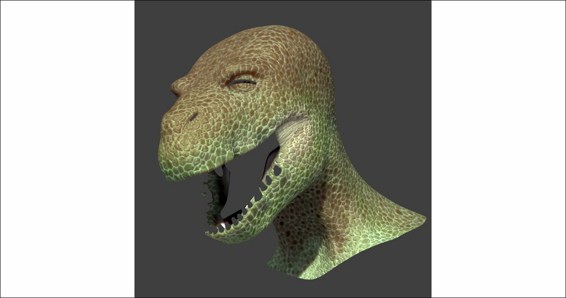
The F12 rendered final result in Blender Internal
The other missing shaders for the Gidiosaurus skin are solved in exactly the same way we used in the previous chapter for the other Cycles skin shaders: by selecting the entire BI frame with all the parented nodes and pressing Ctrl + C to copy them, then selecting the different material slots and pressing Ctrl + V to paste everything; in Blender Internal, we have to make the single materials inside the nodes single user one by one and then substitute the textures according to the UDIM tile the material corresponds to (U1V0_col.png, U1V0_scales.png, U2V0_col.png, and so on).
So, in the end, each material will have two sets of nodes, one for the Cycles shader and one for the Blender Internal shader, and each one works under the respective render engine; this will be useful, as we'll see in the next chapter, for the rendering stage.
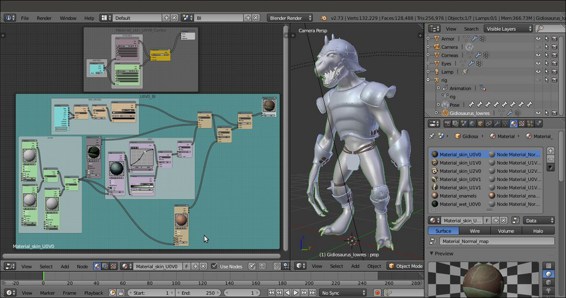
Two different sets of nodes for the same material
