
With the rapid growth of open source software, particularly in the enterprise, it was inevitable that open source office suites would reach a level of maturity that means they are suitable for deployment in a corporate environment. Thanks to the open-sourcing of Sun’s StarOffice, Linux can benefit from a true Microsoft Office style office suite by the name of OpenOffice.org. Many businesses already use OpenOffice.org and its commercial counterpart, StarOffice, and they are already enjoying the cost benefits of not having to pay license fees or support costs. Of course, there are more suites available than just OpenOffice.org and in this chapter we will explore the options available.
Despite what some hacks have found, OpenOffice.org is making real inroads into directly replacing Microsoft Office, thanks to a lot of hard work by Sun and the community at large. Although not 100% compatible with Microsoft binary formats (DOC, XLS, and PPT) OpenOffice.org gets it right nearly every time. Unless you are working with extremely complex documents that involve specialized functions only available with MS Office, you should encounter no problems with OpenOffice.org.
Note
Why is OpenOffice.org not 100% compatible with Microsoft Office? Well, Microsoft is notoriously secretive about its proprietary file formats and the only way that OpenOffice.org could ensure compatibility would be to reverse-engineer each file format, akin to taking apart a telephone to see how it works. This reverse-engineering could be classed as illegal under U.S. law, which would make OpenOffice.org somewhat of a potential hot-potato if they chose this path. However, OpenOffice.org manages to maintain a very high standard of importing and exporting so you should not experience too many problems.
A productivity suite could be classed as containing two or more applications that could be used for creating documents, presentations, spreadsheets, and databases. Other applications could include email clients, calculators/formula editors, and even illustration packages. Commonly they are all tied together by a default look and feel, which makes sticking to one particular suite much easier. Because Fedora uses OpenOffice.org as its standard office suite, we will introduce you to Writer and Calc, the two most popular OpenOffice.org components. We will also take a brief look at some of the other Linux-based office suites that are available.
Note
As with most projects, the more active development that has taken place, the bigger the overall project. Fedora is no exception to this and the team at The Fedora Project has been very busy putting Fedora on a diet—removing packages that are not considered to be essential to Fedora or are duplicated in functionality. This includes some productivity applications, so if you try to find one in Add/Remove Programs and it is not there, try installing it with yum (see Chapter 38, “Advanced yum”).
As we have mentioned earlier, OpenOffice.org is the default application suite for Fedora. However, with all things open source, there are plenty of alternatives should you find that OpenOffice.org does not meet your specific requirements. These include the popular Gnome Office and also KOffice, the default KDE productivity suite. You are more likely to hear more about OpenOffice.org, especially as more and more people wake up to the fact that it is compatible with MS Office file formats. In fact, the state of Massachusetts recently elected to standardize on two file formats for use in government, the Adobe Acrobat PDF format and the OASIS OpenDocument format, both of which are supported natively in OpenOffice.org.
Note
The decision by the state of Massachusetts to standardize on PDF and OpenDocument has huge ramifications for the open source world. It is the first time that OpenDocument, an already-agreed open standard, has been specified in this way. What it means is that anyone who wishes to do business with the state government must use OpenDocument-based file formats, and not the proprietary formats in use by Microsoft. Unfortunately for Microsoft, it does not have support for OpenDocument in any of its applications, making them useless to anyone wishing to work with the state government. This is despite Microsoft being a founding member of OASIS, who developed and ratified the OpenDocument standard!
For the majority of users of productivity suites, OpenOffice.org should fulfill most, if not all, of your requirements. However, the first hurdle you need to get over is not whether it can do what you require of it, but rather if it can successfully import and export to proprietary Microsoft formats. In the main, OpenOffice.org should import and export with minimal hassle, perhaps getting a bit stuck with some of the more esoteric Office formatting. Given that most users do not go much beyond tabs, columns, and tables, this level of compatibility should suffice.
However, you are strongly advised to round up a selection of documents that could potentially fall foul of the import/export filter and test them thoroughly (of course, keeping a backup of the originals!). There is nothing worse than for a system administrator who has deployed a new productivity suite to suddenly get users complaining that they cannot read their files. This would quickly destroy any benefits felt from the other useful functions within OpenOffice.org, and could even spell the return of proprietary formats and expensive office suites. Many users do not mind switching to OpenOffice.org, largely because the user interface closely resembles that of similar Microsoft applications. This helps to settle users into their environment and hopefully dispel any fears they have over switching. Such similarity makes the transition to OpenOffice.org a lot easier.
Of course, just looking similar to Microsoft applications is not the only direct benefit. OpenOffice.org supports a huge array of file formats, and is capable of exporting to nearly 70 different types of documents. Such a wide variety of file formats means that you should be able to successfully use OpenOffice.org in nearly any environment.
OpenOffice.org contains a number of productivity applications for use in creating text documents, preparing spreadsheets, organizing presentations, managing projects, and more. The following components of the OpenOffice.org package are included with Fedora:
Writer—. This word processing program enables you to compose, format, and organize text documents. If you are accustomed to using Microsoft Word, the functionality of OpenOffice.org Writer will be familiar to you. The presentation of these functions in the application menus is slightly different from Microsoft Word’s, however, so you might have to hunt for familiar functions. Spell checking, a thesaurus, macros, styles, and a help facility are built in to Writer and work in a manner consistent with other word processors and applications. You will learn how to get up and running with Writer later on in this chapter.
Calc—. This spreadsheet program enables you to manipulate numbers in a spreadsheet format. Support for all but the most esoteric Microsoft Excel functions means that trading spreadsheets with Excel users should be successful. Calc offers some limited compatibility with Excel macros, but those macros generally have to be rewritten. Calc also supports data exchange formats such as the Data Interchange Format and dBASE format. We walk through setting up a basic spreadsheet with some formulas as well as showing you how to build a basic Data Pilot later on in this chapter.
Impress—. This presentation program is similar to Microsoft PowerPoint and enables you to create slide show presentations that include graphs, diagrams, and other graphics. Impress also works well with PowerPoint files. When it is opened, Impress starts with a wizard that steps you through the creation of a new presentation, lets you use an existing template (although none are provided), or allows you to open an existing presentation.
Math—. This math formula editor enables you to write mathematical formulas with a number of math fonts and symbols for inclusion in a word processing document. Such symbols are highly specialized and not easily included in the basic functionality of a word processor. It is of interest primarily to math and science writers, but Math can be useful to anyone who needs to include a complex formula in their text.
Base—. This database was introduced with the OpenOffice.org 2.0 suite, which is provided with Fedora. It provides a fully functional database application. When you open Base, you are asked to set up the database for use. The easy-to-use setup assistants take you through most of the hard work.
Draw—. This graphics application allows you to create images for inclusion in the documents produced with OpenOffice.org. It saves files only in OpenOffice.org format, but it can import most common image formats. It is not meant as a replacement for more general graphics applications, but it has enough features to meet most needs.
Dia—. This technical drawing editor from the GNOME Office suite enables you to create measured drawings, such as those used by architects and engineers. Its functionality is similar to that of Microsoft Visio.
Planner—. You can use this project management application for project planning, scheduling, and tracking; this application is similar to, but not compatible with, Microsoft Project. It is found in the Office menu as the Project Planner item.
Fedora provides an RPM package for OpenOffice.org. If you do not install the RPM package during your initial Fedora installation, you can install it later, using the Add/remove Applications tool or by using yum install openoffice.org from the command line.
Tip
OpenOffice.org is constantly improving its productivity applications. You can check the OpenOffice.org website (http://www.openoffice.org/) for the latest version. The website provides a link to download the source or a pre-compiled version of the most current working installation files. A more current version might offer file format support that you need. Should you need a Windows compatible version, you will also find it at the website. Sometimes the version that Fedora provides can be a little unstable. If you find that this happens, you are best advised to go to the OpenOffice.org website and download the Linux version. OpenOffice.org is packaged in RPM format, so refer to Chapter 7, “Managing Software,” for instructions on how to use the rpm command.
The installation of OpenOffice.org is done on a systemwide basis, meaning that all users have access to it. However, each user has to go into OpenOffice.org to configure it for their individual needs. This initial configuration happens transparently the first time you load any of the OpenOffice.org components, and might mean the application takes a little longer to load as a result. Be patient, and your desired application will appear.
Shown in Figure 9.1 are icons on the left of the top desktop panel that represent the different components of OpenOffice.org as well as other applications. From left to right, beginning with the Applications and Actions menus, the icons represent the Firefox web browser, Evolution email, OpenOffice.org Writer, OpenOffice.org Impress, and OpenOffice.org Calc. The icons displayed on your desktop might vary from those shown here. If you click the Applications icon, the main menu opens, and all the OpenOffice.org applications can be accessed from the Office menu.

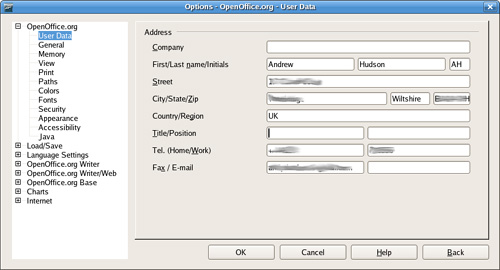
As is the case with many Linux applications, you may be somewhat overwhelmed by the sheer number of configuration options available to you in OpenOffice.org. Thankfully a lot of thought has gone into organizing these options, which are available by clicking the Tools menu and selection Options. It does not matter which program you use to get to this dialog box, it appears the same if summoned from Writer, Impress, or Calc. It acts as a central configuration management tool for all OpenOffice.org applications. You can use it to set global options for all OpenOffice.org applications, or specific options for each individual component. For instance, in Figure 9.2, you can change the user details and information, and this is reflected across all OpenOffice.org applications.
Tip
Two websites provide additional information on the functionality of OpenOffice.org:
http://lingucomponent.openoffice.org/download_dictionary.html—This site provides instructions and files for installing spelling and hyphenation dictionaries, which are not included with OpenOffice.org.
http://sourceforge.net/projects/ooextras/—This site provides templates, macros, and clip art, which are not provided with OpenOffice.org.
OpenOffice.org is a constant work in progress, but the current release is on par with the Sun version of StarOffice 8.0. You can browse to the OpenOffice.org website to get documentation and answers to frequently asked questions and to offer feedback.
Out of all the applications that make up OpenOffice.org, the one that you are most likely to use on a regular basis is Writer, the OpenOffice.org word processor. With a visual style very similar to Microsoft’s Word, Writer has a number of strengths over its commercial and vastly more expensive rival. In this section you will learn how to get started with Writer and make use of some of its powerful formatting and layout tools.
Note
You may be interested to know that Writer was the primary word processor chosen to write and edit this book.
You can access Writer either through its shortcut on the panel or by going to the Applications, Office menu and selecting Word Processor. After a few seconds Writer opens up with a blank document and a blinking cursor awaiting your command. It can be tempting to just dive in and start typing your document, but it can be worthwhile to do some initial configuration before you get stuck in.
First of all, make sure that the options are set to your requirements. Click the Tools menu and select Options to bring up the Options dialog box as seen in Figure 9.2. The initial screen allows you to personalize OpenOffice.org with your name, address, and contact details, but there are options to configure features that you might also want to alter. First of all, check that your default paths are correct by clicking the Paths option. You might want to alter the My Documents path, as shown in Figure 9.3, to something a little more specific than just your home directory.

You might also want to change OpenOffice.org so that it saves in Microsoft Word format by default, should you so require. This can be done under the Load/Save General options shown in Figure 9.4, and it is a good idea if you value your work to change the Autorecovery settings so that it saves every couple of minutes.
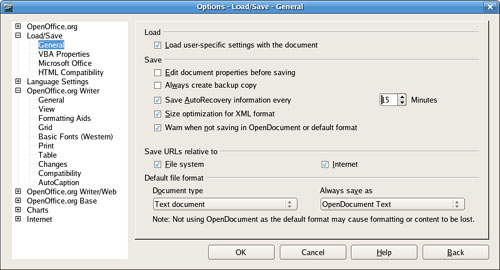
Also shown in Figure 9.4 are a set of options that are specific to Writer. From top to bottom, they are
General—. Specify options that affect the general use of Writer
View—. Specify what you want Writer to display
Formatting Aids—. Specify whether you want to see non-printing characters
Grid—. Create a grid that you can use to snap frames and images in place
Basic Fonts—. Select your default fonts for your document here
Print—. Specify exactly what you want Writer to output when you print your document
Table—. Set options for drawing tables within Writer
Changes—. Define how Writer handles when it records changes to documents
Compatibility—. A set of rules that Writer uses to ensure close compatibility with earlier versions of Writer
AutoCaption—. Create automatic captions for images, charts, and other objects
A little bit of time working through these options can give you a highly personalized and extremely productive environment.
One of the significant benefits of using Writer is the ability to easily apply formatting and styles to extremely complex documents. Depending on the type of documents you work with, you might want to consider creating your own styles beyond the 20 included by default. Styles can be accessed either by the Style drop down box in the toolbar, or by the Styles and Formatting window shown in Figure 9.5. If you cannot see the window, press the F11 key to display it.
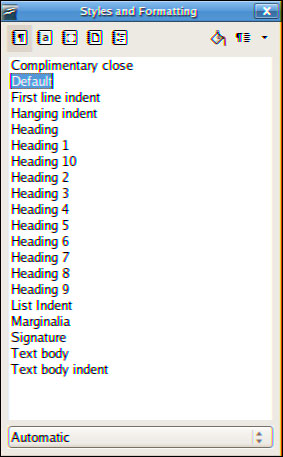
The easiest way to work with the Styles and Formatting tool is to highlight the text you want to style up and double-click the required style in the window. There are quite a few to choose from, but you might find them restrictive if you have more specialized needs. To start defining your own styles, press Ctrl+F11 to bring up the Style Catalog, shown in Figure 9.6, where you add, modify and delete styles for pages, paragraphs, lists, characters and frames.

The spreadsheet component of OpenOffice.org is named Calc, and is a very capable Excel alternative. Earlier versions of Calc were limited to only 32,000 rows, but now Calc can support 65,656 rows, the same amount as Excel.
Calc is used for storing numerical information that you need to analyze in some way. So, for instance, you could use it to help you budget month-by-month. It can take care of the calculations for you, as long as you tell Calc what you want it to do. Anyone with experience in Excel will feel right at home with Calc.
In this section, we will show you how to get started with Calc, including entering formulas and formatting. We will also take a look at some of the more advanced features of Calc, including the Data Pilot feature which allows you to easily summarize information.
You can either click the shortcut icon that is located on the top GNOME panel, or select Spreadsheet from the Office menu under the Applications main menu. Whichever route you take, the result is the same and Calc starts to load.
By default, Calc loads with a blank spreadsheet just waiting for you to enter information into it. In Figure 9.7, you can see that we have already started to enter some basic information into Calc.
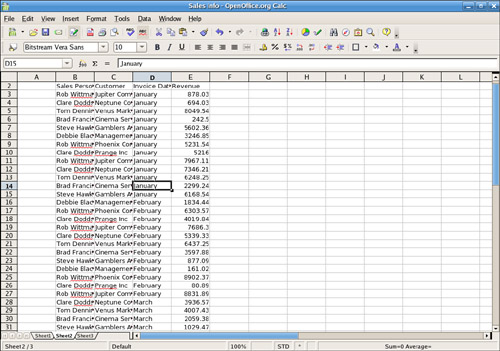
Calc’s layout makes it easy to organize information into rows and columns. As you can see in the example, we have sales people listed alongside the left hand column, customers in the second column, Invoice Date in the third column, and finally Revenue in the fourth column. At the moment, there are no formulas entered to help you interpret the data. Clicking the E43 cell selects it and allows us to enter in a formula in the top formula bar. If we enter in the equal sign, Calc knows that what we are entering is a formula and works accordingly.
In our example, we want to know the total revenue brought in up to now, so we need to enter in the formula =sum(E3:E42) and press return. Calc automatically enters the result into cell E43 for you to see. Now we want to see what the average order value was. To do this, we have to obtain how many orders there were. For this we can use the counta function to count the number of entries in a given list. This is usually used when you need to find out how many entries there are in a text list. So, in cell B43, enter =counta(B3:B42) and press Enter. Calc now counts the number of entries in the range and returns the total in B43. All that remains for us to do is divide the total revenue by the number of orders to find the average order value. So, in cell E44, enter the formula =E43/B43 to get the average order value.
Tip
Calc offers some nifty little features that you can use quickly if you need to. The handiest one in our opinion is the ability to select multiple cells and see straight away the total and average of the range. You will find these figures in the bottom-right status bar. This has saved us numerous times when we have needed to get this information quickly!
Getting back to our example, it looks a little basic at the moment as there is no formatting involved. For instance, which currency are we billing in? You can also see that some of the cells have text that does not fit, which is highlighted by a small right arrow in the cell. We should also add some labels and titles to our spreadsheet to make it a bit more visually appealing.
To start off, let’s make all the revenue figures into currency figures. To do this, select all the cells containing revenue information and click on the small icon shown in Figure 9.8. This immediately formats the cells so that they display the dollar sign and also puts in a thousands separator to make the numbers easier to read.
Now we need to space all the cells so that we can read all the information! A quick and easy way to do this is to click the area immediately to the left of column A and immediately above row 1 to select the entire spreadsheet. Now all you have to do is double-click the dividing lines and each column resizes according to its longest entry.
Next let’s add a little color to our worksheet by using the paint can icon in the toolbar. Select the range B2 to E2 with the mouse cursor and click the paint can icon to bring up the color window as shown in Figure 9.9. Now select the color you want to use and Calc fills the cells with that color. You can also change the font color by using the icon immediately to the right in the same way.

Finally we need to add a couple more finishing touches. The first one is to enlarge the font for the column headers. Select the range B2 to E2 again and click the font size in the toolbar to change it to something a little larger. You might also want to use the bold and italic options to emphasize the headers and also the totals some more.
If you have followed the steps as described, you should end up with a spreadsheet similar to the one in Figure 9.10.

Calc includes a powerful tool that lets you summarize large groups of data to help you when you need to carry out any analysis. This tool is called a data pilot, and you can use it to quickly summarize data that might normally take a long time if you did the calculations manually. Using the sample spreadsheet from earlier, we will take you through how to build a simple data pilot, showing you how to analyze and manipulate long lists of data.
In the previous section we worked with a spreadsheet that showed sales people, customers, date of invoice, and revenue. At the foot of the spreadsheet there were a couple of formulas that allowed us to quickly see the total revenue earned and the average order value.
Now we want to find out how our sales people have earned individually. Of course you could add this up manually using a calculator, but that would defeat the point of using Calc. So, we need to create a data pilot to help us summarize the information.
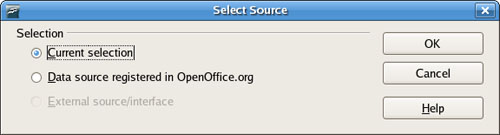
First, we need to select all the cells from B2 to E42 as this is the data that we want to analyze. After these are selected, click on the Data menu and select Data Pilot, Start to open up the Data Pilot Wizard. The first screen is shown in Figure 9.11 and is defaulted to current selection. Make sure that you choose this one to use the data in the selected range and click OK to continue.
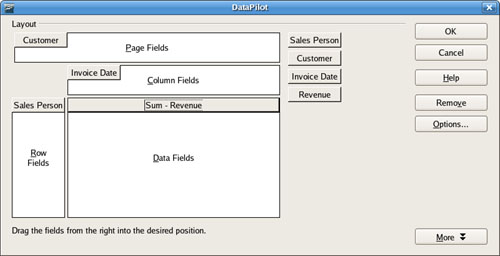
The next screen allows you to lay out your data pilot as you want it. In this example we want to have Sales Person in the left hand column marked Row Fields, so click and drag the Sales Person option from the list on the right and drop it onto the Row Fields area. We also want to see the revenue broken down by Month, so drag the Invoice Date box to the Column Field area. Finally drag Customers to the Page Field area (so you can filter by Customer) and drag the Revenue option to the Data Field area. You should end up with something like Figure 9.12 and you are almost ready to display your data pilot.
The final piece in the puzzle is to tell Calc where you want it to place the finished data pilot. To do this, click the More button to drop down some extra options and select the box Send Results To to choose a new sheet. When you click OK now, Calc builds the data pilot and displays it on a new sheet in your workbook. The new data pilot can be seen in Figure 9.13.

The other office suite available for GNOME is Gnome Office, which is a collection of individual applications. Unlike OpenOffice.org, Gnome Office does not have a coherent suite of applications, meaning that you have to get used to using a word processor that offers no integration with a spreadsheet, and which cannot work directly with a presentation package. However, if you only need one or two components, it is worthwhile investigating Gnome Office.
Here are some of the primary components of the Gnome Office suite that are available in Fedora:
AbiWord—. This word processing program enables you to compose, format, and organize text documents and has some compatibility with the Microsoft Word file format. It uses plug-ins (programs that add functionality such as language translation) to enhance its functionality.
Gnumeric—. This spreadsheet program enables you to manipulate numbers in a spreadsheet format. Support for all but the most esoteric Microsoft Excel functions means that users should have little trouble trading spreadsheets with Excel users.
The GIMP—. This graphics application allows you to create images for general use. It can import and export all common graphic file formats. The GIMP is analogous to Adobe’s Photoshop application and is described in Chapter 11, “Graphics Manipulation.”
Evolution—. Evolution is a mail client with an interface similar to Microsoft Outlook, providing email, scheduling, and calendaring. It is described in Chapter 8, “On the Internet: Surfing the Web, Writing Email, and Reading the News.”
Balsa—. This lightweight mail client is in the mold of Microsoft Outlook Express. It is described in Chapter 8.
The loose association of applications known as Gnome Office includes several additional applications that duplicate the functionality of applications already provided by Fedora. Those extra GNOME applications are not included in a default installation of Fedora to eliminate redundancy. They are all available from the Gnome Office website, at http://www.gnome.org/projects/ooo/. Both The GIMP and Evolution are available with Fedora by default. You have to use yum or pirut to retrieve the remaining components.
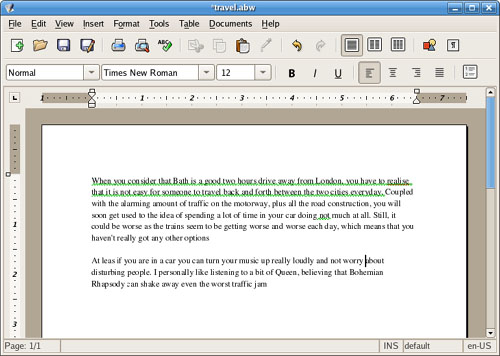
Fedora provides the AbiWord editor as part of its Extras, shown in Figure 9.14. AbiWord can import XML, Microsoft Word, RTF, UTF8, plain text, WordPerfect, KWord, and a few other formats. AbiWord is notable for its use of plug-ins, or integrated helper applications, that extend its capabilities. These plug-ins add language translation, HTML editing, a thesaurus, a Linux command shell, and an online dictionary, among other functions and features. If you just need a lightweight but powerful word processing application, you should examine AbiWord.
AbiWord is not installed by default in Fedora; instead you need to use yum to retrieve it like this:
#yum install abiword
After yum has retrieved and installed Abiword, it becomes available in the Applications menu, under the Office submenu. Simply click the icon to launch the application, or you can launch it from the command line, like this:
$ abiword &
If you are familiar with Microsoft Works, the AbiWord interface will be familiar to you because its designers based the interface upon Works.
You can use the Gnumeric spreadsheet application to perform financial calculations and to graph data, as shown in Figure 9.15. It can import comma or tab-separated files, text, or files in the Gnumeric XML format, saving files only as XML or text. To launch Gnumeric from the menu, choose Office, More Office Applications, and then Gnumeric Spreadsheet. You can also launch the spreadsheet editor from the command line, like this:
$ gnumeric &
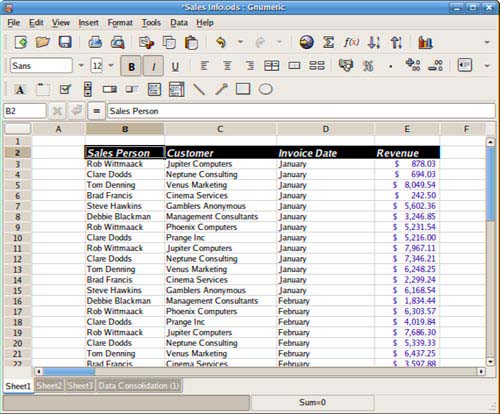
After you press Enter, the main Gnumeric window appears. You enter data in the spreadsheet by clicking a cell and then typing in the text box. To create a graph, you click and drag over the spreadsheet cells to highlight the desired data, and then you click the Graph Wizard icon in Gnumeric’s toolbar. Gnumeric’s graphing component launches and you are guided through a series of dialogs to create a graph. When you are finished, you can click and drag a blank area of your spreadsheet, and the graph appears.
The Project Planner application is useful for tracking the progress of projects, much like its Windows counterpart, Microsoft Project. When the main window is displayed, you can start a new project or import an existing project. The application provides three views: Resources, Gantt Charts, and Tasks.
Note
Some productivity applications fall into the category of groupware; these include shared calendars, files, notes, email, and the like. These applications were covered in detail in Chapter 8.
The K Desktop Environment, known as KDE, is not the default desktop environment for Fedora. KDE comes with its own set of libraries, widgets, and a system of inter-application communication (drag-and-drop) that is incompatible with the default GNOME desktop environment. This does not mean that the KDE applications are not useable if you choose a GNOME desktop (or vice versa). Although KDE duplicates a lot of the functionality of the GNOME offerings, the KDE applications often present a unique approach to solving familiar problems and might be just what you are looking for.
The KDE office suite KOffice was developed to provide tight integration with the KDE desktop. Integration enables objects in one application to be inserted in other applications via drag-and-drop, and all the applications can communicate with each other, so a change in an object is instantly communicated to other applications. The application integration provided by KDE is a significant enhancement to productivity. (Some GNOME desktop applications share a similar communication facility with each other.) If you use the KDE desktop instead of the default GNOME desktop, you can enjoy the benefits of this integration, along with the Konqueror web and file browser.
The word processor for KOffice is KWord. KWord is a frames-based word processor, meaning that document pages can be formatted in framesets that hold text, graphics, and objects in enclosed areas. Framesets can be used to format text on a page that includes columnar text and images that the text needs to flow around, making KWord an excellent choice for creating documents other than standard business letters, such as newsletters and brochures.
KWord and other components of KOffice are still under development and lack all the polished features of OpenOffice.org and AbiWord, as well as the necessary Microsoft file format support. If Microsoft compatibility is unimportant to you and you and your associates use the KDE desktop environment rather than GNOME, KOffice is worth considering. The next version of KOffice will include the Kolab groupware applications referred to in Chapter 8; GNOME lacks similar groupware functionality at present.
You can access the KOffice components from the More Office Applications submenu under the Office menu. You can also access them from the KOffice shell, which can be launched from the command line, like this:
$ koshell &
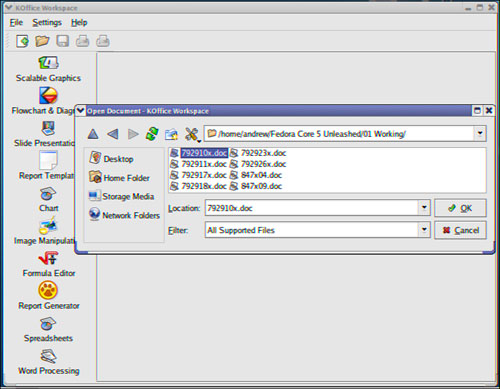
After you press Enter, you see the main window of KOffice shell, as shown in Figure 9.16. On the left are icons representing all the KOffice applications available to you. Clicking on one starts a dialog to open an existing file or begin work in a new file.
You can click on icons on the left side of the main window to launch the KWord word processing client, the KSpread spreadsheet program, and other components. You can also launch individual clients from the command line without using the KOffice workspace. For example, to use KWord, enter the following:
$ kword &
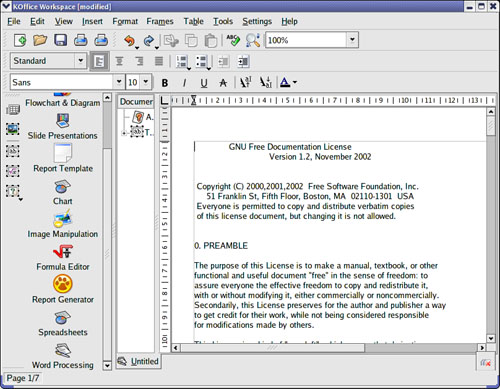
KWord then asks you to select a document for your session. The KWord client, shown in Figure 9.17, offers sophisticated editing capabilities, including desktop publishing.
The KOffice KSpread client is a functional spreadsheet program that offers graphing capabilities. Like KWord, KSpread can also be launched from the command line. After you use a command like this, you are asked to choose a type of document (new or previous document):
$ kspread &
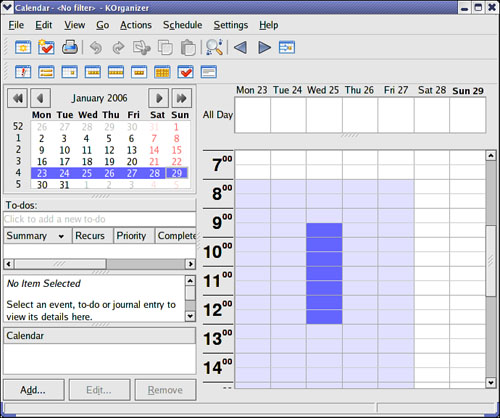
KDE includes other productivity clients in its collection of KOffice and related applications. These clients include an address book, time tracker, calculator, notepad, and scheduler. One popular client is KOrganizer, which provides daily, weekly, work week, and monthly views of tasks, to-do lists, and scheduled appointments with background alarms.
A journal, or diary, function is also supported within it, and you can synchronize information with your Palm Pilot. You can launch this client from the KDE desktop panel’s menu or from the command line, like this:
$ korganizer &
A typical KOrganizer window is shown in Figure 9.18.
Microsoft Windows is fundamentally different from Linux yet you can install and run some Microsoft Windows applications in Linux by using an application named Wine. Wine enables you to use Microsoft Windows and DOS programs on UNIX-based systems. Wine includes a program loader that you can use to execute a Windows binary, along with a .dll library that implements Windows command calls, translating them to the equivalent UNIX and X11 command calls. Because of frequent updates to the Wine code base, Wine is not included with Fedora. Download a current version of Wine from http://www.winehq.org/. To see whether your favorite application is supported by Wine, you can look at the Wine application database at http://appdb.winehq.org/appbrowse.php.
As well, there are other solutions to enable use of Microsoft productivity applications, primarily CodeWeavers’ CrossOver Office. If you are after a painless way of running not only Microsoft Office, but also Apple iTunes and other software, you should really pay CodeWeavers a visit. CrossOver Office is one of the simplest programs you can use to get Windows-based programs to work. Check out www.codeweavers.com to download a trial version of the latest software. It requires registration, but do not worry—the guys at CodeWeavers are great and will not misuse your details. The big plus is that you get a whole month to play around with the trial before you decide whether to buy it. Of course, you might get to the end of the 30 days and realize that Linux does what you want it to do and you don’t want to go back to Windows. Do not be afraid; take the plunge!
http://www.openoffice.org—The home page for the OpenOffice.org office suite.
http://www.pclinuxonline.com/modules.php?name=News&file=article&sid=3199—A set of links to tips, tricks, and enhancements for OpenOffice.org. One link at the site is to a PDF file that explains how to use OpenOffice.org as a database front end for MySQL.
http://www.gnome.org/projects/ooo/—The GNOME Office site.
http://www.koffice.org—The home page for the KOffice suite.
http://en.hancom.com/—The home page for the Hancom Office suite.
http://bulldog.tzo.org/webcal/webcal.html—The home page of the excellent WebCal web-based calendar and scheduling program.
http://www.codeweavers.com—Website of the hugely popular CrossOver Office from CodeWeavers that allows you to run Windows programs under Linux.