
As Chapter 3 demonstrated, installing Fedora is an extremely easy task in the majority of cases. Installation itself includes Fedora probing for existing system hardware and then automatically configuring itself accordingly. By doing this it produces a system that is almost ready to be used.
Regardless of how proficient you are with Linux, you can expect to do some extra configuration once you have logged in to your system, even if it is as basic as changing the background picture or significantly altering the way GNOME looks. In this chapter we examine some of the graphical tools you can use to enhance and change your environment. We also look at some ways you can troubleshoot any initial problems with your configuration as well looking at some other tweaks you can perform on your new installation.
As Linux is built on a resilient UNIX foundation, it is much more stable than other operating systems. This may come as a surprise to you if you are used to the Blue Screens of Death found on a certain operating system from Redmond, WA. However, even though things might seem to be okay, Linux could have a problem that might not affect the appearance of the system. Sometimes kernel modules for devices might not load, or services might not start for some reason. In this section, you will learn how to examine some of the in-built error logs within Fedora to help you diagnose any unseen faults. Fedora has a command that allows you to see detailed messages that are output directly by the operating system. This command is the dmesg command and is commonly used with the grep command to filter output. The dmesg command takes its output directly from the /var/log/messages file, so you can choose to either run dmesg directly, or enter less /var/log/messages instead. The output is fairly detailed, so be prepared for some initial shock when you see how much information is generated. You might find it easier to generate a file with the dmesg output by using the command
$dmesg > dmesg.txt
This takes the output from the dmesg command and stores it in a new text file called dmesg.txt. You can then browse it at your leisure using vi or emacs, depending on your taste.
The messages are generated by the kernel, other software run by /etc/rc.d/rc.sysinit, and Fedora’s runlevel scripts. You might find what appear to be errors at first glance, but some errors are not really problems (for example, if a piece of hardware is configured but not present on your system).
Thanks to Google, troubleshooting is no longer the slow process it used to be. You can simply copy and paste error messages into Google and click find to bring up a whole selection of results similar to the problem you are facing. Remember, Google is your friend, especially http://www.google.com/linux, which provides a specialized search engine for Linux. You can also try http://marc.theaimsgroup.com, which browses newsgroup and mailing list archives. Either way you are likely to come across people who have had the same problem as you.
It is important to only work on a solution to one problem at a time; otherwise you may end up getting no work done whatsoever. You should also get into the habit of making backup copies of all files that you modify, just in case you make a bad situation worse. Use the copy command like this:
#cp file file.backup
You should never use a .bak extension as this could get overwritten by another automatic process and will leave you frustrated when you try to restore the original file.
If something breaks as a result of you changing the original file, you can always copy the original back into place using the command like this:
#cp file.backup file
(You can save many blood-pressure–related medical expenses just by using these two simple commands. Feel free to send us any tokens of appreciation!)
Whenever you add a new piece of hardware, be it a replacement graphics card or that new printer that you have been promising yourself, you need to take time to configure it properly. The hardware detection and configuration utility kudzu should be your first port of call. Every time you boot into Fedora, kudzu examines the availability of hardware and prompts you to configure or remove software for the device. The chances of you not using kudzu are pretty slim because Fedora automatically includes it during the installation. You are advised to let kudzu have first shot at installing and configuring your new hardware. If it fails, give the other methods in this chapter a try.
Note
The kudzu service maintains a database of your system’s hardware information under the /etc/sysconfig directory in a file named hwconf. This service can be started, stopped, or restarted (like other operating system services) from the command line by using a script under the /etc/rc.d/init.d directory (named kudzu). You can add options or enable various features of Kudzu, such as timeouts, by editing the KUDZU_ARGS= entry in the kudzu script (see the kudzu man page for the options). You can also use the command-line based service command or the graphical system-config-services client to control kudzu. See Chapter 15, “Automating Tasks,” for more information on using these commands.
You can perform many post-installation tasks without rebooting or downtime. With proper planning, you also can create a server or workstation configuration that allows hot-swapping of system storage and other components, eliminating the need for downtime. In this chapter, you learn how to configure various USB and FireWire (IEEE-1394) devices in addition to keyboards, modems, and notebook PCMCIA services.
Information about your system’s installed hardware is contained in a number of files under the Fedora directory system. Aside from one or two symbolic links, or shortcut-type files created under the /dev directory for the convenience of system utilities, nearly all these hardware settings are in text files under the /etc directory. The contents of these files are used by various software services to manage your system’s hardware, save changes to your hardware, ensure that settings are saved between reboots, and to properly configure your system upon booting. A number of these files are used by the /etc/rc.d/rc.sysinit script when Linux starts. For example, some of these files include
/etc/sysconfig/hwconf—. Lists the currently configured system hardware (used bykudzu)/etc/sysconfig/apmd—. Lists system power-management settings (used by theapmddeamon)/etc/sysconfig/clock—. Contains time zone, clock, and hardware clock settings (used by thehwclockcommand)/etc/sysconfig/irda—. Provides configuration data concerning Infrared Data Association (IrDA) hardware/etc/sysconfig/keyboard—. Lists current keyboard mapping (and provides language settings)/etc/sysconfig/mouse—. Details the current system pointing device (such as whether or not a PS2 or USB mouse is used)/etc/modprobe.conf—. Defines device names, kernel hardware support modules to load, and any optional parameters (see Chapter 40, “Kernel and Module Management,” for more information about Linux kernel modules)/etc/pcmcia—. A directory containing a Personal Computer Memory Card International Association (PCMCIA) hardware database and device settings (see the section “Managing PCMCIA” later in this chapter)
You will find additional information about the files in /etc/sysconfig in the file named sysconfig.txt under the /usr/share/doc/initscripts directory.
Caution
Do not edit kudzu’s text-file database of installed hardware; these files are updated dynamically by Kudzu and dire consequences will result if you start tampering. If you have trouble with a device, however, you can check the information in these files when troubleshooting to see whether the device is properly recognized and its definition matches the actual hardware.
Fedora has tools available to configure and customize your input devices. If you need to change your keyboard’s language, or alter settings for your mouse, you will need to know about them. These tools include
gnome-mouse-properties—. A graphical mouse configuration tool for the Fedora desktopsystem-config-keyboard—. A graphical keyboard configuration tool for the Fedora desktop
The following sections explain how to use these tools to configure keyboards and pointing devices in Fedora.
Note
Linux supports many different types of keyboards. Until the last few years, most keyboards used the PS/2 protocol (originally developed by IBM) attached to a PC with a six-pin mini-connector. Today, however, nearly all computers use universal serial bus (USB) connectors for user input devices. Although many of today’s PCs (and notebooks) continue to provide PS/2 ports, most manufacturers are now introducing legacy-free computers without direct PS/2 support.
You can make a number of keyboard configuration choices in Fedora. You can choose a keyboard language that supplies the keyboard letters, diacritical marks, and layout appropriate for the language you will be typing in during your console or graphical sessions. Other configuration options include changing the keyboard’s translation table to remap the order of keys on your keyboard, swapping specific keys (such as Caps Lock and Ctrl), or changing the delay period between the press of the key and the appearance of the character onscreen. (This configuration can help you synch the character entry to your typing speed.)
You can make keyboard configuration changes through text-based (console) keyboard commands or by using the graphical user interface.
If you do not use X, use Fedora’s system-config-keyboard command to change your keyboard type and language. This command can be used without an active X session (or if you are using X, from inside a terminal window) like this:
# system-config-keyboard
After you press Enter, you will see the Configure Keyboard dialog, as shown in Figure 4.1.

This dialog enables you to choose a new keyboard type.
Scroll through the list to highlight a desired keyboard type, and then use the Tab key to highlight the OK button and press Enter. The listings represent entries under the /lib/kbd/keymaps/i386 directory, which are used to associate your keyboard’s layout and keys with a language. The keyboard configuration is stored in the file /etc/sysconfig/keyboard, which might look like this:
KEYBOARDTYPE="pc"
KEYTABLE="us"
If you are using the Fedora desktop during an X session, you can use the graphical interface to select a keyboard language. To open the keyboard configuration dialog box, click the desktop panel System Settings Keyboard menu item, or use the system-config-keyboard client at the command line of a terminal window, like so:
$ system-config-keyboard
After you press Enter, you will be prompted for the root password. Enter the password and click OK. You will then see the Keyboard dialog box shown in Figure 4.2. This dialog box is similar to that displayed by system-config-keyboard.
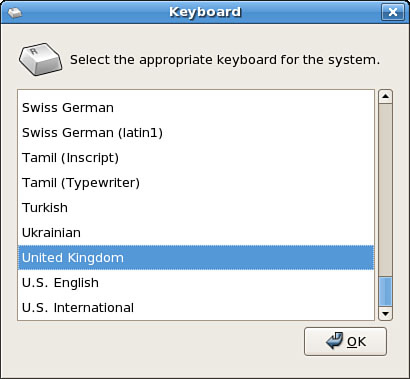
Scroll through the list of languages, highlight a language, and then click OK to save your change. Table 4.1 lists text-based and graphical commands you can use to manipulate or get information about your keyboard.
Table 4.1. Linux and X Keyboard-Related Commands
| Displays keyboard translation tables |
| Modifies current keyboard mode |
| Changes keypress delay, repeats |
| Loads new keyboard table |
| Prints character, keycode, and other keystroke information |
| Displays, changes keyboard light-emitting diode (LED) settings |
| Shows, sets keyboard character translations for X |
| Displays or saves X keyboard mappings |
| Modifies keyboard settings for X |
| Changes key mappings for X |
The X11 keyboard and other clients can be used to input a keyboard description into a running X server, show current keyboard character translations, change a keyboard map, and set other keyboard (and pointer) preferences. X11 settings are generally contained in a system’s xorg.conf file (see Chapter 6, “The X Window System,” for more information).
As a trivial example, the following short shell script (see Chapter 15 for more information on how to use shell scripts) can be used to blink the keyboard Caps Lock LED on and off each second (press Ctrl+C to stop the blinking) while using the console:
#!/bin/sh
while :
  do
   setleds -L +caps ; sleep 1 ; setleds -L -caps ; sleep 1;
done
Perhaps a more useful example is to switch the Caps Lock and Ctrl keys on your keyboard. Some users might find typing sessions a bit more comfortable if the locations are swapped. There are a number of ways to swap the keys. For your console-based sessions, use the loadkeys command to read in a file containing reverse key values for the keys:
keymaps 0-15
keycode 58 = Control
keycode 29 = Caps_Lock
You can then immediately swap the keys by using loadkeys to read in the file (perhaps named swapkeys) like so:
# loadkeys <swapkeys
The same swapping can be used for your Fedora desktop by editing your /etc/X11/xorg.conf file’s keyboard InputDevice section and adding
Option "XkbOptions" "ctrl:swapcaps"
Yet another way to get the same results is to create a file named .Xmodmap in your home directory that contains
remove Lock = Caps_Lock
remove Control = Control_L
keysym Control_L = Caps_Lock
keysym Caps_Lock = Control_L
add Lock = Caps_Lock
add Control = Control_L
Or you can save the settings in a file (such as mykeyswap) and use the xmodmap client to directly read in the new keys like so:
$ xmodmap mykeyswap
Note that this will only work if you use the xterm or rxvt terminal clients. See Chapter 6 for more information about the Fedora desktop.
Tip
The system-config-keyboard command will present its graphical interface if launched from the command line during a graphical desktop session (that is, while using the X Window System). However, you can force system-config-keyboard to use its text-based console interface by including the --text option on the command line like this:
# system-config-keyboard --text
This technique can also be used with the sndconfig command discussed later in this chapter. Using a console-based interface with one of these commands can be handy if you do not want the client to launch over a network after you have connected from a remote host.
This section introduces pointer device configuration for Fedora. You will see how to use the graphical gnome-mouse-properties client for configuring a mouse for your desktop.
Note
Many pointing devices, such as the IBM Trackpoint (found in several versions of IBM non-notebook keyboards) work fine with Fedora. However, if you use a trackball, joystick, or other devices such as the Synaptics TouchPad, the Cirque GlidePoint, and wireless or infrared (IrDA) pointers, you might need to experiment with different configuration settings or use a driver provided (hopefully) by the manufacturer.
Linux PC tablet users will have good reason to rejoice with the release of the Linux 2.6 series kernel. The new kernel will feature built-in touchscreen support and other improvements to make life easier when using Linux on a tablet PC. Compaq Tablet TC1000 users can browse to http://linux-tablet-pc.dhs.org/ for links to various drivers and supporting software. Some manufacturers provide direct links to Linux drivers or support reports. For example, Toshiba 3501 Tablet PC users can browse to http://linux.toshiba-dme.co.jp/linux/eng/pc/ptg3501_report.htm for additional information.
Starting from Fedora 6, there is no longer support for serial-based mice as they are considered to be obsolete. Most modern mice use the USB interface, although PS/2 mice are still quite common. Also, readers of previous editions might notice that mouseconfig and system-config-mouse have been totally removed from Fedora. This is because the hardware support is now so effective that these packages have been made redundant!
Fedora does include some support for joystick use through the jsattach, jscal, and jstest commands (installed from the joystick*.rpm package). You can use these commands to support, calibrate, and test certain joystick makes and models.
The Fedora installer will recognize and correctly configure a computer’s pointing device, but if you install a new pointing device, you will need to reconfigure the system for its use.
When using a PS/2 pointing device, a file named /dev/mouse will point to /dev/psaux; when using a USB pointing device, /dev/mouse will point to /dev/input/mice. The /dev/mouse file is a symbolic link, used for the convenience of many Linux applications. It is much more convenient for a program to look for /dev/mouse instead of /dev/input/mice or /dev/psaux.
USB service (most likely initially configured by the installer) is started during the boot process by an entry in the system’s module configuration file, /etc/modprobe.conf:
alias usb-controller usb-uhci
In this example, the PC platform uses a universal host controller interface (UHCI), and the uhci.o kernel module will be loaded from the /lib/modules/2.6-X/kernel/drivers/usb directory when Linux boots. Another USB controller commonly in use is the open host controller interface (OHCI), requiring loading of the ohci.o module to enable USB service.
If your pointing device does not work, you can use the dmesg command to see if Linux has recognized the device during the boot process. This can provide some diagnostic information because Linux or the driver (perhaps a module) usually outputs diagnostic information:
...
usb-uhci.c: USB UHCI at I/O 0xd800, IRQ 15
usb-uhci.c: Detected 2 ports
usb.c: new USB bus registered, assigned bus number 2
hub.c: USB hub found
hub.c: 2 ports detected
usb-uhci.c: v1.275:USB Universal Host Controller Interface driver
hub.c: USB new device connect on bus1/1, assigned device number 2
usb.c: USB device 2 (vend/prod 0x1241/0x1122) is not claimed by any
active driver.
usb.c: registered new driver hiddev
usb.c: registered new driver hid
input0: USB HID v1.00 Mouse [1241:1122] on usb1:2.0
hid-core.c: v1.8 Andreas Gal, Vojtech Pavlik <[email protected]>
hid-core.c: USB HID support drivers
mice: PS/2 mouse device common for all mice
...
In this example (your output might look different), the kernel has recognized a generic USB mouse. USB support is initially enabled by the usbcore.o kernel module. In this example, the USB controller interface is initialized and configured by loading the usb-uhci.o kernel module, and then additional modules, such as input.o and hid.o, will be loaded to support a mouse (and/or keyboard) USB device.
You can see what modules have been loaded by using the output of the lsmod command. Note that you might see different memory size values, depending on your computer and module version:
# lsmod
...
mousedev         4288 1
hid           18720 0 (unused)
input           3744 0 [mousedev hid]
usb-uhci         21636 0 (unused)
usbcore         59072 1 [hid usb-uhci]
As you can see, USB device support, especially for pointing devices, involves proper loading of a chain of modules rather than a single driver.
Tip
On booting or connection, every USB device reports a pair of numbers representing a vendor and associated product (model). Problems can arise if the vendor and product ID are not recognized by a pertinent Linux kernel module. If a device is not properly recognized, it might not work with Linux. It is sometimes possible to rebuild a USB kernel module and include your device’s vendor and product ID in order to get the device to work. For example, if you have installed the Linux kernel source, the file named scanner.h under the /usr/src/linux-2.6/drivers/usb directory contains many popular USB scanner vendor and product IDs that are used by the kernel’s scanner.o kernel module. See Chapter 40 for more information about rebuilding the Linux kernel and kernel modules. For a list of the latest USB devices supported with Linux, browse to http://www.qbik.ch/usb/devices/.
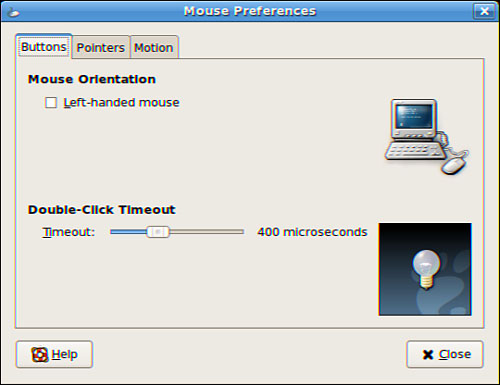
After Linux has recognized your hardware, you can use the gnome-mouse-properties command to configure a new pointer. Start the command like this:
$ gnome-mouse-properties
Tip
If Linux recognizes a two-button pointer, the three-button emulation is automatically selected. (A simultaneous depress of both buttons sends a middle-button click.)
Using a three-button mouse is essential for copy and paste operations—either at a text console or during X sessions. The left mouse button is most often used for clicking and selection, whereas the right mouse button is generally used for configuration or property display. The middle button is used for scrolling and pasting text or graphics.
After you press Enter, the Mouse Preferences dialog appears, as shown in Figure 4.3.
The configuration entry contained in the /etc/X11/xorg.conf and used by X.org for the Fedora desktop, looks like
Section "InputDevice"
    Identifier   "Mouse0"
    # Modified by mouseconfig
    Driver     "mouse"
    Option     "Device"        "/dev/mouse"
    Option     "Protocol"       "PS/2"
    Option     "Emulate3Buttons"    "yes"
    #Option    "ZAxisMapping"      "4 5"
EndSection
This entry enables the use of a USB pointing device during X sessions. See Chapter 6 to learn about X.
The ZAxisMapping entry (disabled in the preceding example) enables scrolling with a mouse that has a combination scroll-wheel and middle button. Many other types of input devices can be used with Linux and X.org. For information about using a mouse with X.org, read the file README.mouse under the /usr/X11R6/lib/X11/doc directory.
Mouse support for copy and paste operations during a Linux console session is provided by the General Purpose Mouse driver (gpm). gpm is a daemon, or software that runs in memory as a background process while you use Linux. If you make the appropriate configuration choices, the /etc/rc.d/init.d/gpm script starts the gpm daemon when Fedora boots. If you are not using X, you can configure Linux to start gpm when booting by using the ntsysv command from the console. Run the ntsysv command as root, like this:
# ntsysv
After you press Enter, you will see the Services dialog, as shown in Figure 4.4.

Scroll through the list of services using the Up or Down cursor keys to highlight the gpm service. Press the spacebar to toggle use of the service on (an asterisk appears between the brackets) or off (no asterisk). Press the Tab key to highlight the OK button and then press Enter to save your changes. The changes will take effect the next time you boot Fedora.
Note
You can use the chkconfig command or the system-config-services client to configure Linux to run the gpm daemon when you are working in console mode (but not during X Window System sessions). Use the chkconfig command like this:
# chkconfig --level 3 gpm on
# chkconfig --level 5 gpm off
See Chapter 15 to see how to configure when services run under Fedora.
When you add or change the graphics devices used in your system after the initial installation, you must configure those devices. Adding or changing the display for your system can be as simple as swapping out the monitor or replacing a display adapter. For Intel-based PCs, this can mean switching from the use of the motherboard’s built-in display adapter (if available)—by inserting a graphics card in the accelerated graphics port (AGP) or peripheral component interface (PCI) slot—or perhaps adding a second display adapter to support the use of multiple display monitors for X sessions.
Although a display monitor can be easily disconnected or reattached to a running system, insertion or removal of a graphics display adapter will require downtime—the bane of academic, enterprise, corporate, or small-business operations.
Your Fedora desktop is provided by the X Window System, a client and server software package that is configured to use your computer’s video card, monitor, keyboard, and mouse. If you use the graphical desktop and kudzu (discussed earlier in this chapter) and change your graphics card, monitor, keyboard, or mouse, you might be asked to remove existing hardware configuration and reconfigure the new equipment the next time you boot.
The details about configuring X.org for Linux are covered in Chapter 6, but the basic utility used to configure a new xorg.conf file is system-config-display, Fedora’s graphical X configuration tool. You can also use Xorg -configure, which can generate an xorg.conf file by probing installed hardware.
Note
Connecting and using an external monitor with a notebook can be convenient, especially if the external monitor provides a larger desktop than the notebook’s built-in display. However, configuring an external display for a notebook can sometimes be a problem when using X11. The notebook’s graphics chipset must be supported by an X.org driver module, and the module must enable switching or concurrent use of an external monitor. Fortunately, many notebook chipsets are supported, and some notebook manufacturers provide support information for configuring external displays. For example, if your notebook has a Neomagic chipset, use the internDisp and externDisp options in the notebook’s xorg.conf to enable use of an external display. Keep in mind that although Red Hat encourages and supports X.org development efforts, the X.Org Foundation LLC controls X.org development and X graphics support. See Chapter 6 for more information about Linux and X11.
Fortunately, creating a working xorg.conf file (found in the directory /etc/X11) is usually easily accomplished when installing Fedora. If a new video card or monitor is put in use before installation, it will most likely work because X.org supports many families and types of graphics chipsets. Although newer graphics chipsets might cause some display compatibility problems, it is usually possible to configure a basic working display using existing software. The X.Org Foundation and contributing developers do a great job of providing software that works with nearly every product on the market.
If you are experiencing X11 configuration problems during installation, skip the configuration. Various README files with specifics about a particular chipset are included with X.org and you should also check the X.Org Foundation website (see the “Reference” section at the end of this chapter) for any errata, changes, updates, or new releases.
Most workstation users want to have a configured sound card working with Linux. Sound support is generally configured when Linux first boots (or during the install process if the sound card is recognized). Fedora uses the Advanced Linux Sound Architecture (ALSA) to enable sound support on your workstation.
To use sound, you should then use ALSA’s alsamixer command to unmute your sound card’s channels and save the settings using the alsactl command:
# alsactl store 0
The state of your sound card will be saved in the file /etc/asound.state. These settings, such as channel volumes, can be retrieved later by using the restore option instead of store.
Note
You will find complete documentation about the Linux kernel’s sound support in various text files under the /usr/src/kernels/2.6.yourversionhere/Documentation/sound/alsa directory if you install the source code to Linux.
Configuration problems can arise, especially if your sound card’s manufacturer will not or cannot release specifications to help open source developers create working drivers. If your sound card is not recognized or is recognized but does not work, and using ALSA fails, you can turn to commercial sound drivers from 4Front Technologies. These relatively inexpensive drivers support more than 350 sound systems and are installed, configured, and controlled using shell scripts. Browse to http://www.opensound.com for more information.
Fedora also includes a Red Hat-derived graphical sound card configuration client that can be used during an X session. Start the system-config-soundcard client by clicking your desktop panel’s System Settings Soundcard Detection menu or item, or by using the command at a terminal window like so:
$ system-config-soundcard
After you press Enter, you are prompted for the root password. Enter the password and click OK. The system-config-soundcard tries to automatically detect and configure your sound card. You then see a dialog you can use to test your sound card settings, as shown in Figure 4.5. Click the play button to listen to a sample sound.

More than 38 million users in the United States and another 85 million users around the world now connect to the Internet with cable or DSL service, but for many users a modem is the standard way to connect with an Internet service provider (ISP) using the Point-to-Point Protocol (PPP). Other common tasks for modems include sending and receiving faxes. If you add or change your modem after the initial installation, you will need to configure Fedora to use the new modem to perform all these tasks.
Fedora includes several tools you can use to configure and use an internal or external modem in your notebook or PC. Chapter 18, “Network Connectivity,” contains the details about configuring Fedora to connect to the Internet using a modem. This section covers how to configure and use modems using serial ports (using a standard formerly known as RS232, but now called EIA232) or USB.
Linux uses /dev/ttySX, /dev/ttyUSBX, or /dev/usb/ttyUSBX for serial ports, where X can range from 0 to 15. Many additional ports can be added to a system using multiport cards or chained USB devices. A PC’s integral serial ports are generally recognized at boot time. To see a list of recognized ports for your system, pipe the dmesg command output through the fgrep command like so:
# dmesg | grep tty
ttyS00 at 0x03f8 (irq = 4) is a 16550A
ttyS01 at 0x02f8 (irq = 3) is a 16550A
In this example, the grep command reports that two serial ports have been recognized in the dmesg output. Note that the device matching ttyS00 is /dev/ttyS0, despite the kernel output. The PC’s external modem can be attached (most likely using a male DB9 adapter) to either port. Under Linux, nearly all modem-dependent software clients look for a symbolic link named /dev/modem that points to the desired device. This link is not created by default, but as root, you can create this device manually using the ln command like this:
# ln -s /dev/ttyS0 /dev/modem
In this example, /dev/modem will point to the first serial port.
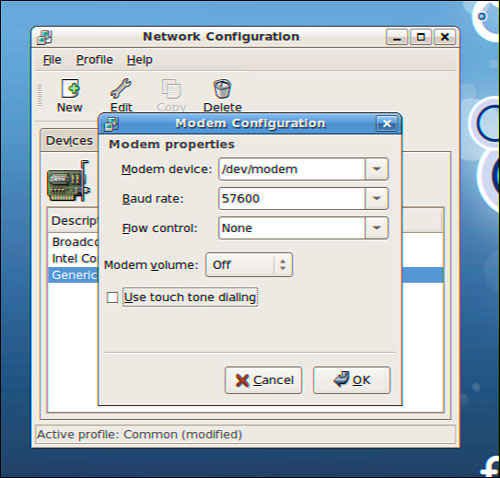
You can also use the graphical X client neat to configure a modem after the initial installation. Internet connection software such as Fedora’s system-config-network client (shown in Figure 4.6) will try to probe the system for an available modem. If a modem is not found, you can manually enter modem data.
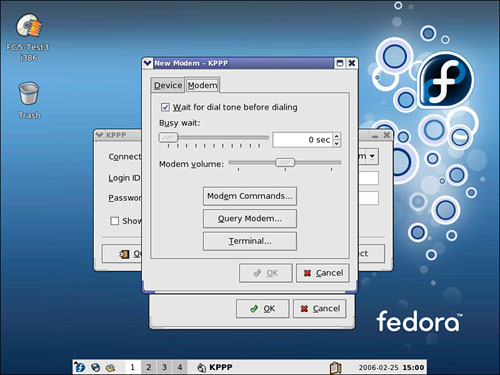
KDE provides the kppp client (shown in Figure 4.7) that can also be used to look for and set up a modem when you set up a new Point-to-Point Protocol (PPP) connection. Click the Query Modem button in kppp’s dialog to search for an installed modem.
Fedora includes command-line–based diagnostic and serial port configuration tools for the system administrator. For example, to get more information about a specific port, you can use the statserial command, along with a designated device like this:
# statserial /dev/ttyS0
Device: /dev/ttyS0

Signal Pin Pin Direction Status Full
Name   (25) (9) (computer)       Name
-----  ---  --- --------- ------ -----
FG      1    -    -         -    Frame Ground
TxD     2    3    out       -    Transmit Data
RxD     3    2    in        -    Receive Data
RTS     4    7    out       1    Request To Send
CTS     5    8    in        0    Clear To Send
DSR     6    6    in        0    Data Set Ready
GND     7    5    -         -    Signal Ground
DCD     8    1    in        0    Data Carrier Detect
DTR    20    4    out       1    Data Terminal Ready
RI     22    9    in        0    Ring Indicator
The sample output is a display of the associated device’s port signals. Another tool is the setserial command that can be used to display port statistics and reconfigure a serial port’s system interrupt or speed. This can be handy when using some serial devices, such as a cellular phone that requires specific serial port characteristics. To get information about a specific port, use setserial, along with the device name like this:
# setserial -a /dev/ttyS0
/dev/ttyS0, Line 0, UART: 16550A, Port: 0x03f8, IRQ: 4
    Baud_base: 115200, close_delay: 50, divisor: 0
    closing_wait: 3000
    Flags: spd_normal skip_test
In this example, the characteristics of /dev/ttyS0 are displayed. The setserial command can also be used to configure or fine-tune a port’s characteristics using 32 different command-line options and values.
One option for using a legacy serial device such as a modem on a PC that does not have a serial port but supports USB is to use a USB-to-serial converter. These devices provide a serial port dongle and plug in to a USB hub or port. You can see the output and designated serial port by looking at the output of the dmesg command:
usb.c: registered new driver serial
usbserial.c: USB Serial support registered for Generic
usbserial.c: USB Serial Driver core v1.4
usbserial.c: USB Serial support registered for Keyspan PDA
usbserial.c: Keyspan PDA converter detected
usbserial.c: Keyspan PDA converter now attached to ttyUSB0
(or usb/tts/0 for devfs)
usbserial.c: USB Serial support registered for Keyspan PDA - (prerenumeration)
usbserial.c: USB Serial support registered for Xircom PGS - (prerenumeration)
usbserial.c: USB Serial support registered for Entregra PGS - (prerenumeration)
keyspan_pda.c: USB Keyspan PDA Converter driver v1.1
Linux should recognize and configure a designated serial port (such as /dev/ttyUSBX in the example) when the device is plugged in. Fedora also comes with a number of fax utilities that can be used to configure a system to send or receive phone faxes. One of the easier-to-configure fax utilities is the fax command. As root, you can configure the software by editing a few entries in the /usr/bin/fax shell script:
DEV=modem
FROM="1 555 555-1212"
NAME="Company Name"
The most important entry is DEV=, which will not need to be changed as long as /dev/modem points to an active fax-capable modem. You can also edit /usr/bin/fax to customize other entries, such as the fax viewing command. Use the test command-line option to check the settings like this:
# fax test
Sending a fax using the fax command is straightforward:
# fax send 5551212 document.txt
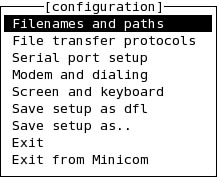
Use the minicom or xminicom script (used for launching minicom in a terminal window during an X session) for dial-up connections and terminal sessions to remote Linux systems. To configure this terminal program for use with an attached modem, start the client as root with its -s or setup option like this:
# minicom -s
After you press Enter, you will see a setup dialog. Select Serial-Port Configuration and press Enter. You will then see a Configuration Settings dialog as shown in Figure 4.8 that you can use to configure the program to work with an attached modem.
Other issues regarding modems focus on Linux notebook users with laptops using controllerless modems. These modems use proprietary software to emulate a hardware modem and are commonly referred to as WinModems due to the software being available only on Windows. Despite the release of binary-only drivers to enable use of some of these modems, these devices remain the bane of Linux notebook and some desktop users.
You might find some support for Lucent (but not Lucent AMR), Motorola SM56-type, the IBM Mwave, and Conexant HSF (not HCF) controllers. At the time of this writing, there was no support for any 3Com or U.S. Robotics controllerless modems. For links to drivers and more information, browse to the Linux Winmodem web page at http://www.linmodems.org.
Advanced Power Management (APM) enables workstations and servers to automatically turn off when instructed to shut down. Most often used by Linux mobile users, APM can help extend battery sessions through the use of intelligent storage-cell circuitry, CPU throttling (similar to, but not the same as safety thermal throttling incorporated by Intel in Pentium III and IV CPUs), and control of displays and hard drives.
Most PCs support APM via the BIOS and hardware. APM support is configured, enabled, and then incorporated in the Linux kernel.
APM information is constantly updated in the file /proc/apm, which can look like this:
# cat /proc/apm
1.14 1.2 0x03 0x01 0x03 0x09 100% 10800 sec
This example provides information such as battery charge, along with time and percentage of time remaining. From left to right in the example are the driver version, BIOS version, status, AC status, battery status, battery state, remaining battery life, and number of seconds of life remaining. Some X11 clients, such as the asapm, xapmload, or GKrellM clients, parse this file and display icons or graphical power LEDs to present the information in an easier-to-digest form. These clients can be especially helpful for notebook users.
APM is supported by all kernels included with Fedora. However, problematic hardware or APM misconfiguration can cause kernel panics with some hardware, resulting in the inability to boot Linux. When this happens, you must reconfigure APM, and then build and install a new Linux kernel. (See Chapter 40 for more information.)
Basic Linux kernel APM configuration options include
CONFIG_APM—. Whether or not to configure APM supportCONFIG_APM_IGNORE_USER_SUSPEND—. Ignores keyboard suspend instructionCONFIG_APM_DO_ENABLE—. Enables APM at bootCONFIG_APM_CPU_IDLE—. Idle CPU when not usedCONFIG_APM_DISPLAY_BLANK—. Enables monitor or LCD panel blankingCONFIG_APM_RTC_IS_GMT—. Determines clock settingCONFIG_APM_ALLOW_INTS—. Allows interrupts during APM use (such as serial-port activity)CONFIG_APM_REAL_MODE_POWER_OFF—. Enables powering down
Fedora includes several APM-related commands—such as apm that prints APM information and apmsleep, used to suspend and then awake notebook hardware at a specific time. Linux notebook users can use the apm command like this:
$ apm -v
APM BIOS 1.2 (kernel driver 1.16)
AC on-line, battery status high: 95%
Other power management incorporated in the kernel includes control of peripheral control interface (PCI) devices and display power management signaling (DPMS) for enabled monitors, which can help energy costs by placing devices in a low-power state after a preset time. Screen saving, as most astute Linux system administrators and users know, is no longer necessary to protect displays from image burn-in. And password protection enabled by the screensaver provides only a modicum of physical security.
Hardware health monitoring is supported by the lm_sensors software package, which acquired some notoriety when early versions allegedly caused IBM ThinkPad notebooks to suffer permanent damage. However, system administrators managing desktop PCs can benefit from using applications, such as the sensors command that takes advantage of the hardware monitoring features of the lm_sensors libraries.
You can customize the output of the sensors command by editing (as root) the /etc/sensors.conf file, but the default settings should work for your computer. To enable sensor reading, use the sensors-detect command to determine which kernel modules to load to enable sensor output:
# /usr/sbin/sensors-detect
This program will help you determine which I2C/SMBus modules you need to
load to use lm_sensors most effectively. You need to have i2c and
lm_sensors installed before running this program.
Also, you need to be `root', or at least have access to the /dev/i2c-*
files, for most things.
If you have patched your kernel and have some drivers built in, you can
safely answer NO if asked to load some modules. In this case, things may
seem a bit confusing, but they will still work.

It is generally safe and recommended to accept the default answers to all
questions, unless you know what you're doing.

We can start with probing for (PCI) I2C or SMBus adapters.
You do not need any special privileges for this.
Do you want to probe now? (YES/no):
Type YES and press Enter to begin the probe (do not if you have an IBM ThinkPad notebook; see http://www2.lm-sensors.nu/~lm78/cvs/browse.cgi/lm_sensors2/README.thinkpad for more information). The command will then begin a series of probes of your PC’s motherboard and report on found hardware. After you answer the prompts, the program will display one or more recommended command lines (and perhaps a new entry to /etc/modprobe.conf) to enable sensor reporting. For example,
modprobe i2c-isa
modprobe via686a
You can then use the sensors command’s -f option to view various component temperatures in Fahrenheit, like this:
$ sensors -f
via686a-isa-6000
Adapter: ISA adapter
Algorithm: ISA algorithm
2.0V:   +1.36 V (min = +1.79 V, max = +2.18 V)
2.5V:   +2.49 V (min = +2.24 V, max = +2.74 V)
I/O:    +3.28 V (min = +2.95 V, max = +3.62 V)
+5V:    +5.02 V (min = +4.47 V, max = +5.49 V)
+12V:   +11.62 V (min = +10.79 V, max = +13.18 V)
Case Fan: 2700 RPM (min = 48214 RPM, div = 2)
CPU Fan: 3497 RPM (min = 67500 RPM, div = 2)
SYS Temp: +98.8°F (limit = +295°F, hysteresis = -95°F)
CPU Temp: +98.8°F (limit = +295°F, hysteresis = -95°F)
SBr Temp: +79.3°F (limit = -74°F, hysteresis = -95°F)
Monitoring your system’s hardware can be critically important, especially if you overclock the central processing unit (CPU) in order to gain performance.
The Fedora installer will query you during installation for default time zone settings, and whether or not your computer’s hardware clock is set to Greenwich Mean Time (GMT)—more properly known as UTC or Coordinated Universal Time.
Linux provides a system date and time; your computer hardware provides a hardware clock-based time. In many cases, it is possible for the two times to drift apart. Linux system time is based on the number of seconds elapsed since January 1, 1970. Your computer’s hardware time depends on the type of clock chips installed on your PC’s motherboard, and many motherboard chipsets are notoriously subject to drift.
Keeping accurate time is not only important on a single workstation, but also critically important in a network environment. Backups, scheduled downtimes, and other network-wide actions need to be accurately coordinated.
Fedora provides several date and time utilities you can use at the command line or during an X session, including these:
date—. Used to display, set, or adjust the system date and time from the command linehwclock—. A root command to display, set, adjust, and synchronize hardware and system clockssystem-config-date—. Fedora’s graphical date, time, and network time configuration tool
Use the date command to display or set your Linux system time. This command requires you to use a specific sequence of numbers to represent the desired date and time. To see your Linux system’s idea of the current date and time, use the date command like this:
# date
Wed Jan 10 14:17:01 EDT 2005
To adjust your system’s time (say, to January 27, 2006 at 8 a.m.), use a command line with the month, day, hour, minute, and year, like so:
# date 012606002003
Fri Jan 27 08:00:00 EDT 2003
Use the hwclock command to display or set your Linux system time, display or set your PC’s hardware clock, or to synchronize the system and hardware times. To see your hardware date and time, use hwclock with its --show option like so:
# hwclock --show
Fri 27 Jan 2006 02:17:53 PM GMT -0.193809 seconds
Use hwclock with its --set and --date options to manually set the hardware clock like so:
# hwclock --set --date "01/27/06 08:00:00"
# hwclock --show
Tue 27 Jan 2006 08:00:08 AM GMT -0.151718 seconds
In these examples, the hardware clock has been set using hwclock, which is then used again to verify the new hardware date and time. You can also hwclock to set the Linux system date and time date using your hardware clock’s values with the Linux system date and time.
For example, to set the system time from your PC’s hardware clock, use the --hctosys option like so:
# hwclock --hctosys
To set your hardware clock using the system time, use the --systohc option like so:
# hwclock --systohc
Fedora’s graphical X tool named system-config-date can be used to set your system date and time. Start the client by clicking the desktop menu’s System Settings Date & Time menu item, or from the command line of an X11 terminal window like this:
$ system-config-date &
After you press Enter, you are asked to enter the root password. Type in the root password and click the OK button. You will then see a window, as shown in Figure 4.9.

Set the date and time by using the calendar and time fields. You can also have your workstation obtain updated date and time information via the network by entering a remote time server hostname in the Network Time Protocol field. This requires that the ntpd time daemon be properly configured and running.
Note
HTML documentation for using the ntpd daemon is in /usr/share/doc/ntp*/ntpd.htm (if ntpd is installed on your system).
Click the Time Zone tab to change or verify your system’s time zone. The current system time zone is designated by a file named localtime in the /etc directory, and is a copy of the pertinent time zone database file under the /usr/share/zoneinfo directory. For example,
$ ls -l /etc/localtime
-rw-r--r--    1 root    root         1267 Apr  1 16:39 /etc/localtime
$ ls -l /usr/share/zoneinfo/America/New_York
-rw-r--r--    5 root    root         1267 Mar 13 18:00
/usr/share/zoneinfo/_America/New_York
This file changes if you make a time zone change using system-config-date.
Mobile Linux users take advantage of notebook PCMCIA slots to add 70-pin, credit-card–sized devices to support ethernet LAN connectivity, wireless operations, FireWire devices, Compact Flash hard drives, external storage devices, serial ports, and modems. Many different types of PCMCIA cards and Compact Flash form-factor cards in a PCMCIA caddy are supported by the Linux kernel and David Hinds’ Card Services software.
Power is provided to PCMCIA devices and adapters directly through the card slot, although some external hardware might require an additional power source. PCMCIA support is enabled and configured at boot time. With the newer Linux kernels; however, support is provided by kernel modules or direct Linux kernel support.
The PCMCIA Card Services software provides diagnostic information by one or more high or low beeps upon card insertion. One high and one low beep indicate that a card is recognized, but failed to be configured. A single beep indicates that the card was only recognized. Two high beeps indicate that a card was recognized and configured.
For example, if you use a compact flash storage device and insert it into your notebook while using Fedora, you should hear two high beeps. You can then check to see what device has been assigned to the card by using the dmesg command:
$ dmesg
...
hde: SunDisk SDCFB-8, ATA DISK drive
ide2 at 0x100-0x107,0x10e on irq 3
ide-floppy driver 0.99.newide
hde: 15680 sectors (8 MB) w/1KiB Cache, CHS=245/2/32
 hde: hde1
...
Not all the output is shown here (and yours might look different), but this example shows that the card has been recognized and configured as the /dev/hde device (with a single partition, /dev/hde1). You can then use the device as any other storage medium (see Chapter 39, “Managing the File System,” for more information on using hard drives with Linux).
Other devices can be similarly recognized and configured. For example, if you have a combination ethernet and modem PCMCIA card and insert it into your notebook, you should hear two sets of high beeps (to indicate successful recognition and configuration of the network interface and modem). The Linux kernel will report the interface and device information:
$ dmesg
...
eth0: NE2000 (DL10019 rev 05): io 0x300, irq 3, hw_addr 00:E0:98:06:84:C5
ttyS04 at port 0x0af8 (irq = 3) is a 16450
..
Here, the network interface has been recognized as eth0 (see Chapter 18, “Network Connectivity,” to see how to connect to a network). The modem is configured to use /dev/ttyS04.
Again, troubleshooting problems with PCMCIA cards can be difficult, especially with the explosion in popularity and type of 802.11b/g wireless networking cards. Such troubleshooting is likely to require downloading, building, and installing new drivers.
Fortunately, however, nearly all serial, modem, and Compact Flash storage cards are easily recognized and configured. Many Ethernet cards are also supported. To check on the current support status for many cards, read the file SUPPORTED.CARDS. You will find a copy under the /usr/share/doc/kernel-pcmcia-cs-3.X.XX/ directory (where X.XX is the version of the package) if you install the pcmciautils RPM package.
Note
If you have trouble configuring and using a PCMCIA card, browse to the Linux PCMCIA home page at http://kernel.org/pub/linux/utils/kernel/pcmcia/pcmcia.html/. Click the known problems link to see whether other users with the same card are having problems, or if the card is not fully supported. If a new version of the PCMCIA kernel drivers is available and changes have been made to your card’s drivers (or if a new driver has been developed), download and install the newer software. See Chapter 40 for information on installing the new PCMCIA modules, or follow the directions included with the PCMCIA software.
Although PCMCIA cards can be inserted or removed while using Fedora, be careful when using these cards. For example, do not remove a network card while connected to a remote computer. Do not pull a compact flash card or other storage media card (such as an IBM microdrive) while the card’s filesystem is mounted and in use—you could corrupt the media’s filesystem and experience loss of data.
You can control a PCMCIA device from the command line, and insert and remove the card without physically removing and then inserting the card. Use the cardctl command to control PCMCIA service to one or more card slots on your notebook or desktop PC with a PCMCIA adapter. The cardctl command is used to get and print information about an inserted card, suspend or resume power to a card, reset a card, perform a software insertion or removal, or configure a card according to a particular, predefined scheme (such as using a network in the office or at home). The format of the command is cardctl command slot_number (such as 0 or 1).
For example, if you have inserted a compact flash card, eject the card (after unmounting its filesystem) using the cardctl command and its eject option, along with the card’s slot number like this:
# cardctl eject 0
This can save power when running a notebook. When the card is needed again, you can subsequently “insert” the card like so:
# cardctl insert 0
Linux provides support for using a variety of CD and DVD devices and media. This section shows how to determine what device has been assigned to your CD drive and how to get additional drive information if the drive supports recording on optical media.
AT Attachment Packet Interface, or ATAPI, IDE-based CD drives, are recognized during installation and work through the ide-cd kernel module. A symbolic link named /dev/cdrom will be created and will point to your CD’s device (perhaps /dev/hdb or /dev/hdc). You can use many different types of CD drives with Linux, and you can easily replace, add, or upgrade your system to use a new drive. Part of a successful configuration involves the proper installation of the hardware and being able to determine the drive’s device when using Linux.
Linux recognizes CD and DVD drives upon booting if they are attached to your computer’s motherboard with proper cabling and if they are assigned as either a master or slave on an IDE channel. Look through your kernel boot message for the drive device assignment, such as
hdd: DVDROM 10X, ATAPI CD/DVD-ROM drive
If you have a DVD-capable drive, you generally should also have a symbolic link named /dev/dvd that points to your drive’s device because many DVD clients, such as xine or vlc, look for /dev/dvd by default. If you have a CD-RW drive, the Fedora installer inserts a kernel argument into your boot loader’s configuration file that specifies use of the ide-scsi kernel. For example,
append="hdb=ide-scsi"
A similar entry in the grub boot loader’s /etc/grub.conf file would look like this:
kernel boot/vmlinuz-6.5-1.358 ro root=/dev/hda2 hdb=ide-scsi
The first CD-RW drive is assigned to the device /dev/scd0 (although it might still be initially recognized while booting as an IDE device), with subsequent drives assigned to /dev/scd1, and so on. To initialize your drive for use, the following modules should be loaded:
Module        Size Used by Not tainted
sg          30244 0 (autoclean)
sr_mod        15192 0 (autoclean)
cdrom        27872 0 (autoclean) [sr_mod]
ide-scsi       8128 0
scsi_mod       96572 2 [sr_mod ide-scsi]
Look for kernel message output regarding the device such as this:
Attached scsi CD-ROM sr0 at scsi0, channel 0, id 0, lun 0
sr0: scsi3-mmc drive: 0x/32x writer cd/rw xa/form2 cdda tray
Uniform CD-ROM driver Revision: 3.12
Your ATAPI-based CD-RW drive will then work as a SCSI device under emulation, and the symbolic link /dev/cdrom should point to /dev/scd0. You can also use the cdrecord command (included with Red Hat’s multimedia software packages) to acquire SCSI device information about your drive for later use during a burn operation like this:
# cdrecord -scanbus
Cdrecord 1.10 (i686-pc-linux-gnu) Copyright (C) 1995-2001 Jörg Schilling
Linux sg driver version: 3.1.22
Using libscg version 'schily-0.5'
scsibus0:
    0,0,0 0) 'HL-DT-ST' 'RW/DVD GCC-4120B' '2.01' Removable CD-ROM
    0,1,0 1) *
    0,2,0 2) *
    0,3,0 3) *
    0,4,0 4) *
    0,5,0 5) *
    0,6,0 6) *
    0,7,0 7) *
The pertinent information—0,0,0 in the example (SCSI bus, device ID, and Logical Unit Number, or lun)—can then be used during a burn operation like this:
# cdrecord -v speed=8 dev=0,0,0 -data -eject file_name.img
In this example, a CD-ROM data image named file_name.img is created on a CD-R or CD-RW media at a speed of 8, and the new disk will be ejected after the write operation has completed. See “Burning CDs in Fedora” in Chapter 10, “Multimedia Applications,” for other ways to create CD-ROMs.
This section provides some basic information you can use if you attach a FireWire CD drive to your system. These drives use a high-speed serial interface, otherwise known as IEEE 1394, which supports data transfers more than 30 times faster than the first version of USB (at speeds up to 400Mbps), although USB 2.0 devices are a bit faster.
Linux has supported FireWire since the advent of the 2.4-series kernel, and now works with many different devices, such as video cameras, VCRs, hard drives, scanners, PCMCIA cards, and CD, DVD, or CD-RW drives. The Fedora installer should recognize most FireWire interface hardware; if so, you will be able to use the device with Linux. One Linux FireWire component, the video1394 kernel module, currently supports more than 120 different digital video cameras. General support exists for many different hard drives and DVD or CD-RW drives.
If you install a FireWire interface after Fedora has been installed, you can initialize support for your device, such as a CD-RW drive, by loading the ieee1394 and ohci1394 kernel modules like this:
# insmod ieee1394
# insmod ohci1394
Next, look for relevant device information from the Linux kernel using the dmesg command:
ohci1394: $Revision: 1.80 $ Ben Collins <[email protected]>
PCI: Found IRQ 10 for device 00:0b.0
PCI: Sharing IRQ 10 with 00:07.5
ohci1394_0: OHCI-1394 1.0 (PCI): IRQ=[10] MMIO=[ee000000-ee000800]
 Max Packet=[2048]
ieee1394: Device added: node 2:1023, GUID 00d0010500007d8e
ieee1394: sbp2: Driver forced to serialize I/O (serialize_io = 1)
ieee1394: sbp2: Node 2:1023: Max speed [S400] - Max payload [2048]
scsi1 : IEEE-1394 SBP-2 protocol driver
 Vendor: TEAC Model: CD-W28E Rev: 1.1A
 Type: CD-ROM ANSI SCSI revision: 02
In this example, the FireWire drivers have recognized a CD-RW drive (which will be assigned to /dev/scd1 because another CD-RW is also present on the system). You might also find that the sbp2 kernel module has loaded:
Module        Size Used by Not tainted
sbp2         14400 0
ohci1394       15872 0 (unused)
ieee1394       25768 0 [sbp2 ohci1394]
Note
Fedora’s installer should recognize any FireWire hardware in your PC during installation. Depending on your computer’s hardware, you might find an entry in /etc/modprobe.conf such as alias ieee1394-controller ohci1394.
Again, use the cdrecord command and its -scanbus option to obtain information needed to use the drive under SCSI emulation:
# cdrecord -scanbus
Cdrecord 1.10 (i686-pc-linux-gnu) Copyright (C) 1995-2001 Jörg Schilling
Linux sg driver version: 3.1.22
Using libscg version 'schily-0.5'
scsibus0:
    0,0,0  0) 'HL-DT-ST' 'RW/DVD GCC-4120B' '2.01' Removable CD-ROM
    0,1,0  1) *
    0,2,0  2) *
    0,3,0  3) *
    0,4,0  4) *
    0,5,0 5)  *
    0,6,0  6) *
    0,7,0  7) *
scsibus1:
    1,0,0 100) 'TEAC  ' 'CD-W28E    ' '1.1A' Removable CD-ROM
    1,1,0 101) *
    1,2,0 102) *
    1,3,0 103) *
    1,4,0 104) *
    1,5,0 105) *
    1,6,0 106) *
    1,7,0 107) *
The pertinent information for the FireWire drive—1,0,0 in the example (a drive attached to SCSI bus 1, assigned device 0 and a lun of 0)—can then be used during a read operation like this:
# export CDDA_DEVICE=1,0,0
# cdda2wav -B
Type: ROM, Vendor 'TEAC  ' Model 'CD-W28E     ' Revision '1.1A' MMC+CDDA
724992 bytes buffer memory requested, 4 buffers, 75 sectors
#Cdda2wav version 1.10_linux_2.4.17-0.13smp_i686_i686 real time sched.
soundcard support
AUDIOtrack pre-emphasis copy-permitted tracktype channels
  1- 8       no       no   audio  2
Table of Contents: total tracks:8, (total time 52:12.72)
 1.( 5:25.67), 2.( 9:06.65), 3.( 5:50.68), 4.( 5:35.57), 5.( 7:28.35)
 6.( 6:34.60), 7.( 6:07.15), 8.( 6:01.05),

Table of Contents: starting sectors
 1.(    0), 2.( 24442), 3.( 65457), 4.( 91775), 5.( 116957)
 6.( 150592), 7.( 180202), 8.( 207742), lead-out( 234822)
CDINDEX discid: SBRXDC1u_.D2S6U1MWq7ksIYOUE-
CDDB discid: 0x5e0c3a08
CD-Text: not detected
CD-Extra: not detected
samplefile size will be 552301388 bytes.
recording 3130.09600 seconds stereo with 16 bits @ 44100.0 Hz ->'audio'...
percent_done:
100% track 1 successfully recorded
100% track 2 successfully recorded
...
In this example, an environment variable named CDDA_DEVICE with the drive’s SCSI information is created, and the cdda2wav command is used to extract the entire contents of an audio CD into .wav file format, with each track saved in a separate file. Other utilities might only need to know the name of the device, such as /dev/scd1, like this:
# cdparanoia -d /dev/scd1 -B
cdparanoia III release 9.8 (March 23, 2001)
(C) 2001 Monty <[email protected]> and Xiphophorus

Report bugs to [email protected]
http://www.xiph.org/paranoia/

    Couldn't disable kernel command translation layer
Ripping from sector    0 (track 1 [0:00.00])
     to sector 234821 (track 8 [6:01.04])

outputting to track01.cdda.wav
...
Note
Fedora also includes the cdrdao command, which can create Disk-At-Once (DAO) audio and data CD-ROMs. Other types of CD recording supported by Linux drivers and various CD drives include Track-At-Once and Session-At-Once, which turn the drive’s laser on and off during various stages of the recording process.
In this example, the CD-RW device name is used, and again, all tracks from an audio CD will be extracted and saved as .wav audio files. Other graphical clients, such as xine, grip, and xcdroast, are included with Fedora and can be used to create or copy audio and data CDs. See Chapter 10 for more details on burning CDs.
Wireless networking used to be a pig to configure for Linux, requiring a lot of complicated steps in order to connect to a wireless network. However, Fedora 5 includes a great utility called NetworkManager that makes connecting to and managing wireless networks extremely easy. Thanks to the inclusion of several wireless chipset drivers in the Fedora Linux kernel, it is now very easy to connect to WEP and WPA encrypted wireless networks.
If you have an Intel Centrino-based system then you need to retrieve the latest firmware from http://ipw2200.sourceforge.net, unpack it and copy the contents of the file to /lib/firmware. For Broadcom-based wireless systems, you need to retrieve the fwcutter program to extract the firmware from the relevant driver file. Head on over to http://tinyurl.com/eemyd for full instructions on where to retrieve the driver files and also how to use fwcutter. When you have extracted the firmware, you need to place it in the /lib/firmware directory. After you have a set of firmware files in place, you need to activate NetworkManager in system-config-services as well as NetworkManager Dispatcher.
When these are activated, nm-applet will appear in the notification area of your top panel (see Figure 4.10). This is the applet that handles and monitors network connections.
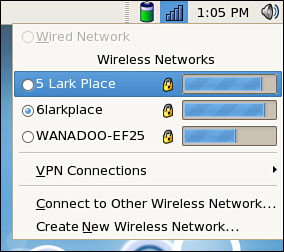
It is worthwhile rebooting at this point so that Fedora can detect the presence of the firmware. When you have logged back in, click the nm-applet icon in the toolbar to connect to a wireless network. If your wireless access point broadcasts its SSID, it should appear in the list under wireless networks (similar to Figure 4.10). Simply click on the required network and NetworkManager will sense what encryption (if any) is in use and ask you for the passkey. Enter this and Network Manager will start the wireless connection. The passkey will then be stored in the default keyring, so if you have not yet used the keyring, you are asked to create a password. From now on, whenever you log in to Fedora, you will be asked for the key to unlock the keyring.
If for some reason your wireless network does not appear (you might have your SSID hidden), you will have to use the Connect to Other Wireless Network option, which brings up the screen shown in Figure 4.11.
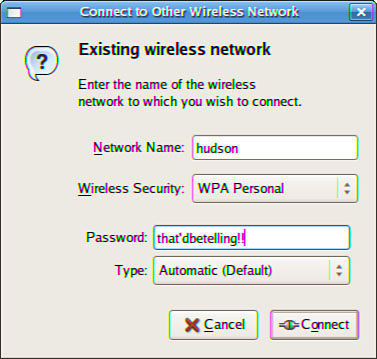
NetworkManager can handle WEP and WPA encryption. You are advised to use WPA encryption as it is the stronger of the two.
NetworkManager can also connect to Cisco VPN connections, using the vpnc software. Install this using yum and you will be able to specify connection settings as appropriate, or if you have access to a pre-defined configuration (.pcf file) you can import it directly into NetworkManager.
The Linux Keyboard and Console HOWTO—Andries Brouwer’s tome on keyboard and console issues; includes many troubleshooting tips.
http://www.avocent.com/Cybex/PublicW2.nsf/gwMain?OpenFrameset—Product details for a KVM switch running Linux.
http://www.luv.asn.au/overheads/virtualconsoles.html—Using virtual consoles with Linux.
http://www.synaptics.com/products/touchpad.cfm—Information about TouchPad pointing devices.
http://www.compass.com/synaptics/—A site for a Linux TouchPad driver.
http://www.x.org/—The X.Org Foundation, home of X11R7.
http://www.alsa-project.org—The home page for the Advanced Linux Sound Architecture project, an alternative set of sound drivers for Linux
http://www.opensound.com—Commercial sound drivers for Linux.
/usr/src/linux-2.6/Documentation/power/pci.txt—Patrick Mochel’s document regarding PCI power-management routes for Linux kernel and PCI hardware support programmers.
http://www.tldp.org/pub/Linux/docs/HOWTO/Modem-HOWTO—One of the newest HOWTOs on using modems with Linux.
http://www.tldp.org/pub/Linux/docs/HOWTO/Serial-HOWTO—David S. Lawyer’s Serial HOWTO, with additional information about Linux and serial port use.
http://www2.lm-sensors.nu/~lm78/cvs/lm_sensors2/doc/FAQ—Information regarding the lm-sensors software for Linux.
http://pcmcia-cs.sourceforge.net/—A source for the latest PCMCIA drivers for Linux.
http://www.camiresearch.com/Data_Com_Basics/RS232_standard.html—A description and tutorial on the EIA232 (formerly RS232) standard.
http://www.qbik.ch/usb/devices/—The place to check for compatibility of USB devices for Linux.
http://www.linmodems.org—This site provides links to several drivers for controllerless modem use under Linux.
http://www.linux1394.org/—The home page for the Linux IEEE 1394 project with new information, links to updated drivers, and lists of compatible chipsets and devices.
http://www.faqchest.com/—The FAQchest, a searchable archive of FAQ’s HOWTOs and mailing lists; an alternative to http://marc.theaimsgroup.com/.
http://groups.google.com/—Search Usenet groups through Google; another alternative to http://marc.theaimsgroup.com/.
http://www.linuxquestions.org/—The Linux Questions site; a useful set of community forums that can help you find answers to your more frustrating problems.
http://www.fokus.gmd.de/research/cc/glone/employees/joerg.schilling/private/_cdrecord.html—The home page for the cdrecord command and related utilities.
http://arstechnica.com/guide/building/bios/bios-1.html—An excellent discussion of BIOS options at ArsTechnica.
http://www.linuxnetmag.com/en/issue5/m5devs1.html—A brief article on how to make use of the information found in devices.txt.