
Using PowerPoint Task Panes
PowerPoint 2002 introduces a new user interface tool—the task pane. PowerPoint has eight main task panes that are readily accessible, as well as several others that appear only under certain conditions (such as the Revisions pane for reviewing and collaborating). These task panes are
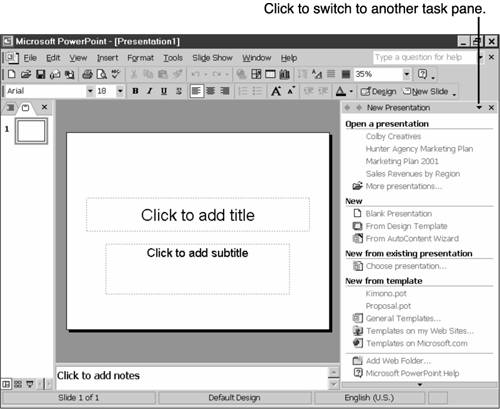
New Presentation Enables you to create a new presentation in a variety of ways or open an existing presentation. Choose File, New from the menu bar to open this task pane, seen in Figure 1.8.
Figure 1.8. The New Presentation task pane is one of many new task panes in PowerPoint 2002.
→ To learn how to use the New Presentation task pane, see Chapter 2.
Clipboard Offers the ability to collect and paste up to 24 different items. Choose Edit, Clipboard from the menu bar to open this task pane.
Search Provides both basic and advanced search capability on both your own computer and a network. Choose File, Search from the menu bar to open this task pane.
Insert Clip Art Displays search functionality for locating clip art images as well as links to the Clip Organizer. Choose Insert, Picture, Clip Art from the menu bar to open this task pane.
→ For more information about using clip art and the Media Gallery, see Chapter 13, “Working with Media Clips and the Clip Organizer.”
Slide Layout Enables you to apply up to 31 different layouts, each with its own additional design flexibility. Choose Format, Slide Layout from the menu bar or click the New Slide button on the Formatting toolbar to open this task pane.
Slide Design Offers three sections of design functionality: Design Templates, Color Schemes, and Animation Schemes. Choose Format, Slide Design from the menu bar or click the Design button on the Formatting toolbar to open this task pane.
→ For more information about slide layouts and design, see Chapter 2.
Custom Animation Enables you to apply sophisticated animations to your slides or objects on your slides. Choose Slide Show, Custom Animation from the menu bar to open this task pane.
Slide Transition Offers the ability to apply animated transitions as you move from slide to slide. Choose Slide Show, Slide Transition from the menu bar to open this task pane.
→ For more information about the Custom Animation and Slide Transition task panes, see Chapter 15.
You can also choose View, Task Pane from the menu bar to open the task pane. The most recently viewed pane opens, but you can easily change to a different task pane. To do so, click the down arrow on the upper-right side of the task pane to open a menu of all available panes.
The upper-left corner of the task pane contains back and forward arrows that you can click to go back to the previously viewed task panes in the order in which you opened them and forward again. To close a task pane, click the Close button in the upper-right corner or choose View, Task Pane again.
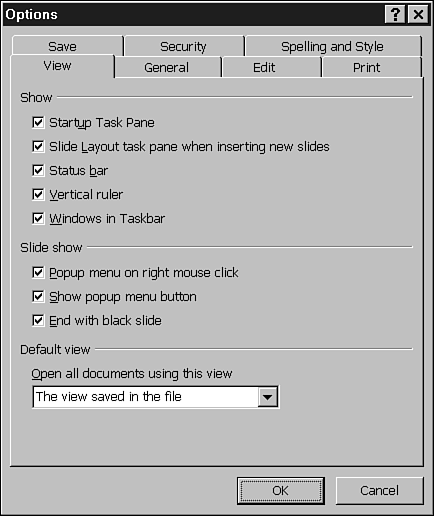
To customize when task panes appear, choose Tools, Options and go to the View tab of the Options dialog box (see Figure 1.9).
Remove the check mark by the Startup Task Pane check box if you don't want a task pane to appear upon startup. Remove the check mark by the Slide Layout Task Pane When Inserting New Slides check box if you don't want the Slide Layout task pane to open when you click the New Slide button.
You can also resize the task pane if you want to make it horizontally bigger or smaller. To do so, pause the mouse pointer over the left edge of the pane until the pointer displays as a two-headed arrow. Click the mouse and drag the left edge to either the left or right, depending on whether you want to increase or decrease the amount of screen space the task pane occupies.
Figure 1.9. Customize how to display task panes in PowerPoint.
Using the Clipboard Task Pane
The Clipboard task pane is new to PowerPoint 2002 and is shared with other Office XP applications such as Word and Excel. This collect-and-paste feature enables you to copy multiple items and then paste them selectively, rather than simply copying and pasting a single item. In Office XP, you can collect up to 24 items—text, objects, graphics, documents, Web pages, and so forth—and then selectively paste these as needed. The Clipboard task pane enables you to view and manage the 24 items you have most recently copied. To open this task pane, choose Edit, Office Clipboard. If you already have a task pane open, click the down arrow in the upper-right corner and choose Clipboard from the menu that appears. Figure 1.10 illustrates this task pane.
Click an item on the Clipboard task pane to paste it on the current slide (where the cursor is active). On this task pane you also can
Click the Paste All button to paste all collected objects into the open presentation or document.
Click the Clear All button to delete all collected items from the Clipboard.
Right-click on a selected item and choose Delete from the menu that appears to delete the individual item only.
Click the Options button for four additional options:
Show Office Clipboard Automatically Automatically displays the Clipboard when you copy or cut an object.
Figure 1.10. You can easily manage and share information using the Clipboard task pane.

Collect Without Showing Office Clipboard Enables you to copy and cut text and objects without displaying the Clipboard.
Show Office Clipboard Icon on Taskbar Displays a Clipboard icon on the taskbar in the lower-right corner of your screen when the Clipboard task pane is open.
Show Status Near Taskbar When Copying Displays the Clipboard's status (such as 6 of 24 collected) next to the Clipboard icon in the taskbar when you copy text or an object.
Using the Search Task Pane
Sometimes you won't be able immediately to find a presentation you want to open. You might have so many saved presentations that it's difficult to find files whose names you've forgotten. Or you might have saved the file you're looking for in another folder and can't locate it. Using the Search task pane, you can conduct sophisticated searches based on text found in a particular presentation, as well as on specific presentation properties, to help you find the exact file you need. Basic Search is the default PowerPoint task pane, but you can click the Advanced Search hyperlink on this task pane to open the Advanced Search pane, where you can do more detailed searches based on file properties.
Performing a Basic Search
To open the Search task pane, choose File, Search from the menu bar. If you already have a task pane open, click the down arrow in the upper-right corner and choose Search from the menu that appears. The Basic Search task pane opens by default (see Figure 1.11).
Figure 1.11. To search for specific text in a presentation, use the Basic Search task pane.

To perform a basic search, follow these steps:
Enter the specific text you want to search for in the Search Text field. This can be any text included in the presentation you want to find.
In the Search In field, select the folder or folders you want to search from the drop-down list. These can be folders on your computer, on a connected network drive, or on a Web folder. To expand a folder, click the plus (+) sign; to collapse it, click the minus (-) sign. When you find the folder you want, place a check mark in the box that precedes it.
Tip from
If you have no idea where the file is located, choose Everywhere to search in all locations. Be aware, however, that it takes longer to search all folders rather than to focus on specific folders.
Select the type of files to look for in the Results Should Be drop-down list. Options include a variety of Office file types (PowerPoint, Word, or Excel files, for example) or Web pages.
Tip from
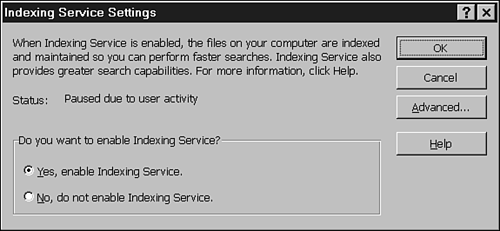
If you want to enable PowerPoint's Indexing Service, click the Search Options hyperlink to open the Indexing Service Settings dialog box (see Figure 1.12). Enabling Indexing Service directs PowerPoint to index your files when your computer is idle so that searches are faster and more accurate. If Fast Search isn't installed, you'll first need to click the Install hyperlink to install it before you can see the Search Options hyperlink.
Figure 1.12. Indexing speeds up searching a large collection of files.
Click the Search button to begin the search process. PowerPoint finds matching presentations and displays them in the task pane, which is renamed Search Results (see Figure 1.13).
Figure 1.13. PowerPoint displays the results of your search.

Note
For additional options, click the down arrow next to the selected file. From the menu that appears, you can edit the file, create a new file from this file, copy the link to the Clipboard, or view the file's properties.
Click the Stop button to stop a search in progress. Click Modify to return to the Basic Search task pane.
Performing an Advanced Search
If you want to search on specific presentation properties, you'll need to use the Advanced Search task pane. These properties align to the information you see in the Properties dialog box. To access Advanced Search functionality, click the Advanced Search hyperlink at the bottom of the Basic Search task pane. Figure 1.14 illustrates the Advanced Search task pane.
Figure 1.14. You can search on the properties in the Advanced Search task pane.

→ If you want to know the exact definition of each file property, see “Setting Presentation Properties” in Chapter 21.
Table 1.2 lists all the properties you can search on the Advanced Search task pane as well as the conditions available for each, which fall into three main categories: text, numbers, and dates.
Depending on your selection in the Condition field, the Value field may activate. For example, if you search the Last Printed property and choose Yesterday as your condition, no further value is required. However, if you search the Title property and select Includes Words as the condition, you have to enter a value to indicate the exact words to include.
As another example, let's say you want to find a specific presentation whose filename you've forgotten. You do remember, however, that you created the presentation sometime last week. To find this file, you could search the Creation Date property for the Last Week condition. Based on this information, you can locate all presentations created within the past week, which should narrow your search considerably.
To use the Advanced Search task pane, follow these steps:
Select a property from the drop-down list.
Select a condition from the available choices for the chosen property.
If required, enter a value that matches the criterion for which you're searching.
Click the Add button to add this criterion to the search list.
Continue adding search criteria as needed. As you add criteria, choose either the And or Or option button to specify whether the search should look for this criterion and other specified criteria or whether it should look for this criterion or other specified criteria.
Note
To remove a search, select it in the list and click Remove. To remove all searches, click Remove All.
Continue with steps 2 through 5 described in “Performing a Basic Search,” earlier in this chapter.
Understanding PowerPoint Views
PowerPoint 2002 includes three different views. A view is a way you see and work with the software; which one you use depends on what you're doing at any particular time. To display a particular view, click its View button in the lower-left portion of the PowerPoint window.
PowerPoint's three views are
Normal view This is the default view and displays three panes: the Normal View pane, which includes the Outline and Slides tabs, the slide pane in the center, and the notes pane beneath it. Figure 1.15 illustrates Normal view.
Note that your screen might also display a task pane. This is a separate pane and isn't connected to your choice of view. If you have a task pane open, it will appear in both Normal view and Slide Sorter view, but it won't appear if you present a slideshow.
The three Normal view panes are
The slide pane, which is the largest of the three panes. You can add text, graphics, tables, charts, and other objects to your presentation on the slide pane.
Figure 1.15. Normal view is PowerPoint's default viewing option.

The Normal View pane, on the left side of the screen. This pane offers an Outline tab, which displays an outline of your presentation, including the initial text of each slide. It also offers a Slides tab, which displays a thumbnail of your slides. You can use this pane to rearrange and organize slides or to move to another slide. On the Outline tab you can also enter content. Note that when you click the Outline tab, text labels are displayed (Outline and Slides). When you click the Slides tab, an icon appears as a label.
The notes pane includes space for you to write speaker's notes or notes to yourself about your presentation.
You can easily resize the panes in Normal view. To do so, drag the border between panes to a new location. If you want to hide the Normal View pane, click its Close button. You can always reopen it later by choosing View, Normal (Restore Panes).
→ For suggestions on creating effective speaker's notes, see “Creating Notes and Handouts” in Chapter 10, “Creating and Printing Presentation Materials.”
Note
You can also use the scrollbar on the right side of the slide pane to navigate between presentation slides. The Page Up and Page Down keys also enable you to navigate.
Slide Sorter view This view, shown in Figure 1.16, displays miniature previews of all the slides in your presentation, making it easier for you to organize them.
→ To learn how to use this view, see “Using the Slide Sorter View” in Chapter 6, “Formatting Slides and Presentations.”
Slide Show view Slide Show view displays your slides as they would appear in a slideshow, full-screen without any PowerPoint menus, toolbars, or other features. Figure 1.17 illustrates this view.
Figure 1.16. Seeing miniature versions of your slides can help you rearrange them.
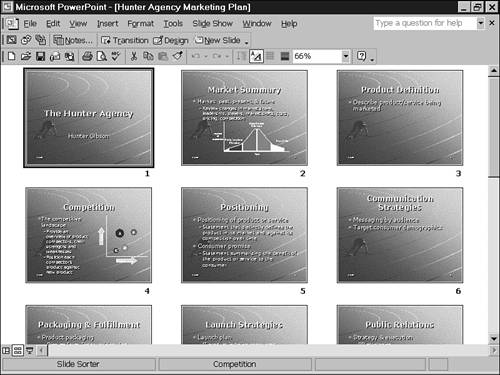
Figure 1.17. Slide Show view demonstrates how your presentation will look when you present it.

→ For details on viewing slideshows, see Chapter 9, “Presenting a Slideshow.”
PowerPoint's default view is Normal view with the Outline tab selected. If you want to change this, choose Tools, Options and go to the View tab on the Options dialog box, as shown in Figure 1.18.
Figure 1.18. You can alter PowerPoint's defaults in the Options dialog box.

On this tab, you can specify your default view from the Open All Documents Using This View drop-down list.