
Checking Spelling and Style
Creating a quality presentation that is error free and easy to read is a natural objective when you use PowerPoint, and PowerPoint's spelling and style checkers can offer some assistance in this area. Keep in mind that, although these automated tools can help you catch errors, they aren't foolproof and don't take the place of thorough proofreading by a real person. To set options for spelling and style checks, select Tools, Options and go to the Spelling and Style tab. Figure 3.12 illustrates this tab.
You can choose any of the following spelling options:
Check Spelling as You Type Underlines each suspected spelling error as you type it.
Hide All Spelling Errors Doesn't display red underlining for suspected spelling errors.
Always Suggest Corrections Suggests possible correct spelling options.
Ignore Words in UPPERCASE Skips any word that is all uppercase in the spell-check process.
Ignore Words with Numbers Skips any word that includes a number in the spell-check process.
Figure 3.12. You can designate several spell-checking options in PowerPoint.

Setting Style Options
If you also want to check style, select the Check Style check box and click the Style Options button. This opens the Style Options dialog box, shown in Figure 3.13.
Figure 3.13. Setting default case and punctuation helps give a more consistent look to your presentation.

Note
The style checker uses the Office Assistant to check style. If the Office Assistant isn't enabled, PowerPoint prompts you to do so.
Caution
Although having PowerPoint search for potential style errors can help you find mistakes you wouldn't otherwise notice, be careful to look closely at the changes it suggests rather than just automatically accepting all style changes. Sometimes automation can yield unusual and unwanted results.
On the Case and End Punctuation tab, you can select the default case and end punctuation styles for your presentation slide titles and body text. Options include the capability to
Set Slide Title Style to Sentence case, lowercase, UPPERCASE, or Title Case (the default).
Set Body Text Style to Sentence case (the default), lowercase, UPPERCASE, Title Case, or Consistent case. Sentence case is your best choice for regular body text because it's the most readable.
Set Slide Title Punctuation to either Paragraphs Have Punctuation (the default) or Paragraphs Do Not Have Punctuation.
Set Body Punctuation to Paragraphs Have Punctuation, Paragraphs Do Not Have Punctuation, or Paragraphs Have Consistent Punctuation (the default, which ensures that your punctuation choices match). For example, a bulleted list in a well-designed presentation shouldn't have a mixture of periods and no periods at the end of the bulleted text; it should be consistent.
Select the check boxes next to all options for which you want PowerPoint to search and choose the option from the drop-down list.
Tip from
If you want to place a character other than a period at the end of the slide title or body text, enter the appropriate character in the Slide Title or Body Text edit box. For example, you might want to use a colon instead of a period in some cases. In that case, PowerPoint would look for the colon instead of the period.
Note
If you've enabled another language, such as Japanese, additional grammar options may appear for that language.
→ To learn more about foreign language options, seeAppendix B, “Using PowerPoint's Foreign Language Capabilities.”
On the Visual Clarity tab, you can view and revise the existing defaults for font clarity and presentation legibility.
On this tab you can set the
Maximum number of fonts
Minimum point size for title text
Minimum point size for body text
Maximum number of bullets
Maximum number of lines per title and per bullet
The Visual Clarity tab already includes default selections for these options that are based on basic design principles, but you can change any settings in the adjacent drop-down lists. When you run PowerPoint's spelling checker, it looks for violations of these constraints.
Caution
Even though you can change these defaults to suit your needs, consider carefully before doing so. Exceeding the recommended number of fonts and bullets and changing to overly small or overly large fonts can make your presentation difficult to read.
If you make changes to the settings on the Style Options dialog box and want to go back to PowerPoint's defaults, click the Defaults button.
Running a Spelling and Style Check
After you've set the spelling and style options you want, you can check your presentation.
If you set the option to have PowerPoint check spelling as you type, you know immediately when you've possibly misspelled a word. PowerPoint underlines all suspected misspellings, as shown in Figure 3.14.
You can either fix the error yourself or right-click to see some suggested alternatives from which to choose. Figure 3.14 illustrates some suggestions.
PowerPoint missing some of your spelling or style errors? See “Checking Spelling and Style” in the “Troubleshooting” section near the end of this chapter.
You can also spell-check your entire presentation all at once. To do so, follow these steps:
When PowerPoint encounters an error, it displays the Spelling dialog box, shown in Figure 3.15.
The Not in Dictionary field highlights the misspelled word, and the Change To field suggests the most likely alternative. The Suggestions box also provides additional alternatives.
Figure 3.14. When you right-click an underscored spelling error, PowerPoint offers suggested spellings.
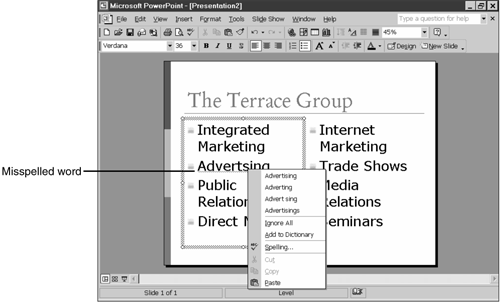
Figure 3.15. The Spelling dialog box offers several options for handling potential misspellings.

Select the correct spelling or enter it manually in the Change To field.
The Spelling dialog box also includes several buttons that provide other options:
Ignore Ignores the misspelling and continues checking spelling.
Ignore All Ignores all instances of the misspelling in the presentation and continues checking spelling.
Change Changes the individual misspelled word to the spelling offered in the Change To field.
Change All Changes all instances of the misspelled word to the spelling offered in the Change To field.
Add Adds the suspect word to the custom dictionary as a correctly spelled word.
AutoCorrect Adds the misspelled word and its corrected version to the AutoCorrect list.
→ To learn more about AutoCorrect, see “Setting AutoCorrect Options” in Chapter 21.
Tip from
To make further modification to your custom dictionaries, go to Microsoft Word and choose Tools, Options from the menu bar. On the Spelling and Grammar tab of the Options dialog box, click the Custom Dictionaries button. The Custom Dictionaries dialog box opens, from which you can make additional modifications to your custom dictionaries.
You'll find custom dictionaries stored as text files in one of three locations, depending on your operating system and configuration: C:Windows_folder Application Data Microsoft Proof, C:Windows_folder ProfilesUser_name Application Data Microsoft Proof, or C:Windows_folder ProfilesUser_name.
Note
PowerPoint also targets unknown words as spelling errors, such as a person's name, a company name, or a product. Be sure to check carefully for these and add the names and words you commonly use in presentations to the dictionary.
When PowerPoint finishes checking spelling, it informs you with another dialog box.