Using Bullets
Creating a bulleted list of text is a very common PowerPoint task. If you use the AutoContent Wizard, your presentation probably already contains a slide with text formatted as a bulleted list. You can add a bulleted list to any slide that contains text, as well as within a table.
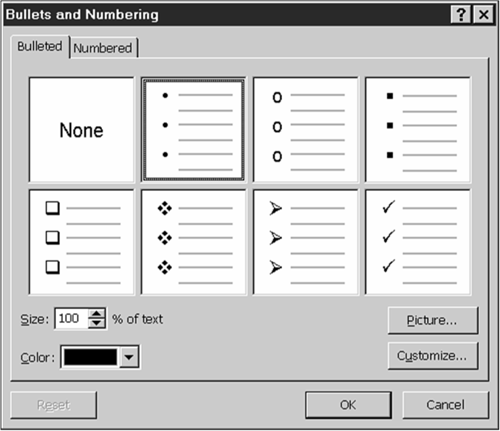
![]() To change a numbered list or other text to a bulleted list, select the text and click the Bullets button on the Formatting toolbar. The default style for bullets comes from the design template applied to the presentation. You can change this if you want, however. To do so, select the bulleted list that you want to change and choose Format, Bullets and Numbering. Figure 3.8 shows the Bullets and Numbering dialog box that appears.
To change a numbered list or other text to a bulleted list, select the text and click the Bullets button on the Formatting toolbar. The default style for bullets comes from the design template applied to the presentation. You can change this if you want, however. To do so, select the bulleted list that you want to change and choose Format, Bullets and Numbering. Figure 3.8 shows the Bullets and Numbering dialog box that appears.
Figure 3.8. You can choose from many different bullet types.

On the Bulleted tab of this dialog box, you can choose from the seven bullet styles displayed, or you can choose None to remove bullets. In the Size field, you can scroll to enlarge or reduce the bullet size from the default 100%.
To change the color of a bullet, select a new color from the Color drop-down list. For additional color choices, click More Colors to open the Colors dialog box.
→ To learn more about the Colors dialog box, see“Using the Colors Dialog Box” in Chapter 14.
→ To change the bullets in your entire presentation, do so on the master slide; see“Modifying the Slide Master” in Chapter 21.
You can also create picture or character bullets, if none of the seven default bullet styles suits your needs.
Creating Picture Bullets
To apply a picture bullet, click the Picture button to open the Picture Bullet dialog box, which enables you to choose from a wide variety of more creative bullet styles.
Select your desired bullet from those that appear or enter a keyword in the text box and click Search to locate matching bullets. Click OK to apply. Figure 3.9 shows a presentation that uses picture bullets.
Figure 3.9. A picture bullet can enhance a creative presentation.

Tip from
To import your own picture bullets (maybe a logo or something you already use on a Web site or other company literature), click the Import button to open the Add Clips to Organizer dialog box.
Creating Character Bullets
You can choose a character bullet for your bulleted list if you want something a little different. In the Symbol dialog box you can choose from a variety of fonts. Each font displays its character set, from which you can choose a new character bullet.
To apply a character bullet, click the Customize button in the Bullets and Numbering dialog box to open the Symbol dialog box, shown in Figure 3.10.
Select a font from the Font drop-down list, choose the bullet you want from the display area, and click OK. To speed up your insert process, you can view and choose from character bullets you've recently applied to a bullet list from the Recently Used Symbols section.
Figure 3.10. Use a font like Wingdings for character bullets.

Note
You can select a color and size for your character bullet in the Bullets and Numbering dialog box.
