Aligning Objects
You can align objects in much the same way that you align text. Select the objects you want to align, click the Draw button on the Drawing toolbar, choose Align or Distribute from the menu, and then select one of the following menu options:
Align Center Aligns selected objects horizontally by their center.
Align Middle Aligns selected objects vertically based on their middle point.
Distribute Horizontally Aligns three or more selected objects horizontally across the slide.
Distribute Vertically Aligns three or more selected objects vertically across the slide.
Relative to Slide Aligns selected objects relative to the slide, rather than the other objects. For example, if you choose Relative to Slide and Align Left, all objects align to the left of the slide itself, rather than to the object that is farthest to the left.
Nudging Objects
If you want to move an object only incrementally, you can nudge it. To do this, select the object you want to nudge, click the Draw button on the Drawing toolbar, choose Nudge, and then select one of the following directions: Up, Down, Left, or Right. You might need to nudge an object several times to achieve the desired results. The advantage to nudging is that you can control very small movements, which is difficult to do if you move an object with the mouse.
Tip from
Alternatively, you can also select an object and use the arrow keys to nudge the object in the direction of the arrow.
Snapping to a Grid or Shape
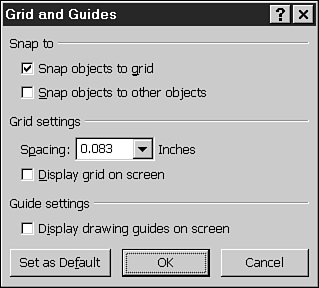
When you align or move objects, the objects snap to an invisible grid, which guides their positioning. This helps you more precisely align and position objects in your presentation, creating a more polished and professional look. If you want to use other objects as a positioning guide, you can snap to shapes. To choose these options, click the Draw button on the Drawing toolbar and choose Grid and Guides to open the Grid and Guides dialog box (see Figure 14.30).
Figure 14.30. Snap objects to a grid or another object.

In this dialog box, you can choose to snap objects to either a grid or other objects. You can also indicate the spacing of your grid in inches (from 1/24th of an inch to two inches).
Select the Display Grid on Screen check box to activate the grid. You'll see checkerboard-style squares on your screen in the spacing width you specified, which will help you position your objects. Although the grid appears onscreen, it doesn't appear in print or during an actual presentation.
Another option is to use adjustable drawing guides by selecting the Display Drawing Guides on Screen check box. This will place one adjustable vertical line and one adjustable horizontal line on your screen, which you can drag to position where you want them. These, too, are invisible in print or during a presentation.
To set these options as your default, click the Set as Default button. Click OK to close the Grid and Guides dialog box.
