
Developing Delegate Controls
Delegate controls provide a superior way of control replacement or substitution based on ControlID and a Sequence number. By using delegate controls, you can replace existing controls on a page with your own controls without customizing or modifying the page markup code. The delegate controls are enclosed in SharePoint:DelegateControl tag. If you examine the contents of the v4.master page (out of the box SharePoint 2010 master page) and search for this tag, you would notice that controls such as Top Navigation’s Data Source, Search box, and so on are delegate controls, which means that you can easily replace them with your own custom controls.
For example, let’s replace the links on the top navigation panel based on a custom site map provider, by using delegate controls, as shown in Figure 5.6.
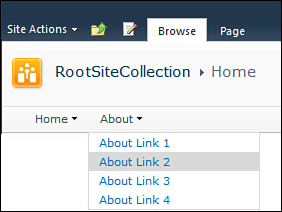
Figure 5.6. Using delegate controls to replace SiteMapProvider for top navigation
The v4.master page contains the following definition for the top navigation panel:
<SharePoint:DelegateControl runat="server"
ControlId="TopNavigationDataSource" Id="topNavigationDelegate">
<Template_Controls>
<asp:SiteMapDataSource
ShowStartingNode="False"
SiteMapProvider="SPNavigationProvider"
id="topSiteMap"
runat="server"
StartingNodeUrl="sid:1002"/>
</Template_Controls>
</SharePoint:DelegateControl>
As you can see, the contents of the top navigation panel are based on a SiteMapDataSource and SPNavigationProvider. Also, make note of the delegate control’s ID (that is, TopNavigationDataSource) and data source’s ID (that is, topSiteMap). You will need these to replace the out of the box data source of the top navigation with your custom data source. Let’s create a custom site map provider and replace that with the out of the box navigation provider. To do that, create an Empty SharePoint project in Visual Studio and add a custom.sitemap file containing your navigation links, as shown here:
<?xml version="1.0" encoding="utf-8" ?>
<siteMap xmlns="http://schemas.microsoft.com/AspNet/SiteMap-File-1.0" >
<siteMapNode roles ="*">
<siteMapNode title="Home" roles ="*">
<siteMapNode url="dummy1" title="Home Link 1" roles ="*"/>
<siteMapNode url="dummy2" title="Home Link 2" roles ="*" />
<siteMapNode url="dummy3" title="Home Link 3" roles ="*">
</siteMapNode>
</siteMapNode>
<siteMapNode title="About" roles ="*">
<siteMapNode url="dummy4" title="About Link 1" roles ="*"/>
<siteMapNode url="dummy5" title="About Link 2" roles ="*" />
<siteMapNode url="dummy6" title="About Link 3" roles ="*" />
<siteMapNode url="dummy7" title="About Link 4" roles ="*" />
</siteMapNode>
</siteMapNode>
</siteMap>
You want this file to be deployed to the TEMPLATE/LAYOUTS folder under the SharePoint root, so make sure that you add this file under the SharePoint mapped Layouts folder in the project.
Next add an Empty Element into the project and insert the following contents into the Elements.xml file:
<?xml version="1.0" encoding="utf-8"?>
<Elements xmlns="http://schemas.microsoft.com/sharepoint/">
<Control
Id="TopNavigationDataSource"
Sequence="1"
ControlClass="System.Web.UI.WebControls.SiteMapDataSource"
ControlAssembly="System.Web,
version=2.0.3600.0, Culture=neutral,
PublicKeyToken=b03f5f7f11d50a3a">
<Property Name="ID">topSiteMap</Property>
<Property Name="SiteMapProvider">CustomSiteMapProvider</Property>
<Property Name="ShowStartingNode">true</Property>
</Control>
</Elements>
In the preceding XML fragment, the Id attribute specifies the control ID of the out of the box top navigation’s data source (we made note of this earlier). The sequence value of 1 ensures that the navigation provider overrides the out of the box navigation provider. (A lower value implies higher precedence.) The ControlClass and ControlAssembly attribute indicate that the control being defined is of type SiteMapDataSource, which is defined in the System.Web assembly. The last three Property elements define our custom site map provider and indicate that the starting node should be visible.
Add the following entry into your web application’s web.config to register the Custom Sitemap Provider:
<add name="CustomSiteMapProvider"
siteMapFile="_layouts/DelegateControlDemo/custom.sitemap"
type="Microsoft.SharePoint.Navigation.SPXmlContentMapProvider,
Microsoft.SharePoint, Version=14.0.0.0, Culture=neutral,
PublicKeyToken=71e9bce111e9429c" />
Manual modifications to the web.config should generally be avoided, as these may get deleted with the installation of Service Packs. SharePoint provides a way to edit the web.config programmatically as well using the SPWebConfigModifications class. Modifications done using this class are persisted in the configuration database. This is discussed more in Hour 7, “Understanding SharePoint 2010 Server Side Development,” while exploring SharePoint server side development.
Validate the correctness of the SiteMapFile attribute, which should point to the custom.sitemap file, containing the navigation links.
Further, rename the Feature element in the project to DelegateControlDemoFeature so that you can easily identify the feature later on when examining the feature list.
Deploy the solution, and as always, Visual Studio by default activates the associated feature, which is DelegateControlDemoFeature. Verify that after the successful feature activation (which happens as a part of deployment), the links in the top navigation appear as specified in your custom.sitemap file. If you deactivate the feature DelegateControlDemoFeature the sitemap data source should automatically default to the out of the box one.