In the last few chapters, you've been learning how to build and present slide shows that support you as you speak to your audience directly When you build such presentations, you design each slide to assist you, not duplicate your efforts. Slides designed for a live presentation typically do not contain a lot of detail; they function as pointers and reminders for the much more detailed live discussion or lecture taking place in the foreground.
When you build a self-running or user-interactive presentation, the focus is exactly the opposite. The slides are going out there all alone and must be capable of projecting the entire message all by themselves. Therefore, you want to create slides that contain much more information.
Another consideration is audience interest. When you speak to your audience live, the primary focus is on you and your words. The slides assist you, but the audience watches and listens primarily to you. Therefore, to keep the audience interested, you have to be interesting. If the slides are interesting, that's a nice bonus. With a self-running or user-interactive presentation, on the other hand, each slide must be fascinating. The animations and transitions that you learned about in Chapter 18 come in very handy in creating interest, as do sounds and videos, discussed in Chapters 16 and 17.
Note
Another name for a self-running presentation is a kiosk presentation. This name comes from the fact that many self-running informational presentations are located in little buildings, or kiosks, in public areas such as malls and convention centers.
Letting the audience take control can be scary. If you aren't forcing people to go at a certain pace and view all the slides, what's to guarantee that they don't skim through quickly or quit halfway through?
Well, there are no guarantees. Even in a show with a live speaker, though, you can't control whether people pay attention. The best you can do is put together a compelling presentation and hope that people want to view it. The same applies to a user-interactive presentation. People are either going to watch and absorb it or they're not. There's no point in treating the audience like children. On the contrary, they will likely respond much better if you give them the options and let them decide what content they need.
Navigational controls are the main thing that separates user-interactive presentations from normal ones. You have to provide an idiot-proof way for people to move from slide to slide. Okay, technically yes, they could use the same navigational controls that you use when presenting a show (see Chapter 20), but those controls aren't always obvious. Moving forward is a no-brainer (click the mouse), but what about moving backward? Would you have guessed "P" for Previous if you hadn't already known? Probably not. And what if they want to end the show early? The first half of this chapter shows you various techniques for creating navigational controls.
Here are some ideas for ways to use navigational controls:
Web resource listings. Include a slide that lists Web page addresses that users can visit for more information about various topics covered in your presentation. You can also include Web cross-references throughout the presentation at the bottom of pertinent slides.
Product information. Create a basic presentation that describes your products, with For More Information buttons for each product. Then create hidden slides with the detailed information about each product and hyperlink those slides to the For More Information buttons. Don't forget to put a Return button on each hidden slide so that users can easily return to the main presentation.
Access to custom shows. If you have created custom shows, set up action buttons or hyperlinks that jump the users to them on request.
Quizzes. Create a presentation with a series of multiple-choice questions. Create custom action buttons for each answer. Depending on which answer the user clicks, set it up to jump to either a "Congratulations, you're right!" slide or a "Sorry, try again" slide. From each, include a Return button to go on with the quiz.
Troubleshooting information. Ask the user a series of questions and include action buttons or hyperlinks for the answers. Set them up to jump to the slides that further narrow down the problem based on their answers until they finally arrive at a slide that explains the exact problem and proposes a solution.
Directories. Include a company directory with e-mail hyperlinks for various people or departments so that anyone reading the presentation can easily make contact.
Besides navigational controls, the other big consideration with a user-interactive show is distribution. How will you distribute the presentation to your audience? Some of the methods you've already learned about in this book will serve you well here, such as packaging a presentation on CD (Chapter 20). Or you may choose instead to set up a user kiosk in a public location, e-mail the presentation file to others, or make it available on the Web.
All navigational controls that you create on slides are, at their core, hyperlinks. You're probably familiar with these already from using the Web; they're underlined bits of text or specially enabled graphics that take you to a different site or page that you clicked. In the case of your PowerPoint presentation, the hyperlinks take users to the next or previous slide, a hidden slide, a custom slide show, or perhaps some external source such as a Web site or data file.
Even though they are all hyperlinks (so they all work the same underneath), the various types of navigational controls can look very different on the surface. You can have "bare" hyperlinks where the actual address appears, hyperlinks where the text is different from the address, action button graphics, or graphics you create or import yourself. In addition, a navigational control can have pop-up helper text in a ScreenTip. figure 21.1 shows several types of navigational controls on a sample slide.
Note
Most people associate the word hyperlink with the Internet. However, a hyperlink is simply a link to somewhere else; it does not necessarily refer to an Internet location. You can hyperlink to another slide in the same presentation, for example, or to a different presentation, or even to some unrelated data file in another application like Word or Excel.
Notice the directions at the bottom of figure 21.1. This is necessary because it's not obvious that the graphic is a hyperlink, and users would not normally think to try clicking on it. Notice also the ScreenTip associated with the second text hyperlink. This is useful because the text itself does not provide the address, and the user may want to know the address before clicking the hyperlink. For example, if the PC does not have Internet access, the user would not want to click a hyperlink that points to a Web page.
The action buttons in the bottom-right corner in figure 21.1 are typical of the action buttons that PowerPoint creates. They are just AutoShapes with pre-assigned action settings for On Click. You can create your own, but the preset ones are awfully handy.

Before you dive into building an interactive presentation, you must decide how the audience will navigate from slide to slide. There is no one best way; the right decision depends on the audiences comfort level with computers and hyperlinks.
Consider these points:
Is the audience technically savvy enough to know that they should press a key or click the mouse to advance the slide, or do you need to provide that instruction?
Does your audience understand that the arrow action buttons mean Forward and Back, or do you need to explain that?
Does your audience understand hyperlinks and Web addresses? If they see underlined text, will they know that they can click it to jump elsewhere?
Is it enough to include some instructions on a slide at the beginning of the show, or do you need to repeat the instructions on every slide?
Think about your audiences needs and come up with a plan. Here are some sample plans:
For a beginner level audience: Begin the presentation with an instructional slide explaining how to navigate. Place action buttons in the same place on each slide (using the Slide Master) to help them move backward and forward and include a Help button that they can click to get more detailed instructions.
For an intermediate level audience: Place action buttons on the same place on each slide, along with a brief note on the first slide explaining their presence.
For an advanced audience: Include other action buttons on the slide that allow the user to jump around freely in the presentation — go to the beginning, to the end, to a certain section, and so on. Advanced users understand and can take advantage of a more sophisticated navigation system.
In the next few sections, I show you how to create all of the types of navigational controls shown in figure 21.1.
Now that you know that hyperlinks are the key to user interactivity, you will want to add some to your presentation. You can start with text-based hyperlinks because they're the easiest. You can add them either bare or with explanatory text.
The most basic kind of hyperlink is an Internet address, typed directly into a text box. When you enter text in any of the following formats, PowerPoint automatically converts it to a hyperlink:
You do not have to do anything special to create these hyperlinks; when you type them and press Enter or the space bar, PowerPoint converts them to hyperlinks. You know the conversion has taken place because the text becomes underlined and a different color. (The exact color depends on the color scheme in use.)
figure 21.2 shows some examples of these bare hyperlinks. I call them bare because you see what's underneath them — the actual address — right there on the surface. There is no friendly "click here" text that the link hides behind. For example, the text [email protected] is a hyperlink that sends e-mail to that address. In contrast, a link that reads "Click here to send e-mail to me" and contains the same hyperlink address is not bare, because you do not see the address directly.
Note
If PowerPoint does not automatically create hyperlinks, the feature may be disabled. Choose Office
Note
If stands for File Transfer Protocol. It's a method of transferring files via the Internet. Up until a few years ago, FTP was a totally separate system from the Web, but nowadays, most Web browsers have FTP download capabilities built-in, so anyone who has a Web browser can receive files via FTP. However, to send files via FTP, the user must have a separate FTP program.

A "friendly" hyperlink is a hyperlink comprising text but not just the bare address. For example, in figure 21.1, "Customer Satisfaction Surveys" is a text hyperlink. ("Friendly" is not an industry-standard technical term; it's just one I find convenient for discussion in this book.)
You can select already-entered text and make it a hyperlink, or you can enter new text. Either way, follow these steps:
Note
These steps take you through the process generically; see the sections in "Choosing the Hyperlink Address" later in the chapter for specific information about various kinds of hyperlinks you can create.
To use existing text, select the text or its text box. Otherwise, just position the insertion point where you want the hyperlink.
On the Insert tab, click Hyperlink, or press Ctrl+K. The Insert Hyperlink dialog box opens as shown in figure 21.3.
In the Text to Display field, type or edit the hyperlink text. This text is what appears underlined on the slide. Any text you've selected appears in this field by default; changing the text here changes it on your slide as well.
Enter the hyperlink or select it from one of the available lists. (See the following section, "Choosing the Hyperlink Address," to learn about your options in this regard.)
(Optional) The default ScreenTip for a hyperlink is its address (URL) or the file path if it is a file stored on a local disk. If you want the ScreenTip to show something different when the user points the mouse at the hyperlink, click the ScreenTip button and enter the text for the ScreenTip. See figure 21.4.
Warning
Internet Explorer supports ScreenTips (in version 4.0 and higher), but other browsers may not. This is not an issue if you plan to distribute the presentation in PowerPoint format, but if you plan to convert it to Web pages (see Chapter 22), it might make a difference.
Click OK to close the Set Hyperlink ScreenTip dialog box.
Click OK to accept the newly created hyperlink.


Tip
Ideally the combination of the hyperlink text and the ScreenTip should provide both the actual address and some friendly explanation of it. If the bare address appears as the hyperlink text, use friendly text describing the link location as the ScreenTip. If the friendly text appears as the hyperlink text, use the actual address as the ScreenTip.
The options in step 4 for selecting the address were purposely glossed over because this is a rather complex topic. The various options are shown in the next section.
You can use the Insert Hyperlink dialog box to create a hyperlink to any address that's accessible via the computer where the presentation will run. Although many people think of a hyperlink as an Internet address, it can actually be a link to any file, application, Internet location, or slide.
Warning
A hyperlink will not work if the person viewing the presentation does not have access to the needed files and programs or does not have the needed Internet or network connectivity. A hyperlink that works fine on your own PC might not work after the presentation has been transferred to the user's PC.
Possible addresses to hyperlink include the following:
Other slides in the current presentation
Slides in other presentations (if you provide access to those presentations)
Documents created in other applications (if the user has those applications installed and those document files are available)
Graphic files (if the user has access to an application that can display them)
Internet Web pages (if the user has an Internet connection and a Web browser)
E-mail addresses (if the user has an Internet connection and an e-mail program)
FTP site addresses (if the user has an Internet connection and a Web browser or an FTP program)
The most common kind of link is to another slide in the same presentation. There are many uses for this link type; for example, you can hide several backup slides that contain extra information. You can then create hyperlinks on certain key slides that allow the users to jump to one of those hidden slides to peruse the extra facts. To create a hyperlink to another slide:
Start the hyperlink normally (on the Insert tab, click Hyperlink).
In the Insert Hyperlink dialog box, click Place in This Document. The dialog box controls change to show a list of the slides in the presentation (see figure 21.5).
Select the slide or custom show that you want.
Click OK.

Tip
If you are choosing a custom show and you want the presentation to continue from the original spot after showing this custom show, mark the Show and Return check box (see figure 21-5). This check box is not available for individual slides. For an individual slide, put a Return action button on it to return to the previously viewed slide. See the section "Creating Your Own Action Buttons" later in this chapter.
If you want to link to a Web or FTP site, as you learned earlier in the chapter, you can simply type the address directly into any text box. Alternatively, you can use the Insert Hyperlink command to create the link.
When the Insert Hyperlink dialog box is open, if you don't know the address you want to refer to, you can browse for it. Here's how:
Leaving the Insert Hyperlink dialog box open, switch out of PowerPoint and back to Windows.
Open a Web browser and navigate to the page to which you want to refer.
Switch back to PowerPoint. The address is filled in for you in the Address box.
Continue creating the hyperlink normally.
Tip
You can also copy and paste a URL into the Address box, or choose a page from the Browsed Pages list.
You can also create a hyperlink to any file available on your PC's hard disk or on your local area network. This can be a PowerPoint file or a data file for any other program, such as a Word document or an Excel spreadsheet. Or, if you don't want to open a particular data file, you can hyperlink to the program file itself, so that the other application simply opens.
For example, perhaps you have some detailed documentation for your product in Adobe Acrobat format (PDF). This type of document requires the Adobe Acrobat Reader. So you can create a hyperlink with the text "Click here to read the documentation" and link to the appropriate PDF file. When your audience member clicks that link, Adobe Acrobat Reader opens and the documentation displays.
Warning
Remember that not everyone has the same applications installed that you do. For example, although Adobe Acrobat Reader is free, many people don't have it installed yet. You might want to add another hyperlink or button to your slide that users can click to download a free viewer for that application's data from the Web if needed.
To link to a data file, start the hyperlink normally (on the Insert tab, click Hyperlink) and click Existing File or Web Page if that is not already selected. Then do one of the following:
Click Current Folder to display a file management interface from which you can select any folder or drive on your system. You can open the Look In list and choose Computer to start from the top level of your drives/folders structure, and then navigate to the location containing the file and select it. See figure 21.6.
Click Recent Files to display a list of the files you have recently opened on your PC (all types), and click the file you want from the list.
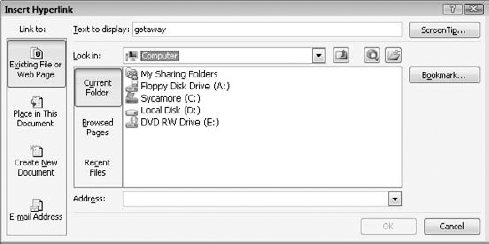
Figure 21.6. You can browse files on your hard disk by choosing Current Folder, and then setting Look In to Computer.
Complete the hyperlink normally from that point. You are not limited to only the folder on your local drives if you choose Current Folder; you can open the Look In list and choose My Network Places to browse the network. However, make sure that the PC on which the presentation will be displayed will also have access to this same location.
Perhaps you want the audience to be able to create a new document by clicking a hyperlink. For example, perhaps you would like them to be able to provide information about their experience with your Customer Service department. One way to do this is to let them create a new document using a program that they have on their system, such as a word processor.
Warning
Keep in mind that not everyone will have the same applications you do. A new document hyperlink will not work if the user does not have an appropriate application for creating that file type.
To create a link to a new document, start the hyperlink normally. Click the Create New Document button, and the controls in the Insert Hyperlink dialog box change to those shown in figure 21.7.
Enter the name of the new document that you want to create. The type of document created depends on the extension you include. For example, to create a Word document, use the .doc extension. See Table 21.1 for other extensions. If the path where it should be stored is not correct in the Full Path area, click the Change button. Navigate to the desired location, and click OK to return. Then click Edit the New Document Later and finish up normally.
Warning
If you provide this presentation to multiple users, each one will use the same filename for the new document. This can be a problem because one file may overwrite another. It might be easier to collect information from multiple users using an e-mail address hyperlink (discussed later in this chapter).

The most important part about adding a link to create a new file is to make sure that you use an extension that corresponds to a program that users have on the PCs where they will be viewing the presentation. When a program is installed, it registers its extension (the usually-three-character code after the period in a file's name) in the Windows Registry so that any data files with that extension are associated with that program. For example, when you install Microsoft Word, it registers the extension .doc for itself, and PowerPoint registers .ppt for its own use. Table 21.1 lists some of the more common file types and their registered extensions on most PCs. Also make sure that the location you specify for the Full Path will always be accessible whenever the presentation is run.
Tip
If you need to hyperlink to an executable file, but you do not need a new document (for example, to link to a program like Calculator), do not use Hyperlink on the Insert tab. Instead use an Action Setting and choose Run Program as the action. For the program to run, use the full path to the application, in quotation marks. Because you must enter the full paths to each of these, the link will probably not work when the presentation is run on a different computer.
Table 21.1. Commonly Used Extensions for Popular Programs
You can also create a link that opens the user's e-mail program and addresses an e-mail to a certain recipient. For example, perhaps you want the user to e-mail feedback to you about how he liked your presentation or send you requests for more information about your product.
Warning
For an e-mail hyperlink to work, the person viewing the presentation must have an e-mail application installed on his or her PC and at least one e-mail account configured for sending e-mail. This isn't always a given, but it's probably more likely than betting that they have a certain application installed (as in the preceding section).
To create an e-mail hyperlink, either type the e-mail address directly into the text box on the slide (for a bare hyperlink) or start a hyperlink normally with the Hyperlink button on the Insert tab. Then click the E-mail Address button in the dialog box and fill in the e-mail address and an optional subject line. PowerPoint will automatically add mailto: in front of the address. Then complete the hyperlink normally. See figure 21.8.

If you need to change the displayed text for the hyperlink, simply edit it just as you do any text on a slide. Move the insertion point into it and press Backspace or Delete to remove characters, and then retype new ones.
If you need to change the address, or the ScreenTip, right-click the hyperlink and choose Edit Hyperlink. The Edit Hyperlink dialog box appears, which is identical to the Add Hyperlink dialog box except for the name. From there you can change any properties of the link, just like you did when you created it initially.
To remove a hyperlink, you can either delete the text completely (select it and press Delete), or just remove the hyperlink leaving the text intact. To do the latter, right-click the hyperlink and choose Remove Hyperlink.
There are two ways to create a graphics-based hyperlink. Both involve skills that you have already learned in this chapter. Both work equally well, but you may find that you prefer one to the other. The Action Settings method is a little bit simpler, but the Insert Hyperlink method allows you to browse for Web addresses more easily.
A graphics-based hyperlink is really no more than a graphic with an action setting attached to it. You set it up just as you do with the action buttons (which you will learn more about later in this chapter).
Place the graphic that you want to use for a hyperlink.
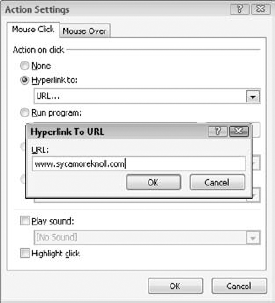
Click the graphic and then on the Insert tab, click Action. The Action Settings dialog box opens.
Choose Hyperlink To.
Open the Hyperlink To drop-down list and choose URL. The Hyperlink to URL dialog box opens.
Type the URL to link to and click OK as shown in Figure 21.9.
Warning
If you are using an e-mail address, type mailto: in front of the address you enter in step 5. If you do not, PowerPoint will automatically add http:// in front of it and the link will not work.
Click OK.
Now the graphic functions just like an action button in the presentation; the audience can click it to jump to the specified location.
If you would like to take advantage of the superior address-browsing capabilities of the Insert Hyperlink dialog box when setting up a graphical hyperlink, follow these steps instead of the preceding ones:
Place the graphic that you want to use for a hyperlink.
Right-click it and choose Hyperlink. The Insert Hyperlink dialog box appears.
Choose the location, as you learned earlier in this chapter for text-based hyperlinks. The only difference is that the Text to Display box is unavailable because there is no text. If you typed the text in a graphic, Text to Display is available.
Click OK.
Action buttons, which you saw in figure 21.1, enable your audience members to move from slide to slide in the presentation with a minimum of fuss. PowerPoint provides many preset action buttons that already have hyperlinks assigned to them, so all you have to do is place them on your slides.
The action buttons that come with PowerPoint are shown in Table 21.2, along with their preset hyperlinks. As you can see, some of them are all ready to go; others require you to specify to where they jump. Most of the buttons have a default action assigned to them, but you can change any of these as needed.
Tip
At first glance, there seems little reason to use action buttons that simply move the slide show forward and backward. After all, isn't it just as easy to use the keyboard's Page Up and Page Down keys, or to click the left mouse button to advance to the next slide? Well, yes, but if you use Kiosk mode, described in the later in the chapter, you cannot move from slide to slide using any of the conventional keyboard or mouse methods. The only thing the mouse can do is click on action buttons and hyperlinks.
Table 21.2. Action Buttons
Button | Name | Hyperlinks to |
|---|---|---|
Back or Previous | Previous slide in the presentation (not necessarily the last slide viewed; compare to Return). | |
Forward or Next | Next slide in the presentation. | |
Beginning | First slide in the presentation. | |
End | Last slide in the presentation. | |
Home | First slide in the presentation. (Home is where you get started and it's a picture of a house, get it?) | |
Information | Nothing, by default, but you can point it to a slide or document containing information. | |
Return | Last slide viewed, regardless of normal order. This is useful to place on a hidden slide that the audience will jump to with another link (such as Help), to help them return to the main presentation when they are finished. | |
Movie | Nothing, by default, but you can set it to play a movie that you specify. | |
Document | Nothing, by default, but you can set it to open a file that you specify. | |
Sound | Plays a sound that you specify. If you don't choose a sound, it plays the first sound on PowerPoint's list of standard sounds (Applause). | |
Help | Nothing, by default, but you can point it toward a slide containing help or a Help file from an application (usually has a .hlp extension but could also have a .chm or .html extension). | |
None | Nothing, by default. You can add text or fills to the button to create custom buttons. |
To place an action button, follow these steps:
If you want to place the button on the Slide Master, display it (on the View tab, click Slide Master). If you want to place the button on all layouts, click the top slide (the slide master itself). If you want only a certain layout to receive the buttons, click it.
Tip
Some action buttons are best placed on the Slide Master, such as Next and Previous; others, such as Return, are special-use buttons that are best placed on individual slides such as hidden slides.
On the Insert or Home tab, click Shapes. A palette of shapes appears; at the bottom of the palette are the action buttons. See figure 21.10.
Click the button that you want to place. Your mouse pointer turns into a crosshair.
To create a button of a specific size, drag on the slide (or Slide Master) where you want it to go. Or, to create a button of a default size, simply click once where you want to place it. You can resize the button at any time later, the same as you can any object.
Tip
If you want to place several buttons, and you want them all to be the same size, place them at the default size to begin with. Then select them all, and resize them as a group. That way they will all be exactly the same size.
The Action Settings dialog box appears. Make sure the Mouse Click tab is on top. See figure 21.11.
Confirm or change the hyperlink set up there:
If the action button should take the reader to a specific location, make sure the correct slide appears in the Hyperlink To box. Refer to Table 21.2 to see the default setting for each action button. Table 21.3 lists the choices you can make and what they do.
If the action button should run a program, choose Run program and enter the program's name and path, or click Browse to locate it. For example, you could open the Calculator application from an action button. The executable file that runs it is calc.exe.
If the action button should play a sound, make sure the Play Sound check box is marked, and choose the correct sound from the Play Sound drop-down list (or pick a different sound file by choosing Other Sound).
Click OK. The button has been assigned the action you specified.
Add more action buttons as desired by repeating these steps.
If you are working in Slide Master view, exit it by clicking the Close Master View button.
Test your action buttons in Slide Show view to make sure they jump where you want them to.


To edit a buttons action, right-click it and choose Hyperlink to reopen this dialog box at any time.
Table 21.3. Hyperlink to Choices in the Action Settings Dialog Box
Drop-Down Menu Choice | Result |
|---|---|
Previous Slide Next Slide First Slide Last Slide Last Slide Viewed | These choices do just what their names say. These are the default actions assigned to certain buttons you learned about in Table 21.2. |
End Show | Sets the button to stop the show when clicked. |
Custom Show ... | Opens a Link to Custom Show dialog box, where you can choose a custom show to jump to when the button is clicked. |
Opens a Hyperlink to Slide dialog box, where you can choose any slide in the current presentation to jump to when the button is clicked. | |
URL ... | Opens a Hyperlink to URL dialog box, where you can enter a Web address to jump to when the button is clicked. |
Other PowerPoint Presentation ... | Opens a Hyperlink to Other PowerPoint Presentation dialog box, where you can choose another PowerPoint presentation to display when the button is clicked. |
Other File ... | Opens a Hyperlink to Other File dialog box, where you can choose any file to open when the button is clicked. If the file requires a certain application, that application will open when needed. (To run another application without opening a specific file in it, use the Run Program option in the Action Settings dialog box instead of Hyperlink To.) |
The blank action button you saw in Table 21.2 can be very useful. You can place several of them on a slide and type text into them, creating your own set of buttons. To type text into a blank button, follow these steps:
Place a blank action button on the slide (from the Shapes gallery).
Right-click the action button and choose Edit Text. An insertion point appears in it. (You can also select the button and simply start typing.)
Type your text, and then click away from the button when you are finished. If you need to edit the text later, simply click the text to move the insertion point back into it, just as you do with any text box.
You can format action buttons just like other shapes, as you learned to do in Chapter 10. You can apply borders, fills and effects to them, and apply Shape Style presets. You can also use WordArt styles or individual text formatting controls to format the text on them.
To make action buttons of different shapes, you can use the Change Shape button, as in the following steps:
Select the action button(s) to change.
On the Drawing Tools Format tab, click Edit Shape

Click a different shape. See figure 21.12.

figure 21.13 shows some examples of custom buttons you can create with your own text and some shape formatting.

You can create an action button out of any object on your slide: a drawn shape, a piece of clip art, a photograph, a text box — anything. To do so, just from the Insert tab click Action. Then, set the On Click action to Hyperlink To, Run Program, or Play Sound, just as you did for the action buttons in the preceding sections.
Make sure you clearly label the object that you are using as an action button so that the users will know what they are getting when they click it. You can add text to the object directly (for example, with an AutoShape), or you can add a text box next to the button that explains its function. If you want to use a ScreenTip to label the item, use a hyperlink rather than an action setting.
Self-running presentations are not exactly user-interactive because the user does not participate in their running. The show runs at its own pace and the user sits (or stands) passively and observes it.
Not sure when you might use a self-running presentation in your daily life? Here are some ideas:
Trade shows: A self-running presentation outlining your product or service can run continuously in your booth on equipment as simple as a laptop and an external monitor. People who might not feel comfortable talking to a salesperson may stop a few moments to watch a colorful, multimedia slide show.
Conventions: Trying to provide hundreds of convention-goers with some basic information, such as session starting times or cocktail party locations? Set up an information booth in the convention center lobby to provide this information. The slide show can loop endlessly through three or four slides that contain meeting room locations, schedules, and other critical data.
In-store sales: Retail stores can increase sales by strategically placing PC monitors in areas of the store where customers gather. For example, if there is a line where customers stand waiting for the next available register or clerk, you can show those waiting customers a few slides that describe the benefits of extended warranties or that detail the special sales of the week.
Waiting areas: Auto repair shops and other places where customers wait for something to be done provide excellent sales opportunities. The customers don't have anything to do except sit and wait, so they will watch just about anything — including a slide presentation informing them of the other services that your shop provides.
The most important aspect of a self-running show is that it loops continuously until you stop it. This is important because there won't be anyone there to restart it each time it ends.
To set up the show to do just that, follow these steps:
On the Slide Show tab, click Set Up Slide Show. The Set Up Show dialog box opens.
Mark the Loop Continuously Until 'Esc' check box. See figure 21.14. Notice that the Loop Continuously until Esc check box is set permanently to On whenever Browsed at a Kiosk is selected.
In the Advance Slides area, make sure the Using Timings, if Present option is selected.
Click OK.

Note
Timings refers to transition timings, which you learned about in Chapter 18, in the section "Assigning Transitions to Slides." Self-running presentations are good candidates for recorded voice-over narration, which you learned how to set up in Chapter 16.
A kiosk is a self-serve booth or workstation where people can view something without supervision. You have probably seen information kiosks at malls, for example, where users can click or touch buttons on-screen to get information.
When providing a computer to operate unattended to the public, one major concern is that some prankster will come along and tamper with the system. You will learn about some ways to thwart that kind of tampering in the next section, "Setting Up a Secure System," but first let's look at one really basic thing you can do: enable Kiosk mode.
When Kiosk mode is enabled, keyboard navigation is not possible (except for pressing Esc to exit Slide Show view), so users must employ the action buttons and hyperlinks on the slides for navigation. If you place a presentation in Kiosk mode and then hide the keyboard, users will only be able to view the content to which you have linked.
To enable Kiosk mode, follow these steps:
On the Slide Show tab, click Set Up Slide Show. The Set Up Show dialog box opens (figure 21.14).
In the Show Type area, click Browsed at a Kiosk (Full Screen).
Click OK.
Security is a definite concern in self-running presentations. Any time you leave a computer unattended with the public, you run the risk of tampering and theft. At the very least, some guru geek will come along and experiment with your PC to see what you've got and whether he or she can do anything clever with it. At the worst, your entire computer setup could disappear entirely.
There are two levels of security involved in unattended presentation situations:
The security of the physical hardware
The security that the presentation will continue to run
For the most foolproof hardware security, get it out of sight. Hide everything except the monitor in a locked drawer, cabinet, or panel of the kiosk you are using, if possible. If you are at a trade show or convention where you don't have the luxury of a lockable system, at least put everything except the monitor under a table, and try to make sure that someone is attending the booth at all times.
Warning
Don't drape running computers with cloth or any other material that inhibits the airflow around them; doing so increases the risk of overheating.
In an unattended setting, the best way to protect your monitor from walking off is to place it behind a Plexiglas panel where nobody can touch it. Without such a barrier, you run the risk of some jokester turning off its power or turning down its contrast, and anyone who knows something about computers could walk right up and disconnect it and carry it away.
You can also buy various locking cables at computer stores and office supply centers. These cables lock down computer equipment to prevent it from being removed. They include steel cables with padlocks, metal locking brackets, and electronically controlled magnetic locks.
I admit that I am guilty of disrupting other peoples presentations. When I walk up to an unattended computer in a store, the first thing I do is abort whatever program is running and restart the system to check out its diagnostics and find out what kind of computer it is. It's a geek thing, but all geeks do it.
You will doubtless encounter such geeks wherever you set up your presentation, but especially at trade shows and conventions. (We geeks love trade shows and conventions.) Your mission is to prevent them from stopping your presentation.
The best way to prevent someone from tinkering with your presentation is to get the input devices out of sight. Hide the CPU (the main box of the computer), the keyboard, and the mouse. You can't disconnect the keyboard and mouse from the PC, or an error message will appear, but you can hide them. Again, don't cover them with anything that might restrict the airflow, or you might end up with an overheated PC. You can also set up the following security measures in your presentation file:
On the Slide Show tab, click Set Up Slide Show and make sure you have chosen Browsed at a Kiosk. This disables the mouse while the slide show is running. The only way to stop the show will be to use the keyboard. This works best for self-running shows where the slides advance automatically.
Tip
If you make the keyboard available for user navigation, the Esc key will also be available for stopping the program. A utility is available that disables the Esc key at
www.mvps.org/skp/noesc.htm.Show the presentation using the PowerPoint Viewer program rather than PowerPoint itself. That way nobody can access PowerPoint and create a new presentation to show. For further security, remove the PowerPoint application completely from the PC on which the presentation is showing.
Set a startup password for your PC so that if people manage to reboot it, they won't get into your PC to tamper with its settings. This is usually set through the BIOS setup program. If you can't do that, set a Windows startup password for each of the user accounts. (Do that through the User Accounts in the Control Panel in Windows.)
Assign a password to a PowerPoint file, as you learned in Chapter 3, to prevent it from being opened, modified, or both. Although this will not prevent a running presentation from being stopped, it will at least prevent it from being altered or deleted. However, if it is already open, hackers will have full access to it, and if you set it to have a password only for modifications, a hacker could save it under a different name, make changes, and then run the changed version.
In this chapter, you learned the ins and outs of preparing a presentation that users can run interactively or that can run unattended without user interaction. You learned how to create action buttons, and how to set up kiosk mode and to create a secure presentation system that can be left unattended. You can probably think of some uses for such shows, and even more may occur to you later. In the next chapter, you learn how to prepare a presentation — either a user-interactive one or a self-running one — for mass distribution on CD or over the Web.