
Watching how the template-based app works at runtime
Following what goes on when the user launches your app
Getting a handle on how nib files work
Remembering memory management
Knowing what else you should be aware of at runtime
When you create an Xcode project and select a template, as shown in Chapter 4 of Book I, you get a considerable head start on the process of coding your very own iPhone app. Choosing the Utility Application template for the DeepThoughts app results in a working app that offers an information button to display the Flipside view, and a Done button on the Flipside view to get back to the main view.
As the wise sage (and wisecracking baseball player) Yogi Berra once said, "You can observe a lot just by watching." Before you add anything more to this skeleton of a utility app, it helps to look at how it does what it already does. By uncovering the mysteries of what this template does at runtime, you can learn a bit more about where to put your code.
As you find out in Chapter 5 of Book I, a framework offers common code providing generic functionality. The iPhone OS provides a set of frameworks for incorporating technologies, services, and features into your apps. The framework is designed to easily integrate your code; with the framework in place, all you need to do is add the specific functionality that you want in the app — the content as well as the controls and views that enable the user to access and use that content — to the frameworks.
The short-but-happy life of an iPhone app begins when a user launches it by tapping its icon on the Home screen. The system launches your app by calling its main function. Figure 1-1 shows the contents of the main function for the DeepThoughts app.
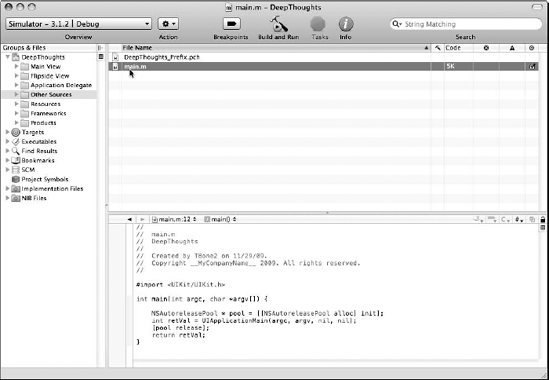
The main function does only three things:
Sets up an autorelease pool
Calls the
UIApplicationMainfunctionAt termination, releases the autorelease pool
To be honest, this whole main function thing isn't something you even need to think about. What's important is what happens after the UIApplicationMain function is called. Here's the play-by-play:
A nib file is a resource file that contains the specifications for one or more objects. The main nib file usually contains a window object of some kind, the application delegate object, and any other key objects. When the file is loaded, the objects are reconstituted (think "instant application") in memory.
In the DeepThoughts app you just started (with a little help from the aforementioned Utility Application template), this is the moment of truth when the
DeepThoughtsAppDelegate, MainViewController, MainView, and the main window are created, along withFlipsideViewControllerandFlipsideView.For more on those objects and the roles they play in apps, see Chapter 5 of Book I.
The
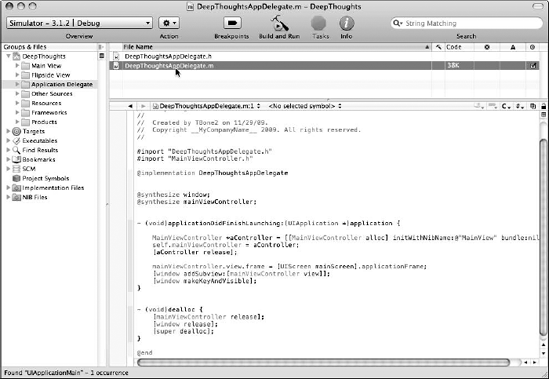
UIApplicationMainsends the application delegate theapplicationDidFinishLaunching: message.You can see the
DeepThoughtsAppDelegate.mfile in Figure 1-2, as provided by the template — see how much code is already written for you!In this step, you initialize and set up your application. It's up to you whether to display your main application window as if the user were starting from scratch, or to go with the way the window looked when the user last exited the application. The application delegate object is a custom object that you code. It's responsible for some of the application-level behavior of your application. (Delegation is an extensively used design pattern that's introduced in Chapter 5 of Book I and explained more thoroughly in Chapter 5 of Book II.)
The
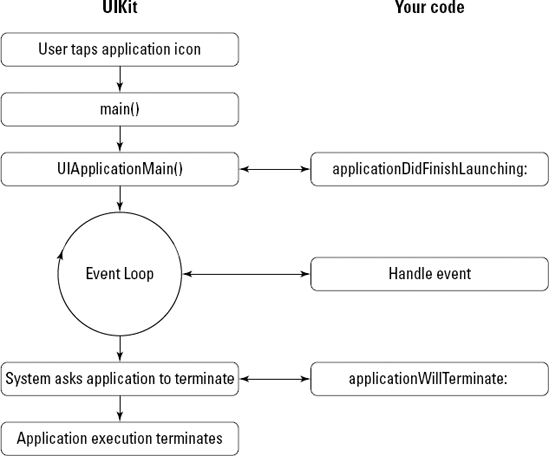
UIKitframework sets up the event loop.The event loop is the code responsible for polling input sources — the screen, for example. Events, such as touches on the screen, are sent to the object — say, a controller — that you have specified to handle that kind of event, as shown in Figure 1-3. These handling objects contain the code that implements what you want your app to do in response to that particular event. A touch in a control may result in a change in what the user sees in a view, a switch to a new view, or even the playing of the song "Don't Touch Me."
When the user performs an action that would cause your app to quit,
UIKitnotifies your app and begins the termination process.Your app delegate is sent the
applicationWillTerminate:message, and you have the opportunity to add code to do whatever you want to do before termination, including saving the state the user was in. Saving is important, because then, when the app is launched again (refer to Step 2) and theUIApplicationMainsends the app delegate theapplicationDidFinishLaunchingmessage, you can restore the app to the state the user left it (such as a certain view).
When you create a new project using a template — quite the normal state of affairs, as shown in Chapter 4 of Book I — the basic application environment is included. That means when you launch your app, an application object is created and connected to the window object, the run loop is established, and so on — despite the fact that you haven't done a lick of coding.
Most of this work is done by the UIApplicationMain function, as illustrated back in Figure 1-3. Here's a blow-by-blow description of what the UIApplicationMain function actually does, and Figure 1-4 illustrates the process.
UIApplicationlooks in theinfo.plistfile, trying to find the main nib file.It makes its way down the Key column until it finds the Main Nib File Base Name entry. Eureka! It peeks over at the Value column and sees that the value for the Main Nib File Base Name entry is
MainWindow.UIApplicationloadsMainWindow.xib.
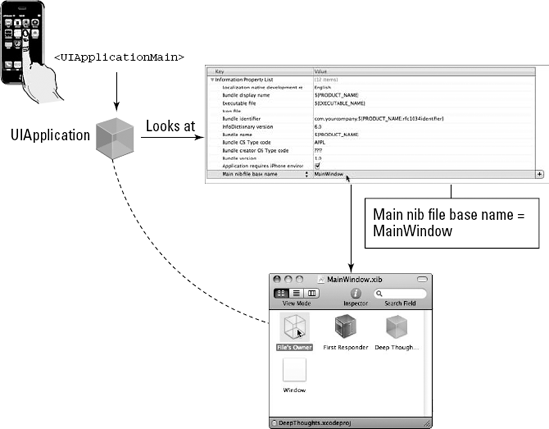
The file MainWindow.xib is what causes your application's delegate, main window, flipside window, and view controller instances to get created at runtime. Remember, this file is provided as part of the project template. You don't need to change or do anything here. This is just a chance to see what's going on behind the scenes.
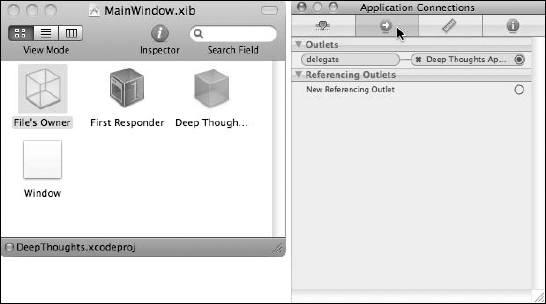
To take advantage of this once-in-a-lifetime opportunity, go back to your project window in Xcode, expand the Resources folder in the Groups & Files list on the left, and then double-click MainWindow.xib. (You do have a project already started, right? If not, check out Chapter 4 of Book I.) When Interface Builder opens, take a look at the nib file's main window — the one labeled MainWindow.xib, which should look like the MainWindow.xib you see at the bottom of Figure 1-4.
The MainWindow.xib window shows four icons, as follows:
File's Owner (proxy object): The File's Owner — the object that's going to use (or own) this file — is of the class
UIApplication. This object isn't created when the file is loaded, as are the window and views — it's already created by theUIApplicationMainobject before the nib file is loaded.UIApplicationobjects have a delegate object that implements theUIApplicationDelegateprotocol. Specifying the delegate object can be done from Interface Builder by setting thedelegateoutlet of aUIApplicationobject. To see that this has already been done for you in the template, click File's Owner, and then click the Connections tab of the Inspector window (or choose Tools
First Responder (proxy object): This object is the first entry in an application's responder chain, which is constantly updated while the application is running — usually to point to the object that the user is currently interacting with. If, for example, the user were to tap a text field to enter some data, the first responder would become the text field object.
An instance of
DeepThoughtsAppDelegateset to be the application's delegate.Window: The window has its background set to black and status bar set to gray, as shown in Figure 1-6, and is set to not be visible at launch. To see the window's attributes, click Window in the
MainWindow.xibwindow, and click the Attributes tab in the Inspector window.

UIApplication loads the parts of the MainWindow.xib as follows:
Creates
DeepThoughtsAppDelegate.Creates
Window.Sends the
DeepThoughtsAppDelegatetheapplicationDidFinishLaunching:message.The
applicationDidFinishLaunching:method inDeepThoughtsAppDelegateinitializes MainView.
Listings 1-1 and 1-2 show the header and implementation of DeepThoughtsAppDelegate. All this is done for you as part of the Xcode template.
Example 1-1. DeepThoughtsAppDelegate.h
@class MainViewController;

@interface DeepThoughtsAppDelegate : NSObject
   <UIApplicationDelegate> {
    UIWindow *window;
    MainViewController *mainViewController;
}

@property (nonatomic, retain) IBOutlet UIWindow *window;
@property (nonatomic, retain) MainViewController
    *mainViewController;

@end
Example 1-2. DeepThoughtsAppDelegate.m
#import "DeepThoughtsAppDelegate.h"
#import "MainViewController.h"

@implementation DeepThoughtsAppDelegate


@synthesize window;
@synthesize mainViewController;


- (void)applicationDidFinishLaunching:(UIApplication *)
   application {

   MainViewController *aController = [[MainViewController
   alloc] initWithNibName:@"MainView" bundle:nil];
   self.mainViewController = aController;
   [aController release];

    mainViewController.view.frame = [UIScreen mainScreen].
    applicationFrame;
    [window addSubview:[mainViewController view]];
     [window makeKeyAndVisible];
}


- (void)dealloc {
    [mainViewController release];
    [window release];
    [super dealloc];
}

@end
In Listing 1-2, the MainView view controller is initialized with the initWithNibName:bundle: method. You could use the applicationDidFinishLaunching method to do any other application initialization as well — such as returning everything to what it was like when the user last used the application.
If you look inside the MainViewController.m implementation file, as shown in Listing 1-3, you can see that showInfo initializes the Flipside view with the initWithNibName:bundle: method when the user touches the i information button.
Example 1-3. showInfo in MainViewController.m
- (IBAction)showInfo {

   FlipsideViewController *controller
   = [[FlipsideViewController alloc]
   initWithNibName:@"FlipsideView" bundle:nil];
   controller.delegate = self;

   controller.modalTransitionStyle =
   UIModalTransitionStyleFlipHorizontal;
   [self presentModalViewController:controller animated:YES];

   [controller release];
}
Note
Your goal during startup should be to present your application's user interface as quickly as possible — quick initialization = happy users. Don't load large data structures that your application won't use right away. If your application requires time to load data from the network (or perform other tasks that take noticeable time), get your interface up and running first and then launch the slow task on a background thread. Then you can display a progress indicator or other feedback to the user to indicate that your application is loading the necessary data or doing something important.
The application delegate object (refer to Listing 1-1) is usually derived from NSObject, the root class (the very base class from which all iPhone application objects are derived), although it can be an instance of any class you like, as long as it adopts the UIApplicationDelegate protocol. The methods of this protocol correspond to behaviors that are needed during the application lifecycle and are your way of implementing this custom behavior. Although you aren't required to implement all the methods of the UIApplicationDelegate protocol, every application should implement the following critical application tasks:
Initialization, which I have just covered
Handling events, which I cover in the next chapter
Handling termination, which I cover next
Responding to interruptions and low memory warnings, which I cover later in this chapter
When your app quits, you should save any unsaved data or state (where the user is in the app — the current view, options selected, and stuff like that) to a temporary cache file or to the preferences database. The next time the user launches your app, use that information to restore your app to its previous state.
Getting stuff to (safely) shut down is another application delegate responsibility. Although I don't do this in DeepThoughts, your app's delegate can implement the delegate method applicationWillTerminate: to save the current state and unsaved data to disk. (Yes, the disk in the iPhone is not really a disk — it's a solid state drive that Apple calls a disk.) You can also use this method to perform additional cleanup operations, such as deleting temporary files. I show you how to use the applicationWillTerminate: method to save and restore the RoadTrip app in Chapter 3 of Book V.
The state information you save should be as minimal as possible but still let you accurately restore your app to an appropriate point. You don't have to display the exact same screen used previously — for example, if a user edits a contact and then leaves the Phone app, upon returning, the Phone app displays the top-level list of contacts, rather than the editing screen for the contact.
Launch, initialize, process, terminate, launch, initialize, process, terminate . . . it has a nice rhythm to it, doesn't it? And those are the four major stages of the application's lifecycle. But life isn't simple — and neither is runtime. To mix things up a bit, your application will also have to come to terms with interruptions and memory management.
On an iPhone, various events besides termination can interrupt your app to allow the user to respond — for example, incoming phone calls, SMS messages, calendar alerts, or the user pressing the Sleep button. Such interruptions may only be temporary. If the user chooses to ignore an interruption, your app continues running as before. If the user decides to answer the phone or reply to an SMS message, however, your app will be terminated.
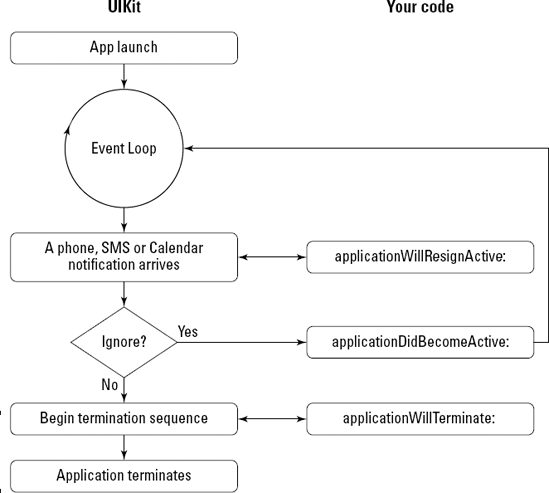
Figure 1-7 shows the sequence of events that occurs during the arrival of a phone call, SMS message, or calendar alert. Here's what that looks like step by step:
The system detects an incoming phone call or SMS message, or a calendar event occurs.
The system sends your application delegate the
applicationWillResignActive:message.Note
Because these interruptions cause a temporary loss of control by your app — meaning that touch events are no longer sent to your app — it's up to you to prevent what's known in the trade as a "negative user experience." For example, if your app is a game, you should pause the game.
The system displays an alert panel with information about the event.
The user can choose to ignore the event or respond to it.
If the user ignores the event, the system sends your application delegate the
applicationDidBecomeActive:message and resumes the delivery of touch events to your app.You can use this delegate method to restore the app to the state it was in before the interruption. What you do depends on your app. In some apps, it makes sense to resume normal processing. In others — if you've paused a game, for example — you could leave the game paused until the user decides to resume play.
If the user responds to the event, instead of ignoring it, the system sends your application delegate the
applicationWillTerminate:message.Your app should do what it needs to do in order to terminate gracefully.
The way the Sleep/Wake button is handled is a little different. When the app enters or resumes from a sleep state, two messages are sent to the application delegate: applicationWillResignActive: and applicationDidBecomeActive:, respectively. In this case, your app always resumes, though the user might immediately launch a different app.
One of the main responsibilities of all good little applications is to deal with low memory. So the first line of defense is (obviously) to understand how you as a programmer can help them avoid getting into that state.
In the iPhone OS, each program uses the virtual-memory mechanism found in all modern operating systems. But virtual memory is limited to the amount of physical memory available. This is because the iPhone OS doesn't store "changeable" memory (such as object data) on the disk to free up space, and then read it in later when it's needed. Instead, the iPhone OS tries to give the running application the memory it needs — freeing memory pages that contain read-only contents (such as code), where all it has to do is load the "originals" back into memory when they're needed. Of course, this may be only a temporary fix if those resources are needed again a short time later.
If memory continues to be limited, the system may also send notifications to the running application, asking it to free up additional memory. This is one of the critical events that all applications must respond to.
When the system dispatches a low-memory notification to your application, it's something you must pay attention to. If you don't, it's a reliable recipe for disaster. (Think of your low-fuel light going on as you approach a sign that says "Next services 100 miles.") UIKit provides several ways of setting up your application so that you receive timely low-memory notifications:
Implement the
applicationDidReceiveMemoryWarning:method of your application delegate. Your application delegate could then release any data structure or objects it owns — or notify the objects to release memory they own.Override the
didReceiveMemoryWarning:method in your customUIViewControllersubclass. The view controller could then release views — or even other view controllers — that are off-screen. For example, in your new project (DeepThoughts) created with the Utility Application template, the template already supplies the following in bothMainViewController.mandFlipsideViewController.m, ready for you to customize:- (void)didReceiveMemoryWarning { // Releases the view if it doesn't have a superview. [super didReceiveMemoryWarning];// Release any cached data, images, etc that aren't in use. } - (void)viewDidUnload { // Release any retained subviews of the main view. // e.g. self.myOutlet = nil; }Register to receive the
UIApplicationDidReceiveMemoryWarningNotification:notification. A model object could then release data structures or objects it owns that it doesn't need immediately and can re-create later.
Each of these strategies gives a different part of your application a chance to free up the memory it no longer needs (or doesn't need right now). As for how you actually get these strategies working for you, this is something that is dependent on your application's architecture. That means you'll need to explore it on your own.
Not freeing up enough memory will result in the iPhone's OS sending your application the applicationWillTerminate: message and shutting you down. For many apps, though, the best defense is a good offense, and you need to manage your memory effectively and eliminate any memory leaks in your code.
When you create an object — a window or button for example — memory is allocated to hold that object's data. The more objects you create, the more memory you use — and the less there is available for additional objects you might need. Obviously, it's important to make available (that is, de-allocate) the memory that an object was using when the object is no longer needed. This is called memory management.
Objective-C uses reference counting to figure out when to release the memory allocated to an object. It's your responsibility (as a programmer) to keep the memory-management system informed when an object is no longer needed.
Note
Reference counting is a pretty simple concept. When you create the object, it's given a reference count of 1. As other objects use this object, they use methods to increase the reference count, and decrease it when they're done. When the reference count reaches 0, the object is no longer needed, and the memory is de-allocated. For details, see the section on raising and terminating responsible objects in Chapter 3 of Book II.
For those who love "Do and Don't" lists, here are the fundamental rules when it comes to memory management:
Any object you create using
allocornew, any method that containscopy, and any object you send aretainmessage to is yours — you own it. That means you're responsible for telling the memory-management system when you no longer need the object and that its memory can now be used elsewhere.Within a given block of code, the number of times you use
new, copy, alloc, andretainshould equal the number of times you usereleaseandautorelease. You should think of memory management as consisting of pairs of messages. If you balance everyallocand everyretainwith arelease, your object will eventually be freed up when you're done with it.When you assign an instance variable using an accessor with a property attribute of
retain, retainis automatically invoked — that is, you now own the object. Implement adeallocmethod to release the instance variables you own.Objects created any other way (through convenience constructors or other accessor methods) are not your problem.
If you have a solid background in Objective-C memory management (all three of you out there), this should be straightforward or even obvious. If you don't have that background, no sweat: See Chapter 3 of Book II for some background.
Okay, there are some aspects of programming that you can skate right past without understanding what's really going on, and you can still create a decent iPhone app. But memory management is not one of them!
Note
A direct correlation exists between the amount of free memory available and your application's performance. If the memory available to your application dwindles far enough, the system will be forced to terminate your application. To avoid such a fate, keep a few words of wisdom in mind:
Minimize the amount of memory you use — make that a high priority of your implementation design.
Be sure to use the memory-management functions.
In other words, be sure to clean up after yourself, or the system will do it for you, and it won't be a pretty picture.
Congratulations — you've just gone through the "Classic Comics" version of another several hundred pages of Apple documentation, reference manuals, and how-to guides.
Although there's a lot left unsaid (though less than you might suspect), what's in this chapter is enough to not only get you started but also to keep you going as you develop your own iPhone apps. It provides a frame of reference on which you can hang the concepts thrown around with abandon in upcoming chapters — as well as the groundwork for a deep enough understanding of the application lifecycle to give you a handle on the detailed documentation.
Time to move on to the really fun stuff: the user interface controls.