Managing the iSCSI Target Server
The iSCSI target server in Windows Server 2012 can be managed by using the user interface through Server Manager, as seen in earlier chapters, or PowerShell cmdlets. This section also walks through the Best Practice Analyzer (BPA) and the options with System Center. With System Center 2012 Virtual Machine Manager, storage arrays also can be managed using an SMI-S provider.
Storage Providers
Windows Server 2012 has two features related to the iSCSI target server:
- Volume Shadow Copy Service (VSS)
- Virtual Disk Service (VDS)
VSS is a framework that allows a volume backup to be performed while the application continues with I/Os. VSS coordinates among the backup application (requester), applications such as Hyper-V (writer), and the storage system such as the iSCSI target (provider) to complete the application-consistent snapshot.
The iSCSI target VSS hardware provider communicates with the iSCSI target server during the VSS snapshot process, thus ensuring that the snapshot is application consistent.
The VDSmanages a wide range of storage configurations. In the context of an iSCSI target, it allows storage management applications to manage iSCSI target servers. In previous versions of Windows Server, the Storage Manager for SANs could be used for storage management tasks. In Windows Server 2012, this console snap-in was removed and replaced by Server Manager, PowerShell/WMI, and Storage Management Initiative Specification (SMI-S). Such an SMI-S provider for the iSCSI target will be made available together with System Center 2012 SP1, which is covered in the next section.
These storage providers are typically installed on a different server than the one running iSCSI target server—for example, a virtual guest cluster running Exchange Server. If this guest is not running Windows Server 2012, you will need to download and install the down-level storage providers:
www.microsoft.com/en-us/download/details.aspx?id=34759
iSCSI Target SMI-S Provider
In Windows Server 2012, the management of the storage device, the iSCSI Software Target, can be done using a SMI-S provider. An SMI-S provider is a software component for a particular storage product. It implements an HTTP/HTTPS server, parses XML requests, and knows how to control those specific devices that usually have their own unique management interfaces.
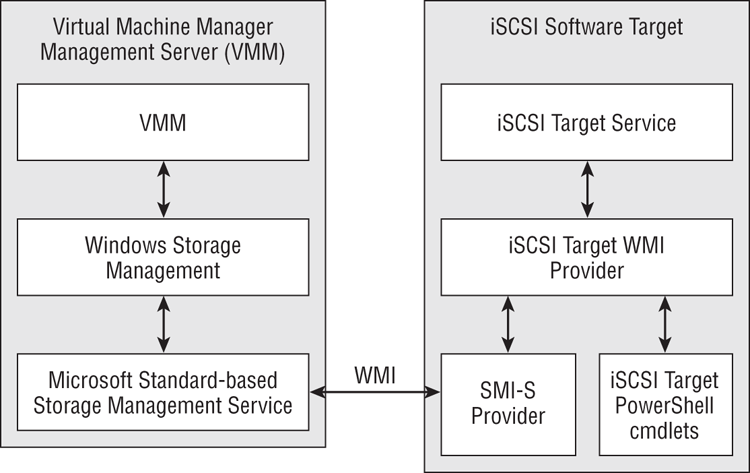
With the release of SP1 for System Center 2012 Virtual Machine Manager (VMM), the iSCSI target server becomes its own SMI-S provider. The provider follows an embedded provider model, which means the component is installed directly on the iSCSI target server. Figure 6-8 shows how the components interact.The SMI-S provider manages the iSCSI target server by using the iSCSI target WMI provider.
Figure 6-8 SMI-S architecture
Microsoft has published an interesting blog article, “Introduction to SMI-S,” with additional information on SMI-S. You can access the article here:
http://blogs.technet.com/b/filecab/archive/2012/06/25/introduction-to-smi-s.aspx
As mentioned before, the iSCSI target server role service must first be installed before the provider can be installed, which means the provider will be installed directly on the iSCSI target server. Therefore, make sure this service role is installed before starting the installation. Also make sure Microsoft KB 276147 is installed on this host to improve the performance of the discovery later on.
To start the installation of the SMI-S provider, locate the installation binaries iSCSITargetSMISProvider.msi under one of the following locations:
- SCVMM installation media: amd64SetupmsiiSCSITargetProv
- SCVMM installation directory: C:Program FilesMicrosoft System Center 2012Virtual Machine ManagersetupmsiiSCSITargetProv
Follow these instructions to install the SMI-S provider on one of the iSCSI target server(s):
Finally, the iSCSI Software Target SMI-S provider can be presented to VMM by running the following PowerShell cmdlets on the VMM management server.
First we need to create a RunAs account to authenticate against the iSCSI target server:
$RunAsCredentials = Get-Credential
$RunAsAccount = New-SCRunAsAccount -Name "<iSCSITargetAdmin>" `
-Credential $RunAsCredentials
The SMI-S provider then can be added as follows:
Add-SCStorageProvider -Name "Microsoft iSCSI Target Provider" `
-RunAsAccount $RunAsAccount -ComputerName “<iSCSITargetComputer>” `
–AddSmisWmiProvider
The Microsoft iSCSI Software Target will then be available in VMM for further management, as illustrated in Figure 6-9.
Figure 6-9 iSCSI target server in VMM

To provision LUNs by using SCVMM, only two more steps are required. In the SCVMM admin console, perform the following steps:
Figure 6-10 Storage pools in SCVMM

VMM can now create LUNs and assign them to the Hyper-V hosts. Additional information on how SCVMM discovers, classifies, and provisions remote storage can be found on TechNet:
http://technet.microsoft.com/en-us/library/gg610600.aspx
Note that this version of the SMI-S provider for the iSCSI target server supports only the integration with SCVMM.
Best Practice Analyzer
Microsoft defines guidelines, recommended practices, for configuring Windows Server 2012 that are considered as ideal under normal circumstances. So, wouldn’t it be great to adopt these best practices and incorporate them into the product to give administrators instant feedback on their configuration? Nothing simpler than that…
Windows Server includes a Best Practice Analyzer (BPA), which can be used by an administrator to check whether a server role runs with the recommended configuration by Microsoft. Deviations from this recommended practice, even critical ones, are highlighted for further investigation—note that not all findings are necessarily problematic, as BPA matches the live configuration against a rule set it receives and updates regularly from Microsoft Update. Running the BPA regularly is a good idea to gain an understanding of how close the configuration is to Microsoft’s recommendation—and to understand how and why deviations in your own configuration happen. Findings marked as critical can then be evaluated and resolved, minimizing the risk of configurations that result in poor performance or reliability, security risks, or data loss.
A best practice scan can be started in Server Manager for the whole File Services role, including the iSCSI target:
The results will be displayed in the same view with a related problem statement and description.
Alternatively, you can use PowerShell to scan a specific model—for example, the iSCSI Target BPA model. To get an overview of all available modules, just use the following cmdlet:
Get-BpaModel | Format-Table -Property IdThe best practice scan is started using the Invoke- cmdlet:
Invoke-BpaModel -ModelId Microsoft/Windows/FileServicesPowerShell
As the iSCSI target management user interface focuses on the presentation of enabling end-to-end scenarios, the underlying cmdlets provide the logic for management tasks that the user interface relies on. The PowerShell capabilities used in the previous version of Windows Server have been expanded for the 2012 release to include the following features:
- Disk snapshot management
- Differencing disk management
- Server global setting management
- Additional filters
The metadata for the iSCSI target server PowerShell modules are stored in MicrosoftiSCSITarget.psd1.
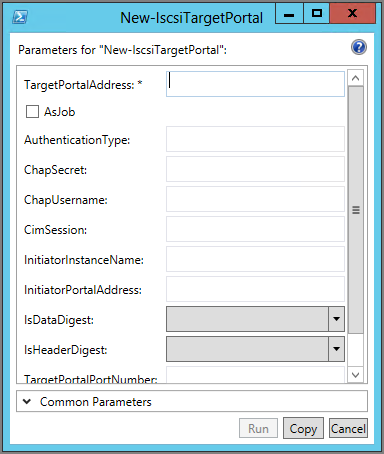
To get a list of the new available iSCSI Initiator cmdlets, you can use the Get-Command -Module iSCSI command in PowerShell. For the iSCSI target, the command would be Get-Command-Module IscsiTarget. You can always get detailed help within PowerShell, including a list of parameters for a specific cmdlet, by using Get-Help. For instance, if you want help creating a new iSCSI target portal, you can obtain help by using the following PowerShell command: Get-Help New-IscsiTargetPortal.
Windows PowerShell 3 also introduces a new cmdlet called Show-Command, which opens a graphical user interface leveraging the Windows PowerShell ISE. This capability makes it easy to understand available parameters and cmdlet syntax. The syntax of New-IscsiTargetPortal, for example, can be displayed by typing Show-Command New-IscsiTargetPortal in a PowerShell console, which opens the dialog box shown in Figure 6-11.
Figure 6-11 PowerShell Show-Command
Quite a few cmdlets have already been shown at the beginning of this chapter. Did you know that you also could use PowerShell to configure the provide disk? Have a look at this example:
Get-DiskSet-Disk -Number 1 -IsOffline 0Set-Disk -Number 1 -IsReadOnly 0Initialize-Disk -Number 1 -PartitionStyle MBRNew-Partition -DiskNumber 1 -UseMaximumSizeGet-Partition –DiskNumber 1 | Format-VolumeGet-Partition –DiskNumber 1 | Add-PartitionAccessPath -AccessPath D: