
Chapter 31
Preparing Your Access Application for Distribution
IN THIS CHAPTER
- Setting options for your current database
- Developing your application
- Putting the finishing touches on your application
- Hardening your application
- Securing the Access environment
You're lucky if you have the luxury of developing only single-user, in-house applications and you never have to worry about distributing an application within a company or across the country. Most developers have to prepare an Access application for distribution sooner or later. You don't even have to develop commercial software to deal with distribution; when you develop an application to be run on a dozen workstations in one organization, you need to distribute your application in some form or other.
This chapter covers the issues relevant to distributing Access applications. However, because some of these items—such as error handling and splitting tables—are covered in detail elsewhere in this book, this chapter focuses primarily on setting database options when preparing your application for distribution.
You need to be concerned with many issues when preparing an Access application for distribution. Distributing your application properly not only makes installing and using the application easier for the end user, but also makes updating and maintaining the application easier for you, the application's developer. In addition, the support required for an application is greatly decreased by properly preparing and packaging the database and associated files for distribution.
Defining the Current Database Options
Access databases have a number of options that simplify the distribution process. You can access these database options by choosing File ![]() Options, and then selecting the Current Database tab (shown in Figure 31.1). You can still use an Autoexec macro to execute initialization code, but the Current Database options enable you to set up certain aspects of your application, thus reducing the amount of startup code that you have to write. It's very important to correctly structure these options before you distribute an Access application.
Options, and then selecting the Current Database tab (shown in Figure 31.1). You can still use an Autoexec macro to execute initialization code, but the Current Database options enable you to set up certain aspects of your application, thus reducing the amount of startup code that you have to write. It's very important to correctly structure these options before you distribute an Access application.
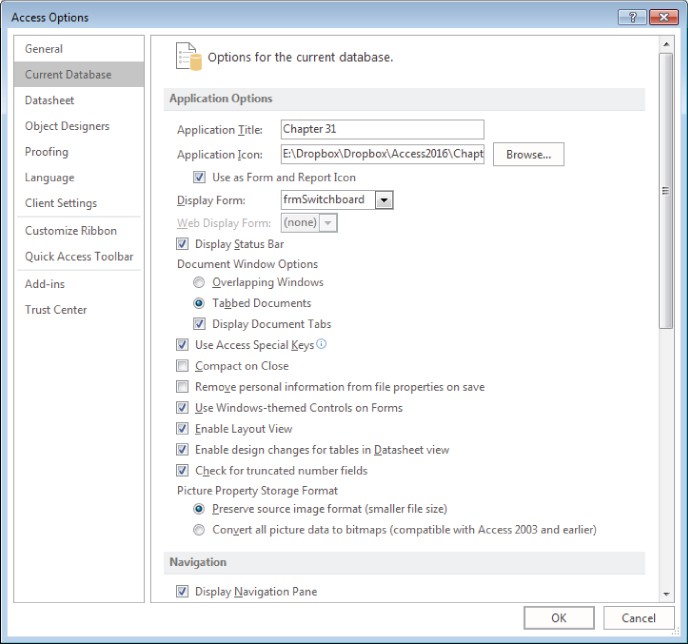
Figure 31.1 The Current Database options enable you to take control of your application from the moment a user starts it.
Application options
The settings in the Application Options section let you define parameters for your database as an application.
Application Title
The text that you provide in the Application Title field displays on the main Access window's title bar. The Application Title is also the text that's displayed in the Windows task bar when the application is open and running.
Application Icon
The icon that you specify in the Application Icon field displays on the title bar of your application and in the task switcher (Alt+Tab) of Windows. If you check the Use as Form and Report Icon box, this icon is also displayed when a form or report is minimized.
If you don't specify your own icon, Access displays the default Access icon, so you might want to provide an application-specific icon for your application. Using special program icons helps your users distinguish between different Access applications.
Display Form
The form you select in the Display Form drop-down list automatically opens when Access starts the application. When the form loads, the Form Load event of the display form fires (if it contains any code), reducing the need to use an Autoexec macro.
Display Status Bar
You can deselect the Display Status Bar check box to remove the status bar from the bottom of the Access screen. (This option is selected by default.)
Document Window Options
Under Document Window Options, you can choose how the forms and reports look in your distributed application. Your options are:
- Overlapping Windows: Overlapping Windows retains the look of previous versions of Access, letting you look at multiple forms at once.
- Tabbed Documents: Tabbed Documents uses a single-document interface (shown in Figure 31.2) similar to recent versions of Internet Explorer.
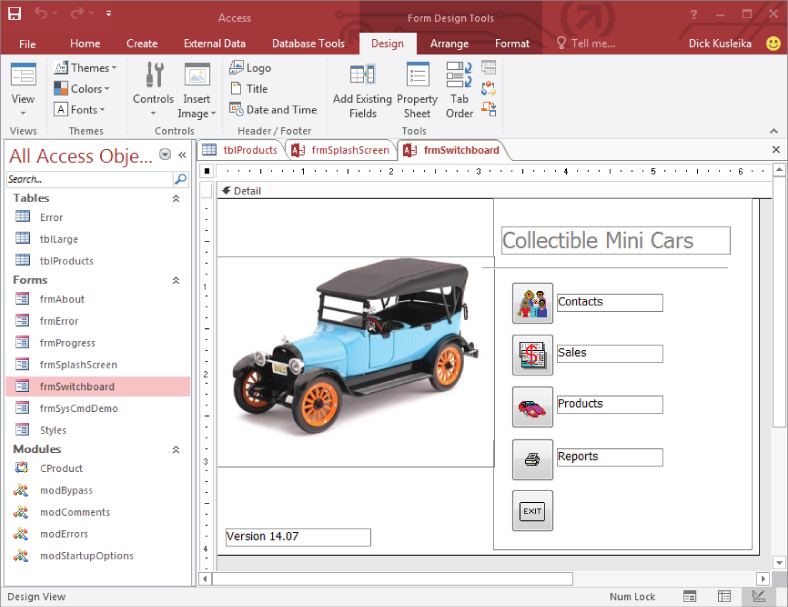
Figure 31.2 A database with the Tabbed Documents option selected. The tabs let you select which Access object to work with.
You must close and reopen the current database for the changes to take effect.
The Display Document Tabs check box is only available when you select Tabbed Documents; it turns on or off the tabs that appear at the top of any open database object. This setting turns off only the tabs and does not close tabbed objects themselves.
Use Access Special Keys
If you select this option, users of your application can use accelerator keys that are specific to the Access environment in order to circumvent some security measures, such as unhiding the Navigation pane. If you deselect this option, the following keys are disabled:
- F11: Press to show the Navigation pane (if hidden).
- Ctrl+G: Press to open the Immediate window in the Visual Basic Editor (VBE).
- Ctrl+Break: In Access projects, press to interrupt Access while retrieving records from the server database.
- Alt+F11: Press to start the VBE.
Compact on Close
Checking the Compact on Close check box tells Access to automatically compact and repair your database when you close it. Some Access developers use Compact on Close as a way to perform this maintenance process each time a user works with a database, while others find it unnecessary. We're in the latter camp, but you can decide for yourself based on the level of activity in your database. You must close and reopen the current database in order for this change to take effect.
Remove Personal Information from File Properties on Save
Checking this box automatically removes the personal information from the file properties when you save the file. You must close and reopen the current database for this change to take effect.
Use Windows-Themed Controls on Forms
Checking this box uses your system's Windows theme on the form/report controls. This setting only applies when you use a Windows theme other than the standard theme.
Enable Layout View
The Enable Layout View check box shows or hides the Layout View button on the Access status bar and in the shortcut menus that appear when you right-click on an object tab.
Enable Design Changes for Tables in Datasheet View
The Enable Design Changes for Tables in Datasheet View check box allows you to make structural changes to your tables in Datasheet view, as opposed to having to be in Design view. In most well-designed Access applications, the users never see the tables in either Design view or Datasheet view, instead interacting with data via forms. If your application allows viewing tables in Datasheet view, you should uncheck this option to prevent unwanted changes to your tables' designs.
Check for Truncated Number Fields
Checking this option makes numbers appear as ##### when the column is too narrow to display the entire value. (This behavior has been in Excel for a long time.) Unchecking this box truncates values that are too wide to be displayed in the datasheet, which means that users see only a part of the column's value when the column is too narrow and might misinterpret the column's contents.
Picture Property Storage Format
Under Picture Property Storage Format, you can choose how graphic files are stored in the database. Your options are:
- Preserve Source Image Format (Smaller File Size): Choose this option if you want to store the image in the original format, which also reduces the database size.
- Convert All Picture Data to Bitmaps (Compatible with Access 2003 and Earlier): Choose this option if you want to store all images as bitmaps, which increases the database size but keeps it compatible with previous versions of Access (Access 2003 and earlier).
Versions of Access prior to 2007 always stored images twice within the database. The first copy was the original format of the image file (such as JPG), while the second copy was a bitmap used only to display the image on Access forms and reports. Because images were stored twice, early Access databases were prone to severe bloating when a lot of image data was stored in the MDB.
You have the option to Preserve Source Image Format to conserve disk space by reducing the database file's size. (This option is only available in the ACCDB file format.) When using this option, Access only stores one copy of an image (in its original format) and dynamically generates a bitmap when the image is displayed on a form or report.
Navigation options
The settings in the Navigation section let you define parameters that affect how users navigate your database as an application.
The Display Navigation Pane check box
With most distributed applications, you might never want your users to have direct access to any of your tables, queries, forms, or other database objects. It's far too tempting for a user to try to “improve” a form or report, or to make some minor modification to a table or query. Rarely are users really qualified to make such changes to an Access database. Deselecting the Display Navigation Pane option hides the Navigation pane from the user at startup.
You must close and reopen the current database for this change to take effect.
The Navigation Options button
One nice addition to recent versions of Access is the ability to select which database options are exposed to users when the Navigation pane is visible at startup. Clicking the Navigation Options button opens the Navigation Options dialog box (shown in Figure 31.3), which you use to change the categories and groups that appear in the Navigation pane.
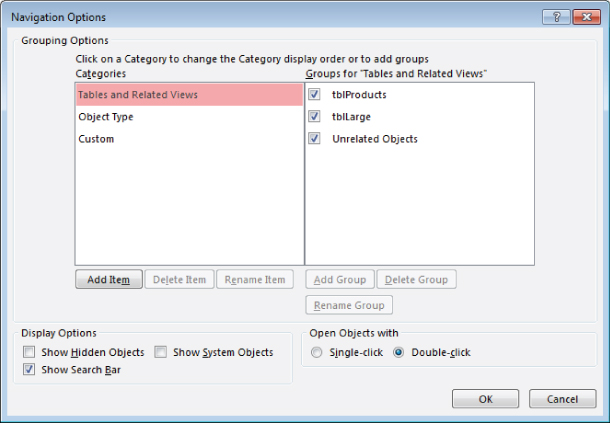
Figure 31.3 The Navigation Options dialog box.
In the Grouping Options section, click a category on the left side of the dialog box to change the category display order or to add groups to the right side of the dialog box. Click the Object Type category to disable viewing of certain Access objects (tables, queries, forms, reports, macros, or modules).
In the Display Options section, you can select the Show Hidden Objects, Show System Objects, and Show Search Bar check boxes.
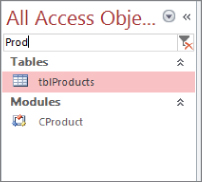
Figure 31.4 The Search Bar appears at the top of the Navigation pane.
In the Open Objects With section, select Single-Click or Double-Click to choose how you open a database object. Double-Click is the default option and is most likely familiar to all your users.
Ribbon and toolbar options
The settings in the Ribbon and Toolbar Options section let you define custom Ribbons and toolbars when using your database as an application. All the options in this section require you to close and reopen the current database for the change to take effect.
Ribbon Name
The Ribbon Name option lets you specify a customized (usually trimmed-down) version of the Ribbon. If you don't supply a Ribbon name, Access uses its built-in Ribbon, which might be inappropriate for your application. The default Ribbon contains many controls for modifying database objects, which might lead to problems with your users.
Shortcut Menu Bar
Setting the Shortcut Menu Bar changes the default menu for shortcut menus (right-click menus) to a menu bar that you specify. Using custom shortcut menus that have functionality specific to your application is always preferable.
Allow Full Menus
Checking the Allow Full Menus box determines whether Access displays all the commands in its menus or just the frequently used commands. If you supply custom menus for all your forms and reports and set the Menu Bar property to a custom menu bar, this setting has no effect.
Allow Default Shortcut Menus
The Allow Default Shortcut Menus setting determines whether Access displays its own default shortcut menus when a user right-clicks an object in the Navigation pane or a control on a form or report.
Name AutoCorrect Options
Several chapters in this book mention the problems associated with changing the names of fundamental database objects such as tables and fields within tables. For example, if you change the name of a table, everywhere you refer to that table (a query, a control's ControlSource property, VBA code, a macro, and so on) becomes invalid, causing the application to malfunction.
Microsoft added the Name AutoCorrect feature to Access 2000 as a way of mitigating the problems that inevitably occur when database objects are renamed. Unfortunately, this feature has never worked quite as well as Microsoft hoped. Primarily, Name AutoCorrect is a major drag on performance. Because Access must constantly monitor activity while Access is used, a database with this option selected runs noticeably slower than it does when the option is turned off. Plus, there are far too many places where an object's name may appear for an AutoCorrect feature to effectively capture every instance when the object is renamed. This is especially true of object names appearing in VBA code; many applications contain hundreds of thousands of lines of VBA code, making it virtually impossible to find and update every object reference.
Developing the Application
Developing an application generally consists of defining the requirements, building the database objects and writing the code, creating the documentation, and testing the application. If you're developing an application for your own use, the requirements are probably in your head. You also may be so familiar with the problem that you're trying to solve that you don't feel a need to formalize the requirements. Consider writing them down anyway as a way to clarify your thoughts and identify any problems early in the development process.
Building to a specification
All databases are meant to solve some problem experienced by users. The problem might be inefficiency in their current methods or the inability to view or retrieve data in a format they need. Or you may simply be converting an obsolete database to a more modern equivalent. The effectiveness of the solution you build will be judged by how well it resolves the problem the users are having. Your best guarantee of success is to carefully plan the application before building any table, query, or form. Only by working to a plan will you know how well the application will solve the user's problem.
Most Access development projects follow this general sequence of events:
- Define the problem. Something is wrong or inadequate with the current methods—a better system is needed and Access appears to be a good candidate to produce the new system.
- Determine the requirements. Interviews with the users yield a description of the basic features the program should provide. The product of these discussions is the design specification, a written document that outlines and details the application.
- Finalize the specifications. Review the design specifications with the users to ensure accuracy and completeness.
- Design the application. The developer uses the initial design specification to design the basic structure of the database and its user interface.
- Develop the application. This is where most developers spend most of their time. You spend a great deal of time building the tables, queries, forms, and other database objects needed to meet the specification produced in Step 2.
- Test. The developer and client exercise the application to verify that it performs as expected. The application is tested against the requirements defined in the design specification, and discrepancies are noted and corrected for Step 7.
- Distribute and roll out. After the application's performance has been verified, it's distributed to its users. If necessary, users are trained in the application's use and instructed on how to report problems or make suggestions for future versions.
Many Access developers dive right into development without adequately defining the application's objectives or designing the database's structure. Unless the application is incredibly simple, a developer who doesn't work to a specification will surely end up with a buggy, unreliable, and trouble-prone database.
Another major error is allowing the database to stray too far from the initial design specification. Adding lots of bells and whistles to an otherwise simple and straightforward database is all too tempting. If implementation digresses too far from the design specification, the project may fail because too much time is spent on features that don't directly address the users' problems. This is one of the reasons for the third step (finalize the specifications). The developer and the user are essentially entering into a contract at that point, and you might want to include a process to be followed in order for either party to make changes to the specification once it's been agreed upon.
Before any work begins, most professional application developers expect the client to submit a written document describing the intended application and specifying what the program is expected to do. A well-written design specification includes the following information:
- Expected inputs: What kind of data (text, numeric, binary) will the database have to handle? Will the data be shared with other applications like Excel or another database system? Does the data exist in a format that is easily imported into an Access database, or will the data have to be re-keyed at run time? Will all the data always be available? Is there a chance that the type might vary? For example, birth dates are obviously dates, but what happens if you know the year of birth but not the month or day?
- User interface: Will the users be comfortable with simple forms, or will they need custom menus and Ribbons and other user-interface components? Is context-sensitive online Help required?
- Expected outputs: Which kinds of reports are needed by the user? Will simple select queries be adequate to produce the desired results, or are totals, crosstabs, and other advanced queries necessary as well?
The whole point of a design specification is to avoid adding unplanned features that decrease the database's reliability without contributing to its utility. Writing a design specification before beginning the actual implementation will consistently yield the following benefits:
- A guide to development effort: Without some kind of design specification, how can you possibly know whether you're building an application that truly meets the client's expectations? As you work through the development phase, you can avoid adding features that don't contribute to the application's objectives and concentrate on those items that the client has identified as having priority.
- Verification that the application meets expectations: All aspects of the application must be tested to verify its operation. The best way to conduct testing is to confirm that all design objectives have been met and that no unexpected behavior is observed during the testing phase.
- Minimization of design changes during implementation: Many problems can be avoided by sticking to the specification. One of the easiest ways to break an application is to add new features not included in the original design. If the application was properly planned, the specified features will have been designed to work together. Introducing new features after development has begun most likely will result in a less reliable system.
Overall, a well-written design specification provides the basis for creating tight, bulletproof applications that fulfill the user's requirements. At the conclusion of the project, the finished database can be compared to the design specification, and its effectiveness in addressing the original problem can be objectively evaluated. Without a design specification written at the beginning of a project, you have no valid measure of how well the application resolves the problem that inspired the project in the first place.
Creating documentation
Even the best-written Access application will fail if users don't fully understand how to use it. And it's not just the user interface that needs to be understood: The logic of what happens when the user clicks a particular button needs to be understood both by at least some of the users as well as by any technical support staff who might be involved with the application.
While many developers dislike writing documentation, leaving it as a last step that they hopefully won't have time for because they've moved onto another project, documentation really is a “necessary evil.”
Documenting the code you write
Over time, changes or additions might be required to the application. Even if you're the one making those changes, the passage of time since you originally wrote the code might mean that even you have problems understanding exactly what the code does. Imagine how much harder it'll be if someone else has to figure it out!
Write self-documenting code by using consistent naming conventions for your variables, constants, and procedures. Provide logical names for your procedures that describe simply and clearly what the procedure does. If you can't come up with a reasonable name for a procedure, it may be that you're trying to do too much in one procedure, and you should consider breaking it up. Use comments when necessary, but don't overuse them or they'll never be read and will be quickly out-of-date. Create a comment when you make an important design decision that you want to document or when you use a non-intuitive programming technique that would be otherwise difficult to understand.
Figure 31.5 shows a short procedure that is mostly self-documenting. The procedure, variables, and constants are well named and a comment is included to explain an unusual line of code.
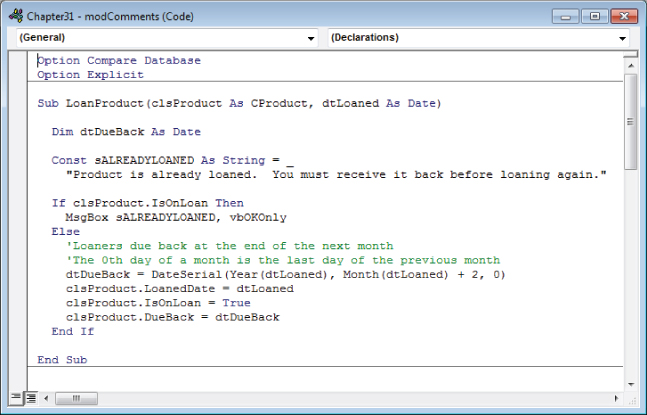
Figure 31.5 Produce self-documenting code when possible.
Name your database objects and controls and don't accept the default names that Access provides for database objects such as forms and controls. The default names are simply a convenience for simple applications and shouldn't be used in professional-quality work.
Documenting the application
The applications you deliver to end users should be accompanied by documentation that explains how the applications are meant to be used. End-user documentation doesn't have to include descriptions of the internal structure or logic behind the user interface. It should, however, explain how the forms and reports work, describe things the users should avoid (for example, changing existing data), and include printouts of sample reports. Use screenshots to illustrate the documentation.
The users of your applications will benefit from the online Help you build into the database. Online Help, of course, means everything from the tooltips you attach to the controls on a form to status-bar text, to sophisticated context-sensitive and “What's this?” help you see in many Microsoft products.
Testing the application before distribution
As you design your application, consider how you'll test the various aspects of it. Planning your tests during the design phase is the best time because the functions of a form or report will be fresh in your mind. Don't wait until you're completely done developing to start thinking about testing, or you'll have a hard time remembering all the important features that you should test. Write out a test plan during, or shortly after, designing an object in your application (such as a table or form). Don't worry if the test plan isn't perfect, you'll be able to change it before you distribute the application.
Execute your test plans as soon as it's practical to do so. Then execute them again when the whole project is complete and you're ready to distribute it. The first time you execute them assures that you designed the object as you intended. Executing them at the end ensures that future changes didn't introduce bugs. You may find that your tests are no longer valid because of changes you made to the design. Design changes happen all the time during development and when tests become invalid you can simply remove them or change them to test the new functionality.
While working through the debugging process of an application, categorize your bugs into one of three categories:
- Category 1: Catastrophic bugs: These bugs are absolutely unacceptable—for example, numbers in an accounting application that don't add up the way they should or a routine that consistently causes the application to terminate unexpectedly. If you ship an application with known Category 1 bugs, prepare for your users to revolt!
- Category 2: Major bugs that have a workaround: Category 2 bugs are fairly major bugs, but they don't stop users from performing their tasks because some workaround exists in the application. For example, a button that doesn't call a procedure correctly is a bug. If the button is the only way to run the procedure, this bug is a Category 1 bug. But if a corresponding Ribbon command calls the procedure correctly, the bug is a Category 2 bug. Shipping an application with a Category 2 bug is sometimes necessary. Although shipping a bug is officially a no-no, deadlines sometimes dictate that exceptions need to be made. Category 2 bugs will annoy users, but shouldn't send them into fits.
- Category 3: Small bugs and cosmetic problems: Category 3 bugs are small issues that don't affect the operation of your application. They may be caption or label misspellings or incorrect text-box colors. Category 3 bugs should be fixed soon, but they shouldn't take precedence over Category 1 bugs. They should take precedence over Category 2 bugs only when they're so extreme that the application looks completely unacceptable or when they cause enough trouble for users that a fix is quickly needed.
Categorizing bugs, and approaching them systematically, helps you create a program that looks and behaves the way its users think it should. Sometimes you may feel like you'll never finish your Category 1 list, but you will. You'll be smiling the day you check your bug sheet and realize that you're down to a few Category 2s and a dozen or so Category 3s! Although you might be tempted to skip this beta-testing phase of development, don't. You'll only pay for it in the long run.
Polishing Your Application
When your application has been thoroughly tested and appears ready for distribution, spend some time polishing your application.
Giving your application a consistent look and feel
First and foremost, decide on some visual design standards and apply them to your application. This step is incredibly important if you want a professional look and feel to your applications. Figure 31.6 shows a form with samples of different styles of controls.
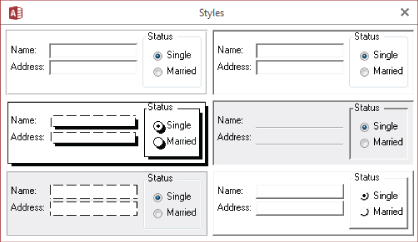
Figure 31.6 You can decide on any interface style that you like for your application. But after you decide on a style, use it consistently.
Your design decisions may include the following:
- Will text boxes be sunken, flat with a border, flat without a border, chiseled, or raised?
- What back color should text boxes be?
- What color will the forms be?
- Will you use chiseled borders to separate related items or select a sunken or raised border?
- What size will buttons on forms be?
- For forms that have similar buttons, such as Close and Help, in what order will the buttons appear?
- Which accelerator keys will you use on commonly used buttons, such as Close and Help?
- Which control will have focus when the form opens?
- How will the tab order be set?
- What will your Enter key property be for text boxes?
- Will you add some visual indication for when list boxes are multi-select and when they aren't?
- Will you add some visual indication for when combo boxes have their Limit to List property set?
Making your application look and work in a consistent manner is the single most important way to make it appear professional. For ideas on design standards to implement in your applications, spend some time working with some of your favorite programs to see which standards they use.
Adding common professional components
Most professional applications have some similar components. The most common components are the splash screen, an application switchboard, and an About box. These may seem like trivial features, but they can greatly enhance your application's appeal. They don't take much time to implement and should be included in all your distributed applications.
A splash screen
The splash screen (see Figure 31.7 for an example) not only aids in increasing perceived speed of an application but also gives the application a polished, professional appearance from the moment a user runs the program.
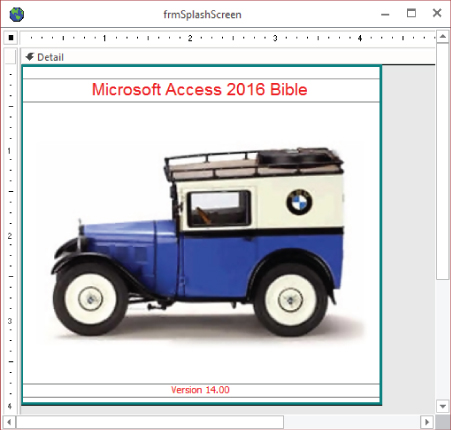
Figure 31.7 A splash screen not only increases perceived speed of your application, but it also gives your application a professional appearance.
Most splash screens contain information such as the following:
- The application's title
- The application's version number
- Your company information
- A copyright notice (© Copyright)
In addition, you might want to include the licensee information and/or a picture on the splash screen. If you use a picture on your splash screen, make it relevant to your application's function. For example, some coins and an image of a check could be used for a check-writing application. If you want, you can also use clip art for your splash screen—just be sure that the picture is clear and concise and doesn't interfere with the text information presented on your splash screen.
To implement the splash screen, have your application load the splash form before it does anything else. (Consider making your splash screen the Display Form in the Application Options, described earlier in this chapter.) When your application finishes all its initialization procedures, close the form. Make the splash form a light form and convert any bitmaps that you place on your splash screen to pictures in order to decrease the splash form's load time.
An application switchboard
An application switchboard is essentially a steering wheel for users to find their way through the functions and forms that are available in the application. Use the switchboard itself as a navigation form, using buttons to display other forms, as shown in the switchboard example in Figure 31.8. This is the switchboard named frmSwitchboard created for the Collectible Mini Cars database in this book.
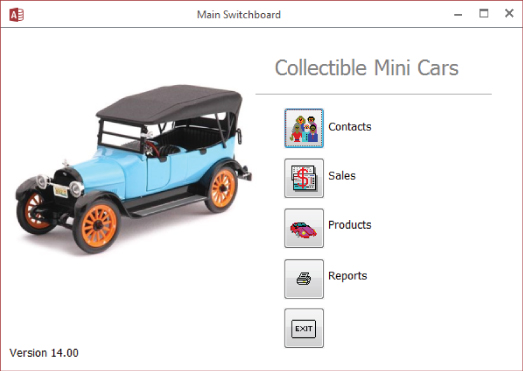
Figure 31.8 The switchboard provides a handy way to navigate throughout the application.
The switchboard provides a familiar place where users can be assured that they won't get lost in the application.
An About box
The About box (like the one shown in Figure 31.9) contains your company and copyright information, as well as the application name and current version. Including your application's licensee information (if you keep such information) in the About box is also a good idea.
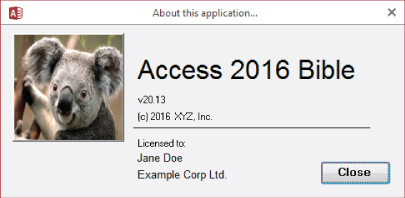
Figure 31.9 An About box provides useful information to the user and protects your legal interests.
The About box serves as legal notice of ownership and makes your application easier to support by giving your users easy access to the version information. Some advanced About boxes call other forms that display system information. You can make the About box as fancy as you want, but usually a simple one works just fine.
The About box should be accessible from a Help menu or from a button on your switchboard form.
The status bar
Keeping your users informed about what's happening with your application is an important part of building a good user experience. Access provides a SysCmd function that lets you display messages in the status bar (the thin colored bar across the bottom of the screen).
By default, the status bar shows information about the state of the object you're working on. For example, when you have a form open in Design view, the left side of the status bar reads “Design View.” The status bar also displays whether the NUM LOCK key is active. Depending on the type of object you have open, the far right of the status bar provides a quick way to switch between views.
Using SysCmd, you can display your own messages on the left side of the status bar. The status bar is a great place to display noncritical messages because it doesn't require any user interaction (other than reading it, of course).
To show a message in the status bar, use the acSysCmdSetStatus parameter, as shown in the following code:
Private Sub cmdHelpText_Click()


  Const sMSG As String = "Hello, World!"


  SysCmd acSysCmdSetStatus, sMSG


End Sub
This code displays "Hello, World!" in the status bar, but you can display any string you'd like. However, if the string is longer than Access has space to show, nothing will display. The status bar can also be used to show the user what's happening during a long process. In the following code, the status bar is updated while looping through a large recordset.
Private Sub cmdLoop_Click()


  Dim rs As ADODB.Recordset
  Dim sSql As String
  Dim lCnt As Long


  sSql = "SELECT * FROM tblLarge;"
  Set rs = New ADODB.Recordset
  rs.Open sSql, CurrentProject.Connection, _
    adOpenKeyset, adLockReadOnly


  Do While Not rs.EOF
    lCnt = lCnt + 1
    If lCnt Mod 10 = 0 Then
      SysCmd acSysCmdSetStatus, _
        "Processing record " & lCnt & " of " & rs.RecordCount
      DoEvents
    End If
    rs.MoveNext
  Loop


  SysCmd acSysCmdClearStatus


  rs.Close
  Set rs = Nothing


End Sub
When processing a lot of records, it's useful to display a counter like in the preceding code. This code updates the status bar every tenth record. If it were updated for every record, it would move so fast the user would barely be able to see it. Also, overuse of the status bar can degrade performance, so updating it only as needed helps speed up the process. The Mod function returns the remainder when the first number is divided by the second. When the remainder is zero, the counter is a multiple of 10 and the status bar is updated. Find a multiple that works for your data. The status bar should update frequently enough that the user doesn't think the program has stopped, but not so frequently that the text is a blur or the performance of the process is affected.
A couple of other aspects of the preceding code are worth mentioning. The recordset was opened with a cursor type of adOpenKeyset. Opening a recordset with this cursor type allows you to use the RecordCount property to return the total number of records. Inside the loop, the DoEvents keyword is used. While the code is running, it can use all the Windows resources; certain activities, like refreshing the screen, are put on hold until the code stops. That's not very helpful when you're trying to display text in the status bar. DoEvents is a command that briefly gives control to Windows so it can complete any tasks in its events queue.
Figure 31.10 shows the status bar being updated.
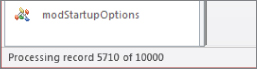
Figure 31.10 Use the status bar to provide feedback on a long process.
Near the end of the procedure, the acSysCmdClearStatus parameter is used to return control of the status bar back to Access.
A progress meter
Access provides a built-in progress meter in the status bar at the bottom of the main Access window. This progress meter is a rectangle that grows horizontally as a long-running process is executed by Access.
Setting up and using a progress meter requires an initializing step, and then setting the meter to its next value. As your code progresses, you don't just increment a counter that is managed by SysCmd. You must explicitly set the meter's value to a value between 0 and the maximum you set at initialization.
Use the acSysCmdInitMeter constant to initialize the meter. You must pass some text that is used to label the meter, as well as the meter's maximum value:
Private Sub cmdInitMeter_Click()


  Const sSTATUSTEXT As String = "Reading Data"


  mlMeterMax = 100
  mlMeterIncrement = 0
  SysCmd acSysCmdInitMeter, sSTATUSTEXT, mlMeterMax


End Sub
This procedure sets the max to 100 and initializes the mlMeterIncrement variable to zero. When this procedure is run, the Access status bar appears, as shown in Figure 31.11.
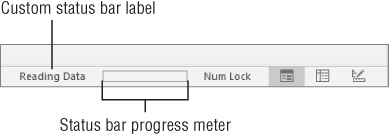
Figure 31.11 The progress meter after initialization.
Incrementing the meter is a little tricky. In the following subroutine, the module-level variable mlMeterIncrement is incremented by 10 and the meter's position is set to the value of mlMeterIncrement:
Private Sub cmdIncrementMeter_Click()
  mlMeterIncrement = mlMeterIncrement + 10


  If mlMeterIncrement > mlMeterMax Then
    mlMeterIncrement = 0
  End If


  SysCmd acSysCmdUpdateMeter, mlMeterIncrement


End Sub
This procedure also checks to see if the value of mlMeterIncrement exceeds the maximum set in the initialization routine. If it does, it starts back at zero. That's interesting for a demonstration, but in real-world situations it's best to set the maximum to an appropriate value that won't be exceeded. Figure 31.12 shows the progress meter after the Progress Meter Demo button was clicked and the Increment Meter button was clicked five times. It's easy to see that the meter has moved a distance proportional to the value of mlMeterIncrement after being incremented five times.

Figure 31.12 The progress meter midway in its movement.
You'll have to choose values for the progress meter's maximum and increment settings in your application. Also, be sure to update the progress meter at appropriate intervals, such as every time one-tenth of a process has run (assuming, of course, that you know ahead of time how many items will be processed or how long an operation may take).
A meter is a valuable way of keeping the user informed of the progress of a lengthy process. Because you control its initial value and the rate at which it increments, you're able to fairly precisely report the application's progress to its users.
The only issue with the default Access progress meter is that it appears at the very bottom of the screen and is easily overlooked by users. Also, if the status bar is hidden through the Display Status Bar option on the Current Database tab of the Access Options dialog box (refer to Figure 31.1), the progress meter can't be seen at all.
If you prefer to keep the status bar hidden and show a progress meter that the users are sure to see, you can create your own progress meter with a form and a couple of label controls. Figure 31.13 shows just such a progress meter. It starts with an unbound form and two label controls. One label is on top of the other and they have the same Top, Left, Height, and Width properties. The label underneath has a lighter BackColor than the label on top.
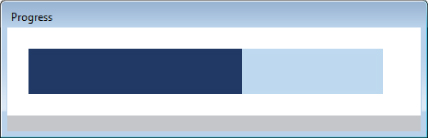
Figure 31.13 A homemade progress meter.
As the program progresses, the top label's Width property is increased, giving the illusion that a darker color is filling a box. The form has certain properties set to give it the look and feel of a progress meter. Table 31.1 shows some of the properties of the form.
Table 31.1 Form Properties for a Progress Meter
| Property | Value | Description |
| Pop Up | Yes | Along with Modal, ensures that the form is always on top and other forms can't be selected. |
| Modal | Yes | Along with Pop Up, ensures that the form is always on top and other forms can't be selected. |
| Caption | Progress | You can change this property to customize your progress meter. |
| Allow Datasheet View | No | Progress meters should only be shown in Form view. |
| Allow Layout View | No | Progress meters should only be shown in Form view. |
| Auto Center | Yes | Puts the progress meter in the middle of the screen. |
| Record Selectors | No | Hides the record selectors. |
| Navigation Buttons | No | Hides the navigation buttons. |
| Control Box | No | Hides the control box. |
| Close Button | No | Hides the close button. |
| Min Max Buttons | No | Hides the minimize and maximize buttons. |
| Border Style | Dialog | Makes the progress meter appear as a dialog box. |
To create the progress meter in Figure 31.13, start by adding two custom properties to frmProgress. In addition to the form properties built-in to Access, you can add properties unique to your application. Add a Max property to set the maximum length of the progress bar and a Progress property to set how far along the process is.
Private mlMax As Long
Private mdProgress As Double


Public Property Get Max() As Long
  Max = mlMax
End Property


Public Property Let Max(lMax As Long)
  mlMax = lMax
End Property


Public Property Get Progress() As Double
  Progress = mdProgress
End Property


Public Property Let Progress(dProgress As Double)
  mdProgress = dProgress
End Property
The Property keyword in VBA is used to define the custom properties. Declare a module-level variable to hold the property's value, like mlMax. Then create Property Get and Property Let procedures to read and write the property, respectively. You can also omit either the Get or Let property statement if you want to make the property read-only or write-only.
Use the Form_Load event to initialize the width of the top label, lblPmFront. The underneath label, lblPmBack, always stays the same width.
Private Sub Form_Load()


  Me.lblPmFront.Width = 0


End Sub
The last piece of code behind frmProgress is a custom method to update the progress bar. A custom method is simply a sub-procedure declared with the Public keyword.
Public Sub UpdateProgress(lProgress As Long)


  If lProgress >= Me.Max Then
    Me.Progress = 1
  Else
    Me.Progress = lProgress / Me.Max
  End If


  Me.lblPmFront.Width = Me.lblPmBack.Width * Me.Progress


End Sub
The first part of the custom method determines if the lProgress argument is greater than the maximum. If it is, Progress is set to 1, or 100%. This way, the progress meter will never go above 100%. If lProgress is less than the max, Progress is set to the ratio of lProgress to the maximum. Finally, the width of lblPmFront is increased by that proportion.
The procedure in the frmSysCmdDemo form that uses this progress meter is shown below. It is very similar to the code used earlier in this chapter to update the status bar when looping through a large recordset.
Private Sub cmdLoopProgress_Click()


  Dim rs As ADODB.Recordset
  Dim sSql As String
  Dim lCnt As Long


  Const sFORMPROGRESS As String = "frmProgress"


  sSql = "SELECT * FROM tblLarge;"
  Set rs = New ADODB.Recordset
  rs.Open sSql, CurrentProject.Connection, _
    adOpenKeyset, adLockReadOnly


  DoCmd.OpenForm sFORMPROGRESS
  Set frmProgress = Forms(sFORMPROGRESS)
  frmProgress.Max = rs.RecordCount


  Do While Not rs.EOF
    lCnt = lCnt + 1
    If lCnt Mod 10 = 0 Then
      frmProgress.UpdateProgress lCnt
      DoEvents
    End If
    rs.MoveNext
  Loop


  DoCmd.Close acForm, sFORMPROGRESS


End Sub
In this procedure, the frmProgress form is opened and assigned to a variable that allows access to the Max property and the UpdateProgress method. The Max property is set to rs.RecordCount and the UpdateProgress method is called within the loop, passing the lCnt variable. Finally, the progress form is closed at the end of the procedure.
Making the application easy to start
You shouldn't expect users to locate the Access data file (ACCDB or MDB) or to choose File ![]() Open in Access to invoke the application. Pinning items to the Windows Start screen isn't difficult. When properly implemented, a program icon creates the impression that the application exists as an entity separate from Access, and endows it with a status equivalent to Word, Excel, or other task-oriented programs.
Open in Access to invoke the application. Pinning items to the Windows Start screen isn't difficult. When properly implemented, a program icon creates the impression that the application exists as an entity separate from Access, and endows it with a status equivalent to Word, Excel, or other task-oriented programs.
Creating a program icon isn't difficult. Many freeware and shareware versions of icon editors are available online, enabling you to create entirely new icons. The Chapter31.accdb example database comes with its own program icon (Earth.ico) for you to experiment with. You designate the program icon in the Access startup options (see the “Application options” section earlier in this chapter) or by setting a program icon in Windows Explorer.
Follow these steps to establish a Windows shortcut for an Access database application:
- In the Microsoft Office program folder (usually
C:Program FilesMicrosoft Office
ootOffice16
), locateMSACCESS.EXE. - Right-click
MSACCESS.EXEand select Create Shortcut. - Press F2 while the shortcut is highlighted and enter a new caption for the icon.
- Right-click the icon and select Properties. The icon's Properties dialog box appears.
- Select the Shortcut tab and add a complete path reference to the application's ACCDB or MDB file to the Target text box.
In Figure 31.14 the application database's path is
E:DropboxDropboxAccess2016Chapter31Chapter31.accdb. Notice that the Target text box contains the path to the Access executable followed by the path to the ACCDB file.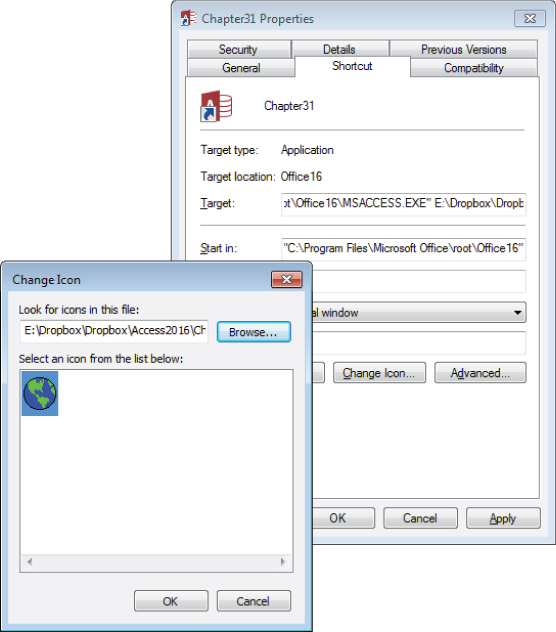
Figure 31.14 It's easy to get Access to automatically open a database from a shortcut icon.
- Click the Change Icon button. The Change Icon dialog box appears.
- Click the Browse button and navigate to the icon file (with an ICO extension) you want to use (see Figure 31.15).
- Drag the shortcut to the computer's desktop or Quick Launch toolbar to provide a convenient way to start the Access application.
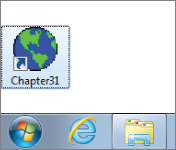
Figure 31.15 A colorful icon can make an application easy to find in a crowded folder or desktop.
Bulletproofing an Application
Bulletproofing (or hardening) an application is the process of making the application more stable and less prone to problems caused by unskilled users. Bulletproofing involves trapping errors that can be caused by users, such as invalid data entry, attempting to run a function when the application is not ready to run the function, and allowing users to click a Calculate button before all necessary data has been entered. Bulletproofing your application is an additional stage that should be completed in parallel with debugging and should be performed again after the application is working and debugged.
Using error trapping on all Visual Basic procedures
An error-handling routine gives you a chance to display a friendly message to the user, rather than some unintuitive default message box. Figure 31.16 shows a message box with a runtime error “2102,” which is unintuitive; however, it also shows a more-detailed message of a form missing or misspelled. The user won't know the name of the form or if it's misspelled or missing. An error-handling routine is needed to provide the user with a more informative and meaningful error message than what's shown in Figure 31.16.
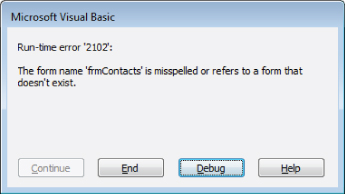
Figure 31.16 An error message resulting from a procedure with no error-handling routine.
One of the most important elements of bulletproofing an application is making sure that the application never crashes (ceases operation completely and unexpectedly). Although Access provides built-in error processing for most data-entry errors (for example, characters entered into a currency field), automatic processing doesn't exist for VBA code errors. You should include error-handling routines in every VBA procedure, as described in Chapter 27.
When running an application at run time, any untrapped error encountered in your code causes the program to terminate completely. Your users can't recover from such a crash, and serious data loss might occur. Your users have to restart the application after such an application error.
Maintaining usage logs
Usage logs capture information such as the user's name or ID, the date, and the time. They provide valuable information, especially if an error occurs. Although you can easily record too much information, a properly designed usage log will permit you to pinpoint whether a certain type of error always seems to occur when a particular user is working with the system or when a certain query is run.
The logging information you add to a database might include updating a time stamp on records in a table when changes are made. Be aware, however, that the more logging you do, the slower the application becomes. The log information will cause the database to grow as well, unless the log information is stored in another location.
You can even tailor the level of logging to suit individual users or groups of users. Using the information captured on a login form, the application can determine at startup what level of logging to impose during the session. To make reviewing the logs much easier, you can even log to a table located in an external database in a different location on the network.
Usage logs can also provide an excellent way to perform a postmortem on an application that doesn't operate properly. If you have logging in each subroutine and function that might fail at run time, you can see exactly what happened at the time an error occurred, instead of relying on the user's description of the error.
Logging can produce undesirable results when errors occur. For example, an error that causes an endless loop can easily consume all available disk space on the user's computer if each iteration of the loop adds a message to an error log. Use logging wisely. You may want to add logging to every procedure in an application during the beta-test process, and reduce the number of calls to the logging procedure just before distributing the application to its users. You may even provide some way that users can turn on logging if they encounter a reproducible problem in a database application.
The function shown in the following listing provides an elementary form of error logging. LogError() writes the following information to a text file in the same location as the database:
- The current date and time
- The procedure name that produced the error
- The error number
- The error description
- The form that was active at the time the error occurred (may be null if no form is open)
- The name of the control that was active at the time the error occurred (may be null if no control is selected)
Using a text file as a log instead of writing to the database keeps the database smaller and improves performance.
Public Sub LogError(ProcName As String, _
     ErrNum As Integer, ErrDescription As String)


  Dim sFile As String, lFile As Long
  Dim aLogEntry(1 To 6) As String


  Const sLOGFILE = "Error.log"
  Const sLOGDELIM = "|"


  On Error Resume Next
  sFile = CurrentProject.Path & "" & sLOGFILE
  lFile = FreeFile


  aLogEntry(1) = Format(Now, "yyyy-mm-dd hh:mm:ss") 'Date stamp
  aLogEntry(2) = ErrNum
  aLogEntry(3) = ErrDescription
  aLogEntry(4) = ProcName
  'The following may be NULL
  aLogEntry(5) = Screen.ActiveForm.Name
  aLogEntry(6) = Screen.ActiveControl.Name


  Open sFile For Append As lFile
  Print #lFile, Join(aLogEntry, sLOGDELIM)
  Close lFile


End Sub
This simple subroutine adds to or creates a text file named Error.log in the same directory as the database. Each error encountered is one line in the text file, and each piece of information is separated by a pipe delimiter.
The most critical items in the error log are the date and time, the error number, and the error description. The procedure name is useful, but it has to be hard-coded for each procedure (subroutine or function) you log with LogError().
The following procedure intentionally generates an error to test the LogError procedure. A button on the frmError form runs this procedure. After the button has been clicked a few times, the Error.log file might look like Figure 31.17.
Private Sub cmdError_Click()


  Dim x As Long


  On Error GoTo ErrHandler


  x = 1 / 0


ErrExit:
  Exit Sub


ErrHandler:
  LogError "cmdError_Click", Err.Number, Err.Description
  Resume ErrExit


End Sub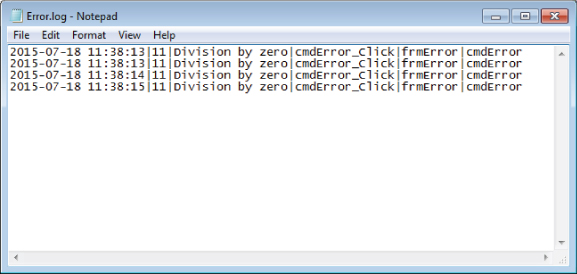
Figure 31.17 A text file can be used to log errors.
When it's time to review the errors, you can open the text file to see what's happened. You can also import the text file into an Access table to allow you to sort and filter the entries. Figure 31.18 shows Error.log imported into a table.
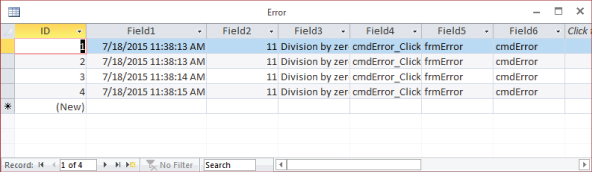
Figure 31.18 The error log can be imported into a table.
Once the data has been analyzed, the Error table can be deleted to keep the database small. Importing an error log is a good candidate for saving the import steps so that it can be easily imported the next time you want to review the data.
Separating tables from the rest of the application
You should separate your code objects (forms, reports, queries, modules, and macros) from your table objects. Many benefits are gained from distributing these objects in separate ACCDB files:
- Network users benefit from speed increases by running the code ACCDB (the database containing the queries, forms, macros, reports, and modules) locally and accessing only the shared data on the network.
- Updates can easily be distributed to users.
- Data can be backed up more efficiently because disk space and time aren't used to continuously back up the code objects.
All professionally distributed applications—especially those intended for network use—should have separate code and data database files.
Building bulletproof forms
You can take several steps to make each form in an application virtually bulletproof:
- Consider removing the Control Box, Min, Max, and Close buttons from the form at design time. Your users will be forced to use the navigation aids you've built into the application to close the form, ensuring that your application is able to test and verify the user's input. When using the tabbed documents interface, the Min and Max buttons don't apply. The Close button is represented by an X at the far right of the tab above the form's body. Removing the Close button from a tabbed form disables the X in the tab but doesn't actually remove it.
- Always put a Close or Return button on forms to return the user to a previous or next form in the application. The buttons should appear in the same general location on every form and should be consistently labeled. Don't use Close on one form, Return on another, and Exit on a third.
- Set the
ViewsAllowedproperty of the form toFormat design time. This setting prevents the user from ever seeing a form as a datasheet. - Use modal forms where appropriate. Keep in mind that modal forms force the user to respond to the controls on the form—the user can't access any other part of the application while a modal form is open.
- Use your own navigation buttons that check for EOF (end of file) and BOF (beginning of file) conditions on bound forms. Use the
OnCurrentevent to verify information or set up the form as the user moves from record to record. - Use the
StatusBarTextproperty on every control, to let the user know what's expected in each control. TheControl TipTextproperty should also be set on all relevant controls.
Validating user input
One of the most important bulletproofing techniques is to simply validate everything the user enters into the database. Capturing erroneous data input during data entry is an important safeguard that you can build into your applications. In many cases, you can use the table-level validation (determined by each field's ValidationRule and ValidationText properties), but in many other cases you'll want more control over the message the user receives or the actions taken by the database in response to erroneous input.
One of the major problems with the ValidationRule property is that it isn't checked until the user actually tabs to the next control, making it impossible to capture bad data entry. You're much better off in many cases validating entries in code. Very often you'll want to validate all controls on a form from the form's BeforeUpdate event instead of individually checking each and every control on the form.
Using the /runtime option
If you're not concerned with protecting your application, and you just want to prevent users from mistakenly breaking your application by modifying or deleting objects, you can force your application to be run in Access's runtime mode. When a database is opened in Access's runtime mode, all the interface elements that allow changes to objects are hidden from the user. In fact, while in runtime mode, it's impossible for a user to access the Navigation pane.
When using the runtime option, you must ensure that your application has a startup form that gives users access to any objects you want them to access. Normally, this is the main menu or main switchboard of your application.
Earlier in this chapter, in the “Making the application easy to start” section, you read how to create a Windows shortcut that launches an Access application. Forcing run-time behavior in Access is quite easy. Simply add the /runtime switch after the reference to the database file in the shortcut properties, as shown in Figure 31.19.
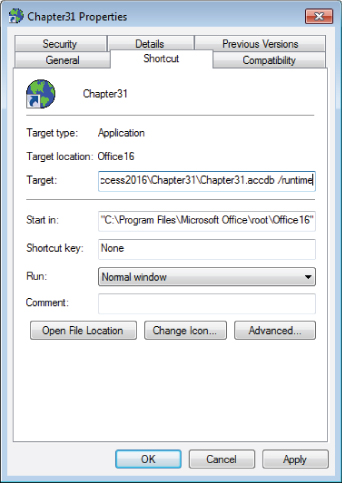
Figure 31.19 Adding the /runtime switch to a shortcut.
Encrypting or encoding a database
When security is of utmost importance, one final step that you need to take is to encrypt or encode the database. Access uses strong encryption to secure the data and contents of Access databases.
Follow these steps to encrypt an Access ACCDB database:
- Open an existing ACCDB database (
Chapter31.accdb) exclusively. - Click the File button in the upper-left corner of the screen, and select the Encrypt with Password command on the Info tab (see Figure 31.20).
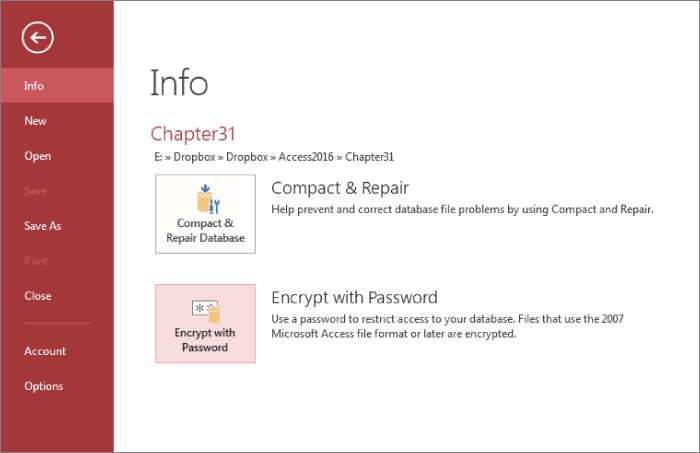
Figure 31.20 Choosing to encrypt an Access database.
- In the Password field, type the password that you want to use to secure the database (see Figure 31.21). Access does not display the password; instead, it shows an asterisk (
*) for each letter.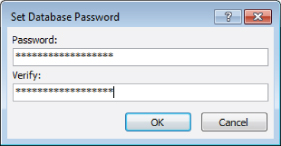
Figure 31.21 Providing a password to encrypt an Access database.
- Retype the same password in the Verify field and click OK.
An encrypted database looks like any other Access application to its users. There is no outward difference in the appearance of the application's forms or reports after encryption. The only difference is that the user is required to provide the password each time the database is opened.
When encrypting a database, however, be aware of the following drawbacks:
- Encrypted databases don't compress from their original size when used with compression programs, such as WinZip or sending it to a compressed (zipped) folder. Encryption modifies the way that the data is stored on the hard drive so compression utilities have little or no effect.
- Encrypted databases suffer some performance degradation (up to 15 percent). Depending on the size of your database and the speed of your computer, this degradation may be imperceptible.
Also, be aware that encrypting a database makes it impossible to access the data or database objects without the proper password. Always maintain an unencrypted backup copy of the database in a secure location in the event that the password is lost or accidentally changed. There is no “universal” password for decrypting an encrypted Access database, and because Access uses strong encryption, there is no way to decrypt the database without the proper password.
Removing a database password
Follow these steps to remove the password from an encrypted database, and restore it to its previous, unencrypted state.
- Open the encrypted ACCDB database (for example,
Chapter31.accdb) exclusively. - Click the File button in the upper-left corner of the screen, and select the Decrypt Database command on the Info tab (see Figure 31.22). The Unset Database Password dialog box appears (see Figure 31.23).
- Enter the database password and click OK.
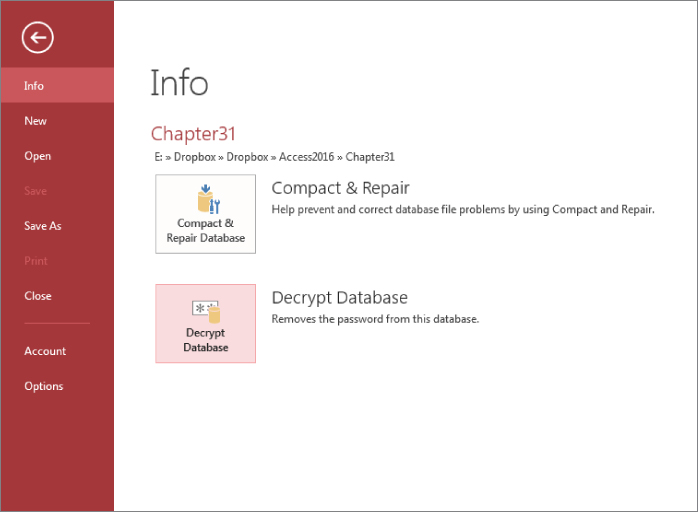
Figure 31.22 Choosing to remove a password from an encrypted Access database.
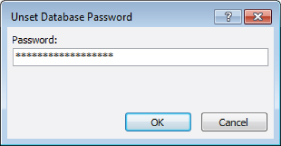
Figure 31.23 Providing a password to remove a password from an encrypted Access database.
Protecting Visual Basic code
You control access to the VBA code in your application by creating a password for the Visual Basic project that you want to protect. When you set a database password for a project, users are prompted to enter the password each time they try to view the Visual Basic code in the database.
- Open the Visual Basic Editor by pressing Alt+F11.
- In the Visual Basic Editor, choose Tools
 Chapter 31 Properties. The Project Properties dialog box appears.
 - Select the Protection tab (shown in Figure 31.24).

Figure 31.24 Creating a project password restricts users from viewing the application's Visual Basic code.
- Select the Lock Project for Viewing check box.
- Enter a password in the Password text box. Access does not display the password; instead, it shows an asterisk (
*) for each letter. - Type the password again in the Confirm Password text box and click OK. This security measure ensures that you don't mistype the password (because you can't see the characters that you type) and mistakenly prevent everyone, including yourself, from accessing the database.
After you save and close the project, users attempting to view the application's code must enter the password. Access prompts for the project password only once per session.
A more secure method of securing your application's code, forms, and reports is to distribute your database as an ACCDE file. When you save your database as an ACCDE file, Access compiles all code modules (including form modules), removes all editable source code, and compacts the database. The new ACCDE file contains no source code but continues to work because it contains a compiled copy of all your code. Not only is this a great way to secure your source code, but it also enables you to distribute databases that are smaller (because they contain no source code) and always keep their modules in a compiled state.
To create an ACCDE file, choose Save As from the File tab, Save Database As, and Make ACCDE, as shown in Figure 31.25.
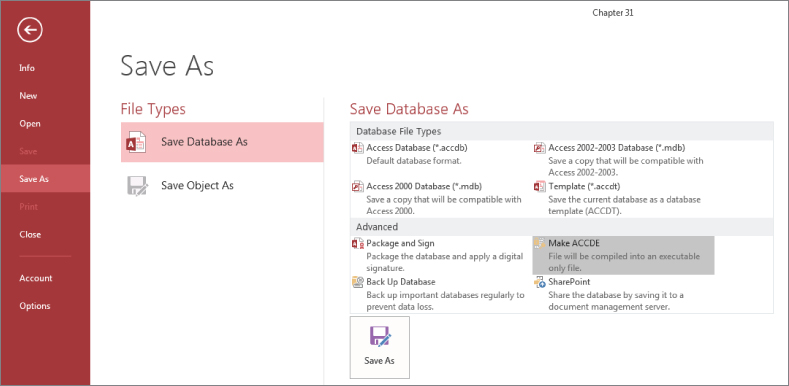
Figure 31.25 Create an ACCDE file to protect your database.
Securing the Environment
A serious Access application must be secured from unauthorized users. The built-in user-level security system (enforced by the ACE database engine, not by Access) provides multiple levels of security. You can, for example, secure a single database object (form, table, report) from individuals, groups, or individuals within groups. A user can even have multiple levels of security (provided the user has been assigned multiple login names). All the Access security objects, their properties, and methods are accessible throughout Access Visual Basic code.
User-level security is available only in the MDB database format. The ACCDB format provides other types of data protection, such as password-protected strong encryption, that is not available in the MDB format. As a developer, you'll have to decide whether user-level security or strong encryption is needed to protect the data in your Access applications.
Setting startup options in code
The options you set on the Current Database tab of the Access Options dialog box (refer to Figure 31.1) apply globally to every user who logs into the database. There are times when you want to control these options through startup code instead of allowing the global settings to control the application. For example, a database administrator should have access to more of the database controls (menus, the Navigation pane) than a data-entry clerk has.
Almost every option you see on the Options screen can be set through code. As you'll see in the “Setting property values” section, you can use Access VBA to control the setting of the current database properties listed in Table 31.2.
Table 31.2 Startup Option Properties of the Application Object
| Startup Option | Property to Set | Data Type |
| Application title | AppTitle |
dbText |
| Application icon | AppIcon |
dbText |
| Display form | StartupForm |
dbText |
| Display database window | StartupShowDBWindow |
dbBoolean |
| Display status bar | StartupShowStatusBar |
dbBoolean |
| Menu bar | StartupMenuBar |
dbText |
| Shortcut menu bar | StartupShortcutMenuBar |
dbText |
| Allow full menus | AllowFullMenus |
dbBoolean |
| Allow default shortcut menus | AllowShortcutMenus |
dbBoolean |
| Allow built-in toolbars | AllowBuiltInToolbars |
dbBoolean |
| Allow toolbar changes | AllowToolbarChanges |
dbBoolean |
| Allow viewing code after error | AllowBreakIntoCode |
dbBoolean |
| Use Access special keys | AllowSpecialKeys |
dbBoolean |
Depending on the username (and password) provided on the login form, you can use VBA code on the splash screen or switchboard form to set or reset any of these properties. Clearly, these properties have a lot to do with controlling the Access environment at startup.
Be aware that many of the database options in Table 31.2, such as AppIcon, require restarting the Access database before they take effect.
Disabling startup bypass
The Access startup properties provide some options for how your users see your application when it starts. Unfortunately, users can bypass your carefully designed startup options by holding down the Shift key as the application starts. Bypassing your startup routines, of course, will reveal the application's design and objects that you've hidden behind the user interface.
Fortunately, the Access designers anticipated the need for bulletproofing an application's startup by providing a database property named AllowBypassKey. This property, which accepts True or False values, disables (or enables) the Shift key bypass at application startup.
Here's the code you need to implement the AllowBypassKey property:
Public Sub SetBypass(bFlag As Boolean)


  Dim db As DAO.Database
  Dim pBypass As DAO.Property
  Const sKEYNAME As String = "AllowBypassKey"


  Set db = CurrentDb
  On Error Resume Next
    Set pBypass = db.Properties(sKEYNAME)
  On Error GoTo 0


  If pBypass Is Nothing Then
    Set pBypass = db.CreateProperty(sKEYNAME, dbBoolean, bFlag)
    db.Properties.Append pBypass
  Else
    pBypass.Value = bFlag
  End If


End Sub
This procedure first tries to point a variable (pBypass) to the AllowBypassKey property. If the variable is Nothing, then the AllowBypassKey property doesn't exist and it is created and appended to the database. If it does already exist, its Value property is set to bFlag (the value passed into the procedure).
Setting property values
You use the CurrentDb object's CreateProperty and Properties.Append methods to add each of these properties. In most cases, unless the property has already been set in the Access Options dialog box, the property hasn't been appended to the database's Properties collection. You must make sure the property exists before trying to set its value in code. The following function sets the value of a startup property, creating and appending the property to the Properties collection if the property doesn't exist:
Public Function SetStartupProperty(sPropName As String, _
  ePropType As DAO.DataTypeEnum, vPropValue As Variant) As Boolean


  Dim db As DAO.Database
  Dim prp As DAO.Property
  Dim bReturn As Boolean


  Set db = CurrentDb
  On Error Resume Next
    Set prp = db.Properties(sPropName)


    If prp Is Nothing Then
      Set prp = db.CreateProperty(sPropName, ePropType, vPropValue)


      If prp Is Nothing Then
        bReturn = False
      Else
        db.Properties.Append prp
        bReturn = True
      End If
    Else
      prp.Value = vPropValue
      bReturn = True
    End If


    SetStartupProperty = bReturn


End Function
Using SetStartupProperty() is quite easy. You must know the exact property name and data type of the property before invoking SetStartupProperty(). The following subroutine demonstrates how to set a startup property with SetStartupProperty():
Sub ChangeAppTitle()


  Dim bSuccess As Boolean


  bSuccess = SetStartupProperty("AppTitle", dbText, "My Application")


  If bSuccess Then
    MsgBox "Application title has been changed."
  Else
    MsgBox "Application title has not been changed."
  End If


End Sub
Notice that the AppTitle property is a string data type (dbText).
Getting property values
Getting the value of a property is much easier than setting a property's value. The Properties collection returns the property, and the Value property returns the value. The syntax to get the value of the AppTitle property is as follows:
On Error Resume Next
GetAppTitle = CurrentDb.Properties("AppTitle").Value
where GetAppTitle is a string variable. The On Error Resume Next statement is necessary in case the property has not been set.