
C H A P T E R 7
Manipulating the DOM
In the previous chapter, I showed you how to select elements. One of the most powerful things you can do with the selection is to change the structure of the HTML document itself, known as manipulating the DOM. In this chapter, I'll show you the different ways in which you can alter the structure, including inserting elements as children, parents, or siblings of other elements. I'll also show you how to create new elements, how to move elements from one part of the document to another, and how to remove elements entirely. Table 7-1 provides the summary for this chapter.

Creating New Elements
You often need to create new elements before you can insert them into the DOM (although you can insert existing elements, as I'll explain later in the chapter). In the sections that follow, I'll show you some different ways that you can create content.
![]() Tip It is important to understand that creating new elements doesn't automatically add them to the DOM. You need to explicitly tell jQuery where the new elements should be placed in the document, which I explain later in this chapter.
Tip It is important to understand that creating new elements doesn't automatically add them to the DOM. You need to explicitly tell jQuery where the new elements should be placed in the document, which I explain later in this chapter.
Creating Elements Using the $ Function
You can create new elements by passing an HTML fragment string to the $ function. jQuery parses the string and creates the corresponding DOM objects. Listing 7-1 contains an example.
Listing 7-1. Creating New Elements Using the $ Function
<!DOCTYPE html>

<html>

<head>

    <title>Example</title>
    <script src="jquery-1.7.js" type="text/javascript"></script>

    <link rel="stylesheet" type="text/css" href="styles.css"/>

    <script type="text/javascript">

        $(document).ready(function() {


            var newElems = $('<div class="dcell"><img src="lily.png"/></div>'),


            newElems.each(function (index, elem) {

                console.log("New element: " + elem.tagName + " " + elem.className);

            });


            newElems.children().each(function(index, elem) {

                console.log("Child: " + elem.tagName + " " + elem.src);

            });

        });

    </script>

</head>

<body>

    <h1>Jacqui's Flower Shop</h1>

    <form method="post">

        <div id="oblock">

            <div class="dtable">

                <div id="row1" class="drow">

                    <div class="dcell">

                        <img src="astor.png"/><label for="astor">Astor:</label>

                        <input name="astor" value="0" required>

                    </div>

                    <div class="dcell">

                        <img src="daffodil.png"/><label for="daffodil">Daffodil:</label>

                        <input name="daffodil" value="0" required >

                    </div>

                    <div class="dcell">

                        <img src="rose.png"/><label for="rose">Rose:</label>

                        <input name="rose" value="0" required>

                    </div>

                </div>

                <div id="row2"class="drow">

                    <div class="dcell">

                        <img src="peony.png"/><label for="peony">Peony:</label>

                        <input name="peony" value="0" required>

                    </div>

                    <div class="dcell">

                        <img src="primula.png"/><label for="primula">Primula:</label>

                        <input name="primula" value="0" required>

                    </div>

                    <div class="dcell">

                        <img src="snowdrop.png"/><label for="snowdrop">Snowdrop:</label>

                        <input name="snowdrop" value="0" required>

                    </div>

                </div>

            </div>

        </div>
        <div id="buttonDiv"><button type="submit">Place Order</button></div>

    </form>

</body>

</html>
In this example, I have created two new elements from an HTML fragment: a div element and an img element. Since you are dealing with HTML, you can use fragments that contain structure. In this case, the img element is a child of the div element.
The jQuery object that is returned by the $ function contains only the top-level elements from the HTML fragment. To demonstrate this, I have used the each function to write information about each element in the jQuery object to the console. jQuery doesn't discard the child elements. They are accessible via the usual navigation methods (which I described in Chapter 6). To demonstrate this, I have called the children method on the jQuery object and printed information about each child element to the console as well. The output from this script is as follows:
New element: DIV dcell

Child: IMG http://www.jacquisflowershop.com/jquery/lily.png
Creating New Elements by Cloning Existing Elements
You can create new elements from existing elements by using the clone method. This duplicates all of the elements in a jQuery object, along with all of their descendant elements. Listing 7-2 gives an example.
Listing 7-2. Cloning Elements
...

<script type="text/javascript">

    $(document).ready(function() {


        var newElems = $('div.dcell').clone();


        newElems.each(function (index, elem) {

            console.log("New element: " + elem.tagName + " " + elem.className);

        });


        newElems.children('img').each(function(index, elem) {

            console.log("Child: " + elem.tagName + " " + elem.src);

        });


    });

</script>

...
In this script I have selected and cloned all of the div elements that are members of the dcell class. To demonstrate that the descendant elements are cloned as well, I have used the children method with a selector to obtain the cloned img elements. I have written details of the div and img elements to the console, producing the following output:
New element: DIV dcell

New element: DIV dcell

New element: DIV dcell

New element: DIV dcell

New element: DIV dcell

New element: DIV dcell

Child: IMG http://www.jacquisflowershop.com/jquery/astor.png

Child: IMG http://www.jacquisflowershop.com/jquery/daffodil.png

Child: IMG http://www.jacquisflowershop.com/jquery/rose.png

Child: IMG http://www.jacquisflowershop.com/jquery/peony.png

Child: IMG http://www.jacquisflowershop.com/jquery/primula.png

Child: IMG http://www.jacquisflowershop.com/jquery/snowdrop.png
![]() Tip You can pass the value
Tip You can pass the value true as an argument to the clone method to include the event handlers and data associated with the elements in the copying process. Omitting this argument or specifying a value of false omits the event handlers and data. I explain the jQuery support for events in Chapter 9 and explain how to associate data with elements in Chapter 8.
Creating Elements Using the DOM API
You can use the DOM API directly to create new HTMLElement objects, which is essentially what jQuery is doing for you when you use the other techniques. I am not going to explain the details of the DOM API, but Listing 7-3 contains a simple example to give you a sense of how you can approach this technique.
Listing 7-3. Using the DOM API to Create New Elements
...

<script type="text/javascript">

    $(document).ready(function() {


        var divElem = document.createElement("div");

        divElem.classList.add("dcell");


        var imgElem = document.createElement("img");

        imgElem.src = "lily.png";


        divElem.appendChild(imgElem);


        var newElems = $(divElem);


        newElems.each(function (index, elem) {

            console.log("New element: " + elem.tagName + " " + elem.className);

        });
        newElems.children('img').each(function(index, elem) {

            console.log("Child: " + elem.tagName + " " + elem.src);

        });


    });

</script>

...
In this example, I create and configure a div HTMLElement and an img HTMLElement and assign the img as the child of the div, just as I did in the first example. There is nothing wrong with creating elements this way, but since this is a book about jQuery, I don't want to go off-topic by straying too far into the DOM API.
I pass the div HTMLElement as an argument to the jQuery $ function so I can use the same each functions as for the other examples. The console output is as follows:
New element: DIV dcell

Child: IMG http://www.jacquisflowershop.com/jquery/lily.png
Inserting Child and Descendant Elements
Now that you have seen how to create elements, you can start to insert them into the document. You will start by looking at the methods that allow you to insert one element inside another in order to create child and descendant elements. Table 7-2 describes these methods.
![]() Tip You can also insert child elements using the
Tip You can also insert child elements using the wrapInner method, which I describe in the “Wrapping the Contents of Elements” section. This method inserts a new child between an element and its existing children. Another technique is to use the html method, which I describe in Chapter 8.
The elements that you pass as arguments are inserted as children to every element in the jQuery object, which makes it especially important to use the techniques I showed you in Chapter 6 to manage the selection so that it contains only the elements you want to work with. Listing 7-4 gives a demonstration of using the append method.
Listing 7-4. Using the append Method
...

<script type="text/javascript">

    $(document).ready(function() {

        var newElems = $("<div class='dcell'></div>")

            .append("<img src='lily.png'/>")

            .append("<label for='lily'>Lily:</label>")

            .append("<input name='lily' value='0' required />");


        newElems.css("border", "thick solid red");


        $('#row1').append(newElems);

    });

</script>

...
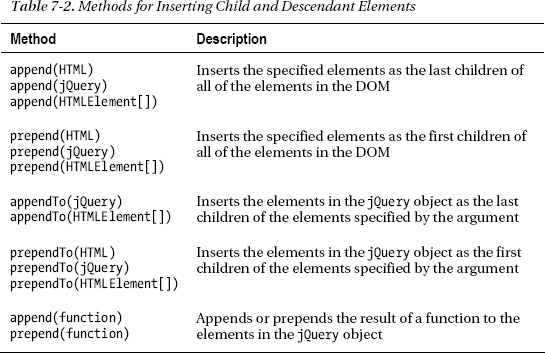
I use the append method in this script in two different ways: first to build up my set of new elements and then to insert those elements into the HTML document. Since this is the first DOM manipulation method that you have encountered, I am going to spend a moment demonstrating some behaviors that will help you avoid the most common DOM-related jQuery errors. But first, let's look at the effect of the script. You can see the result of adding the new elements in Figure 7-1.
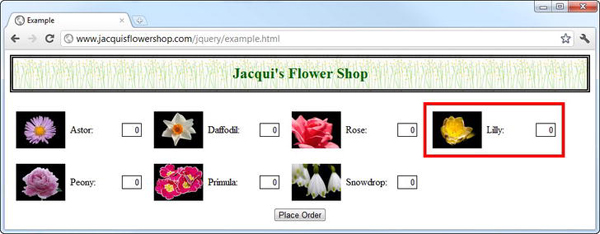
Figure 7-1. Inserting new elements into the document
The first thing you need to look at is the way I built up my new elements using the append method:
var newElems = $("<div class='dcell'/>").append("<img src='lily.png'/>")

    .append("<label for='lily'>Lily:</label>")

    .append("<input name='lily' value='0' required />");
I could have just created a single, bigger block of HTML that contained all of the elements, but I wanted to show a key facet of the DOM manipulation methods, which is that the jQuery objects returned by these methods contain the same elements as the object on which the methods were called. For example, I started with a jQuery object that contained a div element, and the result of each append method was a jQuery object that contained the same div element and not the element that I added. This means that chaining append calls together creates multiple new child elements for the originally selected elements.
The next behavior I wanted to point out was that newly created elements may not be attached to the document, but you can still use jQuery to navigate and modify them. I wanted to highlight the new elements with a border, so I made the following call:
newElems.css("border", "thick solid red");
This is a nice feature that allows you to create and manage complex sets of elements and prepare them fully before adding them to the document.
Finally, I add the new elements to the document, like this:
$('#row1').append(newElems);
The new elements are added to each element in the selection. There is only one element in this selection (the one with the row1 id), and so you have the new lily product on your flower shop page.
Prepending Elements
The complement to the append method is prepend, which inserts the new elements as the first children of the elements in the jQuery object. Listing 7-5 contains an example.
Listing 7-5. Using the prepend Method
...

<script type="text/javascript">

    $(document).ready(function() {


        var orchidElems = $("<div class='dcell'/>")

            .append("<img src='orchid.png'/>")

            .append("<label for='orchid'>Orchid:</label>")

            .append("<input name='orchid' value='0' required />");


        var newElems = $("<div class='dcell'/>")

            .append("<img src='lily.png'/>")

            .append("<label for='lily'>Lily:</label>")

            .append("<input name='lily' value='0' required />").add(orchidElems);


        newElems.css("border", "thick solid red");


        $('#row1, #row2').prepend(newElems);

    });

</script>

...
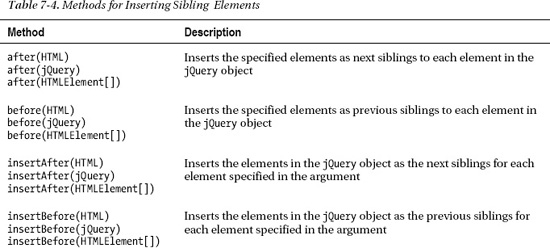
In addition to the prepend method, this script demonstrates another jQuery DOM manipulation characteristic: all of the elements passed as an argument to one of these methods are added as children to all of the elements in the jQuery object. In this example, I create two div elements, one for lilies and one for orchids. I use the add method (highlighted in the listing) to bring both sets of elements together in a single jQuery.
![]() Tip The
Tip The add method will also accept a string containing an HTML fragment. You can use this feature as an alternative to building up new elements using jQuery objects.
I then create another jQuery object that contains the elements with the row1 and row2 id values and use the prepend method to insert the orchid and lily elements into the document. You can see the effect in Figure 7-2.
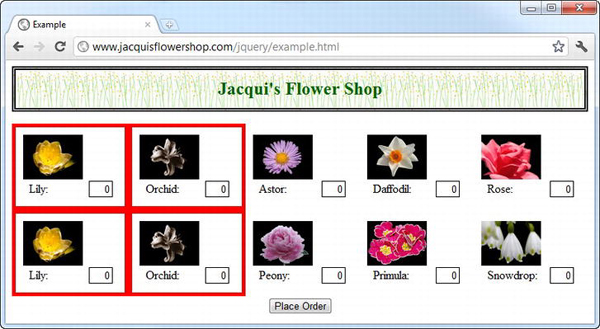
Figure 7-2. Adding multiple new elements to multiple selected elements
The new elements are highlighted with a red border again. As the figure shows, the lily and orchid elements have both been added to both row elements. As an alternative to using the add method, you can pass multiple elements to the DOM modification methods, as shown in Listing 7-6.
Listing 7-6. Passing Multiple Arguments to the prepend Method
...

<script type="text/javascript">

    $(document).ready(function() {


        var orchidElems = $("<div class='dcell'/>")

            .append("<img src='orchid.png'/>")

            .append("<label for='orchid'>Orchid:</label>")

            .append("<input name='orchid' value='0' required />");


        var lilyElems = $("<div class='dcell'/>")

            .append("<img src='lily.png'/>")

            .append("<label for='lily'>Lily:</label>")

            .append("<input name='lily' value='0' required />");


        lilyElems.css("border", "thick solid red");


        $('#row1, #row2').prepend(lilyElems, orchidElems);

    });

</script>

...
Inserting the Same Elements in Different Positions
You can add new elements to the document only once. At this point, using them as arguments to a DOM insertion method moves the elements, rather than duplicates them. Listing 7-7 shows the problem.
Listing 7-7. Adding New Elements to the Document Twice
...

<script type="text/javascript">

    $(document).ready(function() {


        var orchidElems = $("<div class='dcell'/>")

            .append("<img src='orchid.png'/>")

            .append("<label for='orchid'>Orchid:</label>")

            .append("<input name='orchid' value='0' required />");


        var newElems = $("<div class='dcell'/>")

            .append("<img src='lily.png'/>")

            .append("<label for='lily'>Lily:</label>")

            .append("<input name='lily' value='0' required />").add(orchidElems);


        newElems.css("border", "thick solid red");


        $('#row1').append(newElems);

        $('#row2').prepend(newElems);

    })

</script>

...
The intent in this script is clear: to append the new elements to row1 and prepend them to row2. Of course, this isn't what happens, as Figure 7-3 demonstrates.
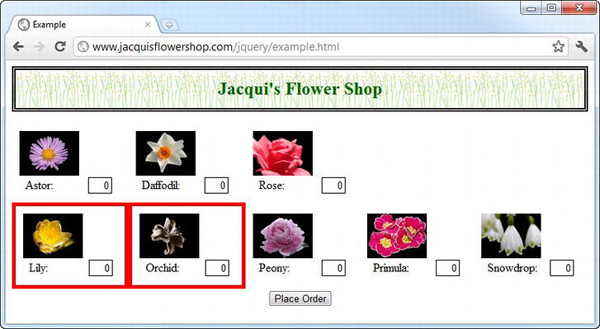
Figure 7-3. Trying (and failing) to add new elements to the document twice
The elements were appended to row1, but the call to prepend has the effect of moving the elements rather than adding them twice. To address this issue, you need to create copies of the elements you want to insert by using the clone method. Listing 7-8 shows the revised script.
Listing 7-8. Cloning Elements So They Can Be Added to the Document More Than Once
<script type="text/javascript">

    $(document).ready(function() {


        var orchidElems = $("<div class='dcell'/>")

            .append("<img src='orchid.png'/>")

            .append("<label for='orchid'>Orchid:</label>")

            .append("<input name='orchid' value='0' required />");


        var newElems = $("<div class='dcell'/>")

            .append("<img src='lily.png'/>")

            .append("<label for='lily'>Lily:</label>")

            .append("<input name='lily' value='0' required />").add(orchidElems);


        newElems.css("border", "thick solid red");


        $('#row1').append(newElems);

        $('#row2').prepend(newElems.clone());

    });

</script>
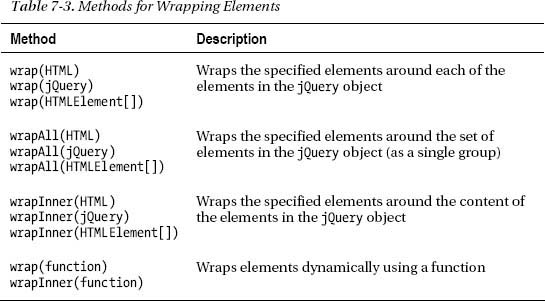
The elements are now copied and inserted in both locations, as shown in Figure 7-4.
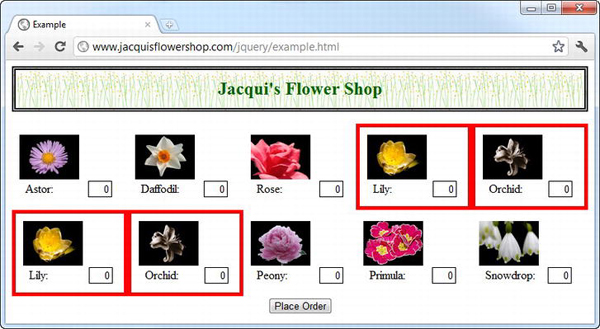
Figure 7-4. Cloning and inserting elements
Inserting from a jQuery Object
You can use the appendTo and prependTo methods to change the relationship around. The elements are in the jQuery object are inserted as the children of the elements specified by the argument. Listing 7-9 provides an example.
Listing 7-9. Using the appendTo Method
...

<script type="text/javascript">

    $(document).ready(function() {


        var newElems = $("<div class='dcell'/>");


        $('img').appendTo(newElems);


        $('#row1').append(newElems);

    });

</script>

...
In this script, I create jQuery objects to contain a new div element and the img elements in the document. I then use the appendTo method to append the img elements as the children of the div element. You can see the result in Figure 7-5. As you can see, the effect of the script is to move the img elements to the new div element, which I appended to the row1 element.

Figure 7-5. Using the appendTo method
Inserting Elements Using a Function
You can pass a function to the append and prepend methods. This allows you to dynamically insert children for the elements selected by the jQuery object, as shown by Listing 7-10.
Listing 7-10. Adding Child Elements Dynamically with a Function
<script type="text/javascript">

    $(document).ready(function() {


        var orchidElems = $("<div class='dcell'/>")

            .append("<img src='orchid.png'/>")

            .append("<label for='orchid'>Orchid:</label>")

            .append("<input name='orchid' value='0' required />");


        var lilyElems = $("<div class='dcell'/>")

            .append("<img src='lily.png'/>")

            .append("<label for='lily'>Lily:</label>")

            .append("<input name='lily' value='0' required />");


        $(orchidElems).add(lilyElems).css("border", "thick solid red");


        $('div.drow').append(function(index, html) {

            if (this.id == "row1") {

                return orchidElems;

            } else {

                return lilyElems;

            }

        });

    });

</script>
The function is invoked once for each element in the jQuery object. The arguments passed to the function are the index of the element in the selection and the HTML of the element that is being processed; the HTML is a string. In addition, the value of the this variable is set to the appropriate HTMLElement. The result from the function will be appended or prepended to the element being processed. You can return an HTML fragment, one or more HTMLElement objects, or a jQuery object.
In this example, I prepare by creating sets of elements for the lily and orchid products and then return them from the append function based on the value of the id property. You can see the result in Figure 7-6.
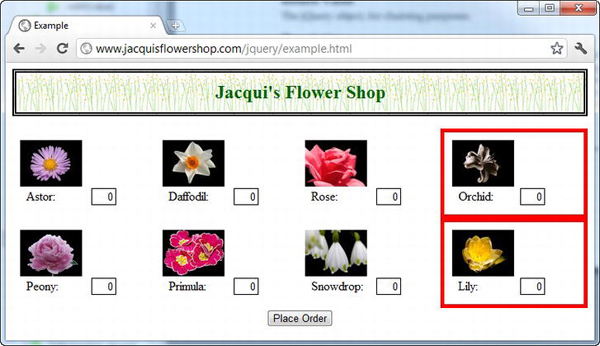
Figure 7-6. Inserting elements dynamically based on a function
Inserting Parent and Ancestor Elements
jQuery provides you with a set of methods for inserting elements as parents or ancestors of other elements. This is known as wrapping (because one element is wrapped by another). Table 7-3 describes these methods.
![]() Tip The complement to the wrapping methods is
Tip The complement to the wrapping methods is unwrap, which I describe in the “Removing Elements” section later in this chapter.
When you perform wrapping, you can pass multiple elements as the argument, but you must make sure that there is only one inner element. Otherwise, jQuery can't figure out what to do. This means that each element in the method argument must have at most one parent and at most one child. Listing 7-11 demonstrates the use of the wrap method.
Listing 7-11. Using the wrap Method
...

<script type="text/javascript">

    $(document).ready(function() {


        var newElem = $("<div/>").css("border", "thick solid red");

        $('div.drow').wrap(newElem);


    });

</script>

...
In this script, I create a new div element and use the css method to set a value for the CSS border property. I then use the wrap method to insert the div element as the parent to all of the label elements in the document. You can see the effect in Figure 7-7.
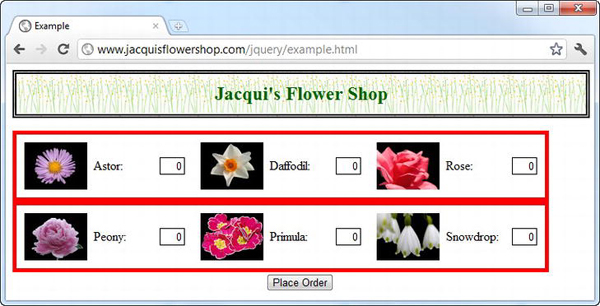
Figure 7-7. Using the wrap method to add a parent to elements
The elements that you pass as arguments to the wrap method are inserted between each element in the jQuery object and their current parents. So, for example, this fragment of HTML:
...

<div class="dtable">

    <div id="row1" class="drow">

        ...

    </div>

    <div id="row2" class="drow">

        ...

    </div>

</div>

...
is transformed like this:
...

<div class="dtable">

    <div style="...style properties...">

        <div id="row1" class="drow">

            ...

        </div>

    </div>

    <div style="...style properties...">

        <div id="row2" class="drow">

            ...

        </div>

    </div>

</div>

...
Wrapping Elements Together
When you use the wrap method, the new elements are cloned, and each element in the jQuery object gets its own new parent element. You can insert a single parent for several elements by using the wrapAll method, as shown in Listing 7-12.
Listing 7-12. Using the wrapAll Method
...

<script type="text/javascript">

    $(document).ready(function() {


        var newElem = $("<div/>").css("border", "thick solid red");

        $('div.drow').wrapAll(newElem);


    });

</script>

...
The only change in this script is the use of the wrapAll method. You can see the effect in Figure 7-8.
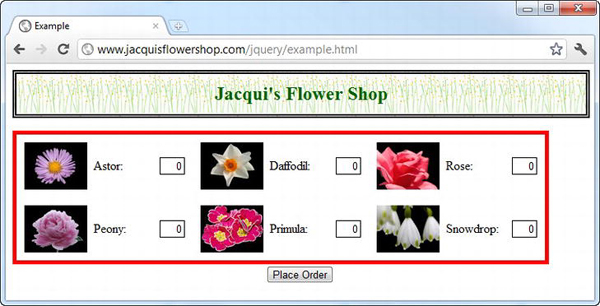
Figure 7-8. Using the wrapAll method
The new element is used to insert a common parent to the selected elements, such that the HTML is transformed like this:
...

<div class="dtable">

    <div style="...style properties...">

        <div id="row1" class="drow">

            ...
        <div id="row2" class="drow">

        </div>

    </div>

</div>

...
Be careful when using this method. If the selected elements don't already share a common parent, then the new element is inserted as the parent to the first selected element. Then jQuery moves all of the other selected elements to be siblings of the first one. Listing 7-13 contains a script that shows this use of the method.
Listing 7-13. Using the wrapAll on Elements Without a Common Parent
...

<script type="text/javascript">

    $(document).ready(function() {


        var newElem = $("<div/>").css("border", "thick solid red");

        $('img').wrapAll(newElem);


    });

</script>

...
I have selected the img elements in the document, none of which share a common parent. You can see the effect of this script in Figure 7-9. The new div element has been inserted into the document as the parent to the astor image, and all of the other images have been inserted as siblings.
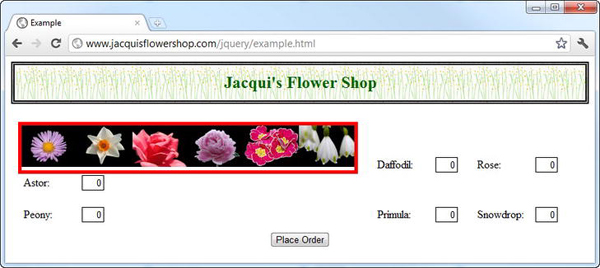
Figure 7-9. Using wrapAll on elements that don't share a common parent
Wrapping the Content of Elements
The wrapInner method wraps elements around the contents of the elements in a jQuery (as opposed to the elements themselves). Listing 7-14 provides a demonstration.
Listing 7-14. Using the wrapInner Method
<script type="text/javascript">

    $(document).ready(function() {


        var newElem = $("<div/>").css("border", "thick solid red");

        $('.dcell').wrapInner(newElem);


    });

</script>
The wrapInner method inserts new elements between the elements in the jQuery object and their immediate children. In the script, I select the elements that belong to the dcell class and wrap their contents with a new div element. You can see the effect in Figure 7-10.
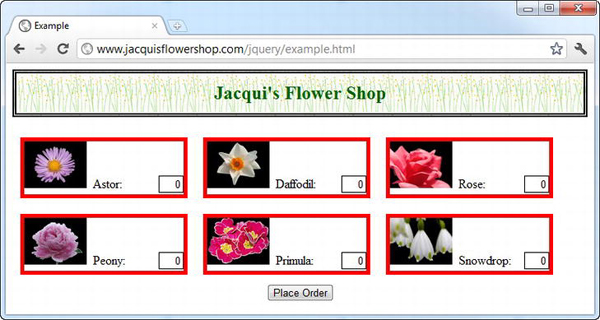
Figure 7-10. Using the wrapInner method
As an aside, you can achieve the effect of the wrapInner method using append. Just for reference, here is the equivalent script:
<script type="text/javascript">

    $(document).ready(function() {


        var newElem = $("<div/>").css("border", "thick solid red");

        $('.dcell').each(function(index, elem) {

            $(elem).append(newElem.clone().append($(elem).children()));

        });


    });

</script>
I am not suggesting you use this approach (the wrapInner method is easier to read and more convenient), but I think this is a good example of how you can use jQuery to approach the same problem in a number of different ways.
Wrapping Elements Using a Function
You can pass a function to the wrap and wrapInner methods to generate elements dynamically. The sole argument for this function is the index of the element in the selected elements. The special variable this is set to the element to be processed. The script in Listing 7-15 shows how you can wrap dynamically.
Listing 7-15. Wrapping Elements Dynamically
...

<script type="text/javascript">

    $(document).ready(function() {


        $('.drow').wrap(function(index) {

            if ($(this).has('img[src*=rose]').length > 0) {

                return $("<div/>").css("border", "thick solid blue");;

            } else {

                return $("<div/>").css("border", "thick solid red");;

            }

        });


    });

</script>

...
In this example, I use a function with the wrap method to tailor the new parent element based on the descendants of each of the selected elements. You can see the effect of this script in Figure 7-11.
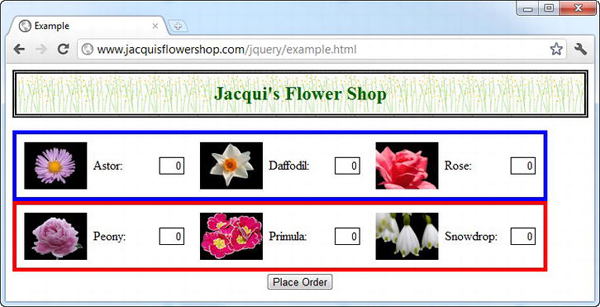
Figure 7-11. Using the wrap method with a function to generate parent elements dynamically
Inserting Sibling Elements
As you might imagine, jQuery also provides you with a set of methods to insert elements into the document as siblings of existing elements. Table 7-4 describes these methods.
The before and after methods follow the same pattern you saw when inserting other kinds of element in the document. Listing 7-16 contains a demonstration of both methods.
Listing 7-16. Using the before and after Methods
...

<script type="text/javascript">

    $(document).ready(function() {


        var orchidElems = $("<div class='dcell'/>")

            .append("<img src='orchid.png'/>")

            .append("<label for='orchid'>Orchid:</label>")

            .append("<input name='orchid' value='0' required />");


        var lilyElems = $("<div class='dcell'/>")

            .append("<img src='lily.png'/>")

            .append("<label for='lily'>Lily:</label>")

            .append("<input name='lily' value='0' required />");


        $(orchidElems).add(lilyElems).css("border", "thick solid red");


        $('#row1 div.dcell').after(orchidElems);

        $('#row2 div.dcell').before(lilyElems);


    });

</script>

...
In this script, I create new sets of elements for orchids and lilies and use them with the before and after methods to insert them as siblings for each of the elements in the dcell class. The orchid elements are inserted as next siblings for all the elements in row1, and the lily elements are inserted as previous siblings for all of the elements in row2. You can see the effect of this script in Figure 7-12.
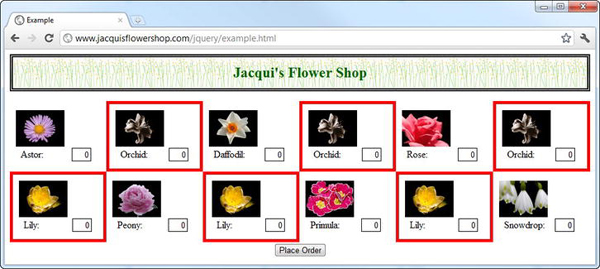
Figure 7-12. Using the before and after elements to create siblings
Inserting Siblings from a jQuery Object
The insertAfter and insertBefore methods insert the elements in the jQuery object as the next or previous siblings to the elements in the method argument. This is the same functionality as in the after and before methods, but the relationship between the jQuery object and the argument is reversed. Listing 7-17 shows the use of these methods. This script creates the same effect, as shown in Figure 7-12.
Listing 7-17. Using the insertAfter and InsertBefore Methods
<script type="text/javascript">

    $(document).ready(function() {


        var orchidElems = $("<div class='dcell'/>")

            .append("<img src='orchid.png'/>")

            .append("<label for='orchid'>Orchid:</label>")

            .append("<input name='orchid' value='0' required />");


        var lilyElems = $("<div class='dcell'/>")

            .append("<img src='lily.png'/>")

            .append("<label for='lily'>Lily:</label>")

            .append("<input name='lily' value='0' required />");


        $(orchidElems).add(lilyElems).css("border", "thick solid red");


        orchidElems.insertAfter('#row1 div.dcell'),

        lilyElems.insertBefore('#row2 div.dcell'),

    });

</script>
Inserting Siblings Using a Function
You can insert sibling elements dynamically using a function with the after and before methods, just as you did for parent and child elements. Listing 7-18 contains an example of dynamically generating sibling elements.
Listing 7-18. Generating Sibling Elements Dynamically with a Function
...

<script type="text/javascript">

    $(document).ready(function() {


        $('#row1 div.dcell').after(function(index, html) {

            if (index == 0) {

                return $("<div class='dcell'/>")

                    .append("<img src='orchid.png'/>")

                    .append("<label for='orchid'>Orchid:</label>")

                    .append("<input name='orchid' value='0' required />")

                    .css("border", "thick solid red");

            } else if (index == 1) {

                return $("<div class='dcell'/>")

                    .append("<img src='lily.png'/>")

                    .append("<label for='lily'>Lily:</label>")

                    .append("<input name='lily' value='0' required />")

                    .css("border", "thick solid red");

            }

        });


    });

</script>

...
In this script, I use the index argument to generate siblings when the index of the element being processed is 0 or 1. You can see the effect of this script in Figure 7-13.
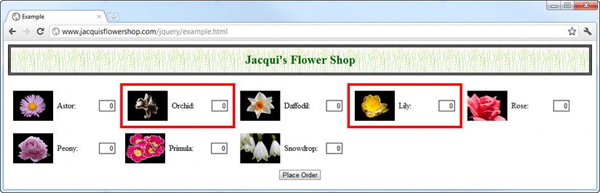
Figure 7-13. Adding sibling elements using a function
Replacing Elements
You can replace one set of elements with another using the methods described in Table 7-5.
The replaceWith and the replaceAll methods work in the same way, with the exception that the role of the jQuery object and the argument are reversed. Listing 7-19 demonstrates both methods.
Listing 7-19. Using the replaceWith and replaceAll Methods
<script type="text/javascript">

    $(document).ready(function() {


        var newElems = $("<div class='dcell'/>")

                    .append("<img src='orchid.png'/>")

                    .append("<label for='orchid'>Orchid:</label>")

                    .append("<input name='orchid' value='0' required />")

                    .css("border", "thick solid red");


        $('#row1').children().first().replaceWith(newElems);


        $("<img src='carnation.png'/>").replaceAll('#row2 img')

            .css("border", "thick solid red");


    });;

</script>
In this script, I use the replaceWith method to replace the first child of the row1 div element with new content (this has the effect of replacing the astor with the orchid). I also use the replaceAll method to replace all of the img elements that are descendants of row2 with the image of a carnation. You can see the effect of this script in Figure 7-14.
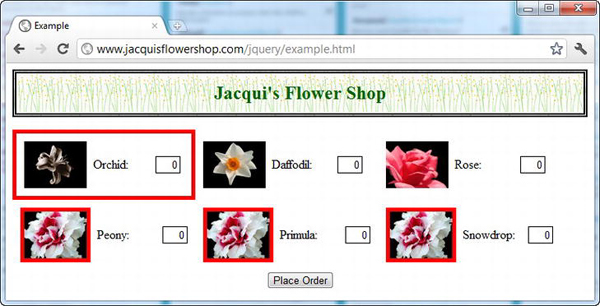
Figure 7-14. Replacing content with the replaceWith and replaceAll methods
Replacing Elements Using a Function
You can replace elements dynamically by passing a function to the replaceWith method. This function is not passed any arguments, but the this variable is set to the element being processed. Listing 7-20 provides a demonstration.
Listing 7-20. Replacing Elements Using a Function
...

<script type="text/javascript">

    $(document).ready(function() {

        $('div.drow img').replaceWith(function() {

            if (this.src.indexOf("rose") > -1) {

                return $("<img src='carnation.png'/>").css("border", "thick solid red");

            } else if (this.src.indexOf("peony") > -1) {

                return $("<img src='lily.png'/>").css("border", "thick solid red");

            } else {

                return $(this).clone();

            }

         });

    });

</script>

...
In this script, I replace img elements based on their src attribute. If the src attribute contains rose, then I replace the img element with one displaying carnation.png. If the src attribute contains peony, then I replace the element with one displaying lily.png. Both of the replacement elements have a red border to make their position in the document evident.
Otherwise, I return a clone of the element being processed, which has the effect of replacing the element with a copy of itself. You can see the effect in Figure 7-15.
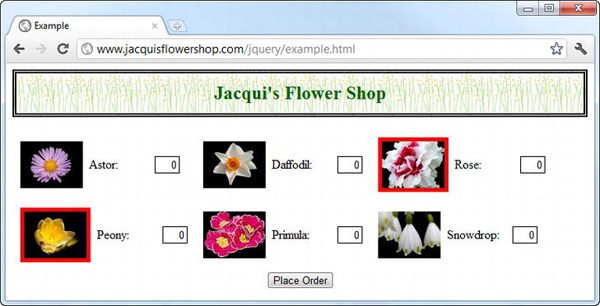
Figure 7-15. Replacing elements using a function
![]() Tip If you don't want to replace an element, then you can simply return a clone. If you don't clone the element, then jQuery ends up removing the element entirely. Of course, you could avoid this issue by narrowing your selection, but that isn't always an option.
Tip If you don't want to replace an element, then you can simply return a clone. If you don't clone the element, then jQuery ends up removing the element entirely. Of course, you could avoid this issue by narrowing your selection, but that isn't always an option.
Removing Elements
To complement your ability to insert and replace elements, jQuery provides a set of methods that you can use to remove elements from the DOM. Table 7-6 describes these methods.


Listing 7-21 shows how you can use the remove elements to remove elements from the DOM.
Listing 7-21. Removing Elements from the DOM with the remove Method
<script type="text/javascript">

    $(document).ready(function() {

        $('img[src*=daffodil], img[src*=snow]').parent().remove();

    });

</script>
This script selects the img elements whose src attributes contain daffodil and snow, gets their parent elements, and then removes them. You can filter the elements that you remove if you pass a selector to the remove method, as shown in Listing 7-22.
Listing 7-22. Filtering Elements to Remove Using a Selector
<script type="text/javascript">

    $(document).ready(function() {


        $('div.dcell').remove(':has(img[src*=snow], img[src*=daffodil])'),


    });

</script>
Both of these scripts have the same effect, as shown in Figure 7-16.
![]() Tip My experience with the
Tip My experience with the remove method is that not all selectors will work as a filter. I recommend thorough testing and relying on the initial selection where possible.
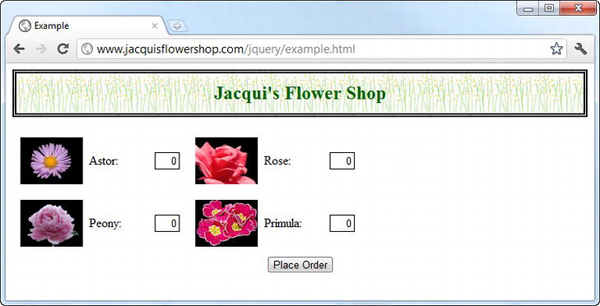
Figure 7-16. Removing elements from the DOM
![]() Tip The
Tip The jQuery object returned from the remove method contains the original set of selected elements. In other words, the removal of elements is not reflected in the method result.
Detaching Elements
The detach method works in the same as the remove method, with the exception that data associated with the elements is preserved. I explain associating data with elements in Chapter 8, but for this chapter it is enough to know that this is usually the best method to use if you intend to insert the elements elsewhere in the document. Listing 7-23 shows the detach method in use.
Listing 7-23. Using the detach Method to Remove Elements While Preserving the Associated Data
<script type="text/javascript">

    $(document).ready(function() {

        $('#row2').append($('img[src*=astor]').parent().detach());

    });

</script>
This script detaches the parent element of the img element whose src attribute contains astor. The elements are then inserted back into the document using the append method, which I described earlier in the chapter. I tend not to use this method, because using append without detach has the same effect. You can rewrite the key statement in the listing as follows:
$('#row2').append($('img[src*=astor]').parent());
You can see the effect of the script in Figure 7-17.
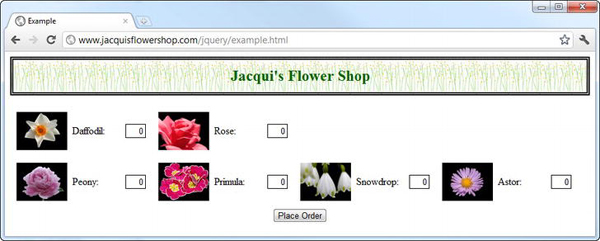
Figure 7-17. Using the detach element
Empting Elements
The empty method removes any descendants and text from the elements in a jQuery object. The elements themselves are left in the document, as demonstrated by Listing 7-24.
Listing 7-24. Using the empty Method
<script type="text/javascript">

    $(document).ready(function() {

        $('#row1').children().eq(1).empty().css("border", "thick solid red");

    });

</script>
In this script, I select the child of the row1 element at index 1 and call the empty method. To make the change more evident, I added a border using the css method. You can see the effect in Figure 7-18.
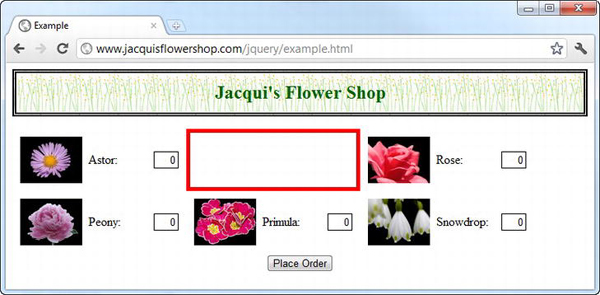
Figure 7-18. Using the empty method
Unwrapping Elements
The unwrap method removes the parents of the elements in the jQuery object. The selected elements become children of their grandparent elements. Listing 7-25 shows the unwrap method in use.
Listing 7-25. Using the unwrap Method
<script type="text/javascript">

    $(document).ready(function() {

        $('#row1 div').unwrap();

    });

</script>
In this script, I select the div elements that are descendants of the element whose id is row1 and call the unwrap method. This has the effect of removing the row1 element, as shown in Figure 7-19. The change in alignment of the unwrapped elements arises because the CSS styles I defined in the CSS style sheet rely on the row1 elements to maintain the grid layout in the page.
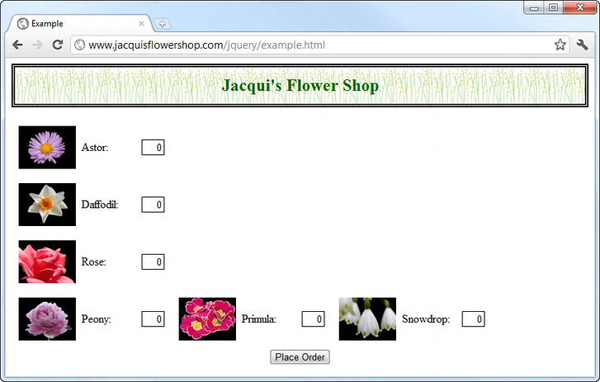
Figure 7-19. Using the unwrap method
Summary
In this chapter, I showed you how to use jQuery in order to manipulate the DOM. I showed you how to create new elements and the many different ways in which elements (new or existing) can be inserted into the DOM as children, parents, and siblings. I also showed you how to move elements within the DOM and how to remove elements entirely.