
C H A P T E R 6
Managing the Element Selection
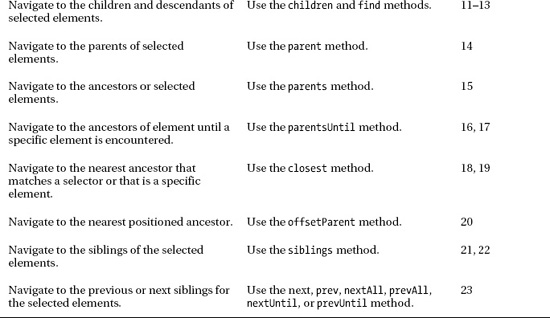
Most of the time, you use jQuery in a pretty distinct two-step pattern. The first step is to select some elements, and the second step is to perform one or more operations on those elements.In this chapter, I focus on the first step, showing you how to take control of the jQuery selection and tailor it to your exact needs. I’ll also show you how to use jQuery to navigate the DOM. In both cases, you start with one selection and perform operations on it until it contains just the elements you require. As you’ll see, thecorrelation between the elements you start with and those you finish with can be as simple or as sophisticated as you like. Table 6-1 provides the summary for this chapter.

Expanding the Selection
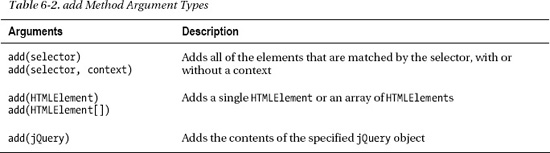
The add method allows you to expand the contents of a jQuery object by adding additional elements. Table 6-2 shows the different arguments you can use.
Like many jQuery methods, the add method returns a jQuery object on which you can call other methods, including further calls to the add method. Listing 6-1 demonstrates the use of the add method to broaden a set of elements.
![]() Caution A common mistake is to assume that the
Caution A common mistake is to assume that the remove method is the counterpart to the add method and will narrow the selection. In fact, the remove methodchanges the structure of the DOM, as I explain in Chapter 7. Use one of the methods I describe in the “Narrowing the Selection” section instead.
Listing 6-1. Using the addMethod
<!DOCTYPE html>

<html>

<head>

    <title>Example</title>

    <script src="jquery-1.7.js" type="text/javascript"></script>

    <link rel="stylesheet" type="text/css" href="styles.css"/>

    <script type="text/javascript">

        $(document).ready(function() {


            var labelElems = document.getElementsByTagName("label");

            var jq = $('img[src*=daffodil]'),


            $('img:even').add('img[src*=primula]').add(jq)

                .add(labelElems).css("border", "thick double red");


        });

    </script>

</head>

<body>

    <h1>Jacqui's Flower Shop</h1>

    <form method="post">

        <div id="oblock">

            <div class="dtable">

                <div id="row1" class="drow">

                    <div class="dcell">

                        <img src="astor.png"/><label for="astor">Astor:</label>

                        <input name="astor" value="0" required>

                    </div>

                    <div class="dcell">

                        <img src="daffodil.png"/><label for="daffodil">Daffodil:</label>

                        <input name="daffodil" value="0" required >

                    </div>

                    <div class="dcell">

                        <img src="rose.png"/><label for="rose">Rose:</label>

                        <input name="rose" value="0" required>

                    </div>

                </div>

                <div id="row2"class="drow">

                    <div class="dcell">

                        <img src="peony.png"/><label for="peony">Peony:</label>

                        <input name="peony" value="0" required>
                    </div>

                    <div class="dcell">

                        <img src="primula.png"/><label for="primula">Primula:</label>

                        <input name="primula" value="0" required>

                    </div>

                    <div class="dcell">

                        <img src="snowdrop.png"/><label for="snowdrop">Snowdrop:</label>

                        <input name="snowdrop" value="0" required>

                    </div>

                </div>

            </div>

        </div>

        <div id="buttonDiv"><button type="submit">Place Order</button></div>

    </form>

</body>

</html>
The script in this example uses all three approaches to add elements to the initial selection: with another selector, with some HTMLElement objects, and with another jQuery object. Once I have built up my set of objects, I call the css method to set a value for the border property, which has the effect of drawing a thick red border, as shown in Figure 6-1.
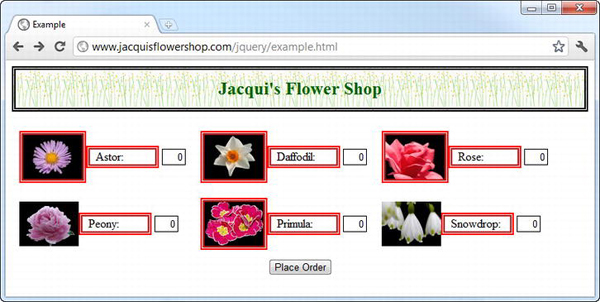
Figure 6-1. Expanding the selection with the add method
Narrowing the Selection
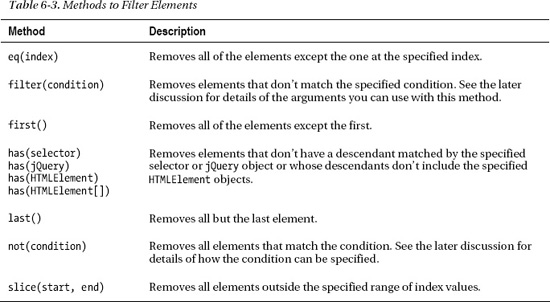
A number of methods allow you to remove elements from the selection. They are described in Table 6-3. In every case, the methods return a new jQuery object that contains the reduced element selection. The jQuery object on which the method was called remains unchanged.
Reducing the Selection to a Specific Element
The three most basic reduction methods are first, last, and eq. These three methods allow you to select a specific element based on its position in the jQuery object. Listing 6-2 provides a demonstration.
Listing 6-2. Reducing the Selection Based on Element Position
...

<script type="text/javascript">

    $(document).ready(function() {


        var jq = $('label'),


        // select and operate on the first element

        jq.first().css("border", "thick double red");


        // select and operate on the last element

        jq.last().css("border", "thick double green");


        // select and operate on an element by index

        jq.eq(2).css("border", "thick double black");

        jq.eq(-2).css("border", "thick double black");


    });

</script>

...
Notice that I call the eq method twice. When the argument to this method is positive, the index is counted from the first element in the jQuery object. When the argument is negative, the counting is done backward, starting from the last element. You can see the effect of this script in Figure 6-2.
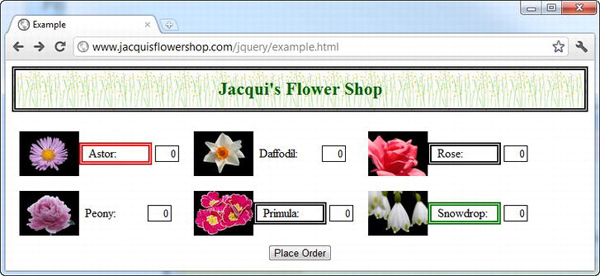
Figure 6-2. Reducing the selection to a specific element
Reducing the Selection by Range
The slice method lets you reduce the selection to a range of elements, specified by index. Listing 6-3 provides a demonstration.
Listing 6-3. Using the slice Method
...

<script type="text/javascript">

    $(document).ready(function() {


        var jq = $('label'),


        jq.slice(0, 2).css("border", "thick double black");

        jq.slice(4).css("border", "thick solid red");


    });

</script>

...
The arguments to the slice method are the index to begin selection and the index to end selection. Indexes are zero-based, so the arguments I used in the example (0 and 2) have the effect of selecting the first two elements. If you omit the second argument, then the selection continues to the end of the set of elements. By specifying a single argument of 4 for a set of six elements, I selected the last two elements (which have the index values of 4 and 5). You can see the result of this script in Figure 6-3.
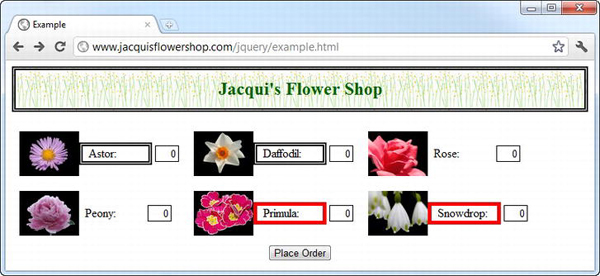
Figure 6-3. Reducing the selection by range
Filtering Elements
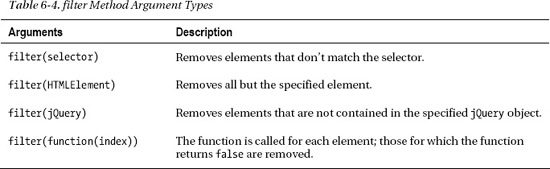
The filter method lets you specify a condition. Any elements that don’t meet the condition are removed from the selection. Table 6-4 shows the different arguments you can use to express the filtering condition.
Listing 6-4 shows all four ways of specifying a filter.
Listing 6-4. Specifying a Filter
...

<script type="text/javascript">

    $(document).ready(function() {

        // remove elements whose src attribute contains the letter 's'

        $('img').filter('[src*=s]').css("border", "thick double red");


        // remove elements that don't contain the letter p

        var jq = $('[for*=p]'),

        $('label').filter(jq).css("color", "blue");


        // remove elements that are not the specified element

        var elem = document.getElementsByTagName("label")[1];

        $('label').filter(elem).css("font-size", "1.5em");


        // remove elements using a function

        $('img').filter(function(index) {

            return this.getAttribute("src") == "peony.png" || index == 4;

        }).css("border", "thick solid red")

    });

</script>

...
The first three techniques are self-evident. You can filter based a selector, another jQuery object, or an HTMLElement object. The fourth technique, which relies on a function, requires a little more explanation. This is the technique that I have highlighted in the listing.
jQuery calls your function once for every element contained by the jQuery object. If you return true from the method, the element for which the function has been called is retained. If you return false, then the element is removed. There is one argument passed to the function, which is the index of the element for which the function is being called. In addition, the this variable is set to the HTMLElement object that you need to process. In the listing, I return true if the element has a particular value for the src attribute and for a specific index value.
![]() Tip You might be wondering why I have used the
Tip You might be wondering why I have used the getAttribute method on the HTMLElement in the filter function, as opposed to calling the src property. The reason is that the getAttribute method will return the value that I set for the src attribute in the document (which is a relative URL), but the src property will return a fully qualified URL. For this example, the relative URL was simpler to work with.
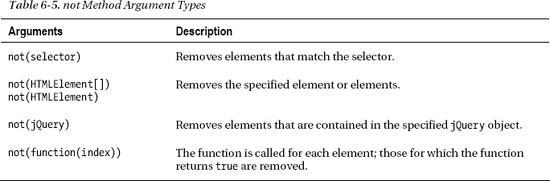
The complement to the filter method is not, which works in much the same way but inverts the filtering process. Table 6-5 shows the different ways in which you can apply a condition using the not method.
Listing 6-5 shows the use of the not method, based on the previous example.
Listing 6-5. Using the not Function
...

<script type="text/javascript">

    $(document).ready(function() {


        $('img').not('[src*=s]').css("border", "thick double red");


        var jq = $('[for*=p]'),

        $('label').not(jq).css("color", "blue");


        var elem = document.getElementsByTagName("label")[1];

        $('label').not(elem).css("font-size", "1.5em");


        $('img').not(function(index) {

            return this.getAttribute("src") == "peony.png" || index == 4;

        }).css("border", "thick solid red")

    });

</script>

...
You can see the effect of this script in Figure 6-4. It is, of course, the inverse of the effect of the previous example.
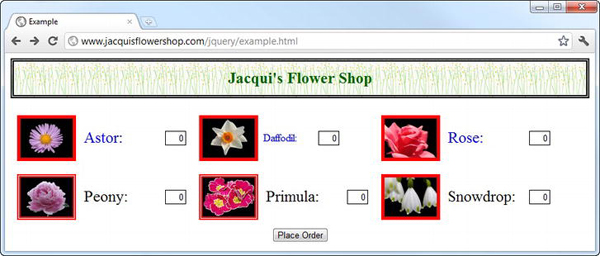
Figure 6-4. Filtering elements using the not method
Reducing the Selection Based on Descendants
You can use the has method to reduce the selection to elements that have particular descendants, by specifying either a selector or one or more HTMLElement objects. Listing 6-6 shows the use of the has method.
Listing 6-6. Using the has Method
<script type="text/javascript">

    $(document).ready(function() {


        $('div.dcell').has('img[src*=astor]').css("border", "thick solid red");


        var jq = $('[for*=p]'),

        $('div.dcell').has(jq).css("border", "thick solid blue");


    });

</script>
In this script, I reduce the selection by removing elements that don’t have specific descendants. In the first case, where I use a selector, I remove elements that don’t have at least one descendant img element with a src attribute value that contains astor. In the second case, where I use a jQuery object, I remove elements that don’t have at least one descendant that has a for attribute with a value that contains the letter p. You can see the effect of this script in Figure 6-5.
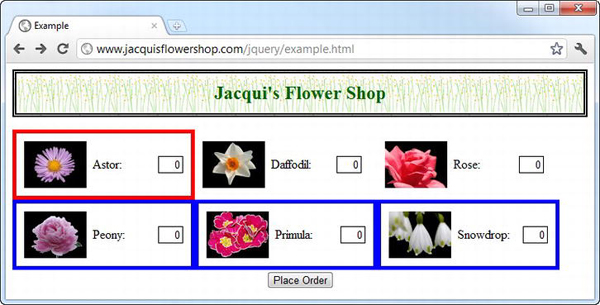
Figure 6-5. Using the has method to reduce the selection
Mapping the Selection
The map method provides a flexible way to use one jQuery object as a means to create another. You pass a function to the map method. This function is called for every element in the source jQuery object, and the HTMLElement objects that you return from the function are included in the result jQuery object. Listing 6-7 shows the map method in use.
Listing 6-7. Using the map Method
...

<script type="text/javascript">

    $(document).ready(function() {


        $('div.dcell').map(function(index, elem) {

            return elem.getElementsByTagName("img")[0];

        }).css("border", "thick solid red");


        $('div.dcell').map(function(index, elem) {

            return $(elem).children()[1];

        }).css("border", "thick solid blue");


</script>

...
In this script, I perform two mapping operations. The first uses the DOM API to return the first img element contained in each element, and the second uses jQuery to return the first item in the jQuery object returned by the children method (I’ll explain this method fully later in this chapter, but as its name suggests, it returns the child nodes of each element in a jQuery object).
![]() Tip You can return only one element each time the function is called. If you want to project multiple result elements for each source element, you can combine the
Tip You can return only one element each time the function is called. If you want to project multiple result elements for each source element, you can combine the each and add methods, which I described in Chapter 8.
Testing the Selection
You can use the is method to determine whether one of more elements in a jQuery object meets a specified condition. Table 6-6 shows the arguments you can pass to the is method.
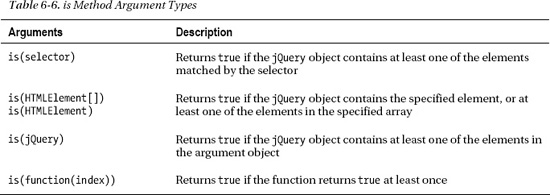
When you specify a function, jQuery will invoke that function once for each element in the jQuery object, passing the index of the element as the function argument and setting the this variable to the element itself. Listing 6-8 shows the is method in use.
![]() Note This method returns a boolean value. As I mentioned in Chapter 5, not all jQuery methods return a
Note This method returns a boolean value. As I mentioned in Chapter 5, not all jQuery methods return a jQuery object.
Listing 6-8. Using the is Method
...

<script type="text/javascript">

    $(document).ready(function() {


        var isResult = $('img').is(function(index) {

            return this.getAttribute("src") == "rose.png";

        });

        console.log("Result: " + isResult);


    });

</script>

...
This script tests to see whether the jQuery object contains an element whose src attribute value is rose.png and writes out the result to the console, as follows:
Result: true
Changing and Then Unwinding the Selection
jQuery preserves a history stack when you modify the selection by chaining methods together, and you can use a couple of methods to take advantage of this, as described in Table 6-7.

You can use the end method to return to the previous selection, which allows you to select some elements, expand or reduce the selection, perform some operations, and then return to the original selection, as demonstrated by Listing 6-9.
Listing 6-9. Using the end Method
...

<script type="text/javascript">

    $(document).ready(function() {


        $('label').first().css("border", "thick solid blue")

            .end().css("font-size", "1.5em");
    });

</script>

...
In this script, I start by selecting all of the label elements in the document. I then reduce the selection by calling the first method (to get the first matched element) and then set a value for the CSS border property using the css method.
I then call the end method to return to the previous selection (which moves you from the first label element back to all of the label elements) and then call the css method again, this time to set a value for the font-size property. You can see the effect of this script in Figure 6-6.
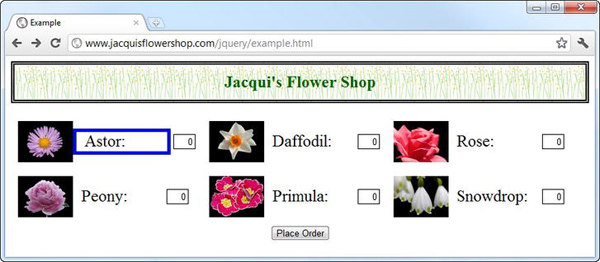
Figure 6-6. Using the end method
The andSelf method adds the contents of the previous selection on the stack to the current selection. Listing 6-10 shows the addSelf method in use.
Listing 6-10. Using the andSelf Method
...

<script type="text/javascript">

    $(document).ready(function() {

        $('div.dcell').children('img').andSelf().css("border", "thick solid blue");

    });

</script>

...
In this example, I select all of the div elements that are members of the dcell class and then use the children method to select all of the img elements that are their children (I explain the children method fully in the “Navigating the DOM” section later in this chapter). I then call the andSelf method, which combines the previous selection (the div element) with the current selection (the img elements) in a single jQuery object. Finally, I call use the css method to set a border for the selected elements. You can see the effect of this script in Figure 6-7.
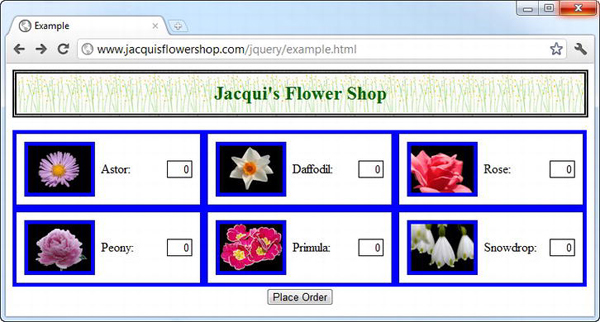
Figure 6-7. Using the andSelf method
Navigating the DOM
You can use a selection as the start point for navigating elsewhere in the DOM, in essence using one selection as the start point for creating another. In the following sections, I’ll describe and demonstrate the jQuery navigation methods. I explained the different kinds of relationships that can exist between elements in a document in Chapter 2.
![]() Tip All of the methods that are described in the following sections return a
Tip All of the methods that are described in the following sections return a jQuery object. This object will contain the matched elements if there are any and will be empty (i.e., the length property will be zero) if there are not.
Navigating Down the Hierarchy
When you navigate down the DOM hierarchy, you are selecting children and descendants of the elements contained in a jQuery object. Table 6-8 describes the relevant jQuery methods.
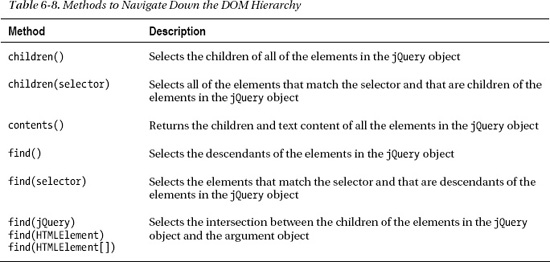
The children method will select only those elements that are immediate descendants of each element in the jQuery object, optionally filtered by a selector. The find method will select all descendant elements, not just the immediate ones. The contents method will return the children elements, plus any text content. Listing 6-11 shows the children and find methods in use.
Listing 6-11. Using the children and find Methods
...

<script type="text/javascript">

    $(document).ready(function() {


        var childCount = $('div.drow').children().each(function(index, elem) {

            console.log("Child: " + elem.tagName + " " + elem.className);

        }).length;

        console.log("There are " + childCount + " children");


        var descCount = $('div.drow').find('img').each(function(index, elem) {

            console.log("Descendant: " + elem.tagName + " " + elem.src);

        }).length;

        console.log("There are " + descCount + " img descendants");


    });

</script>

...
In this example, I use the children method without a selector and the find method with one. I write the details of the selected elements to the console along with how many were selected. The console output from this script is as follows:
Child: DIV dcell

Child: DIV dcell

Child: DIV dcell

Child: DIV dcell

Child: DIV dcell

Child: DIV dcell

There are 6 children


Descendant: IMG http://www.jacquisflowershop.com/jquery/astor.png

Descendant: IMG http://www.jacquisflowershop.com/jquery/daffodil.png

Descendant: IMG http://www.jacquisflowershop.com/jquery/rose.png

Descendant: IMG http://www.jacquisflowershop.com/jquery/peony.png

Descendant: IMG http://www.jacquisflowershop.com/jquery/primula.png

Descendant: IMG http://www.jacquisflowershop.com/jquery/snowdrop.png

There are 6 img descendants
One of the nice features of the children and find methods is that you don’t receive duplicate elements in the selection. Listing 6-12 provides a demonstration.
Listing 6-12. Generating a Selection with Overlapping Descendants
...

<script type="text/javascript">

    $(document).ready(function() {


        $('div.drow').add('div.dcell').find('img').each(function(index, elem) {

            console.log("Element: " + elem.tagName + " " + elem.src);

        });


    });

</script>

...
In this example, I start by creating a jQuery object that contains all of the div elements that are members of the drow class and all of the div elements that are members of the dcell class. The key point to note is that all of the members of the dcell class are contained within members of the drow class, meaning that you have overlapping sets of descendants and the potential for duplication when I use the find method with the img selector, since the img elements are descendants of both classes of div elements. But jQuery comes to the rescue and ensures that there are no duplicates in the elements returned, as demonstrated in the output from this script:
Element: IMG http://www.jacquisflowershop.com/jquery/astor.png

Element: IMG http://www.jacquisflowershop.com/jquery/daffodil.png

Element: IMG http://www.jacquisflowershop.com/jquery/rose.png

Element: IMG http://www.jacquisflowershop.com/jquery/peony.png

Element: IMG http://www.jacquisflowershop.com/jquery/primula.png

Element: IMG http://www.jacquisflowershop.com/jquery/snowdrop.png
Using the find Method to Create an Intersection
You can pass a jQuery object, an HTMLElement object, or an array of HTMLElement objects as the argument to the find method. When you do this, you select the intersection between the descendants in the source jQuery object and the elements in the argument object. Listing 6-13 provides a demonstration.
Listing 6-13. Using the find Method to Create an Intersection
<script type="text/javascript">

    $(document).ready(function() {


        var jq = $('label').filter('[for*=p]').not('[for=peony]'),

        $('div.drow').find(jq).css("border", "thick solid blue");


    });

</script>
As this script demonstrates, the advantage of this approach is that you can be very specific about the elements that intersect with the descendants. I create a jQuery object that I then reduce using the filter and not methods. This object then becomes the argument to the find method on another jQuery object that contains all of the div elements in the drow class. The final selection is the intersection between the descendants of the div.drow elements and my reduced set of label elements. You can see the effect of the script in Figure 6-8.
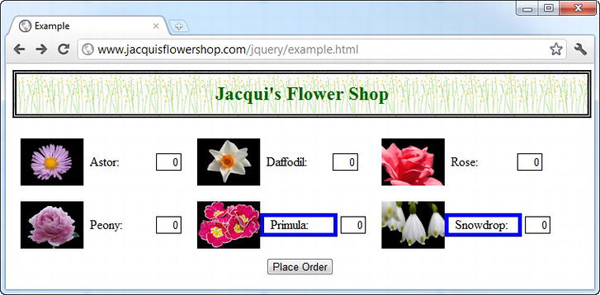
Figure 6-8. Using the find method to create an intersection
Navigating Up the Hierarchy
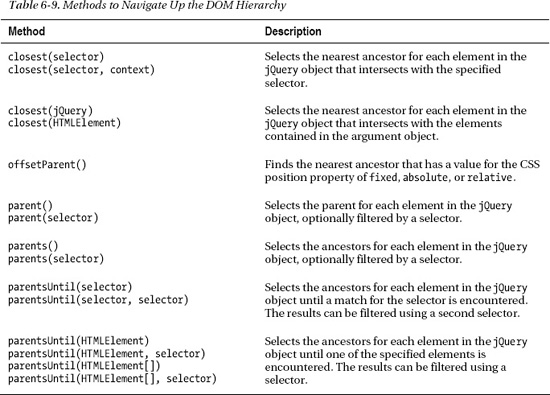
When you navigate up the DOM hierarchy, you are interested in parents and ancestors of the elements contained in a jQuery object. Table 6-9 shows the methods you can use to navigate upward.
Selecting Parent Elements
The parent method lets you select the parent element for each of the elements in a jQuery object. If you provide a selector, then only parent elements that match the selector will be included in the result. Listing 6-14 shows the parent element in use.
Listing 6-14. Using the Parent Element
...

<script type="text/javascript">

    $(document).ready(function() {
        $('div.dcell').parent().each(function(index, elem) {

            console.log("Element: " + elem.tagName + " " + elem.id);

        });


        $('div.dcell').parent('#row1').each(function(index, elem) {

            console.log("Filtered Element: " + elem.tagName + " " + elem.id);

        });


    });

</script>

...
In this script, I select all of the div elements who are members of the dcell class and then call the parent method to select the parent elements. I have also demonstrated using the parent method with a selector. I use the each method to write information about the selected parent elements to the console, which produces the following output:
Element: DIV row1

Element: DIV row2

Filtered Element: DIV row1
Selecting Ancestors
The parents method (note the final letter s) lets you select all of the ancestors of elements in a jQuery object, not just the immediate parents. Once again, you can pass a selector as a method to the argument to filter the results. Listing 6-15 demonstrates the parents method.
Listing 6-15. Using the parents Method
...

<script type="text/javascript">

    $(document).ready(function() {


        $('img[src*=peony], img[src*=rose]').parents().each(function(index, elem) {

            console.log("Element: " + elem.tagName + " " + elem.className + " "

                             + elem.id);

        });


    })

</script>

...
In this example, I have selected two of the img elements and used the parents method to select their ancestors. I then write information about each ancestor to the console, to produce the following output:
Element: DIV dcell

Element: DIV drow row2

Element: DIV dcell
Element: DIV drow row1

Element: DIV dtable

Element: DIV  oblock

Element: FORM

Element: BODY

Element: HTML
A variation on selecting ancestors is presented by the parentsUntil method. For each element in the jQuery object, the parentsUntil method works its way up the DOM hierarchy, selecting ancestor elements until an element that matches the selector is encountered. Listing 6-16 provides a demonstration.
Listing 6-16. Using the parentsUntil Method
...

<script>

    $(document).ready(function() {


        $('img[src*=peony], img[src*=rose]').parentsUntil('form')

            .each(function(index, elem) {

                console.log("Element: " + elem.tagName + " " + elem.className

                        + " " + elem.id);

        });


    });

</script>

...
In this example, the ancestors for each element are selected until a form element is encountered. The output from the script is as follows:
Element: DIV dcell

Element: DIV drow row2

Element: DIV dcell

Element: DIV drow row1

Element: DIV dtable

Element: DIV  oblock
Notice that elements that match the selector are excluded from the selected ancestors. In this example, this means that the form element is excluded. You can filter the set of ancestors by providing a second selector argument, as shown in Listing 6-17.
Listing 6-17. Filtering the Set of Elements Selected by the parentsUntil Method
...

<script type="text/javascript">

    $(document).ready(function() {
        $('img[src*=peony], img[src*=rose]').parentsUntil('form', ':not(.dcell)')

            .each(function(index, elem) {

            console.log("Element: " + elem.tagName + " " + elem.className

                        + " " + elem.id);

        });


    });

</script>

...
In this example, I have added a selector that will filter out elements that belong to the dcell class. The output from this script is as follows:
Element: DIV drow row2

Element: DIV drow row1

Element: DIV dtable

Element: DIV  oblock
Selecting the First Matching Ancestor
The closest method lets you select the first ancestor that is matched by a selector for each element in a jQuery object. Listing 6-18 provides a demonstration.
Listing 6-18. Using the closest Method
...

<script type="text/javascript">

    $(document).ready(function() {


        $('img').closest('.drow').each(function(index, elem) {

            console.log("Element: " + elem.tagName + " " + elem.className

                        + " " + elem.id);

        });


        var contextElem = document.getElementById("row1");

        $('img').closest('.drow', contextElem).each(function(index, elem) {

            console.log("Context Element: " + elem.tagName + " " + elem.className

                        + " " + elem.id);

        });


    })

</script>

...
In this example, I select the img elements in the document and then use the closest method to find the nearest ancestor that belongs to the drow class.
You can narrow the scope for selecting ancestors by specifying an HTMLElement object as the second argument to the method. Ancestors that are not the context object or are not descendants of the context object are excluded from the selection. The output from the script is as follows:
When you specify a jQuery object or one or more HTMLElement objects as the argument to the closest method, jQuery works its way up the hierarchy for each element in the source jQuery object, matching the first argument object it finds. This is demonstrated by Listing 6-19.
Listing 6-19. Using the Closest Method with a Set of Reference Objects
...

<script type="text/javascript">

    $(document).ready(function() {


        var jq = $('#row1, #row2, form'),


        $('img[src*=rose]').closest(jq).each(function(index, elem) {

            console.log("Context Element: " + elem.tagName + " " + elem.className

                        + " " + elem.id);

        });


    });

</script>

...
In this example, I select one of the img elements in the document and then use the closest method to select the ancestor elements. I have supplied a jQuery object containing the form element and the elements with the row1 and row2 ID as the argument to the closest method. jQuery will select whichever of the elements is the nearest ancestor to the img element. In other words, it will start to work its way up the hierarchy until it encounters one of the elements in the argument object. The output for this script is as follows:
Context Element: DIV drow row1
The offsetParent is a variation on the closest theme and funds the first ancestor that has a value for the position CSS property of relative, absolute, or fixed. Such an element is known as a positioned ancestor, and finding one can be useful when working with animation (see Chapter10 for details of jQuery support for animation). Listing 6-20 contains a demonstration of this method.
Listing 6-20. Using the offsetParent Method
<!DOCTYPE html>

<html>

<head>

    <title>Example</title>

    <script src="jquery-1.7.js" type="text/javascript"></script>

    <link rel="stylesheet" type="text/css" href="styles.css"/>

    <style type="text/css">
        #oblock {position: fixed; top: 120px; left: 50px}

    </style>

    <script type="text/javascript">

        $(document).ready(function() {

            $('img[src*=astor]').offsetParent().css("background-color", "lightgrey");

        });

    </script>

</head>

<body>

    <h1>Jacqui's Flower Shop</h1>

    <form method="post">

        <div id="oblock">

            <div class="dtable">

                <div id="row1" class="drow">

                    <div class="dcell">

                        <img src="astor.png"/><label for="astor">Astor:</label>

                        <input name="astor" value="0" required>

                    </div>

                    <div class="dcell">

                        <img src="daffodil.png"/><label for="daffodil">Daffodil:</label>

                        <input name="daffodil" value="0" required >

                    </div>

                    <div class="dcell">

                        <img src="rose.png"/><label for="rose">Rose:</label>

                        <input name="rose" value="0" required>

                    </div>

                </div>

            </div>

        </div>

        <div id="buttonDiv"><button type="submit">Place Order</button></div>

    </form>

</body>

</html>
In this cut-down version of the example document, I have used CSS to set a value for the position property for the element with the id of oblock. In the script, I use jQuery to select one of the img elements and then call the offsetParent method to find the closest positioned element. This method works its way up the hierarchy until it reaches an element with one of the required values. I use the css property to set a value for the background-color property for the selected element, as you can see in Figure 6-9.
Figure 6-9. Finding the closest positioned ancestor
Navigating Across the Hierarchy
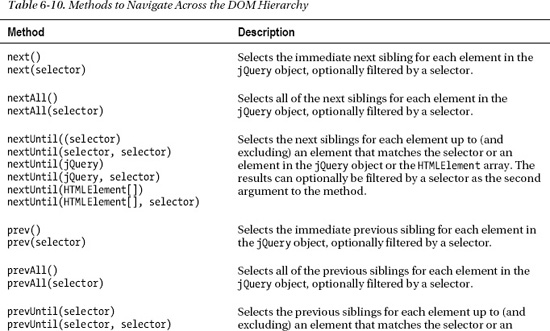
The final form of DOM navigation deals with siblings. The methods that jQuery provides for this are described in Table 6-10.

Selecting All Siblings
The siblings method selects all of the siblings for all of the elements in a jQuery object. Listing 6-21 shows this method in use. (For this listing, I have returned to the full flower shop document shown in Listing 6-1).
Listing 6-21. Using the siblings Method
...

<script type="text/javascript">

    $(document).ready(function() {


        $('img[src*=astor], img[src*=primula]')

            .parent().siblings().css("border", "thick solid blue");


    });

</script>

...
In this example, I select two of the img elements, call the parent method to select their parent elements, and then call the siblings method to select their sibling elements. Both the previous and next siblings will be selected, and I use the css method to set a value for the border property. You can see the effect in Figure 6-10. (I used the parent method to make the effect of the CSS property clearer.)

Figure 6-10. Selecting sibling elements
Notice that only the siblings are selected, not the elements themselves. Of course, this changes if one element in the jQuery object is a sibling of another, as shown in Listing 6-22.
Listing 6-22. Overlapping Sets of Siblings
...

<script type="text/javascript">

    $(document).ready(function() {

        $('#row1 div.dcell').siblings().css("border", "thick solid blue");

    });

</script>

...
In this script, I start by selecting all of the div elements that are children of the row1 element and then call the siblings method. Each of the elements in the selection is the sibling to at least one of the other elements, as you can see in Figure 6-11.
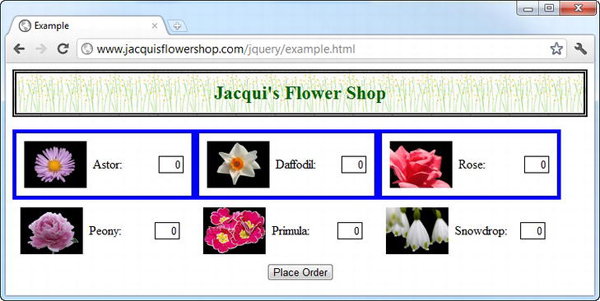
Figure 6-11. Overlapping sibling elements
Selecting Next and Previous Siblings
I am not going to demonstrate all of the methods for selecting next and previous siblings, because they work in the same way as the other navigation methods. Listing 6-23 shows the nextAll and prevAll methods in use.
Listing 6-23. Using the nextAll and prevAll Methods
<script type="text/javascript">

    $(document).ready(function() {

        $('img[src*=astor]').parent().nextAll().css("border", "thick solid blue");

        $('img[src*=primula]').parent().prevAll().css("border", "thick double red");

    });

</script>
This script selects the next siblings for the parent of the astor image and the previous siblings for the primula image. You can see the effect of this script in Figure 6-12.
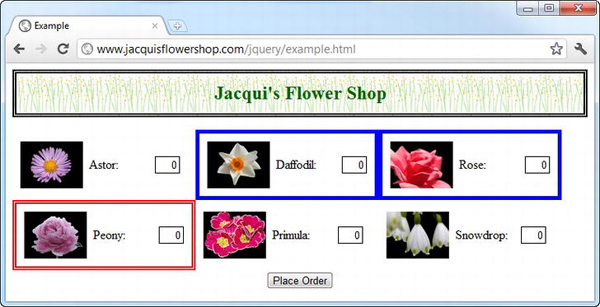
Figure 6-12. Selecting next and previous siblings
Summary
In this chapter, I showed you how to take control of the jQuery selection and tailor it to your exact needs, including adding elements, filtering elements, using mapping, and testing the selection to assess a condition. I also showed you how you can use a jQuery selection as the starting point to navigate the DOM, using one selection as the starting point for traversing the document in order to create another.