
Once Corosync and Pacemaker are installed, we only need to modify a single configuration file to activate them. As we've mentioned earlier and shown in the introduction diagram, Corosync is the conduit that Pacemaker uses for communication. Corosync also binds itself to services that rely on its channels, so it will also launch Pacemaker on our behalf.
This recipe will explain how to create a simple configuration for Corosync that will establish a secure Pacemaker cluster.
We have already installed everything we need, but if we are running a Debian-based system such as Ubuntu or Mint, we have one more step. Before Corosync will work properly, we need to enable its startup script. Open the /etc/default/corosync file and make sure it contains this line:
START=yes
Without it, Corosync won't run even if we start it manually. We removed it from system boot time, but that doesn't mean we never want it to run at all!
For this recipe, we have two PostgreSQL nodes: pg1 and pg2, which are assigned IP addresses in the 192.168.56.0 subnet. Follow these steps as a root-capable user:
- On
pg1, run this command to generate an authorization key file:corosync-keygen - Open another connection to
pg1and perform several activities untilcorosync-keygencompletes. - Copy the resulting
/etc/corosync/authkeyfile topg2. Make sure it is copied to/etc/corosync/authkeyas well. - Modify the
bindnetaddrline in the/etc/corosync/corosync.conffile on bothpg1andpg2so that it contains the following value:bindnetaddr: 192.168.56.0
- Modify the
secauthline in the/etc/corosync/corosync.conffile on bothpg1andpg2so that it contains the following value:secauth: on
- Start Corosync on both
pg1andpg2with this command:sudo service corosync start - Show the status of Pacemaker with the
crmutility onpg1:sudo crm status
The first step involves securing our Corosync communication channel. The corosync-keygen utility will generate a 1024-bit key that helps Pacemaker nodes identify each other, but to do so, it involves a lot of random input.
We can generate entropy by making the server perform tasks. If the server is otherwise idle, running commands, testing SQL, or simply waiting, it will eventually exit and save a file named authkey in the /etc/corosync configuration directory. As we want this file to be the same on all nodes, we also copy it from pg1 to pg2.
Next, we only need to change two lines in the existing configuration files to suit our needs. First, we need to tell Corosync which network interface it should bind to with bindnetaddr. In our case, both servers are on the 192.168.56.0 network, so we can use that value. This address will likely be different on your system, but it's easily obtained.
Then, we change secauth to on to enable secure and encrypted communication between nodes. When this is done on both nodes, we can start Corosync with the service command, and our work is done.
To verify that the Pacemaker cluster exists, we can use the crm command. What is crm? It stands for Cluster Resource Manager and will be the command we use for all Pacemaker interactions from now on. The status parameter displays the current state of the cluster, and for our test systems, it looks like this:
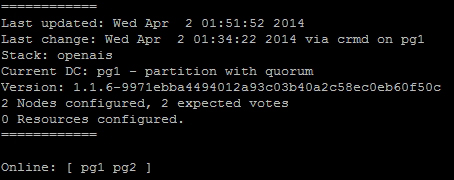
As we can see, Pacemaker can communicate with both nodes, so it lists them as Online. The rest of the information presented here regarding quorum and votes can be ignored for now, but we'll cover it soon enough.
- As mentioned earlier, the clusterlabs.org site should be considered the ultimate resource regarding Corosync and Pacemaker. To learn more about the process we used here, proceed to http://clusterlabs.org/wiki/Initial_Configuration.
- Otherwise, the
corosync.conffile actually has its own extensive manual page available via themanutility. It's extremely useful to create more advanced clusters. Use the following command:man corosync.conf