
There's something to be said for simplicity. So far, the tools we've discussed in this chapter are larger client-server mechanisms or components of entire toolkits. One of the central tenets of the Unix philosophy is to build tools that do one thing well. In this case, we turn to Peak6 and their walctl WAL-management tools.
I created walctl specifically to address shortcomings in existing WAL-related utilities. Primarily of note is the question of architecture. Existing WAL tools follow an architecture diametrically opposed to the end goal of high availability. We often see this:
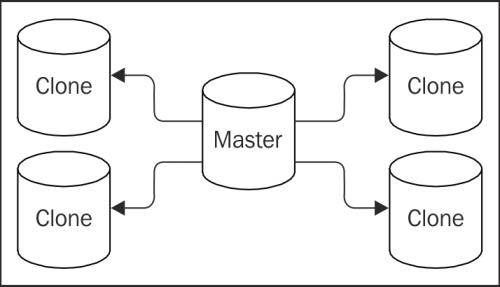
In this kind of model, the master node is tasked with transmitting transaction streams or WAL files to every node in the cluster. This makes it fantastically difficult to change the active master node and potentially overloads the master node itself. The primary write node of any cluster should be focused on fulfilling client requests. The purpose of walctl is to impose a structure like this:

Instead of forcing the master node to supply each standby, the master transmits WAL data to a central archive server. Then, each clone can pull from that location as needed. In this recipe, we will install walctl so that we can take advantage of the structure it advocates.
Currently, walctl is very new. As such, it resides primarily on GitHub. You can download a copy of walctl from https://github.com/OptionsHouse/walctl.
We also suggest that you install rsync, openssh, and PostgreSQL server development libraries. For most PostgreSQL servers, it's very likely these are already installed.
For this procedure, we will need three servers. The archive server should be named pg-arc, our primary PostgreSQL server is pg-primary, and the new standby will be pg-clone. As usual, the PostgreSQL data directory will be located at /db/pgdata. For simplicity, the system user on all machines will be postgres. Be sure to have the password for this user!
- As a root-capable user on
pg-primaryandpg-clone, run these commands to install walctl:git clone https://github.com/OptionsHouse/walctl cd walctl sudo make install
- As a root-capable user on
pg-arc, create the WAL storage directory:sudo mkdir -m 0600 /db/wal_archive sudo chown postgres:postgres /db/wal_archive
- On
pg-primary, create and export an SSH key to thepg-arcandpg-cloneservers:ssh-keygen -t rsa -N '' ssh-copy-id pg-arc ssh-copy-id pg-clone
- Repeat the previous step on the
pg-cloneserver:ssh-keygen -t rsa -N '' ssh-copy-id pg-arc ssh-copy-id pg-primary
- Execute this SQL on
pg-primaryto create a database user for walctl:CREATE USER walctl WITH PASSWORD 'test' SUPERUSER REPLICATION;
- Modify
pg_hba.confonpg-primaryand add these lines:host replication walctl pg-clone md5 host replication walctl pg-primary md5
- On
pg-cloneandpg-primary, ensure this line appears in the.pgpassfile for thepostgresuser:*:*:*:walctl:test
- On
pg-cloneandpg-primary, create a file named/etc/walctl.confwith these contents:PGDATA=/db/pgdata ARC_HOST=pg-arc ARC_PATH=/db/wal_archive
- On
pg-primary, execute this command to set up walctl:walctl_setup master - If instructed by
walctl_setup, restart the PostgreSQL server:pg_ctl -D /db/pgdata restart
Currently, the best source for the walctl files is from GitHub. We suggest that you clone the repository and install the latest version with the included Makefile. After doing so, most of the installation steps are actually things that we've already done, such as creating and distributing SSH keys, allowing host connections in pg_hba.conf, or adding authentication information to .pgpass. It doesn't actually matter how you do this, but the end result must match these requirements:
- Both
pg-primaryandpg-clonemust be able to communicate via SSH withpg-arc - The
pg-cloneserver must be able to connect topg-primaryto clone data and potentially stream it as well - We don't suggest using trust-based authentication, so some higher-security method such as
md5should be used to authenticate thewalctldatabase user
Given the above has been accomplished—either by our instructions or otherwise—we can configure walctl. A minimal configuration requires three settings before walctl will operate normally. To read or write WAL files to their expected locations, PGDATA must be set. Then, it needs ARC_HOST to send files to the archive server, and ARC_PATH so that it knows where to store archived WAL files.
The walctl_setup utility has one purpose: prepare PostgreSQL for walctl integration. When called with the master parameter as we've done here, it modifies postgresql.conf so that WAL files are compatible with archival, and streaming replicas can connect. In addition, it enables archive mode and sets archive_command to invoke a walctl utility named walctl_push, which sends WAL files to the archive server. While calling walctl_setup on our test server, this was the output:
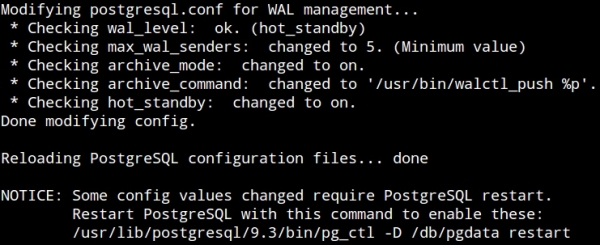
Walctl knows which settings can be changed by reloading PostgreSQL configuration files and which require a full service restart. It even tells us how to do it if we don't already know. If that last NOTICE doesn't appear in the output, the pg-primary server is already archiving WAL files on pg-arc. Otherwise, restarting PostgreSQL will initialize the process.
- Currently, all documentation for walctl is located at the GitHub repository at https://github.com/OptionsHouse/walctl
The README file in the source code also contains very similar instructions to what we described in this recipe