
Once Slony has been installed and is running on both nodes, we can actually make use of it and copy tables to a remote database. For high availability PostgreSQL servers, making data available to external systems means long-running and potentially disruptive ad hoc queries run elsewhere. It also means that reporting environments have direct copies of relevant tables and do not need to retrieve this data from our OLTP systems.
While it is possible for OLTP servers to act as OLAP systems as well, these workloads are quite different. For the best performance possible and the least risk of outages, each server should be specialized. So, let's use Slony to do just that.
We will be continuing where we left off in the Setting up Slony recipe. Please make sure to have completed that recipe before continuing. As we want tables to test Slony with, we should create some. The pgbench utility can do this quickly. Execute this command on the primary PostgreSQL server as the postgres user:
pgbench -i postgres
For this recipe, 192.168.56.30 will remain our subscriber. Follow these instructions to copy the pgbench tables and all future changes from pg1 to pg2:
- Extract the table creation statements from the primary database with the following command as the
postgresuser:pg_dump -s -t 'pgbench*' postgres > /tmp/tables.sql - Create the empty tables on the subscriber node by executing this command as the
postgresuser on the primary node:psql -U rep_user -h 192.168.56.30 -f /tmp/tables.sql postgres - Confirm that the tables exist on the subscriber node by executing the following SQL statement on that system:
SELECT schemaname, tablename FROM pg_tables
 WHERE tablename LIKE 'pgbench%';
- Create a file named
pgbench_set.slonikin the/etc/slonydirectory with the following contents:include </etc/slony/nodes.slonik>; create set (id=1, origin=1, comment='pgbench Tables'), set add table (set id=1, origin=1, id=1, fully qualified name = 'public.pgbench_accounts'), set add table (set id=1, origin=1, id=2, fully qualified name = 'public.pgbench_branches'), set add table (set id=1, origin=1, id=3, fully qualified name = 'public.pgbench_tellers'), - Create a file named
subscribe_pgbench.slonikin the/etc/slonydirectory with the following contents:include </etc/slony/nodes.slonik>; subscribe set (id = 1, provider = 1, receiver = 2, forward = no); - Create the
pgbenchsubscription set with this command:slonik < /etc/slony/pgbench_set.slonik - Subscribe our secondary node to the new
pgbenchset with this command:slonik < /etc/slony/subscribe_pgbench.slonik - Execute the following SQL on the subscriber node to confirm that data is being copied:
SELECT count(1) FROM pgbench_accounts;
Before we can copy any data, we need to begin by copying the table structures from the primary node to the subscriber. Slony only copies data and assumes that the source and target tables have the exact same columns. Therefore, we use pg_dump to obtain a schema-only (-s) extract of any table that begins with pgbench (-t 'pgbench*'). Using the -h parameter, we can execute the resulting SQL statement on the subscriber database and create all of the pgbench tables as empty shells.
Before attempting to create the Slony set, we should first confirm that the tables exist on the subscriber. We can check the pg_tables view and should see these records:
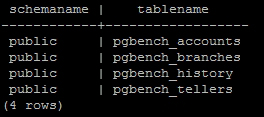
Once we've done this, we can continue by creating a slonik script that will create the Slony subscription set itself. Sets can be sent to any node that requests a subscription and only includes tables in that set. This lets us group tables by content if necessary. Observant readers may notice that we didn't add the pgbench_history table to the subscription set. This is because Slony only copies tables with primary keys by default.
Next, we create one more slonik script for the subscription command itself. As this is our first set, its id is 1. Though Slony supports chained table replication, we don't need that for our setup, so we disable it by setting forward to no.
To send table contents to the remote server, we simply need to create the table set on the primary node and subscribe the secondary node to the new set. This is one reason that we created the two slonik scripts. Another reason is due to the chance that we might need to rebuild this Slony replication cluster in the future. By having all of these scripts, we can do this in a few quick steps by executing all of the slonik scripts.
Provided there were no errors returned by the slonik commands, we can confirm that data is being sent to the subscriber with a single SQL query. We should see this:

Remember that we only extracted and copied the table definitions to the remote server. If we see any rows there, they must have come from Slony.
Slony operates by attaching triggers to both the source and target tables. Due to this, creating a Slony set on a very active database can cause locking contention. Why does it need triggers? The triggers on the source system capture insert, update, and delete activities and forwards them to the remote system. On subscriber nodes, the triggers block any insert, update, or delete activity that does not originate from Slony itself.
The triggers also make it possible to switch between which node is the subscriber, and which is the origin without any further table locks. Keep this in mind when copying data via Slony, or the locks could cause query timeouts and customer complaints. Try to schedule new sets and set modifications during maintenance periods or low-usage periods.
- Once again, we recommend that you read the Slony documentation if you plan to use it for logical table replication. The rich syntax and functionality is beyond the scope of this book, but is available at http://slony.info/documentation/2.2/index.html.