
The Linux Volume Manager (LVM) is something of an optional master control panel for Linux storage devices. It can combine several devices into one, allows arbitrary storage grouping far more granular than simple partitions, and provides functionality such as data snapshots and reorganization. It's very powerful, and in the right hands, greatly improves potential server uptime.
It is also the first layer above the raw storage device in our stack. We start with LVM instead of DRBD, because DRBD at the device level is extremely messy. What do we gain by insulating DRBD from the raw storage device?
- We can easily add storage to the LVM device group assigned to DRBD
- DRBD can be resized while in an online state
- We can perform storage migrations without taking PostgreSQL offline
None of this is possible unless LVM is the first layer. For a high-availability server, this is extremely desirable. Follow along to see how it works.
At this point, all we need is a single unformatted device to use for database storage. In addition, make sure you've prepared the system as described in the Preparing systems for the stack recipe.
For the purposes of this recipe, we will assume that the /dev/sdb device has been dedicated to PostgreSQL use. Follow these steps as the root user on two servers to create the first LVM layer:
- Create and verify a single LVM partition on the device with these commands:
parted /dev/sdb mklabel gpt
parted /dev/sdb mkpart primary 1 100%
parted /dev/sdb set 1 lvm on
parted /dev/sdb print
- Register
/dev/sdbas an LVM physical device with this command:pvcreate /dev/sdb1 - Create a single volume group to contain
/dev/sdb1with this command:vgcreate VG_DRBD /dev/sdb1 - Create a single logical volume as
100%of the outer volume group with this command:lvcreate -n LV_DATA -l 100%VG VG_DRBD - Verify whether the new volume exists and is available with this command:
lvdisplay VG_DRBD/LV_DATA | grep LV
Before we can use LVM safely, we should create at least one partition on the raw device. For this, we use parted, a more advanced partition editor than fdisk. We need parted because it can set the partition table type as GPT, which allows filesystems greater than 2 TB. This is what the first invocation of parted does, with the mklabel parameter set to gpt.
To create the partition itself, we call parted with the mkpart parameter. By using mkpart, we also need to specify the type of partition we want, and its starting and ending positions. We keep things simple by starting at the beginning of the device and using 100% of the available storage.
Finally, we set the LVM flag to true by invoking parted with the set parameter. The set parameter requires a partition number, the flag we want to set, and the value. In our case, we are using the first partition and setting the lvm flag to on.
It's always a good idea to verify our creations, and parted has a print setting to output the current partition table for a specified disk device. Here is /dev/sdb on our test system:
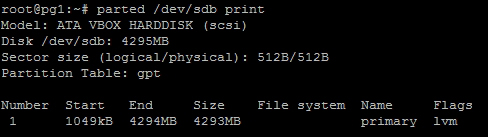
As you can see, the test device we've used for this example is very small, at just over 4 GB. However, we can also see that the partition table is gpt, and the lvm flag is set as expected.
Now we can start with LVM itself. The first step is to use pvcreate to create a physical LVM device. This allows LVM to manage the device, and only requires us to name /dev/sdb1 as the device we're adding.
Next, we need a volume group. Volume groups can be comprised of multiple physical volumes and be split into several logical volumes. By calling vgcreate, we need to name the group with the first parameter. Every subsequent parameter is a device that should be part of the new group. In our case, we only have the /dev/sdb1 device, so that becomes our last parameter.
Since the volume group can host several logical volumes, we need to create at least one. Unlike vgcreate, the lvcreate command does not assume the first parameter is the volume name. Thus, we need to specify the -n parameter to name the volume. By using the -l parameter, we can specify a percentage of the volume group as the size of our volume. For the base volume, we want to use all available storage space (100%VG) since DRBD will be the next layer. The last parameter for lvcreate is the name of the volume group we are using for this logical volume.
The last thing we do is verify that the logical volume has the elements we expect. We can do this with the lvdisplay command as seen here:

From this, we can see that the new logical volume is 4.00 GiB in size and is available for use. We can also observe that LVM created a new device path at /dev/VG_DRBD/LV_DATA. This path will be how we address the storage in the future. It can be formatted, mounted, or treated just like any other Linux storage device.
As we'll discuss in the next recipe, this new /dev location can be used as the target device for another resource such as DRBD.
We hope you noticed the naming scheme inherent in all of the LVM commands. Commands prefixed with pv are meant for physical volume management. Similarly, vg is used for volume groups, and lv is for logical volumes. This greatly simplifies management of LVM devices.
We used pvcreate, vgcreate, and lvcreate in this recipe. However, it shouldn't surprise you that there are also analogous pvremove, vgremove, and lvremove commands as well. There are also commands to retrieve information about volumes and groups: pvdisplay, vgdisplay, and lvdisplay.
This is one of the reasons we enjoy working with LVM; we rarely have to guess at commands.
- LVM itself is a conceptual architecture. To understand more about how it works, we recommend the Linux Documentation Project discussion on the topic at http://tldp.org/HOWTO/LVM-HOWTO/.
- In addition, all of the LVM commands have their own
manpage. We highly recommend at least viewing the man page for each utility before using it. For example:man lvextend