
Up until now, we've been managing WAL files with tools such as cp or rsync. Our end goal was to transmit these to a backup server so that the WAL files were safe long term in case we needed them for PITR recovery. As a bonus, the backup server is a central location that can be committed to tape regularly so that our PostgreSQL databases are preserved so long as we retain the tapes.
While this is a valid and functional approach, logging options, debugging, and flexibility are somewhat limited. Regular operating-system tools are not designed specifically to process PostgreSQL WAL files. Though we can use them for that purpose, there are better utilities available. OmniPITR is a powerful toolkit developed by OmniTI to manage PostgreSQL backup, restore, and WAL files.
This recipe will focus on installing OmniPITR so that we can use it later.
At the time of writing this book, the most recent version of OmniPITR is 1.3.2. In order to install it, we would like to introduce the PostgreSQL Extension Network (PGXN). PGXN is a site that attempts to collect PostgreSQL-related tools and extensions in a single place to simplify usage. PGXN is located at http://pgxn.org/.
PGXN provides a command-line tool named pgxn to access the PGXN repository, which we can install with Python's setuptools. Use this command to install pgxn:
sudo easy_install pgxnclient
For this procedure, we will continue to use two servers. The backup server will still be named pg-backup, and our primary PostgreSQL server is still pg-primary. Make sure to have the password for the postgres system user.
Follow these steps to install OmniPITR on both pg-backup and pg-primary:
- Download OmniPITR using the
pgxnutility with this command:pgxn download omnipitr - Unzip and relocate the OmniPITR files with these commands as a root-capable user:
unzip omnipitr-1.3.2.zip
cd omnipitr-1.3.2
sudo cp bin/* /usr/local/bin
sudo cp -R lib/OmniPITR /usr/local/lib
sudo cp -R doc /usr/local
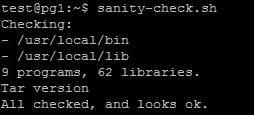
- Check the OmniPITR installation with the following command:
sanity-check.sh - As the
postgresuser onpg-primary, generate an RSA key pair and transmit it topg-backupwith these commands:ssh-keygen -t rsa -N '' ssh-copy-id postgres@pg-backup
- As the
postgresuser onpg-backup, generate an RSA key pair and transmit it topg-primarywith these commands:ssh-keygen -t rsa -N '' ssh-copy-id postgres@pg-primary
Unlike some other toolkits, OmniPITR is purely a set of command-line utilities. As such, its authors never created a proper installation process. With this in mind, we start by downloading the latest omnipitr package from PGXN. Unlike the omnipitr package's install parameter, the download parameter simply retrieves the indicated package and saves it in the local directory.
With the archive saved locally, we begin by extracting its contents and entering the resulting directory. OmniPITR itself is the collection of tools located in the bin/ directory, so we move those files into /usr/local/bin for easy invocation. Due to the way OmniPITR was written, it searches for the doc/ and lib/ directories at the same level as the bin/ directory. This means that the utilities should work if we copy the contents of these directories to /usr/local as well.
Next, we should verify that OmniPITR is properly installed and will function as expected. It is distributed with a file named sanity-check.sh, which we installed with the other files in the bin/ directory. If we execute this command, it will examine various resources and produce a report. The report for our test system looked like this:
Provided the sanity check succeeded, we still need to facilitate communication between pg-backup and pg-primary. To do that, we generate an RSA key pair on each server as the postgres user and send it to the other system. We've performed this task before, so it should come as no surprise now. We do this so that automated tools can transmit files securely.
Both OmniPITR's documentation and the software itself are available on PGXN. To view their installation and usage documents, please use the following URLs:
- OmniPITR—Installation: http://pgxn.org/dist/omnipitr/doc/install.html
- OmniPITR—how to setup: http://pgxn.org/dist/omnipitr/doc/howto.html