
Having more than one viewport displayed can be useful in many situations. For example, you might want to show simultaneous events going on in different locations, or maybe you want to have a separate window for hot-seat multiplayer games. Although you could do it manually by adjusting the Normalized Viewport Rect parameters on your camera, this recipe includes a series of extra preferences to make it more independent from the user's display configuration.
For this recipe, we have prepared a package named basicLevel containing a scene. The package is in the 0423_02_01_02 folder.
To create a picture-in-picture display, just follow these steps:
- Import the
basicLevelpackage into your Unity project. - In the Project view, open basicScene, inside the folder
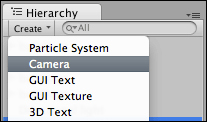
02_01_02. This is a basic scene featuring a directional light, a camera, and some geometry. - Add the Camera option to the scene through the Create dropdown menu on top of the Hierarchy view, as shown in the following screenshot:
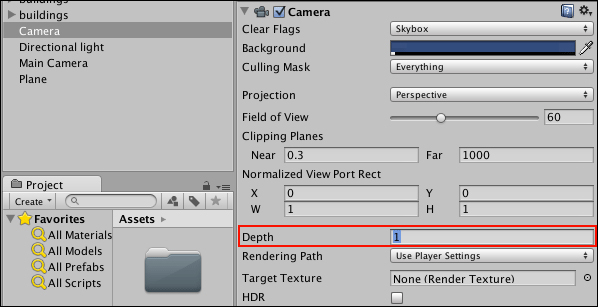
- Select the camera you have created and, in the Inspector view, set its Depth to 1:
- In the Project view, create a new C# script and rename it
PictureInPicture. - Open your script and replace everything with the following code:
using UnityEngine; public class PictureInPicture: MonoBehaviour { public enum HorizontalAlignment{left, center, right}; public enum VerticalAlignment{top, middle, bottom}; public HorizontalAlignment horizontalAlignment = HorizontalAlignment.left; public VerticalAlignment verticalAlignment = VerticalAlignment.top; public enum ScreenDimensions{pixels, screen_percentage}; public ScreenDimensions dimensionsIn = ScreenDimensions.pixels; public int width = 50; public int height= 50; public float xOffset = 0f; public float yOffset = 0f; public bool update = true; private int hsize, vsize, hloc, vloc; void Start (){ AdjustCamera (); } void Update (){ if(update) AdjustCamera (); } void AdjustCamera(){ if(dimensionsIn == ScreenDimensions.screen_percentage){ hsize = Mathf.RoundToInt(width * 0.01f * Screen.width); vsize = Mathf.RoundToInt(height * 0.01f * Screen.height); } else { hsize = width; vsize = height; } if(horizontalAlignment == HorizontalAlignment.left){ hloc = Mathf.RoundToInt(xOffset * 0.01f * Screen.width); } else if(horizontalAlignment == HorizontalAlignment.right){ hloc = Mathf.RoundToInt((Screen.width - hsize) - (xOffset * 0.01f * Screen.width)); } else { hloc = Mathf.RoundToInt(((Screen.width * 0.5f) - (hsize * 0.5f)) - (xOffset * 0.01f * Screen.height)); } if(verticalAlignment == VerticalAlignment.top){ vloc = Mathf.RoundToInt((Screen.height - vsize) - (yOffset * 0.01f * Screen.height)); } else if(verticalAlignment == VerticalAlignment.bottom){ vloc = Mathf.RoundToInt(yOffset * 0.01f * Screen.height); } else { vloc = Mathf.RoundToInt(((Screen.height * 0.5f) - (vsize * 0.5f)) - (yOffset * 0.01f * Screen.height)); } camera.pixelRect = new Rect(hloc,vloc,hsize,vsize); } } - Save your script and attach it to the new camera that you created previously.
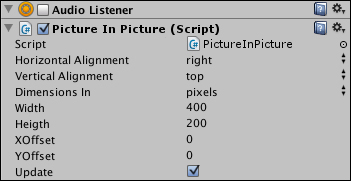
- Uncheck the new camera's Audio Listener component and change some of the PictureInPicture parameters: change Horizontal Alignment to Right, Vertical Alignment to Top, and Dimensions In to pixels. Leave XOffset and YOffset as 0, change Width to 400 and Height to 200, as shown below:
- Play your scene. The new camera's viewport should be visible on the top right of the screen:

Our script changes the camera's Normalized Viewport Rect parameters, thus resizing and positioning the viewport according to the user preferences.
The following are some aspects of your picture-in-picture you could change.
If you change the Dimensions In option to screen_percentage, the viewport size will be based on the actual screen's dimensions instead of pixels.