
Choosing from a variety of cameras is a common feature in many genres: race sims, sports sims, tycoon/strategy, and many others. In this recipe, we will learn how to give players the ability of choosing an option from many cameras using their keyboard.
In order to follow this recipe, we have prepared a package containing a basic level named basicScene. The package is in the folder 0423_02_01_02.
To implement switchable cameras, follow these steps:
- Import the
basicLevelpackage into your Unity project. - In the Project view, open
basicScenefrom the02_01_02folder. This is a basic scene featuring a directional light, a camera, and some geometry. - Add two more cameras to the scene. You can do it through the Create drop-down menu on top of the Hierarchy view. Rename them
cam1andcam2. - Change the
cam2camera's position and rotation so it won't be identical tocam1. - Create an Empty game object by navigating to Game Object | Create Empty. Then, rename it
Switchboard. - In the Inspector view, disable the Camera and Audio Listener components of both
cam1andcam2.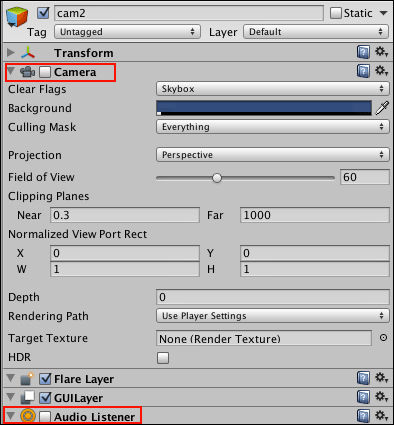
- In the Project view, create a new C# script. Rename it
CameraSwitchand open it in your editor. - Open your script and replace everything with the following code:
using UnityEngine; public class CameraSwitch : MonoBehaviour { public GameObject[] cameras; public string[] shortcuts; public bool changeAudioListener = true; void Update (){ int i = 0; for(i=0; i<cameras.Length; i++){ if (Input.GetKeyUp(shortcuts[i])) SwitchCamera(i); } } void SwitchCamera ( int index ){ int i = 0; for(i=0; i<cameras.Length; i++){ if(i != index){ if(changeAudioListener){ cameras[i].GetComponent<AudioListener>().enabled = false; } cameras[i].camera.enabled = false; } else { if(changeAudioListener){ cameras[i].GetComponent<AudioListener>().enabled = true; } cameras[i].camera.enabled = true; } } } } - Attach
CameraSwitchto theSwitchboardgame object. - In the Inspector view, set both Cameras and Shortcuts size to 3. Then, drag the scene cameras into the Cameras slots, and type
1,2, and3into the Shortcuts text fields, as shown in the next screenshot.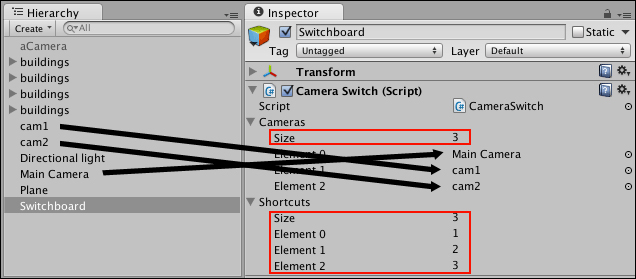
- Play your scene and test your cameras.
The script is very straightforward. All it does is capture the key pressed and enable its respective camera (and its Audio Listener, in case the Change Audio Listener option is checked).
Here are some ideas on how you could try twisting this recipe a bit.
..................Content has been hidden....................
You can't read the all page of ebook, please click here login for view all page.