
As it can be seen in many first-person shooters and survival horror games, lights and shadows can add a great deal of complexity to a scene, helping immensely to create the right atmosphere for the game. In this recipe, we will create a cloudy outdoor environment, lighting it using cookie textures.
If you don't have access to a image editor or prefer to skip the texture map elaboration in order to focus on the implementation, please use the cloudCookie.tga image file provided in the 0423_03_05 folder.
To simulate a cloudy outdoor environment, follow these steps:
- In your image editor, create a new 512 x 512 pixel image.
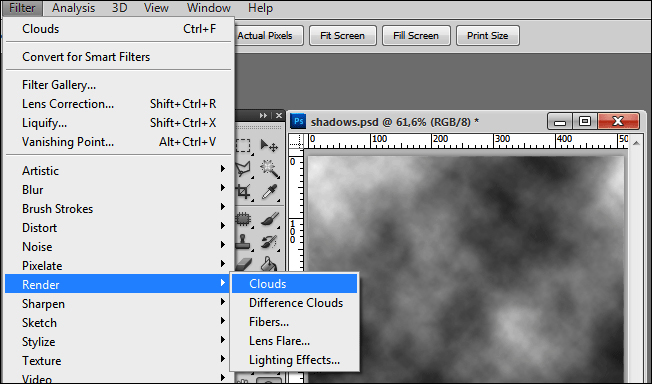
- Using black as foreground color and white as background color, apply the Render Clouds filter (in Photoshop, this is done by navigating to Filter | Render | Clouds):
- Select your entire image and copy it.
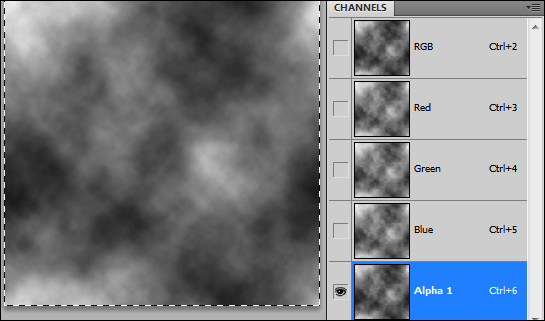
- Open the Channels window (in Photoshop this can be done by navigating to Window | Channels).
- There should be three channels: Red, Green, and Blue. Create a new channel. This will be the Alpha channel.
- In the Channels window, select the Alpha channel and paste your image into it:
- Save your image file as
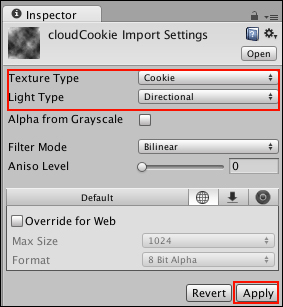
cloudCookie.PSDorcloudCookie.TGA. - Import your image file into Unity and select it in the Project view.
- In the Inspector view, set Texture Type to Cookie, and Light Type to Directional (as shown in the following screenshot):
- We will need a surface to actually see the lighting effect. You can either add a plane to your scene (via the GameObject | Create Other... | Plane menu) or create a terrain (Terrain | Create Terrain) and edit it, if you wish.
- Let's add a light to our scene. Since we want to simulate sunlight, the best option is to create a Directional Light. You can do that through the drop-down menu named Create in the Hierarchy window.
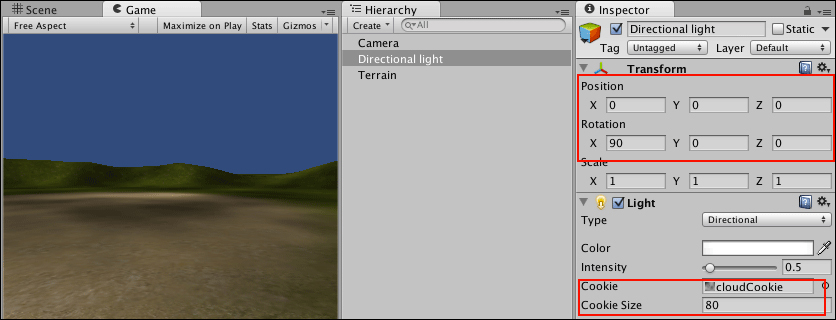
- Using the Transform component of the Inspector view, reset the light's Position to
0,0,0and its Rotation to90,0,0. - In the Cookie field, select the cloudCookie image that you imported earlier. Change the Cookie Size field to 80, or a number that you feel as more appropriate to the scene's dimension. Please leave the Shadow Type as No Shadows:
- Now, we need a script to translate our light and, consequently, the cookie projection. Using the drop-down menu in the Project view, create a new C# Script and rename it to
MovingShadows. - Open your script and replace everything with the following code:
using UnityEngine; using System.Collections; public class MovingShadows : MonoBehaviour { public float windSpeedX; public float windSpeedZ; public float lightCookieSize; // make it equal to the light's Cookie Size parameter in the inspector private Vector3 initPos; void Start() { initPos = transform.position; } void Update() { if (Mathf.Abs(transform.position.x) >= Mathf.Abs(initPos.x) + lightCookieSize) { Vector3 pos = transform.position; pos.x = initPos.x; transform.position = pos; } else { transform.Translate(Time.deltaTime * windSpeedX, 0, 0, Space.World); } if (Mathf.Abs(transform.position.z) >= Mathf.Abs(initPos.z) + lightCookieSize) { Vector3 pos = transform.position; pos.z = initPos.z; transform.position = pos; } else { transform.Translate(0, 0, Time.deltaTime * windSpeedZ, Space.World); } } } - Save your script and apply it to the Directional Light.
- Select the Directional Light. In the Inspector view, change the Wind Speed X and Wind Speed Z parameters to 20 (you can change these values as you wish). The Light Cookie Size parameter has to be changed to the exact amount of the light's cookie size (in our case, 80):

- Play your scene. The shadows should be moving.
With our script, we are telling the Directional Light to move across the x and z axis, causing the Light Cookie texture to be displaced as well. Also, we reset the light object to its original position whenever it travels a distance equal to or greater than the Light Cookie Size parameter. The light position must be reset to prevent it from travelling too far, causing problems in real time render and lighting. The Light Cookie Size parameter is used to ensure a smooth transition.
The reason we are not enabling shadows is because the light angle for the x axis must be 90 degrees (or there will be a noticeable gap when the light resets to the original position). If you want dynamic shadows in your scene, please add a second directional light.
In this recipe we have applied a cookie texture to a directional light. But what if we were using Spot Light or Point Light cookies?
Unity documentation has an excellent tutorial on how to make Spot Light cookies. This is great to simulate shadows coming from projectors, windows, and so on. You can check it out at http://unity3d.com/support/documentation/Manual/HOWTO-LightCookie.html.