
Mixing animations is a great way of adding complexity to your animated characters without requiring a vast number of animated clips. Using Layers and Masks, we can combine different animations by playing specific clips for specific body parts of the character. In this recipe, we will apply this technique to our animated character, triggering animation clips for firing a rifle and throwing a grenade with the character's upper body, while keeping the lower body moving or idle, according to the player's input.
For this recipe, we have prepared a project named MixamoProject, containing several assets such as levels, animated characters, and props. You can find it inside the 0423_05_codes folder.
To mix animations using Layers and Masks, perform the following steps:
- Open the project, and then open the level named 05_03 (inside the Levels folder). Note that it includes a S.W.A.T. character that features the Animator component using the swatController03 Controller.
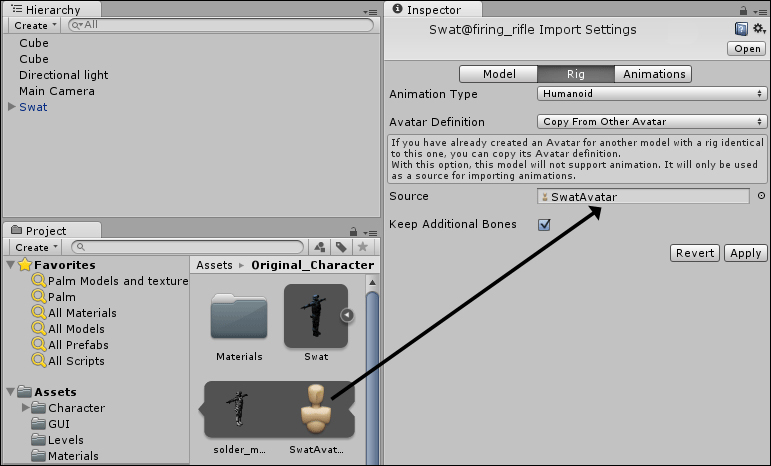
- We need to configure our animation clips. From the Original_Character folder, select the Swat@firing_rifle file.
- Click on the Rig tab. Change Animation Type to Humanoid and Avatar Definition to Copy From Other Avatar. Then, select swatAvatar for Source by choosing it from the list or dragging it from the Project view into the slot. Confirm your changes by clicking on Apply.
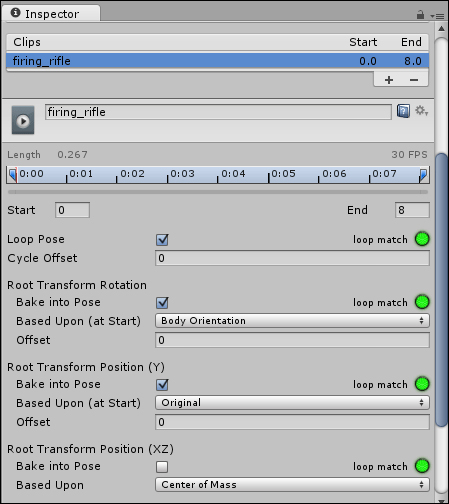
- Now click on the Animations tab. Select the firing_rifle clip from the Clips list and select the Loop Pose checkbox. Under Root Transform Rotation, check Bake into Pose and set Body Orientation for Baked Upon (at Start); Under Root Transform Position (Y), check Bake into Pose and set Original for Baked Upon (at Start); Under Root Transform Position (XZ), leave the Bake into Pose checkbox deselected. Finally, click on the Clamp Range button to adjust the timeline (see the following screenshot). Click on Apply to confirm the changes.
- Now, from the Original_Character folder, select the Swat@toss_grenade file. Click on the Rig tab. Change Animation Type to Humanoid and Avatar Definition to Copy From Other Avatar. Then, select swatAvatar for Source by choosing it from the list or dragging it from the Project view into the slot. Confirm the changes by clicking on Apply.
- Now click on the Animations tab. Select the toss_grenade clip from the Clips list and leave the Loop Pose checkbox deselected. Under Root Transform Rotation, check Bake into Pose and set Body Orientation for Baked Upon (at Start); Under Root Transform Position (Y), check Bake into Pose and set Original for Baked Upon (at Start); Under Root Transform Position (XZ), leave the Bake into Pose checkbox deselected. Finally, click on the Clamp Range button to adjust the timeline. Click on Apply to confirm the changes.
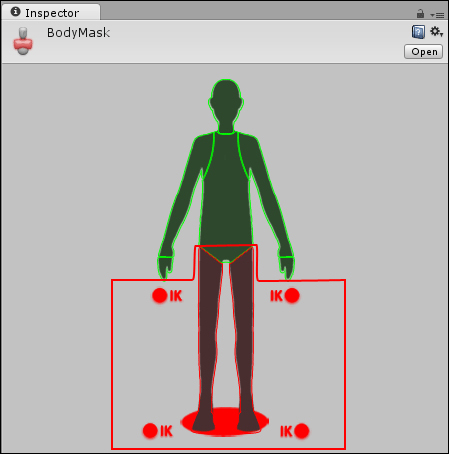
- Let's create our Mask. In the Project view, click on the Create button and add an Avatar Body Mask to the project. Name it
BodyMask. - Select the Body Mask and, in the Inspector view, deselect the character's legs, base, and IK spots, turning their outline red.
- In the Hierarchy view, select the Swat model. Then, from the Animator component in the Inspector view, double-click on swatController03 to open it.
- In the Animator view, create a new Layer by clicking on the + sign on the Layers tab at the top-left corner of the screen, under Base Layer.
- Name the new Layer
UpperBodyand select BodyMask for the Human field under Masks.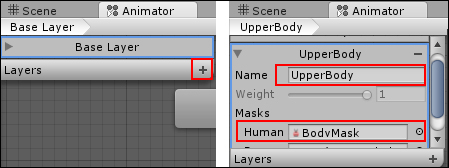
- Now, in the Animator view, with the UpperBody layer selected, create three new empty states (by right-clicking on the gridded area and selecting Empty from the Create State menu). Name the default (orange colored) state
null, and the other two,FireandGrenade. - In the Parameters field at the bottom-left corner of the screen, add two new parameters (of the type
Bool),FireandGrenade.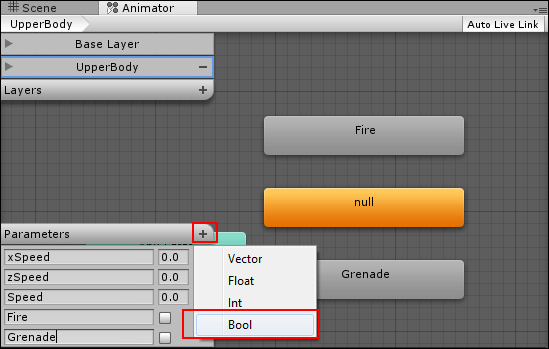
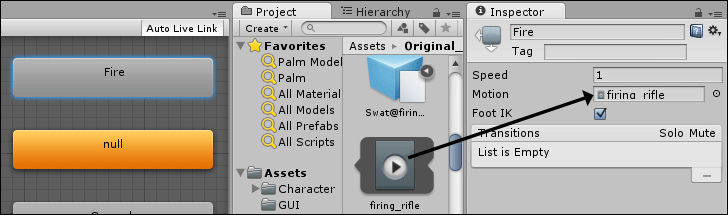
- Select the Fire state and, in the Inspector view, add the firing_rifle animation clip to the Motion field.
- Now select the Grenade state and, in the Inspector view, add the toss_grenade animation clip to the Motion field.
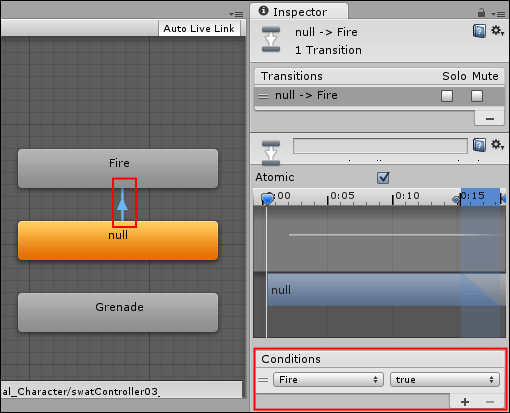
- Right-click on the null state box and select Make Transition from the menu. Then, drag the white arrow into the box named Fire.
- Select the arrow (it should turn blue). Then, in the Inspector view, inside the Conditions box, select the options Fire and true.
- Now make a transition from null to Grenade. Select the arrow and, in the Conditions box, select the options Grenade and true.
- Now create transitions from Fire to null, and from Grenade to null. Select the arrow that goes from Fire to null, and in the Conditions box, select the options Fire and false.
- Finally, select the arrow that goes from Grenade to null, and in the Conditions box, select the option Exit Time and enter the number
0.92.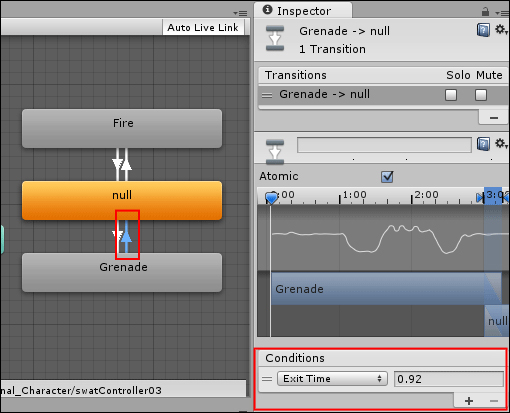
- In the Hierarchy view, select the Swat model. In the Inspector view, select the Basic Controller 03 component and open its script.
- Immediately before the end of the Update() function, add the following code:
if(Input.GetKeyDown(KeyCode.F)){ animator.SetBool("Grenade", true); } else { animator.SetBool("Grenade", false); } if(Input.GetButtonDown("Fire1")){ animator.SetBool("Fire", true); } if(Input.GetButtonUp("Fire1")){ animator.SetBool("Fire", false); } - Save the script and play your scene. You should be able to trigger the Fire and Grenade animations by clicking on the Fire button and pressing the F key, respectively. Observe how the character's legs respond to the walking and running animations.
Once the Avatar Body Mask has been created, it can be used as a way of filtering which body parts will actually play the animation states of a particular layer. In our case, we have constrained our fire_rifle and toss_grenade animation clips to the upper body of our character, leaving the lower body free to play the movement-related animation clips such as walking, running, and strafing.
You might have noticed that the UpperBody layer has a parameter named Blending, which was set to Override by default. This means animation states in that layer will override animation states from lower layers when played. If changed to Additive, the animation from that layer would be added to the ones from lower layers.
For more information on Animation Layers and Avatar Body Masks, check out Unity's documentation at the following two locations:
http://docs.unity3d.com/Documentation/Manual/AnimationLayers.html
http://docs.unity3d.com/Documentation/Manual/AvatarBodyMask.html