
To create a symbol, there are just a few steps to take, a few new tools to learn, and a few important things to remember. So, let's dive right in by turning one of the elements already in your wireframe project into a symbol. Perform the following steps for doing so:
- If it's not already open, select
project_mockup_1.bmmlfrom thebalsamiq_project_filesfolder and open it. - Select all the elements in the header area by clicking-and-dragging the mouse around the entire section, as shown in the following screenshot:

You can also select by pressing Shift while clicking on each piece of the header.
- Once everything is selected, turn the header into a group, by pressing Command + G/Ctrl + G.
- The Property Inspector will appear, indicating that it is now a Group, as shown in the following screenshot:
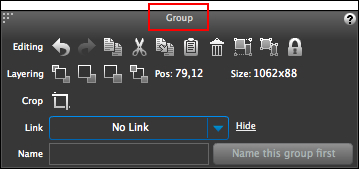
- Give your new group a name by typing it into the Name textbox in the Property Inspector. For example, you can name it
wireframe_header, as shown in the following screenshot: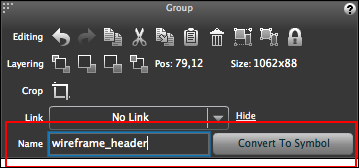
- When you type in the Name field, notice that the button next to it changes from Name this group first to Convert To Symbol.
- When you are done typing, click on the Convert To Symbol button. Once clicked, your grouping will turn green, indicating that it is now a symbol.
Now that you have created your first symbol, you might be wondering where did Balsamiq put it? Luckily, Balsamiq puts your symbols in a unique and easy-to-find place where you have easy access to them anytime.
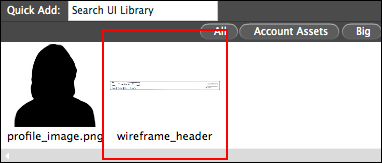
To find it, select the Project Assets button from the UI Library. Project Assets is where Balsamiq stores all of your symbols, as shown in the following screenshot:
You should now see the newly created wireframe_header symbol in the project assets bar, as shown in the following screenshot:
While Balsamiq makes finding your symbols easy using the UI Library, there is one other place where symbols are kept.
Perform the following steps to find it:
- Open the
balsamiq_project_filesfolder. - Once inside, open the
assetsfolder.
There you will find a file called symbols.bmml. Open this file to find the symbol you have just created.
To understand symbols better, think of symbols.bmml as a "master page". For those not familiar with the term, a master
page
is an individual page where common elements, such as a header, footer, navigation, and so on—that is, things that are shared across multiple pages in your project—can be placed. Make a change to the master page and those changes will cascade throughout your entire project, saving you from having to make those same changes page by page.
We will do an exercise later so that you can see this in action.