
The game file to import and load for this session is 5961_10_01.stencyl.
Before we attempt to use the accelerometer in a practical test game, let's carry out an experiment to learn how Stencyl accesses the accelerometer information on a mobile device.
- Attach the mobile device to the development computer using the supplied USB cable.
- Continue to use the blank game created in either of the sections, Time for action – testing on an Android device, or Time for action – testing on an iOS device. Alternatively, import the specified download file for this session.
- Open Test Scene and select the Events button at the upper-center of the screen.
- Select + Add Event | Basics | When Drawing.
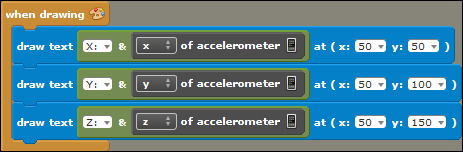
- In the new when drawing event, add the instruction blocks shown as follows, noting that the … of accelerometer block can be found in the instruction block palette under User Input | Mobile-Only:
- Ensure that the target device drop-down box next to the Test Game button, on the Stencyl toolbar, is set to Flash (Player); we're going to test the game in Flash first!
- Click on the Test Game button and view the game on the development computer's screen. It should appear as shown in the following screenshot:

- Close the Flash Player window.
- Change the target device drop-down box to either Android or iOS Device, as appropriate for the attached mobile device, and click on Test Game.
- Wait for the game to be compiled and sent to the device.
- The game should appear on the mobile device's screen, shown as follows (note that the numbers will be constantly changing, and the numbers in the following screenshot are for illustration only):

- Hold the mobile device and tilt it at various angles, noting that, the greater the angle, the greater the change in the numbers being displayed.
We have created a test environment to discover how feedback from the mobile device's accelerometer is sent to a game in Stencyl. Our test environment is very basic; it simply consists of a when drawing event that draws the X, Y, and Z values of the mobile device's accelerometer on the screen.
Prior to testing the game on the mobile device, we first tested it in the Flash Player. But, why did we do this when we know that our development computer doesn't have an accelerometer? Compiling and testing on mobile devices can be a time-consuming process, and when errors occur within our code (errors will sometimes occur within our code because we're human), a lot of time can be wasted because of the relatively long compilation and testing process. However, testing in the Flash Player is much faster (typically a few seconds, rather than several minutes for a mobile device), and it is a great way to find basic errors before committing to testing on a tablet or smartphone. For example, if we miscalculated or mistyped the x and y screen-location values for any of the three draw text blocks in our test game, the game would successfully compile and run on the mobile device, but we might not be able to see the required information. Testing using the Flash Player in the first instance can help to avoid this kind of time-consuming error.
Once we knew that the game compiled and displayed the information in the correct location in the Flash Player, we then tested the game directly on the mobile device, and we learnt that information from the accelerometer is provided as constantly changing numbers. We also learnt that holding and tilting the device at various angles caused changes in the numbers provided by the accelerometer.
Initially, the x, y, and z information provided by the accelerometer may appear difficult to understand. So let's have a look at the following diagram, which shows the position of each axis as it relates to a typical mobile device held in the portrait position:
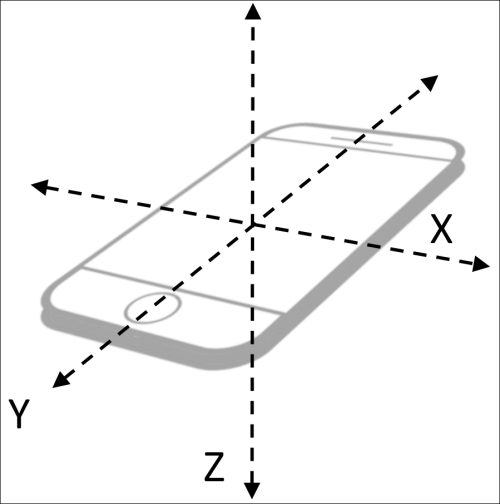
Many readers will have had a quick look at the previous diagram, and will now have a full understanding of the workings of the accelerometer, and how the onscreen numbers relate to the mobile device's position. The rest of us need to experience something a little more practical!
Let's take a few moments to examine how our test game's onscreen numbers change in relation to the physical position of the device, so we can start to make sense of them. This requires some methodical experimentation, and in each case, we will start the experiment by holding the mobile device in the same position — in front of us in the portrait position with the screen facing directly upwards (towards the ceiling), and with the accelerometer information being displayed onscreen, the correct way up:

Disconnect the device from the development computer and hold it so that both the x and y axes numbers are fairly close to zero. It should be possible to maintain the device in a flat position, where both the x and y feedback numbers are somewhere between -0.09 and 0.09. Don't worry about the z feedback for the time being!
We can now start to move the mobile device, in order to more clearly demonstrate the feedback from the accelerometer.
With the test game running, hold the mobile device in the starting position, and while watching the x feedback on the device's screen, tilt the device slowly to the right. We can see that the x feedback decreases from 0 towards -1 (negative 1).
Slowly return the device back to the starting position, so x is approximately zero, and then start tilting the device slowly to the left, again watching the screen as the x feedback increases from approximately 0 towards 1.
Repeat the experiment that we just carried out for the x feedback, but this time, tilt the device forwards, so the top of the device is lower than the bottom. We can see that the y feedback decreases from 0 towards -1 (negative 1). If we tilt the top of the device towards us, so that the bottom of the device is lower than the top, the y feedback increases from approximately 0 towards 1.
Changes in the z axis feedback from the accelerometer are rather difficult to demonstrate by gently moving the mobile device, because the accelerometer is actually measuring the acceleration of the device relative to free fall — it is measuring the magnitude and direction of the acceleration. This is quite easy to visualize and demonstrate for the x and y axes, but the z axis is somewhat different. We don't want to put our expensive mobile device into free fall, because this generally entails lowering it very quickly (that is, dropping it), while viewing the onscreen output, which is not a recommended experiment!
However, it is possible to see changes occurring on the z axis if we place the mobile device flat on a table (screen facing upwards), and then quickly raise the device while watching the information on the screen. We can also see the changes in the z axis information if we lower the device quickly, but these changes are even more difficult to see!
In practice, the z axis input is probably not as useful in games as the x and y axes, although it does have its uses; for example, to detect shaking of the mobile device.