The game file to import and load for this session is 5961_03_01.stencyl.
We're going to fine-tune the collision shapes for the monkey, so ensure that the monkey actor is visible in the Animation Editor:
- Go to the Dashboard tab, click on Actor Types, then double-click on the monkey actor's thumbnail.
Now that we can see the monkey animations, we can go ahead and modify the collision bounds.
- Click on the Collision button in the row of buttons at the upper-center of the screen.

- Look at the center of the screen, where the collision shape for one of the monkey animations is displayed.
- Click on the Idle Left thumbnail in the Animations (left) panel to display the collision bounds for the Idle Left animation.
- Click somewhere just inside the border of the orange rectangular collision shape, so that the box is selected and press the Delete key on the keyboard to remove the collision shape.
- Locate the collision shapes tools at the top of the screen.
- Click on Add Circle to display the Add Circle dialog box.
- Click on OK.
- Click inside the orange border of the new collision circle to ensure that it is selected.
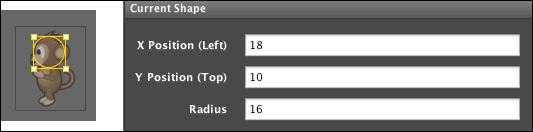
- Use the arrow keys on the keyboard to position the circle over the monkey's head. It should have an X position (Left) of
18units and a Y position (Top) of10units as displayed in the Current Shape panel at the upper-right of the screen.
The position of the collision circle and the configuration of the Current Shape panel are shown in the following screenshot.
Firstly, we displayed the collision configuration screen for the monkey's Idle Left animation, and then we deleted the existing rectangular collision shape.
The next step was to add a new collision shape. In this case, we chose a circle because it more accurately represents the shape of the collision that we want to detect. We then moved the collision circle so that it was positioned over the monkey's head.
It's not desperately important for the collision circle to exactly cover the monkey's head. In fact, it's often better if the collision shapes for actors are very slightly smaller than the image of the actor, because it will appear to be fairer to the player, than if the collision shape is too large.
It's the game designer's decision to make sure that the collision bounds for each actor are appropriate for the game, and often an appropriate configuration can only be determined by playtesting the game. This is why it's important to find impartial testers to play our games and provide feedback, as discussed in the Chapter 2 section entitled, Finding game testers.
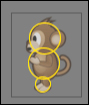
At this point, we can clearly see that we have a problem; the collision circle that we have added will not detect when the monkey's body and feet collide with other objects! We can resolve this problem by adding more collision shapes; we aren't restricted to only one shape for each animation.