
The game file to import and load for this session is 5961_07_11.stencyl.
- Download the following three actors from StencylForge:
- Stencyl Book Success Banner
- Stencyl Book Menu Button
- Stencyl Book Next Button
- For each of the above three actors, change the two physics settings specifying that the actor cannot move and cannot be paused, then close the tabs for StencylForge and for each of the three actors.
- Open the Score Management scene behavior and create three new
Hidden Actorattributes with the following names:Success BannerMenu ButtonNext Button
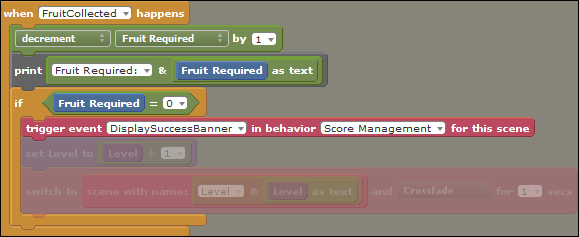
- Again, in the Score Management behavior, view the Fruit Collected event and deactivate the set Level to… and switch to… blocks (right-click and select Activate / Deactivate).
- Immediately above the deactivated set Level to… block, insert a trigger event … instruction block as shown in the following screenshot:
- Add a new custom event to the Score Management behavior, and rename it to
Display Success Banner. - Add the instruction blocks to the new custom event as shown in the following screenshot, ensuring that the event's trigger name is entered as
DisplaySuccessBanner(no spaces):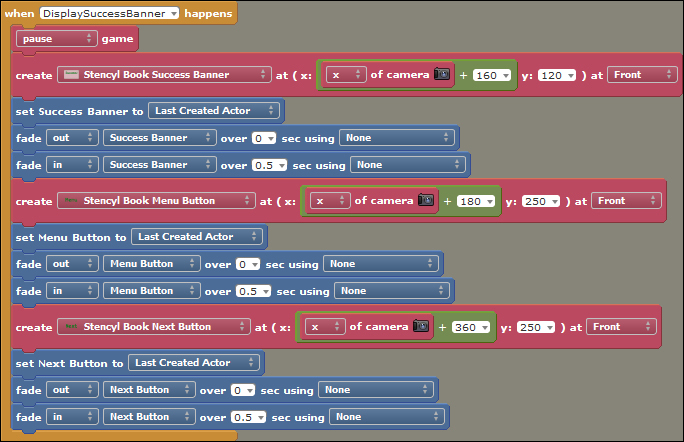
- Ensure that each of the options in the blocks is configured correctly, as shown in the previous screenshot.
- Test the game and collect all the fruit in the first level (but first, read the following testing tip)!
Tip
Testing tip: when testing routines such as the one we have just created, it can be very frustrating and time-consuming to have to play the level through to completion in order to see the finished result! In such cases, it is a good idea to make a temporary change to the instructions so that the new routine can be tested easily. For example, one option is to increase the time allowed to complete the level, because we will have less of a chance of losing all our lives before the message is displayed. However, this change still requires us to play through the whole level. An alternative temporary modification, which will allow very quick testing of the new routine, is to modify the Fruit Collected event so that only one piece of fruit must be collected in order to display the message, as highlighted in the following screenshot:
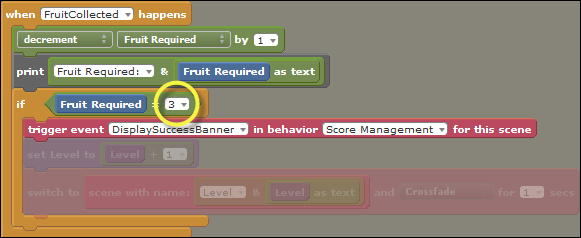
For the purposes of this test, the DisplaySuccessBanner trigger will occur when there are three pieces of fruit remaining. In the first level, there are four pieces of fruit, so as soon as we have collected just one fruit actor, the event will be triggered and our message will be displayed! If the level contains a different number of fruit actors, change the if Fruit Required … block to specify one less piece of fruit that exists in the level.
Once the testing has been completed and we are happy that the routine is working as expected, it is important to remember to return any test values to their original values—in this case, change the number of fruit actors required back to zero. It's also very important to run some tests by completing the entire level, just to ensure that we haven't missed any problems!
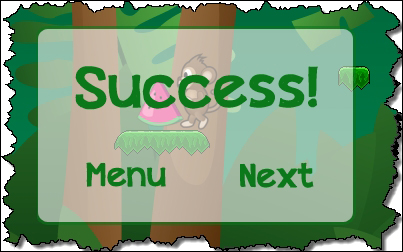
We have created a new custom event that creates a success message, along with the two option buttons, and displays it to the player when all the pieces of fruit have been collected, as shown in the following screenshot:
The first step required was to download (from StencylForge) the actors for the success message - the Success banner, the Menu button, and the Next button, and to configure the physics settings for all three actors, so that they cannot be paused and will not move when they are placed in the game.
We then created three new hidden actor attributes for each of the new actors that we downloaded. These attributes will make it much easier to manipulate the message and button actors elsewhere in the behavior.
The next step required us to deactivate two of the instruction blocks in the Fruit Collected event. We're going to use these two blocks in the following section, Time for action – responding to the player's selection, which is why we deactivated them rather than deleting them. There is no point in making additional work for ourselves when we already have the required ready-to-use blocks!
The final change we made in the Fruit Collected event was to add a trigger for a custom event called DisplaySuccessBanner. The DisplaySuccessBanner custom event didn't exist at this point; we were just putting the required framework in place ready for the next steps.
With the above additions and modifications in place, we then moved on to the main instructions for displaying the message to the player, which required us to create a new custom event that we renamed to Display Success Banner. We then ensured that we put the correct trigger name, DisplaySuccessBanner, in the when … happens event block.
The first task for the custom event is to pause the game, so the action stops and the player can no longer control the monkey. This was achieved by inserting the pause game instruction block.
Although it took quite a bit of work to complete the rest of the Display Success Banner custom event, we have simply carried out the same actions three times for the three actors that are required to display the completed message. Let's examine the first group of blocks that refers to Stencyl Book Success Banner.
The first instruction (the red create … block) creates the actor at a central location on the screen, taking into account the x position of the camera to ensure that the actor's position is centered horizontally, regardless of whether or not the screen has scrolled. The next instruction block, set Success Banner to Last Created actor, places a reference to the newly created actor into an attribute, so that we can access and manipulate the actor with ease. We immediately refer to this Success Banner attribute in the next block, fade out Success Banner over 0 sec using None. This instruction instantly fades the banner to zero transparency so the player cannot see it. The next block, fade in Success Banner over 0.5 sec using None, fades the banner into view over 0.5 seconds.
We then repeat the process of creating, instantly fading-out, then fading-in the actors for the two option buttons, ensuring that the x and y coordinates are specified appropriately.
Why have we gone to the trouble of instantly fading-out, and then gently fading-in each of the actors required for the banner? It's simply a matter of presenting a more pleasant experience for players of our game! We could remove all of the fade … instruction blocks from the DisplaySuccessBanner custom event, but the result would be a message that suddenly jolts onto the screen. Try temporarily deactivating each of the fade … instruction blocks to get a feel for the difference in presentation. Was it worth the extra work of inserting and configuring the six blocks? That's a personal decision, and it's probably a good idea to elicit some feedback from independent testers.