
The game file to import and load for this session is 5961_03_04.stencyl.
As we've seen, the collision box is too large for the leafy platforms; it only needs to surround the top two-thirds of the tile, so let's create a new tile collision shape that meets that requirement.
We're going to be modifying tile collisions, so we need to display the Tileset Editor:
- Go to the Dashboard tab, click on Tilesets, then double-click on the thumbnail for our tileset in the main panel.
- Click on any tile in the tileset in the left-hand panel; the collision-shapes panel will be displayed at the top of the right-hand panel.
- In the upper-right panel, click on the gray + button and then select Create Box… in the pop-up menu.
- In the Create a Box… dialog box, enter the Name, X Position, Y Position, and the Width and Height information as shown in the following screenshot:

- Click on OK.
- In the left panel, click-and-drag the mouse on the first leafy platform tile (position A9 in the grid) across to the fourth leafy platform tile (position D9), and then release the mouse. The four tiles are selected as shown in the following screenshot:

- In the right-hand panel, click on the newly created Platform collision shape. It may be necessary to scroll down to the bottom of the right-hand panel in order to see the new collision shape.

- Select the Jungle scene tab (or open it, if it is not already open) and save the game.
Using the Tileset Editor, we created a new tile collision shape called Platform. We then selected the four tiles that we wanted to modify, and clicked on the icon for the new collision shape, so that it was applied to all the platform tiles that we selected.
Because we changed the collision shape for existing tiles in a scene, we had to open the scene and save it to ensure that the changes to the collision shapes were applied to the relevant tiles in the scene.
We could have specified the collision shape for each tile one at a time, but selecting the four tiles was much quicker, and if an appropriate collision shape had already existed in the upper-right panel, we could have just clicked on the existing collision shape to apply it to the selected tiles.
The game file to import and load for this session is 5961_03_05.stencyl.
Now that we've updated the collision shapes for both the monkey actor and the platform tiles, the collision detection in our game should be much improved.
Test the game, ensuring that the Enable Debug Drawing option is selected in the Run menu, and have a look at the accuracy of the collision between the monkey and the platforms that we have just modified.
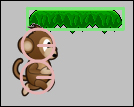
We can see that the collision is now very accurate; there isn't a large gap between the monkey's head and the platform. In fact, there is no gap at all. The monkey's hair slightly overlaps the overhanging leaves on the platform, and this interaction between the actor and the platform will be much more acceptable to players of our game.
Perhaps a little more fine-tuning of the collision bounds might be required before the game is completed, but that is the time to ensure that some serious playtesting is carried out, and feedback from our testers should be reviewed, with adjustments to the game being made as required.