
The game file that needs to be imported and loaded for this session is 5961_04_14.stencyl.
Ensure that the game has been saved, and close any open tabs, leaving only the Dashboard tab visible. Now execute the following instructions to create the countdown timer:
- Create a new Scene Behavior called Score Management.
- Click on the Attributes section button in the instruction block palette.
- Click on the Create an Attribute button, situated immediately below the category buttons.
- In the Name textbox, enter
Countdown. - Select Number in the Type drop-down list.
- Click on the OK button to close the dialog box.
- In the left-hand panel, click on + Add Event.
- Select Time, then Every N Seconds.
- Rename the Every N Seconds event to
Decrement Countdown. - In the new do every … seconds event, enter the digit
1into the empty textbox. - Click on the Numbers & Text section button at the top of the instruction block palette.
- Drag the increment number by 0 block into the do every 1 seconds event block.
- Click on the increment option item and change it to decrement.
- Enter the digit
1into the decrement Countdown by … textbox. - Click on the Flow section button at the top of the block palette.
- Click on the Debug category button.
- Locate the print anything block in the Print to Console subcategory, and drag it below the decrement Countdown by 1 block.
- Select the Attributes section button at the top of the block palette, and click on the Getters category button.
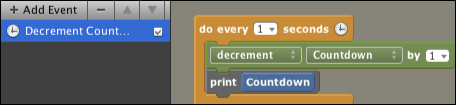
- Drag the blue Countdown block into the empty print … textbox, as shown in the following screenshot:
- Click on the green Attach to Scene button situated above the block palette, and select the Jungle scene.
- In the Attributes window that appears in the main panel, enter the digit
10into the Countdown textbox. - On the main Stencyl menu, select the Log Viewer option from View.
- Test the game.
- When the game has compiled and is being displayed on the screen, examine the contents of the Log Viewer window. Watch what happens after 10 seconds.
- Close the game.
We've created a Score Management behavior, and have displayed the value of the game's countdown in Stencyl's Log Viewer window. We should see that the countdown starts with a value of nine, and reduces by a value of one each second. After 10 seconds, the countdown reached zero, but then it continued to count backwards to -1, -2, -3, and it would continue to count backwards infinitely if we allowed it to (and if we had enough time).
The first step was to create an attribute to store the value of the countdown. An attribute is a changeable value that is used to store a specific piece of information, and, in this case, we need to store a number; therefore, we created a number attribute that represents the number of seconds that we want to count down from. Our new number attribute, called Countdown, can now be used anywhere within the behavior. It can be added to, subtracted from, and tested to see if it equals another value. We can manipulate attributes in almost every way imaginable!
Within the Score Management behavior, we added the do every … seconds event, which we renamed to Decrement Countdown. We then added the increment number by … block, but since we want our attribute to count down, we changed it from increment to decrement. Because our behavior only has one attribute, the name of that attribute automatically replaced the Number option. Finally, for this block, we specified the value we wanted to decrement by, which is 1.
The decrement Countdown by 1 block will be executed once every second, thus providing us with a second-by-second countdown. However, we haven't told the game what to do when the countdown reaches zero. So, it will just carry on counting down until we end the game.
When we attached the behavior to the jungle scene, we were presented with the behavior configuration screen. Because we created an attribute for this behavior, we were given the opportunity to provide a starting value for Countdown, and we entered the number 10.
We don't yet have any way to display the value of the Countdown attribute within our game (that will be discussed in a later section). For now, we are temporarily using the print … instruction block to display the value in the Log Viewer.
Note
The Log Viewer is a very useful tool—we can use a print … block to output information to the Log Viewer, so that we can see what is going on in our game at any time, without having to worry about displaying information on the game screen.
It's also a great tool for debugging because, if we have a problem and we're not sure why the problem is occurring, we can use a print … block to see the values of our attributes, or other information that Stencyl makes available to us, for example, the coordinates of actors.
During the testing of the game, we could see the value of Countdown in the Log Viewer, but the countdown started from nine, not 10. Why? When creating instructions, it's vital to fully understand the sequence of events that will occur. When our Decrement Countdown behavior starts, the process is as follows, remembering that the starting value of the Countdown attribute is 10:
- Decrease the
Countdownattribute by1(it's now equal to9) - Print the value of
Countdownto the Log Viewer
The first time the value of Countdown is printed to the Log Viewer, it has already been reduced by one. This may appear to be a trivial point to note, but such issues can have unexpected consequences in behaviors. So, is certainly worth being aware of what can go wrong. For example, before the game starts, we may have advised the player that they will have 10 seconds to complete the task. They may be annoyed when it appears that they only have 9 seconds. Game players can be very unforgiving.
In this instance, the problem can be resolved very easily, if we wish to do so—simply display the Countdown attribute before it is decreased. We can just drag the print Countdown block so that it is above the decrement Countdown by 1 block. Try it!
We have used a print … debug block which, as we have discovered, is very useful for showing us values used in our game, without having to display them within the game itself.
There are several other debug blocks available to us. Take this opportunity to examine them, and consider how they might be useful to us as game developers.
To view the debug blocks, click on the Flow section button, then on the Debug category button in the block palette.
Remember that right-clicking any block will provide access to the View Help option.