
564 Game Development and Simulation with Unreal Technology
13. Move the cone so the collision capsule is en tirely enc losed inside the cone when
viewed from above. We will worry about getting better collision detection later.
14. Save and compile the blueprint.
15. Your player should now lo ok like Figure 9.2( b).
SETTING UP THE CAMERA
In this stage of the process, we sh ould be ready to establish our camera. The
game we are aiming for is a top-down game. As such, the c amera is located
above the player and looking down. We will establish this camera system by
taking the following steps:
16. With the RotationCha r blueprint still open, perform the following tasks:
a. Click the down arrow in the Add Component box and search for Camera.
b. Select camera to add it to the compo nents section of the blueprin t.
c. Now search for the component Sprint Arm and add it to the blueprin t.
d. Next, you have to drag the camera onto the sp ring arm in the components
section to attach the camera to the spring arm.
e. Select the spring arm and rotate it 90 degrees so that it is now protruding
from the top of the cone object.
f. In the details panel with the spring arm still selected; change the value of the
Target Arm Length to 1000. Basically, the value controls the distance of
the camera from where the character is loca te d and can be changed to your
liking.
g. With the spring arm still selected under the transform section of the details
box, click on rotation and cha nge its value to world or absolute rota tion.
NOTE: If your camera is not attached at the end of the spring arm, you may
need to move the camera manually towards the end of the spring arm.
h. Compile the blueprint.
i. Save your progress so far.
SETTING UP THE PLAYER CONTROLLER
We w ill now need to set up our character controllers.
17. With the player’s blueprint still open, perform the following tasks – if you have
closed the blueprint, open it from the content browser:
a. Click the Defaults tab next to Compon ents tab.
b. In the searc h box type in auto possess.
c. Change the value fro m disabled to Player 0.
d. Compile and save.
18. Open the RotationController blueprint:
a. Check the boxes next to Show Mouse Cursor and Enable Click Events.
b. Change the default mouse cursor to crosshairs.
c. Compile and save the bluep rint.
A Top-Down Game with Blueprints 565
(a) (b)
(c) (d)
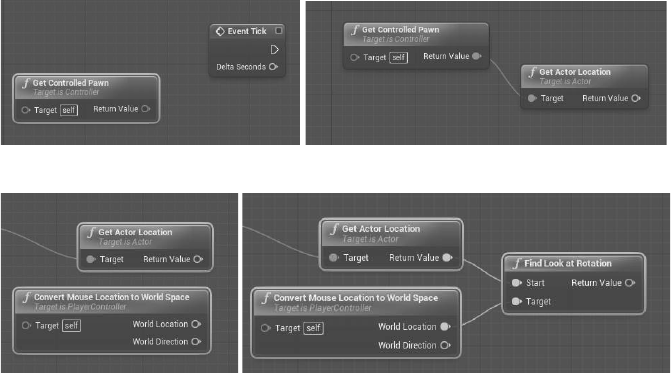
FIGURE 9.3: (a) Placing a Get Controlled Pawn Node. (b) Getting the Pawn’s Location. (c)
Converting Local Coordinate to Global/World Coordinate. (d) Establishing the LookAt Vector.
SETTING UP PLAYER CONTROLLER’S FUNCTIONALITIES
19. With the RotationControll er’s bluepr int still open, perform the following
tasks – if you have c losed the blueprint, open it from the content browser:
20. Click the Graph tab to the right of the Components tab.
21. In the event graph we need to add a n event tick node. To do this, right-click some-
where on the EventGraph canvas, and type Event Tick in the context-sensitive
search box. Click and place the Event Tick in the event grap h (Figure 9.3(a)).
22. Right-click to the left of the Event Tick node and search for Get Controlled
Pawn to place a getter function to your pla yer pawn (Figure 9.3(a)).
23. From the return value o f get controlled pawn, drag off and search for
Get Actor Location (Figure 9. 3(b)). You may need to uncheck context sensi-
tivity.
24. Right-click below the Get Actor Location node and search f or Convert Mouse
Location to World Space (Figure 9.3(c)).
25. Drag a wire from the Return Value of the Get Actor Location and from the
context-sensitive menu search for and place a Find Look at Rotation node
(Figure 9.3(d)).
26. Connect the World Location output of the Convert Mouse Location to
World Space to the Target input of the Find Look at Rotation (Figure 9.3(d)).
27. Drag a wire fr om the Return Value of the Find Look at Rotat io n and type in
the context-sensitive search Break Rot. This will place a Break Rot node to con-
vert the orientation values to rotation values needed to control the actor’s rotation
(Bottom of Fig ure 9.4).

566 Game Development and Simulation with Unreal Technology
28. Drag a wire from the Yaw output of the Break Rot node an d type in the context-
sensitive search Make Rot . Make sure that only the Yaw output of the Break Rot
is conne cted to the Yaw input of the Make Rot and the Pitch and Roll values of
the Make Rot are 0 (Bottom of Figure 9. 4).
29. Drag a wire from the Return Value of the Make Rot and type Set Actor
Rotation in the context-sensitive search box. This will place a Set Actor Ro-
tation node and feed its input rotation f rom the ou tput of the Make Rot node
(Right of Figure 9.4).
30. Connect the Return Value of the Get Controlled Pawn to the Target input of
the Set Actor Rotation (Top-left of Figure 9.4).
31. Connect the exec output of the Event Tick (the white triangle) to th e exec input
of the Set Actor Rotation (Top of Figure 9.4).
32. Compile and save.
FIGURE 9.4: Setting up the Actor Rotation.
FIGURE 9.5: Commenting the Network.
A Top-Down Game with Blueprints 567
COMMENTING IN THE EVENT GRAPH
Commenting your blueprint graphs is a great way to keep your code organized,
as well as to remember what the big-picture fun ctionality of each of the graphs
is.
33. To highlight all the nodes we have created thus far, marquee dr ag aro und the
graphs. Press C key (on your keyboard) while the nodes are highlighted to com-
ment the highlighted section of your code.
34. Name the comments Mouse Rotation for Player or somethin g that w ill
help you easily r emember its function (Figure 9.5). You can also organize your
blueprint nodes by moving them around in the graph editor so that they are easier
to follow a nd read before c ommenting them.
What Happened in TUTORIAL 9.2. . .
In this tutorial we set up our controller, play er, and game mode classes.
SETTING UP CHARACTER CONTROLLER AND GAME
MODE
In this section of our work, we created 3 im portant blueprint cla sses that are
necessary for our game to work.
The Ro tation Controller is essentially a class that inherits from the
Player Controller blueprint. We use this blueprint class to create the c ontrols
for the player character. This class will house the mouse rotation and keyboa rd
input mechanics.
We also cr eated a RotationChar blueprint. This is our main player’s charac-
ter and is inherited from a Player base class.
Finally we created the Rotatin gMode. This is a blueprint that inherits from
the Game Mode base class. The RotationMode blueprint tells the engine to
have the camera rotate around the Rotation Char – i.e., our player, now set as
the default pawn class.
SETTING UP CHARACTER COMPONENTS
To customize the visual look of our player character, w e assigned a simple shape
to its mesh. If you have an artist friend who can create a nice looking mesh for
your character, you can easily plug that mesh instead of the g eneric Cone mesh
we used here.
SETTING UP THE CAMERA SYSTEM
To w rap things up, we attached a spring arm camera to the pawn. This cam-
era will follow the player’s character until the game ends or the player is killed.
(More on this later.)

568 Game Development and Simulation with Unreal Technology
SETTING UP CONTROLLER FUNCTIONALITIES
In this section, w e used the graph editor of the RotationController (our
Player Controller cla ss) to allow our player mover by rotating towards the lo-
cation of the mouse in the level. To ge t this functionality, we first created an
instance of our player pawn and set its ro ta tion to the rotation calculated from
the world location of the mouse (Figure 9.4).
9.4 CHARACTER MOVEMENT AND USER INPUT
With our character, game mode, an d play er controller classes implemented and re ady
to develop we need to establish the input interfaces for our play er character. Unreal
Engine 4 allows you to perform two types of mappings to e stablish your input inter-
faces.
Axis mapping is the mechanism by which you can bind events to continuo us inputs
such as movements of your mouse, or controlling the chara cter’s direction. For ex-
ample, to contro l the camera orientation we can map it to the X and Y movements
of the mouse. Action mapping, on the other hand, allows you to map discrete actions
and bind them to their respective events. For example, we can bin d a key press on
the keyboard to an event that makes the cha racter jump up.
FIND ON THE WEBSITE
To find updates to this tutorial and upda te d instructions about its implementa-
tion on othe r UE4 versions, p le ase visit the book’s companion Website at:
http://www.RVRLAB.com/UE4Book/
TUTORIAL 9.3 Establishing Movements
Now that we have our player controller configu red to g ive us the basic func-
tionalities we need for controllin g our character, we need a way for the engine
to communicate user inputs to the game. This is done th rough a process called
Axis and Action Map pings.
SETTING UP ACTION AND AXIS MAPPINGS
Action and Axis Mapping is made incred ibly simply in Unreal E ngine 4. Basi-
cally, these processes are now hosted within the project setting. We will set up
Axis Maps for our project at this poin t.
1. In th e main editor window go to Edit ◮ Project Settings.
2. Under the Engine section click on Input. You will see both Action Mapping and
Axis Mapping o ptions in the Input section.
..................Content has been hidden....................
You can't read the all page of ebook, please click here login for view all page.