
A Top-Down Game with Blueprints 619
make the following changes (see Figure 9.49(b)):
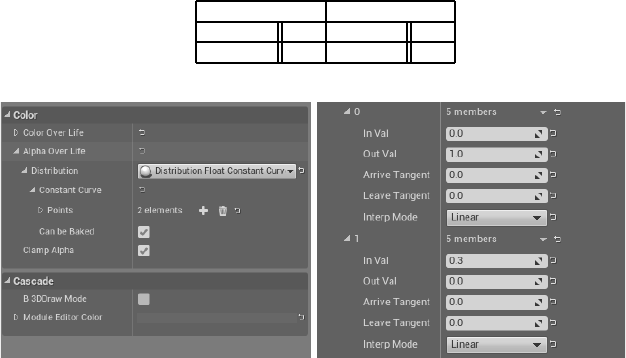
Points ◮ [0] Points ◮ [1]
In Val 0.0 In Val 0.3
Out Val 1.0 O ut Val 0.0
(a) (b)
FIGURE 9.49: (a) Alpha Over Life Distribution. (b) Alpha Over Life Values.
16. Select the Spark Burst emitter. This is the com ponent of the effect that looks like
a fire burst on the point of impact.
17. In the Details rollout, expand the Color Over Life and from ther e expand Dis-
tribution and then exp and Constant.
18. Change the XYZ constant values to 1, 20, 1, respectively, to make them glow green .
A BIG BURST OF SPARK S
Now, we need to make this effect to be more like a burst of sparks, ra ther tha n
a constant spawning of sparks.
19. To do this select Spawn mod ule in the Sparks emitter.
20. Expand Rate ◮ Distribution and change the value for constant to 0.
21. In the Burst section we want to add an element to the burst list. Click on the +
sign to add an element. This will be called [0].
22. Change the Count valu e to 50 (see Figure 9.50(a)).
23. We want to do the exact same thin g under the spawning of the spark burst except
make the count in the burst list elem ent to 12 instead of 5 0 (see Figure 9.5 0(b)).
24. Now, we will have to make the em itter only burst once per hit. To do this, perform
the following tasks:
a. Select th e Required module of the Sparks emitter.
b. Change the Emitter Loops to 1 in the Duration section of the Details
rollout. This will make the emitter create th e particles once.
c. Select th e Required module of the Spark Burst emitter.

620 Game Development and Simulation with Unreal Technology
(a) (b)
FIGURE 9.50: (a) Spawning Section of Sparks. (b) Spawning Section of Sparks Burst.
d. Change the Emitter Loops to 1 in the Duration section of the Details
rollout. This will make the e mitter create these pa rticles once.
SETTING UP SPARKS ’ VELOCITY
Now that our sparks burst is set up, let us make some modifications to the ve-
locity of our sparks.
25. Go into the Sphere module of th e Sparks emitter.
26. In the Details rollout, expand Velocity Scale and then its Distribution. Chang e
the Constant value to 200 ( see Figure 9.51(a)).
27. Now, we want to make our effect a single burst that looks like an explosion when
our projectiles will collide. To do this, perform the fo llowing tasks:
a. Right-click in an empty area in the Sparks emitter b elow the Size By Life
module and add a Velocity ◮ Initial Velocity module.
b. In the Details rollout, expand Start Velocity and then its Distribution.
c. Make sure th e Distributio n is Distribution Vector Uniform. If not,
select it from the drop-down menu.
d. Change the Max values to X:200, Y:200, and Z:200, respectively.
e. Change the Min values to X:-200, Y:-200, and Z:-200, respectively.
f. The value should represent something like Figure 9.51( b).
28. Save your ImpactSparks particle effect.
PROGRAMMING THE HIT VISUAL EFFECTS
Now tha t our particle effects are ready, we can go ahead and program the v isu al
effect.
29. Head bac k into the event graph of our Projectile blue print. If you open the
blueprint, the even t grap h should open up. If not, click on the Graph tab on the
top right corner.

A Top-Down Game with Blueprints 621
(a) (b)
FIGURE 9.51: (a) Sparks’ Velocity Scale. (b) Velocity Distribution.
30. Look up the Destroy Actor node and from its exec (white) drag off a Spawn
Emitter at Location.
31. Set our ImpactSparks we created earlier as the Emitter Template.
32. Connect the HitLocation of the Event Hit node to the Location channel of
the Spawn Emitter at Location node .
33. Drag off a wire from the Spawn Emitter at Location node and search for and
place a Set relative Scale 3D (Context sensitivity may have to be off).
34. Connect the Return Val ue of the Spawn Emitter at Location node to the
Target of the Scale 3D node.
35. Set the XYZ values to 2, 2, 2, respectively (see Figure 9.52).
FIGURE 9.52: Spawning Sparks When Bullets Hit.
36. Compile and save your blueprint.
What Happened in TUTORIAL 9.14. . .

622 Game Development and Simulation with Unreal Technology
In this tutorial we implemented the visual effects for when our projectiles hit an
object. We want to create a spark-like effect to show that the projectiles hit the
object at a high speed and created the spark.
To achieve this effect, we cannot directly use any of the particle systems
that come with the Starter Content. However, the Starter Content comes
with a spa rk effect that we can mo dify to suit our needs.
We first duplicated the P_Sparks effects fro m the Starter Content in or-
der to keep the original spark particle system intact. We then opened the du-
plicated spark s pa rticle system in the Cascade Particle Editor and made the
modifications we needed. These modifications included the ch anges to the Color
and Color Over Life modules distributions of the two emitter components in
the particle system to give them a Fiery look. We also made m odifications to the
Spawn and Burst Rat e of these two emitter modules.
Our g ame is almost complete! The only remaining item is to create an effect on the
player and enemy ma te rials to flash with a bright color for a fraction of a second to
give them the effect of being hit and sustaining some damage.
In th e next tutorial, we will impleme nt the hit flash effect by using ma te rial interfaces.
The material interface objects give us the ability to communicate from our blueprint
with the unreal en gine to change the object’s mater ia l at runtime.
FIND ON THE WEBSITE
To find updates to this tutorial and upda te d instructions about its implementa-
tion on othe r UE4 versions, p le ase visit the book’s companion Website at:
http://www.RVRLAB.com/UE4Book/
TUTORIAL 9.15 Player and Enemy’s Hit Visual Effects
In this tutorial we will add some visual feedback for when the player or an
enemy is hit. To achieve this, we will set up a network to make some changes
to the materials in such a way that it flashes when the object is hit.
SETTING UP THE MATERIALS
Let us first create a material with an ember c olor and a relatively high emissive
property. This will be the material we will use as a flash.
1. Go to the main editor and create a new material. You may create a new folder to

A Top-Down Game with Blueprints 623
hold this material or create it in the Materials folder of the starter content.
2. Call this mater ia l HitFlash.
3. Double-click the HitFlash material to open up the Material Editor.
4. Inside the mater ia l editor, create two Constant3Vector nodes and one Con-
stant n ode. To create the Constant3Vector, you may hold the key ‘3’ on
your keyboard and left-click somewhere on the canvas or right-click and search
for Con stant3Vector. Similarly, holding the ‘1’ key on the keyboard and left-
clicking will p la ce a Constant node.
5. Select the Const ant node you crea te d, and type 1.0 in its Value in the Details
rollout.
6. Connect the Constant to the Roughness channe l of the HitFlash material.
7. Select the Constant3Vector Node.
8. Type the values o f 1.0, 0.384, 0.0 into the R, G, B components of the Con-
stant3Vector in its Details rollout.
9. Connect the Constant3Vector to the Base Color of the HitFlash material.
10. Finally, create another Constant3Vector and change its values to R:10.0,
G:3.8, B:0.0, respectively.
11. Connect this last node to the Emissive Color channel of the HitFlash ma te rial.
12. Your material should look like Figure 9.53.
13. Save the material.
14. Close the mate rial editor.
FIGURE 9.53: Damage Material Network.
..................Content has been hidden....................
You can't read the all page of ebook, please click here login for view all page.