Using the Color, Swatches, and Stroke panels
Defining paint styles
Using the Paint Bucket and Eyedropper tools
Working with transparency
Understanding and creating radial and linear gradients
Using the Gradient tool and Gradient panel
Changing gradients to blends or mesh
Using the Mesh tool
This chapter covers color, gradients, and mesh. Gradients allow you to apply several different colors in a specific pattern across the surface of your image. You learn how to use and edit the preset gradients as well as how to create your own gradients.
Mesh changes your art into a grid of meshed lines, creating a 3-D color look. You use the Mesh tool to add realistic shadows to your object through a delicate balance of color shifts.
You find color options in the Swatches panel, the Color Guide panel, the Color panel, or the color picker. You can also apply color to fills and strokes.
You can access the Swatches panel by choosing Window
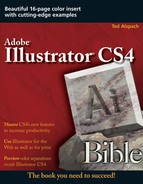
By default, the Swatches panel contains and displays several commonly used colors, patterns, and gradients. You change what displays by clicking the buttons along the bottom of the panel. The following list describes the buttons from left to right:
Swatch Libraries menu: This button displays all the swatch libraries that are installed for quick access. Choosing one brings up another swatch panel with that set of colors in it.
Show Swatch Kinds menu: This button provides access to All swatches, Color swatches, Gradient swatches, Pattern swatches, or Color groups.
Swatch Options: This button provides quick access to the Swatch Options dialog box for the currently selected button.
New Color Group: Clicking this button creates a new color group.
New Swatch: Clicking this button, which looks like a little piece of paper with a bent corner, creates a new swatch. You can also create a new swatch by dragging any single object into the Swatches panel.
Delete Swatch: When you select a swatch and click the trash icon, Illustrator deletes it.
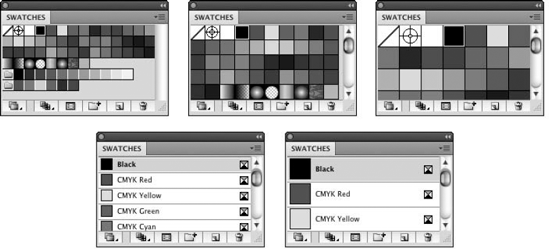
You can also view the swatches in either small or large thumbnail squares or view all the swatches in a list, with names if they have them. You can change the view mode by selecting the appropriate option from the Swatches popup menu. Figure 7.1 shows the default view of the Swatches panel.
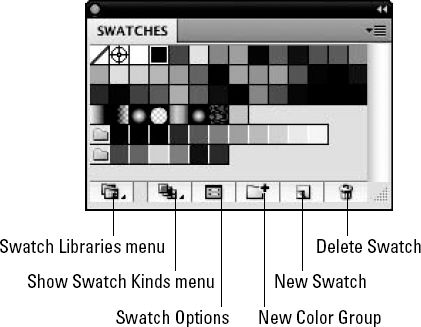
You can create a new swatch based on the current paint style, which appears in the Paint Style section of the Tools panel, by clicking the New Swatch button along the bottom of the Swatches panel. If you press Alt (Option) when creating a new swatch, the New Swatch dialog box, as shown in Figure 7.2, opens. This dialog box allows you to initially name the swatch and set its color mode to either process color (CMYK) or spot color. Process colors are printed using a combination of the four standard printing inks — cyan, magenta, yellow, and black. Spot colors are printed using a special premixed ink that's exactly the color you want to print.
Under the Color Mode in the New Swatch dialog box, you can set Grayscale, RGB, HSB, CMYK, Lab, or Web Safe RGB. Most default process color swatches are set up with RGB. You can also create a new swatch by choosing New Swatch from the Swatches panel's popup menu, which you access by clicking the triangle on the upper-right corner of the panel.
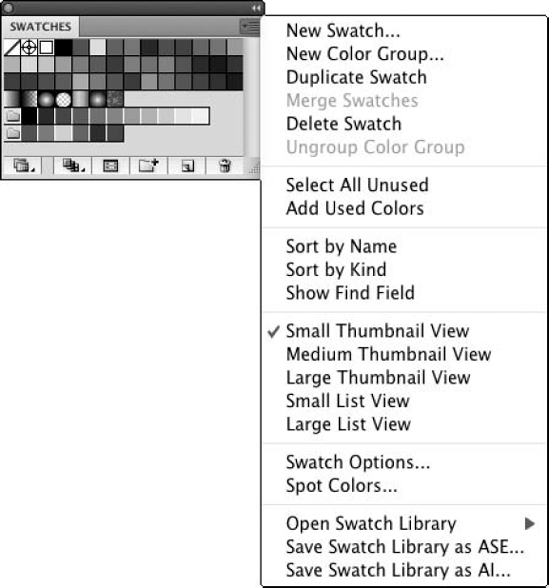
Double-clicking a swatch displays the Swatch Options for that swatch. The Swatch Options dialog box is exactly like the New Swatch dialog box, except that it includes a Preview check box. The Swatch Options dialog box has the following options:
Swatch Name: Lets you change the name of the swatch, which you can view only in List view mode
Color Type: Allows you to set the color type of the swatch to either process or spot
Global: Specifies that the changes should be applied throughout the document
Color Mode: Lets you change the mode to Grayscale, RGB, HSB, CMYK, Lab, or Web Safe RGB
Note
For more on Web-safe colors, see Chapter 19.
In addition, you can select one or more swatches to edit, duplicate, or remove from the Swatches panel. Click a swatch to select it; a frame appears on the selected swatch.
You can select more than one swatch by pressing Ctrl (
If you want to sort the swatches manually, you can do so by selecting any number of swatches and then dragging them to a new location within the Swatches panel.
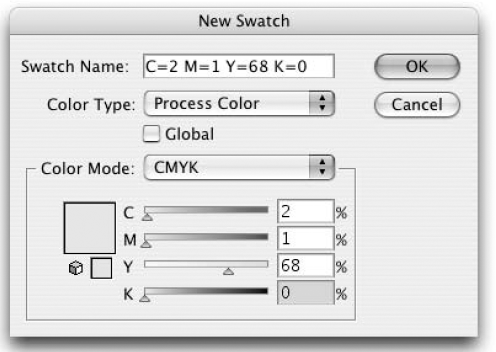
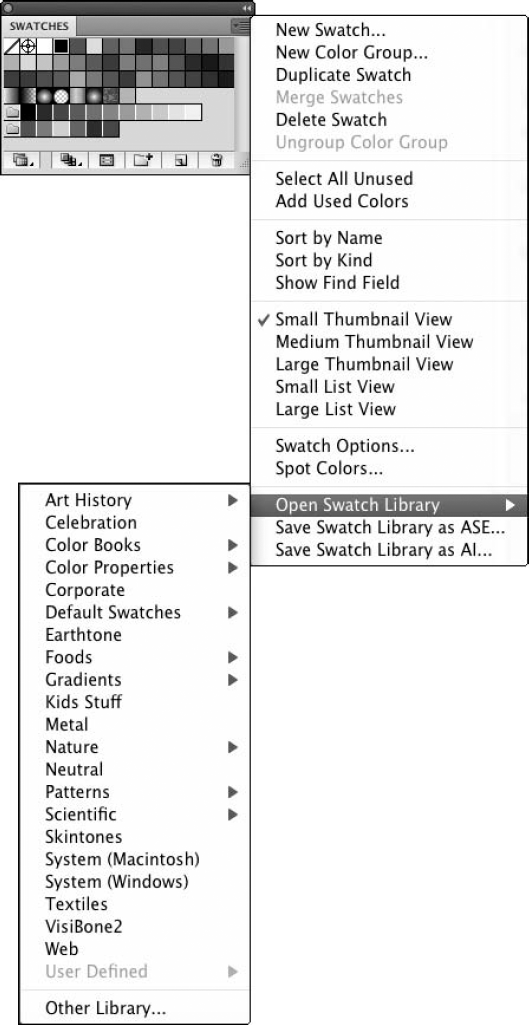
The Swatches popup menu, shown in Figure 7.3, also has other functions, some of which were already mentioned:
New Swatch: This option works the same as the New Swatch button at the bottom of the Swatches panel. A new swatch is created from whatever you select.
New Color Group: This option creates a new color group at the bottom of the swatches panel (color groups are indicated by a folder on the left side of them).
Duplicate Swatch: This option duplicates the selected swatches. You can also drag a selected swatch to the New Swatch button (the little piece of paper) to duplicate the swatch. If you press Alt (Option) while duplicating a swatch, the New Swatch dialog box opens.
Merge Swatches: This option merges two or more selected swatches by using the first selected swatch's name and color. You must have two or more swatches selected to enable this option. It produces a new swatch that's a mixture of the selected swatches.
Delete Swatch: To delete a swatch, select this option. You can also select the swatch and then click the trash icon. A warning dialog box appears asking whether you want to delete the swatch selection. Click Yes to delete the swatch.
Ungroup Color Group: This option ungroups the selected color group.
Select All Unused: This option selects the swatches in the Swatches panel that you aren't using in the current document. You can then delete those swatches if desired.
Add Used Colors: This option adds a swatch for each color in your document. You don't need to select artwork in order for this to work; selecting this option simply adds a number of swatches equal to the different colors in your document.
Tip
Use Add Used Colors in conjunction with New Color Group to quickly create a set of colors that are used in your document. For this to work, you need to select the swatches that were just created prior to choosing the New Color Group option.
Sort by Name: This option organizes the swatches (regardless of which viewing mode the swatch panel is in) alphabetically.
Sort by Kind: This option sorts the swatches to appear, starting with color, then gradients, and then patterns.
Show Find Field: This option opens a Find field so you can type a specific swatch name to search for in the Swatches panel.
The View options: You can also view the swatches in small, medium, or large thumbnail squares or view all the swatches in a small or large list, with names if they have them. These different modes are shown in Figure 7.4.
Swatch Options: Selecting this option displays the Swatch Options for the selected swatch. This dialog box was discussed earlier in this chapter.
Spot Colors: This option displays the Spot Color Options dialog box so that you can choose whether to use Lab values or CMYK values to describe any spot colors.
Open Swatch Library: This option displays a submenu so that you can choose to open a different swatch library.
Save Swatch Library as ASE: Selecting this option presents the Save Panel as the Swatch Library dialog box, which allows you to save your custom swatches for future use.
Save Swatch Library as AI: Selecting this option also displays the Save Panel as the Swatch Library dialog box, except with the file type set to Swatch Exchange Files. Use this option if you're working with a group of people who all need to be using the same color swatches.
In addition to the standard Swatch Library panel, many other default Swatch Library panels are accessible from the Swatch Libraries submenu in the Window menu or from the Open Swatch Library submenu in the Swatches panel's popup menu, as shown in Figure 7.5. You can also create a new Swatch Library panel from any Illustrator document.
To view one of the other default Swatches panels, choose it from the Swatch Libraries submenu. You can't edit these swatch libraries; you can only add swatches from these libraries to your main Swatches panel. To add a swatch (or several selected swatches) to your main Swatches panel, follow these steps:
Select the swatches you want to add.
Choose Add To Swatches from the library's popup menu. You click the triangle on the upper-right corner of the panel to access this popup menu.
Click and drag the swatches to the main Swatches panel or double-click the swatch. Illustrator saves the main Swatches panel with your document. You can customize a panel for a specific document or edit the Adobe Illustrator Startup document's Swatches panel to use a certain set of colors in each new document you create.
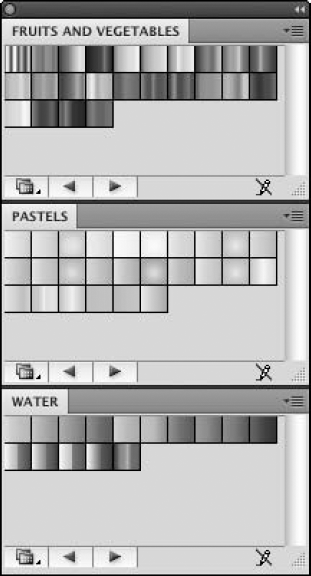
Otherwise, these swatch libraries work the same way as your main Swatches panel; you can choose colors for fill and stroke, sort the swatches by Kind or Name, and view the swatches by List, Small Thumbnail View, or Large Thumbnail View. Figure 7.6 shows three swatch libraries.
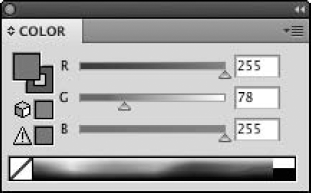
The Color panel provides basic color selection via the Color Ramp along the bottom of the panel and more precise control via sliders and percentage entries in Grayscale, RGB, HSB, CMYK, and Web Safe RGB. Most users of Illustrator use either RGB or CMYK color spaces. Heavy Web designers also use HSB and Web Safe RGB. If you're sure that you want to work only in black and white, choose Grayscale. Use the Color panel to add color to any object's stroke or fill. You can create any color to be used in an illustration by defining it in the Color panel, as shown in Figure 7.7. Access the Color panel by choosing Window
The Color panel has a popup menu (and arrowheads next to the panel's name) that allows you to toggle the display of the options and to choose from the available color spaces. The options are really the color-mixing sliders; I've never found a reason to hide them. In fact, the sliders take up such a small amount of space that after they're in view, you'll probably never hide them either.
The color space options let you switch among the following:
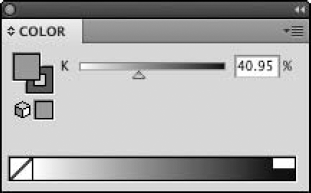
Grayscale: This option shows white to black with all shades of gray in between (see Figure 7.8).
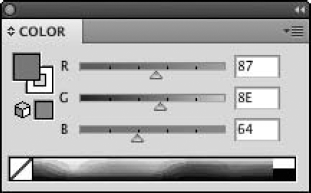
RGB: The red, green, and blue color space is used by computer monitors, and it's perfect for multimedia and Web-page graphics. Refer to Figure 7.7 to see the RGB color space panel. You can type RGB values as percentages or as values from 0 to 255. Double-click to the right of the text fields to change the RGB measurement system from percentages to the numeric 0 to 255 system and back.
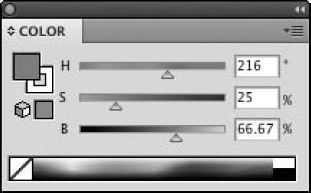
HSB: Hue, Saturation, and Brightness comprise this RGB-derived color space, which is best for adjusting RGB colors in brightness and saturation. Figure 7.9 shows the HSB color space panel.
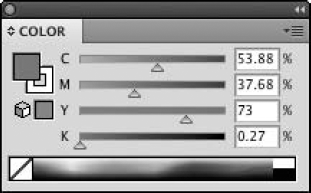
CMYK: Cyan, magenta, yellow, and black are considered typical printing process colors, although Illustrator calls any colors process that aren't spot. Figure 7.10 shows the CMYK color space panel.
Web Safe RGB: These colors are the 216 colors recognized by all graphic Web browsers on any platform (they use hexadecimal numbering). Web-safe colors are covered in more detail in Chapter 19. Figure 7.11 shows the Web Safe RGB color space panel.
As you drag a specific color's slider, the other sliders also change in color. This gives you sort of a preview for what would happen if you were to drag along the sliders. The icon to the left of the sliders shows the current color and whether you're adjusting the fill (solid box) or stroke (box with a hole). Instead of dragging, you can also just simply click a different location along the slider to change its value.
Tip
Press Shift to adjust RGB and CMYK sliders proportionately. This is a great way to tint process colors. Shift+drag the slider with the largest value (CMYK) or the smallest value (RGB) for the most control. When you release the mouse button, Illustrator makes the new color a tint of the original.
You can also change the slider values by typing values for each of the individual color channels (for example, Cyan is a color channel in CMYK). Press Tab to highlight the next text field or press Shift+Tab to highlight the previous text field.
Tip
Most of text fields in Illustrator's panels are mathematically adept. You can add, subtract, multiply, and divide in them. This is useful when typing color percentages in the text fields of the Color panel. To add 5% to the current value, type +5 after the current value. To subtract 5%, type −5 after the current value. To divide the current value by 2, type /2 after the current value. To multiply the current value by 2, type *2 after the current value.
The Color Ramp is the bar along the bottom of the Color panel. It looks like a rainbow of colors. The Color Ramp allows you to quickly pick a color from the current color space. Resting your cursor above the Color Ramp area changes the cursor into an eyedropper.
When you change to a different color space, the Color Ramp along the bottom of the panel also changes to show the rainbow of colors in that particular color space.
Tip
Shift+click the Color Ramp to cycle through the color spaces; this is much faster than choosing a color space from the popup menu.
Click any portion of the Color Ramp to select that color. Illustrator provides large rectangles of black and white to make choosing black or white easier. The Grayscale and Spot Color Ramps have large areas for both 0% and 100% to make selecting those percentages easier. You can also drag over the Color Ramp, watching the large square in the top of the Color panel (if Options are showing) to see the color you're dragging over. If Options aren't shown, look at the active Fill/Stroke icons in the Tools panel to see the color you're currently positioned over. (This works only when the mouse button is pressed as you pass across the Color Ramp.)
Tip
You can press X while dragging around the Color Ramp to switch between the fill and stroke focus. This way, you can quickly select colors for both fill and stroke with one mouse click. If the fill is in focus, click and drag through the Color Ramp to the appropriate color. Then, with the mouse button still pressed, press X; you'll now be picking a color for the stroke. Want to change the fill again? Just press X while holding down the mouse button.
Tip
Press Alt (Option) and then click anywhere on a Color Ramp to affect the opposite attribute. For example, if stroke is in focus on the Tools panel, pressing Alt (Option) and clicking on a Color Ramp changes the fill color, not the stroke. Be aware, however, that Alt (Option)+clicking on a swatch in the Swatches panel doesn't affect the opposite attribute; this works only on a Color Ramp (and the color box in the Color panel).
If you choose certain colors, a little icon appears in the center left of the Color panel, as shown in Figure 7.12. This icon indicates that the current color is out of gamut with the color space. Therefore, the particular color you chose isn't within the range of colors that can be displayed or printed for the selected color space. This issue is generally important only if you plan to print the document using CMYK process colors.
If you plan to use the image on-screen, such as in Web or multimedia publishing, whether the color is in gamut doesn't really matter.

Figure 7.12. The In Gamut indicator appears when the current color can't be accurately displayed or printed.
The best way to reset the current color is to click the In Gamut icon. The RGB or HSB values change so that the resulting color is well within CMYK color space. Another way to change the current color to CMYK color space is to choose CMYK from the Color panel's popup menu.
If you want to change the color space of several objects — or perhaps your entire document — to CMYK, select the objects that you want to change and then choose Effect
Spot colors are colors in Illustrator that aren't separated into process colors (cyan, magenta, yellow, and black) when printed. Instead, they're printed on a different separation. A commercial printer uses special ink (commonly Pantone) for this spot color. Spot colors are indicated in the Swatches panel in Small Thumbnail and Large Thumbnail views by a white triangle containing a black dot in the lower right of the spot color swatch. The List view mode shows a square with a circle inside of it (a spot) on the right edge of the swatch listing. In List view mode, both the color space (grayscale, RGB, or CMYK) and Process/Spot status are indicated to the right of the color chip and name.
You can use as many spot colors in an illustration as you want, although it isn't usually practical or desirable to have more than four in one document. (Because CMYK printing can duplicate most colors, process colors are often a better choice than four spot colors.) Illustrator's default Swatch libraries, accessible by choosing Window
Create a new swatch with the appearance you want. Use the color sliders to do this.
Double-click the newly created swatch. This opens the Swatch Options dialog box.
Change the Swatch type from Process to Spot. Now, when you use that swatch as a fill or stroke, Illustrator considers it a spot color when it comes time to print.
Tip
You can convert any spot color to a standard CMYK color (the color, not the swatch) by selecting the spot color and then changing the color space in the Color panel to CMYK. You can even change the color space to grayscale, RGB, or HSB in this way. This works only on the selected paths; the swatch is not affected.
Now you know how the panels work, but how do you change the color of paths to what's in the panels? The easiest thing to do is to select the path you want to change the fill or stroke (or both) of, change the focus (if necessary) of the Fill/Stroke icons, and select a color from either the Color or Swatches panel. Press X to change the color for the other (fill or stroke).
The key here is selecting. If you have selected paths, any changes you make affect those selected paths.
When you create a new path, Illustrator uses the fill and stroke that are currently displayed in the Paint Style section of the Tools panel.
To apply colors to text, you can either select an entire text area with a Selection tool or select individual characters with a Type tool.
Tip
Selecting Type with a Selection tool can cause type paths, type areas, and type itself to be filled and stroked. You can use the Group Selection tool to deselect the associated paths. Or better yet, just use the Type tool to drag across the characters you want to select.
The Eyedropper and Paint Bucket tools are lifesavers for those who constantly use self-stick notes to jot down the percentages of CMYK (cyan, magenta, yellow, and black) in one path so that those same amounts can be applied to another path. A good reason to use the Paint Bucket and Eyedropper tools is to ensure that your colors are consistent throughout an illustration. So, for example, if you used a custom color somewhere that you want to use again somewhere else, you don't try to duplicate it with a CMYK mix that may not be an exact match. With a couple of clicks or keystrokes, you can easily transfer the color properties of one object to another. The tools work with paths, objects, type, and placed images.
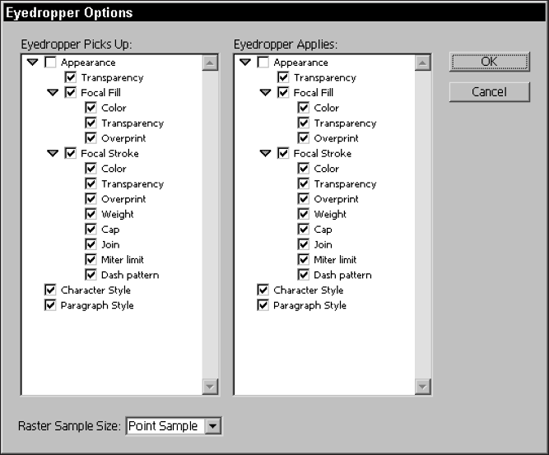
The Eyedropper and Paint Bucket tools work similarly to the other tools in Illustrator in that their properties stay the same until you change them — in this case, by clicking a new path or object with a different color. The Eyedropper tool sucks up color from where you click. Use this to see the breakdown of a color in the area you clicked. The Paint Bucket tool fills in an area with the active color in the Color Swatch. Just click the Paint Bucket tool on the shape you want to fill with color. To give you more control over what the tools can pick up and apply, Illustrator gives you an exhaustive list of properties to select in the Eyedropper Options dialog box. Double-clicking the Eyedropper tool displays this dialog box, as shown in Figure 7.13, where you can select or deselect options depending on what attributes you want to apply. So, for example, you can have the Eyedropper tool pick up the color and stroke weight of a path without transferring the path's transparency properties.
Tip
For more on paths, objects, and type, see Chapters 4, 5, and 9, respectively. Most of the properties listed in the Eyedropper Options dialog box are also discussed in these chapters. For more on placed images, see Chapter 3.
At the bottom of the Eyedropper Options dialog box is the Raster Sample Size menu. From this menu, you can choose whether you suck up a Point Sample (samples the color from the point where you click), 3 × 3 Average (averages the color in an area of 3 pixels by 3 pixels), or 5 × 5 Average (averages the color in an area of 5 pixels by 5 pixels).
The Eyedropper tool samples paint style information from a path and stores it in the Fill and Stroke boxes on the Tools panel without selecting that path. The information stays there until you change the information in the color panel, select another path with different paint style information, or click any other path or placed image with a different paint style.
Tip
If you have paths selected when you click with the Eyedropper tool, all selected objects in the document are changed to the paint style of the path that you clicked.
You use the Live Paint Bucket tool to apply the current paint style to both paths and Live Trace images. You can also apply any attribute that's active in the Appearance panel. Using the Live Paint Bucket tool is a quick and painless way to apply a set style or group of attributes you like to other objects.
Note
For more on the Live Paint Bucket tool, see Chapter 14. For more on Live Trace, see Chapter 13.
Transparency has changed the face of Illustrator. Being able to apply transparent live effects to any object in Illustrator is just plain amazing. It opens up many doors and lets in a kaleidoscope of colors to see through. Transparency is like looking through stained glass, a piece of plastic, anything you can see through. You can adjust the blending modes for a variety of effects. Blending modes are the interaction of the colors of an object with the objects underneath that object. Imagine that you're playing with Plexiglas blocks in three dimensions. You can see what is behind or in front of those blocks. You can even go as far as thinking that you're Superman looking through objects with X-ray vision. You can create stained-glass effects, mix color effects, and so much more. You can apply transparency to objects, groups of objects, or a whole layer.
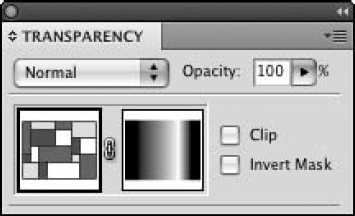
In Illustrator, you apply transparency in the Transparency panel (shown in Figure 7.14). If the Transparency panel isn't showing when you start up Illustrator, choose Window
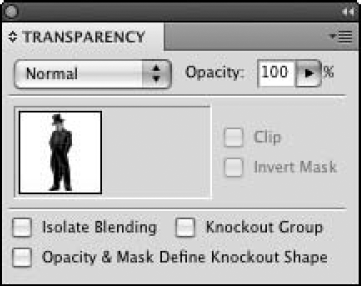
These options, which are discussed in more detail later in this chapter, are available in the Transparency panel:
Mode: Use this option to choose the method used in the blend.
Opacity: Adjust this slider to determine how much you can see through that object.
Clip: This option gives the masks a black background.
Invert Mask: This option reverses luminosity and opacity values of the masked objects.
Isolate Blending: Select this option to affect only the group or layer opacity.
Knockout Group: Selecting this option means that the opacity doesn't affect the group or layer, just the object.
Opacity & Mask Define Knockout Shape: Selecting this option means you can use a mask to delineate where Illustrator applies the transparency settings.
You can apply transparency to an object, group of objects, sublayer, or the entire layer. You can also apply transparency to symbols, patterns, type, 3-D objects, graphic styles, strokes, and brushstrokes. To define an object's transparency, select the object first and then drag the Opacity slider in the Transparency panel to the desired opacity. Figure 7.15 shows an example of changing the top object's opacity.
You adjust the transparency in the Transparency panel by clicking and dragging the Opacity slider. You access the slider by clicking the arrow on the side of the Opacity box. As mentioned previously, opacity is how see-through the object is. Applying no opacity makes an object totally transparent. Applying any amount of opacity makes the object partially transparent. An opacity value of 100% makes the object totally opaque, which mean you can't see through it at all. If you check the Appearance panel, it shows you the amount of opacity applied to that particular object.
To apply opacity to a group of objects or to a whole layer, start with the Layers panel and follow these steps:
In the Layers panel, click the layer you want to adjust.
In the Transparency panel, adjust the Opacity slider or type the Opacity value.
Within the Transparency panel, you find 16 blending modes similar to Photoshop's blending modes. Each mode creates a different effect when applied to the same object. Blending modes can totally change the look of the opacity applied to an object. Using blending modes lets you choose a variety of ways the colors of the objects blend when on top of another object. You create blending modes by combining a base color (the bottom object), the blend color (of the object on top), and the resulting color from the overlapping.
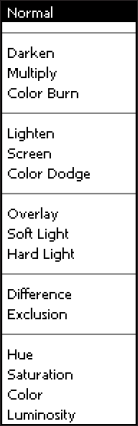
Illustrator supplies a variety of blending modes in the Transparency panel. Figure 7.16 shows the list of blending modes found in the Transparency panel's popup menu:
Normal: Use this for no interaction with the base color, only the blend color result.
Darken: This mode uses the darker color (base or blend) as the resulting color.
Multiply: This mode multiplies the base color by the blend color, creating a darker color.
Color Burn: Use this to darken the base color.
Lighten: This mode uses the lighter color (base or blend) as the resulting color.
Screen: This multiplies the opposite color of the blend and base colors, creating a lighter color.
Color Dodge: Use this to lighten and brighten the base color.
Overlay: This mode either multiplies or screens, depending on the base color. The base color is mixed with the blend color, resulting in the lightness or darkness of the original color. With patterns or graphic styles, the highlights and shadows of the base color are kept and the blend color is mixed in to create lightness or darkness of the beginning color.
Soft Light: This mode is like shining a softened light on the object. Blends less than 50% gray get lightened, and blends greater than 50% get darkened. If the blend is 50%, it's left alone.
Hard Light: This mode is similar to soft light but with a harsh light shining on the object. If the blend color is lighter than 50% gray, the object becomes lightened. If the blend color is darker than 50% gray, the object becomes darkened.
Difference: This mode chooses the brighter color (either base or blend) and subtracts it from the other color.
Exclusion: This mode is similar to the Difference mode but with a lower contrast.
Hue: This creates a result having the base color's saturation and the blend color's hue.
Saturation: This creates a result having the base color's hue and the blend color's saturation.
Color: This creates a result having the base color's luminance and the blend color's hue and saturation.
Luminosity: This mode is the opposite of the Color mode. The result is the base color's hue and saturation and the blend color's luminance.
Isolating blending is a necessary evil when too many objects are involved in an illustration that has transparency. When patterns are involved, you may lose the clarity of your artwork unless you limit how far the blending goes with the Opacity settings. In the Transparency panel, there's a check box for Isolate Blending. Use this to pick and choose how far you want the opacity to affect the underlying objects.
Follow these steps to apply a blending mode to an object:
Click the dropdown list (popup menu) in the Transparency panel and then select a choice to apply that blending mode to the selected object.
Group together the objects that you want in the blend. For more on grouping objects, see Chapter 7.
In the Layers panel, click the radio button to the right of the layer that contains the selected group of objects to target the group of objects you want to isolate.
Click the Isolate Blending check box in the Transparency panel.
Along with Isolate Blending is the Knockout Group check box in the Transparency panel. Knockout Group does the opposite of Isolate Blending. That is, you use the Knockout Group option to block the view of objects under the group.
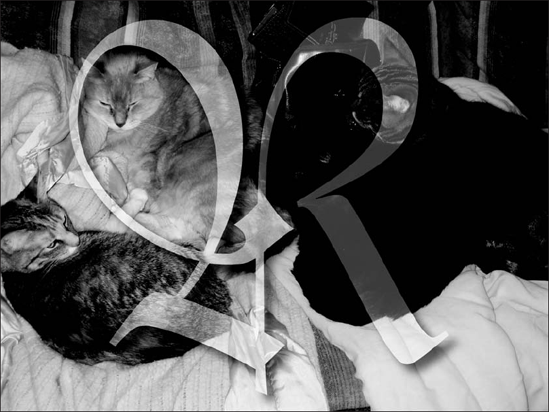
A clipping mask crops the objects behind the mask to the edges of the mask. An opacity mask is similar to a clipping mask. Instead of clipping away other objects, it clips the objects to the defined area (mask) to show transparency. The opacity mask in Illustrator is like the layer mask concept in Photoshop. Use the opacity mask to clip objects to the top shape and apply the opacity mask's luminosity to the underlying objects. Where the top mask is white, you can see the artwork underneath, and where the mask is black, it's opaque. Figure 7.17 shows a group of rectangles on a grid background. The rectangles were added, and an opacity mask consisting of a gradient was applied to the objects, as shown in Figure 7.18. Select Make Opacity Mask from the Transparency panel's popup menu to apply an opacity mask.
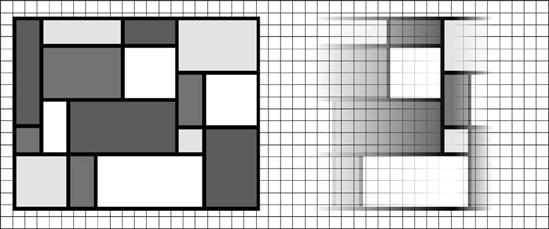
Figure 7.17. The artwork before (left) and after (right) an opacity mask was applied to the set of rectangles
After applying an opacity mask, the original shape disappears. If you don't believe me, check Outline mode. To get the shape back, simply release the opacity mask. You can release the opacity mask under the Transparency panel's popup menu. Choose Release opacity masks, and the objects return to their original state.
Note
For more on the viewing modes, see Chapter 2.
Other choices under the Transparency menu are to unlink or relink an opacity mask. An opacity mask is automatically linked to the object that it's masking. To unlink the opacity mask, click the link symbol between the opacity mask and the object or choose Unlink Opacity Mask in the Transparency panel's popup menu. When you unlink the object from the mask, you can move the object(s) around under the opacity mask, and the mask stays put. To relink the two back together, click the link between the two thumbnails or choose Link Opacity Mask from the Transparency panel's popup menu.
You can disable an opacity mask, and Illustrator removes the mask from its masking task but doesn't delete the objects you used to make the mask from the file. To get the mask back, choose Enable Opacity Mask from the Transparency panel's popup menu.
You can edit opacity masks if you click the thumbnail of the mask in the Transparency panel. Use Illustrator's editing tools to change the mask shape. Other options in the Transparency panel for the opacity mask are to make the opacity mask act as a clipping mask with the Clip option. Select this to have the mask clip the area around the selected mask (like the clipping mask function). You can also use the Invert Mask option. Selecting this option inverts the dark and light, which reverses the original opacity.
Note
When using the Make Opacity Mask function, all the objects in the mask are automatically grouped together.
Now that you're getting into this whole transparency thing, you may find it hard to see which objects have transparency applied to them. To see these transparent objects, you can enable the transparency grid. This grid shows up as a gray-and-white checkered pattern positioned behind all other objects.
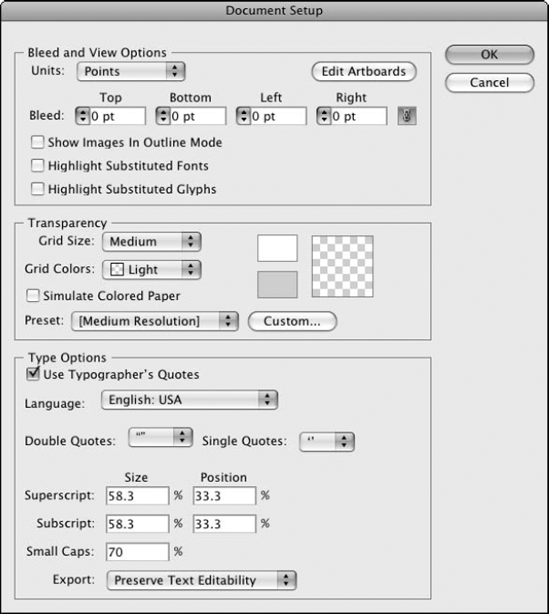
To view the transparency grid, choose View
Using these options, you can set the Grid Size and change the Grid Colors. A preview of the grid is also shown next to the color selection boxes. The Simulate Colored Paper option shows you what your objects look like when printed on colored paper. At the bottom of the Document Setup dialog box are options for setting the Transparency Flattener Settings.
Figure 7.20 shows an example of several objects as they appear above the transparency grid. Objects that are opaque completely block the view of the transparency grid, while those that are partially transparent allow the grid to show through.

Flattening is a process that removes transparency from objects and substitutes objects that have a similar appearance — only without any transparency. Flattening happens when transparency is not supported by other applications. Flattening actually creates more pieces of the objects. Flattening also changes your transparency. You lose transparency, and instead, a color is applied that reflects the opacity color. If you have two objects overlapping and you flatten the image, a third object is created where they overlap.
For more precise control over flattening, you can use the options that are available in the Flatten Transparency dialog box, as shown in Figure 7.21. To use this option, select the object(s) you want to flatten and then choose Object
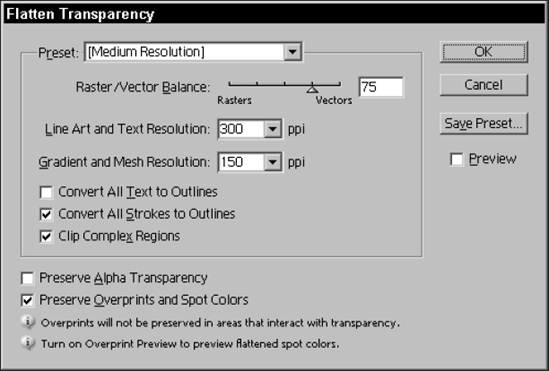
You can set these options in the Flatten Transparency dialog box:
Preset: Choose from preset transparency flattening options of high, medium, or low resolution. Typically, you want to choose higher resolution for final printouts and lower resolution for draft output.
Raster/Vector Balance: This option lets you choose the amount of rasterization. Set the balance high to retain as much vector information as possible. Set the balance lower so that more objects are rasterized into pixels.
Line Art and Text Resolution: Set the resolution of the vector objects when they're rasterized.
Gradient and Mesh Resolution: Set the resolution of the gradients and mesh objects when they're rasterized.
Convert All Text to Outlines: This option changes all text to outlined paths.
Convert All Strokes to Outlines: This option changes all the strokes to outlined paths.
Clip Complex Regions: This option reduces the patching that happens to an object that's partially rasterized and partially vectored. This option can also result in very complex paths, making the image hard to print.
Preserve Alpha Transparency: This option saves the opacity of flattened objects.
Preserve Overprints and Spot Colors: This option saves the overprinting and spot color objects.
Now that you have the basics, let's delve into using transparency on objects. You can create a plethora of different effects using transparency. The following sections cover just a few of the amazing things you can do with transparency.
Transparency is not limited to objects. It's also fantastic to use on type. Take some text and then give it a three-dimensional feel by choosing Effect
Transparency is useful with many different types of objects. Use it in a brushstroke, creating fills, styles, multiple fills, and more. If you choose to flatten the transparency, Illustrator actually cuts it into sections. To flatten transparent objects, first select them and then choose Object
Transparency is not limited to basic objects. You can use transparent effects on symbols, effects, patterns, brushstrokes, and 3-D objects. Figure 7.23 shows three-dimensional gears with different opacity settings. Anything you can do in Illustrator can have transparency applied. The Symbol tool has a Symbol Screener tool, which applies transparency in a brush-like fashion. You can also apply opacity to the whole group of sprayed symbols using the Transparency panel.
Note
For more on the Symbol Screener tool, see Chapter 5.

Using type with brushstrokes and transparency can also result in some eye-catching effects. To create embossed type, follow these steps:
Enter the type you want. Don't worry about the typeface; just pick something plain.
Choose the Selection tool in the Tools panel. This ensures that you're working with the text as an object, not as individual characters.
Give the type a White fill color and a different stroke color (something medium that's not too dark or light). For more on stroke and fill colors, see Chapter 10.
In the Appearance panel, choose Add New Stroke from the Appearance panel's popup menu. A new stroke line item appears in the Appearance panel.
In the Appearance panel, click on the new stroke item, change the color of it to something lighter than the original stroke, and then drag it down below the original stroke.
Choose Effect

With the stroke you just modified selected, click the Duplicate Stroke button at the bottom of the Appearance panel and then drag the new stroke down below both of the other strokes.
Change the color of the new stroke to something a little darker than the original stroke.
Double-click the Transform item in the new stroke (in the Appearance panel) and then change the move values to +1 horizontal and −1 vertical.
This creates an embossed stroke effect. Add a background, and the text lets the background shine through. Figure 7.24 shows an example of this embossed effect.

The Gradient feature has no rivals. It's by far the most powerful gradient-creating mechanism available anywhere. Gradients in Adobe Illustrator can have 32 different colors from end to end in a linear gradient and from center to outside in a radial gradient. Gradients can consist of custom colors, process colors, or just plain black and white. Each gradient stop can have any level of opacity applied to it. The midpoint of two adjacent colors can be adjusted smoothly and easily toward either color. You can make the Gradient panel available at all times because it's a floating panel. You can access it or view it by choosing Window
Note
You can apply gradients only to the fills of paths, not to strokes or text objects. You can't use gradients in patterns either.
To choose a preset gradient, select a path and then ensure that the Fill box is active in the Tools panel. In the Swatches panel, click the gradient swatch icon at the bottom of the panel. The four default gradient presets appear alone in the swatches. When you click a gradient swatch, Illustrator applies the gradient to the selected path.
The Gradient panel, if nothing else, is really neat-looking, with all sorts of nifty little controls at your disposal for creating and modifying gradients; it's shown in Figure 7.25.
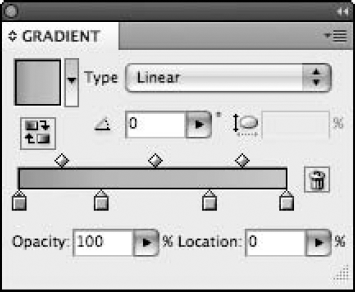
The Type list box (popup menu) at the top of the Gradient panel lets you select from Radial or Linear gradient types. Radial gradients move from that center location of an object radial outward in all directions. Linear gradients move in one direction across the object. If you choose a radial gradient, you can change the distortion of the gradient by editing the value in the Aspect Ratio field (it has a little oval next to it). The Angle field controls the angle of the gradient.
The bottom of the Gradient panel is where you control what colors are in the gradient and where the colors are in relation to one another.
The default gradient is black and white and moves from white on the left to black on the right. To add a new color to the bar, click below the bar where you want the new color to appear. This causes a color marker (which appears as a small square). The new color becomes a step between the left color slider and the right color slider. The Location percentage value defines how close you click to either end with 0% on the left and 100% on the right. In other words, the closer you click to the left end, the closer that color is to the left slider.
If you then click the square marker, it becomes selected. You can tell when a gradient marker is selected because the small triangle above it turns dark. When selected, you can change its color by selecting a new color in the Color panel. You can add up to 32 color stops between the two end colors. When a color stop is selected, typing a different percentage in the Location field on the right changes the color stop's position. When a color stop is selected, you can also change its opacity by typing a value in the Opacity field in the lower left of the panel.
Tip
Double-clicking on a gradient stop displays a temporary Color/Swatch panel that allows you to quickly change the color of the gradient stop.
The diamonds above the color bar show the midpoint between two color stops. By moving the midpoint left or right, you alter the halfway color between two color stops. When a diamond is selected, typing a different percentage in the location field below changes the diamond's position.
Tip
If you start with a black-and-white gradient and want to add color to the gradient, click and drag the color you want from the Color panel onto the marker to change the marker's color mode.
You use the Gradient tool to give a more 3-D look to an object by changing the angle and the starting and ending points for a linear gradient as well as the location of the center and edges of a radial gradient. The tool is also used to offset the highlight on a radial gradient.
Note
Illustrator CS4 allows you to do many of the Gradient panel changes directly on your artwork by displaying a little gradient stop bar, as shown in Figure 7.26. This is extremely handy for tiny adjustments of the gradient stops, especially if you're zoomed in tightly. You can even access the temporary Color/Swatch panel by double-clicking on a gradient stop in this floating bar.
Gradients are created with the Gradient panel and applied from the Gradient tool or panel. Follow these steps:
Double-clicking the Gradient tool displays the Gradient panel. The Gradient tool in the Tools panel looks like a blended rectangle.
Select a gradient type. Choose Radial or Linear.
Select at least one path that's filled with a gradient.
Drag with the Gradient tool on the object. Dragging on linear gradients changes the angle and the length of the gradient as well as the start and end points. Dragging with the Gradient tool on radial gradients determines the start position and end position of the gradient. Clicking with the Gradient tool resets the highlight to a new location.
Figure 7.27 shows a gradient original and after changing the start position of the gradient.
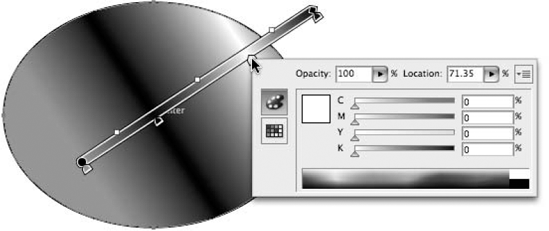
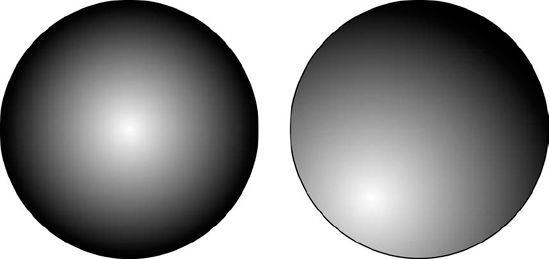
Figure 7.27. The circle on the left has a radial gradient applied to it. The circle on the right has the same gradient, but it's positioned differently within the object by using the Gradient tool.
Using Gradients to Create Bubbles
Gradients are a great tool to use when creating objects with a three-dimensional look. You can create great molecular pieces for a chemistry drawing or bubbles for a fun illustration. Start out by drawing circles and then using the Gradient tool to change the angle of the gradient. Use the Gradient tool to click where you want the highlight to be and then drag where you want the darker area to be. You can create a set of random bubbles quite easily using gradients. To create bubbles, follow these steps:
Draw a circle using the Ellipse tool while holding Shift.
Fill the circle with a radial gradient in a blue color.
Duplicate the fill in the Appearance panel, changing the new fill's gradient location and setting it to Overlay 60% in the Transparency panel.
With the object selected, change the transparency to 80% and then choose the Multiply blend mode. The first figure shows a bubble as well as the Appearance panel, which shows the settings I used for creating a bubble.
Drag the bubble to the Symbol panel to create a new bubble symbol.
Using the Symbol Sprayer tool, first select the bubble in the Symbol panel and then spray out a bunch of bubbles. Use the Symbol Sizer tool to adjust their size, as shown in the last figure.
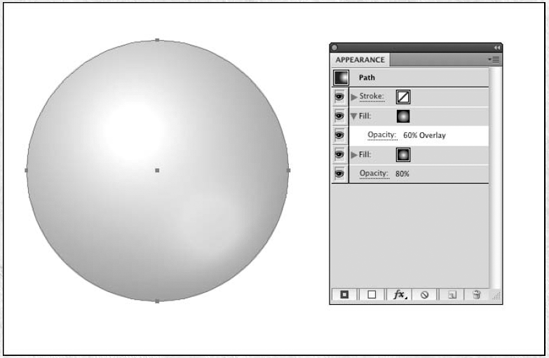
The Appearance panel with the bubble setup

The Symbol panel with the new bubble in place
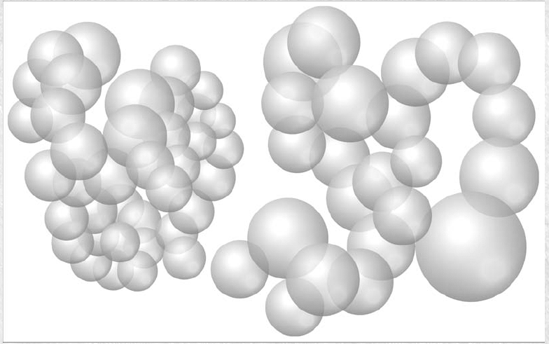
The resulting bubbles sprayed from the Symbol Sprayer tool after some adjustment from the Symbol Sizer tool
Using the other Symbolism tools, change the location, tint, and transparency of the bubbles to give them a more realistic look.
For more on using symbols and the tools related to them, see Chapter 5.
In Illustrator, you can automatically change gradients into blends by selecting the gradient you want to change and then choosing Object
Note
For more on blending, see Chapter 12.
Selecting the Compatible Gradient and Gradient Mesh Printing option in the Print dialog box prevents most gradient problems from occurring. Choose File

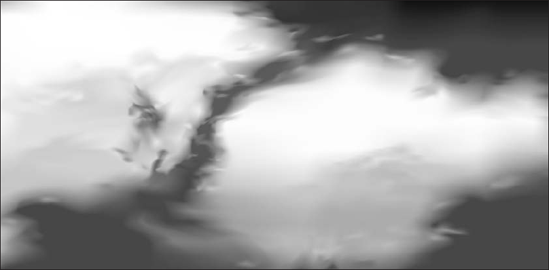
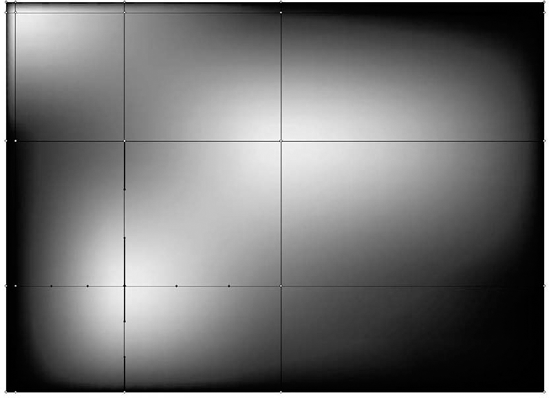
The Mesh tool changes a normal filled path into a multicolored object with the click of a button. You use the Mesh tool to add highlights, shading, and three-dimensional effects. Figure 7.30 shows an object created with the Mesh tool. You click and then create a new color at the clicked point. The new color blends smoothly into the object's original color. This section demonstrates how you enhance highlights and color and add multiple highlights.
The Mesh tool, which is found in the Tools panel, looks like a rectangle with squiggly lines inside. The Mesh tool adds highlights or shading with the click of a mouse. Follow these steps to apply a mesh:
Deselect the object to which you want to add a point.
Pick the color of the highlight point in the Color panel. If it isn't visible, choose Window
Select the Mesh tool from the Tools panel.
Click to set the point.
To change the highlight color, use the Direct Selection tool to select a point on the mesh and then change its color values in the Color panel.
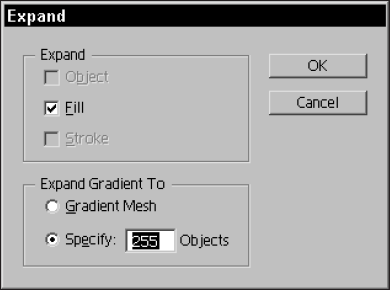
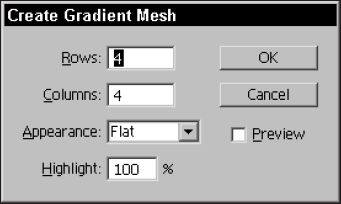
The Create Gradient Mesh dialog box, as shown in Figure 7.31, is accessed by choosing Object
Clicking more than once on an object with the Mesh tool adds more blends to the object. Each click creates new horizontal and vertical axes. For this reason, the tool is called a mesh. The more clicks that are created, the more individual lines appear until the base object appears as a complex mesh of lines. Each intersection of lines is a point of color that can be changed. However, when you change a color, adjacent intersecting points aren't updated. The following steps give you an example of what happens when you add multiple highlights to an object:
Create a dark-colored rectangle and then deselect it.
Change the color in the Color panel to a bright color.
With the Mesh tool, click in the middle of the rectangle. A point of light appears, creating a sort of radial gradient.
Deselect the rectangle, change the fill color to another bright color, and then click another point. When you do this, two additional points that are somewhere between the dark background and the two bright highlights appear. Click again for yet another highlight. Figure 7.32 shows an example of this.
Tip
If you never manually change the color of the two new points, they continue to update to match the color of the surrounding points. But if you change the color of one of those points, they're no longer smart and remain that color regardless of the colors of the points around them.
You can create very complex mesh objects with just a dozen or so clicks. These objects are editable, but you need to somehow keep track of which points were the originals so that all the other ones update automatically.
Tip
You can change the background color of the object you're editing after several highlights have been added by selecting all the points on the perimeter of the original object with the Direct Selection tool. Every click with the Mesh tool adds four points to the perimeter of the object.
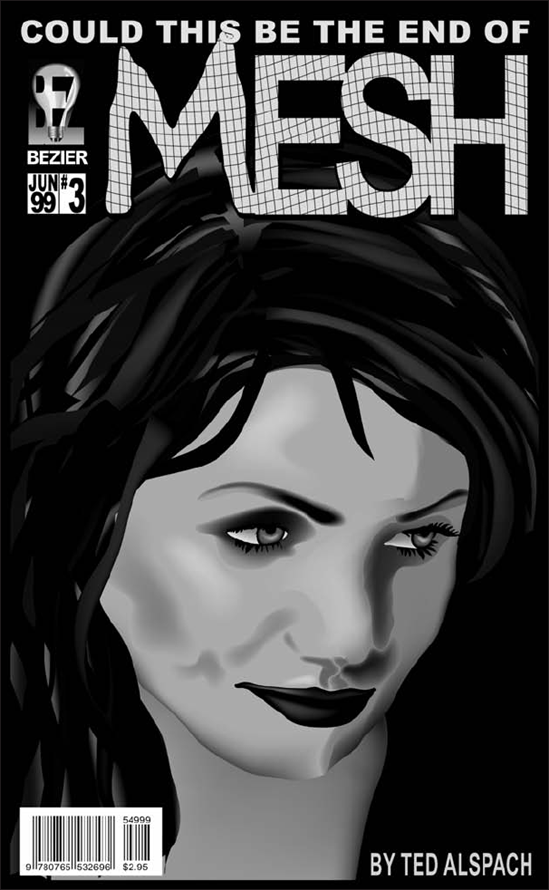
The Mesh tool can be used to create realistic shading and some really impressive effects, such as the comic book cover shown in Figure 7.33.
In this chapter, you learned some very important points about adding a bit of splash to your Illustrator documents by using colors, gradients, and mesh. In particular, this chapter covered the following topics:
You use the Swatches panel to store and apply commonly used colors.
The Color panel allows you to choose colors from a Color Ramp and to mix colors using interactive sliders.
You change the color space from grayscale to CMYK to RGB to HSB by selecting one from the Color panel's popup menu.
You can color paths and type quickly by using the Eyedropper tool to sample colors from paths or placed images.
You can also create your own gradients and then save them in the Swatches panel.
Gradients can consist of gradient stops that have different opacities.
You can quickly turn gradients into blends by selecting the gradient and then applying the Expand option.
The Mesh tool can be used to add shading effects to flat colored areas.