IN THIS CHAPTER
Launching and using Illustrator
Using shortcut keys
Working with Illustrator's interface
Moving around in Illustrator
Using Outline and Preview modes
Understanding the Edit functions
Not too long ago, commercial artists and illustrators worked by hand, not on computers. You might find it hard to believe, but they spent hours and hours with T-squares, rulers, French curves, and type galleys from their local typesetters.
Now, of course, most artists and artist wannabes spend hours and hours with their computers, mice, digitizing tablets, monitors, and on-screen type that they set themselves. A few traditional artists are still out there, but more and more make the transition to the digital world every day.
After that transition, computer artists usually come face-to-face with Illustrator, the industry-standard, graphics-creation software for both print and the Web. The following is a typical example of how people get to know Illustrator.
Illustrator arrives, and the enthusiastic artist-to-be — I'll call him Picasso — opens the box, pops in the DVD, and installs the product. A few minutes later, Picasso launches Illustrator, opens a new file, and is faced with a clean, brand-new, empty document. A world of possibilities awaits — just a few mouse clicks away. But Picasso is a little intimidated by all that white space, just as many budding young writers wince at a new word-processing document with the lone insertion point blinking away.
So, Picasso decides he'll play with the software before designing anything for real. He chooses the Rectangle tool first, clicks, drags, and voilà! A rectangle appears on the screen! His confidence soars. He may try the other shape tools next, but sooner or later, Picasso starts playing with some of the software's other features. Eventually, he eyes the soon-to-be-dreaded Pen tool. And thus starts his downward spiral into terror.
Confusion ensues. Hours of staring at an Illustrator document and wondering "Why?" take up the majority of his time. Picasso doesn't really understand fills and strokes, he doesn't understand stacking order and layers, and he certainly doesn't understand Bézier curves.
Picasso goes through the tutorial three times, but whenever he strays one iota from the set-in-stone printed steps, nothing works. Picasso becomes convinced that the Pen tool is Satan's pitchfork in disguise. Patterns make about as much sense as differential equations. Then, he encounters things such as effects that can be edited later (huh?), miter limits for strokes (yeah, right!), and the difference between targeting a group or all the objects in that group (huh? again). All are subjects that seem quite foreign and impossible to understand.
Picasso had never used or seen software as different as Illustrator.
Ah, but you have an advantage over Picasso. You have this book. The following sections in this chapter take you through the interface and common editing commands that help you construct better illustrations. The other areas focused on are the basic Illustrator functions, from setting up a new document to understanding exactly what paths are and how Illustrator uses them.
Note
Don't worry if you don't already know what the Pen tool is — you learn lots more about each of the drawing tools in Chapter 4.
The first step in getting started is to install the software, which is slightly different depending on whether you use a Mac or a Windows computer. After the software is installed, you can launch Illustrator in one of the following ways:
Double-click Illustrator's application icon.
Double-click an Illustrator document, which automatically launches Illustrator.
In Windows, choose Start

Now that you know how to open the program, it's time to learn how to close it. You can end your Illustrator session at any time by choosing File
You can also close Illustrator in one of these ways:
Mac OS X: Click and hold the Illustrator icon in the Dock and then click Quit or Ctrl+click the Dock icon and then click Quit. You also have the option of pressing Ctrl, clicking the Illustrator icon in the Dock, and then choosing Quit or pressing

Windows: Right-click Illustrator's taskbar icon and then choose Close or press Alt+F4 and then choose Close from the popup menu. You can also close Illustrator by right-clicking the taskbar icon and choosing Close from the popup menu or by pressing Ctrl+Q.
Understanding the interface is the first step in learning Illustrator. Adobe has kept its products looking consistent so that using all its programs together is easy. The tools, panels, and menus are pretty similar when using Illustrator, Photoshop, and InDesign.
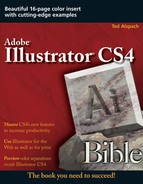
Illustrator's interface offers many elements that let you work in optimum productivity. After you understand the interface, the creation process is much easier. When looking at Illustrator, you find the following:
Document window: The document window appears when you open an existing document or start a new document.
Tools panel: The Tools panel houses the tools you need to create amazing artwork. The tools are set as icons that represent what the tool looks like.
Panels: Panels allow you to choose options such as colors, line width, styles, etc. You can move panels around (floating) to any location, and you can also close or open panels as needed. Panels can be somewhat permanently docked together. If panels are docked together, changing the size of one panel tends to increase the size of one or more of the other panels.
Control panel: The Control panel is a special panel that normally appears just below the menu bar. This panel allows you to quickly choose applicable settings to the currently selected tool.
Menu: The main menu is across the top of the window in Windows and across the top of the main monitor on a Mac. The main menu allows you to access many of Illustrator's powerful commands. Illustrator also makes use of popup context menus that appear when you right-click (Ctrl+click) many objects.
Zoom control: The zoom control provides a quick method of zooming in or out in the document window so that you can see fine details or the entire drawing.
Status bar: The status bar typically shows you what tool is currently being used. You can also choose from several different status bar options if you prefer to see other information, such as the current date and time, the number of undo levels that are available, the color profile that's being used, or the status of shared documents.
Artboard: The Artboard is the part of the document window that contains the art you want to print. It's typically shown as a thin black rectangle.
The document window, as shown in Figure 2.1, is where you perform all your work. It contains two main elements: the Artboard and the Pasteboard.
Tip
You can move the printable area represented by the dashed lines using the Print Tiling tool (one of the two optional modes of the Hand tool). The Print Tiling tool is covered later in this chapter.
Illustrator windows act like windows in most other programs. You use the title bar at the top of the window to move the window around your screen. On the title bar is the name of the document. If you've not yet saved your document, the name of the document is Untitled-1, with the number changing for each new document you create. (Hint: Save it as soon as you create it!) Next to the title of the document is the current viewing percentage relative to actual size.
Note
If you've not maximized the document window, the document's name appears in the document window's title bar rather than in Illustrator's title bar in Windows. This extra document window title bar reduces the size of your workspace, so you may want to maximize the document window in order to gain a little more room to work on your document.
Tip
If you're using a Mac, after you save a document, you can
The scroll bars let you see what is above and below or right and left of the current viewing area. I discuss scroll bars later in this chapter.
Three vital buttons help you close, minimize, and maximize the various windows you open in Illustrator. You find these buttons in the upper-left corner on a Mac and in the upper-right corner in Windows. In Windows, you also find a second set of these buttons — the upper set controls the entire Illustrator window, while the lower set controls the document window.
In addition to these buttons, Illustrator offers three options that help you quickly access your files. The Cascade, Tile, and Arrange Icons commands are all accessible via the Window menu:
Cascade: When you have multiple files open, this command lines up all the title bars in a staggered (stairstep) arrangement going down and to the right.
Tile: With multiple files open, this command tiles the windows next to one another to fill the application window.
Arrange Icons: This command arranges your open files into neat rows.
The Artboard is the area of your document that prints. The area of the Artboard doesn't have to be the same as the printed document. The Artboard is designated by black lines that form a rectangle in the document window and shows the largest area in which you can print. To set the size for the Artboard, click the Artboard tool, which allows you to change the size of the Artboard by dragging handles just as you would with the Bounding Box (where you also drag the handles to resize length and width of a selection). If you don't want to see the Artboard (perhaps because you're working on a large document that won't entirely fit on the Artboard), choose View
Tip
To change the printing page size, use the Media options in the Print dialog box. To access the Print dialog box, choose File
If you're placing your Illustrator files into another application, such as Photoshop or InDesign, the size of the Artboard limits the size of your artwork; anything extending outside the Artboard doesn't appear in other applications.
When using Illustrator, the worst thing that can happen is for you to lose an illustration on which you're working. "Where'd it all go?" you cry. This can happen very easily in Illustrator. Just click a few times on the gray parts of the scroll bars at the bottom of the document window. Each time you click, you move about half the width (or height) of your window, and a few clicks later, your page and everything on it is no longer in front of you. Instead, you see the work area's scratch area, usually a vast expanse of white nothingness.
The work area measures 227.5 × 227.5 inches, which works out to about 360 square feet of drawing space. At actual size, you see only a very small section of the Artboard. A little letter-size document looks extremely tiny on a work area this big. If you get lost in the work area, a quick way back is to choose View
Note
Although the View
This discussion assumes, of course, that you've actually drawn artwork on the Artboard. If you've drawn your artwork way off to the side of the work area, away from the Artboard, you may have more difficulty finding your drawing. At this point, you probably want to choose View
The Print Tiling tool, which you access via the Hand tool (which I discuss later in this chapter), changes how much of your document prints. It does this by moving the printable area of the document without moving any of the printable objects in the document. Clicking and dragging the lower-left corner of the page relocates the printable area of the page to the place where you release the mouse button.
Tip
Double-clicking the Print Tiling tool slot resets the printable-area dotted line to its original position on the page.
The Print Tiling tool is useful when your document is larger than the biggest image area that your printer can print. The tool allows you to tile several pages to create one large page out of several sheets of paper. Tiling is the process by which an image is assembled by using several pieces of paper arranged in a grid formation. A portion of the image prints on each page, and when you fit the pages together, you can view the image in its entirety. Tiling is good only for rough prints because you typically need to manually trim about a quarter-inch around the edge of each sheet of paper; most printers don't print to the edge of the paper.
Note
For more on printing, see Chapter 18.
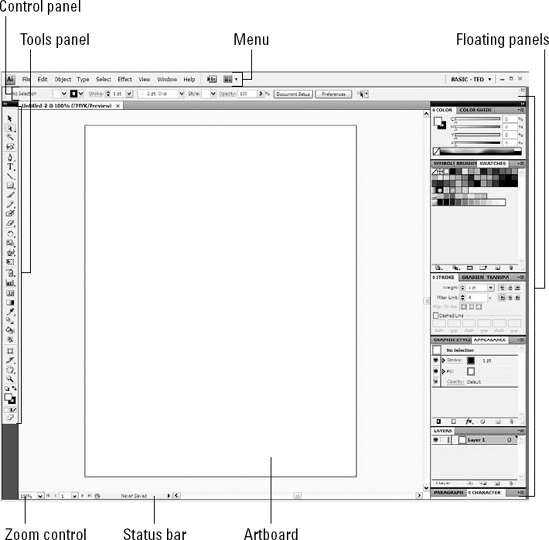
The Tools panel, as shown in Figure 2.2, contains all the tools that you use to draw objects in your documents. The Tools panel normally appears as a panel on the left edge of the document window. To close the Tools panel, you can either click the x (the little circle on a Mac) at the top of the Tools panel or choose Window
If you drag the Tools panel to the right of its sticky panel location, it becomes a floating panel. To turn it back into a panel, drag it to the left edge of the document.
Tip
You can quickly swap between single- and double-column views of the Tools panel by clicking the arrows just above the top of the Tools panel.
Tip
To toggle the display of all panels, not just the Tools panel, press Tab. Each time you press Tab, the panels either hide or are redisplayed — depending on their current state. This won't work if you're using the Type tool with an active insertion point, of course.
Tip
You can show and hide all the panels except the Tools panel by pressing Shift+Tab (again, don't try this when you're using the Type tool with an active insertion point).
To choose a tool, click the tool you want to use in its slot within the Tools panel and then release the mouse button. This highlights it on the Tools panel. You can also choose tools by pressing a key on the keyboard. For example, pressing P selects the Pen tool. You can deactivate a tool only by selecting another one.
Note
Appendix A lists all the shortcut keys for selecting each of the tools.
Many tools have additional popup tools, which are tools that appear only when you click and hold the mouse on the default tool. Illustrator denotes the default tools that have popup tools with a little triangle in the lower-right corner of the tool. To choose a popup tool, click and hold a tool with a triangle until the popup tools appear and then drag to the popup tool you want. The new popup tool replaces the default tool in that tool slot and stays there until you choose another tool from that tool slot.
Tip
You can browse through the popup tools by pressing Alt (Option) while clicking a tool. Each click displays the next tool.
Tip
You can customize the tool shortcuts under the Keyboard Shortcuts dialog box found under the Edit menu. In this dialog box, simply choose the tool you want to change and then type the new shortcut letter, number, or symbol. You can also do this in Adobe Photoshop and Adobe InDesign.
Any tool with a popup option also has a tearoff tab on the right side. You can make the flyout a free-floating panel by clicking this tearoff tab. Use this feature if you find that you're constantly switching between tools in that tearoff. Then, you won't have to click+hold and drag to the next tool.
What if you forget the function of a specific tool or you can't tell the difference between the various tools in Illustrator? No problem! Illustrator comes equipped with a handy Tool Tips feature that identifies tools quickly and easily. When you have Tool Tips activated (and it is by default), you simply move your cursor over the element you want to identify, and a yellow text box pops up and tells you its name. For example, when you place your cursor over the Type tool, a box appears with the words Type Tool (T). The letter within the parentheses indicates the keyboard shortcut for the tool. In this example, if you press T, you activate the Type tool without clicking it. Illustrator provides Tool Tips for every tool in the Tools panel as well as for the panel controls.
If you find the Tool Tips annoying or if you know the tips well enough not to need the Tool Tips, you can disable them in the General screen of the Preferences dialog box. To open the Preferences dialog box, simply choose Edit (Illustrator)
Panels are small windows that are similar to dialog boxes. Panels can float or be docked. To make the following discussion a little more readable, I'll refer to both as panels; they're mostly interchangeable terms when discussing how they work and the contents of each of them, but differences are noted below.

Figure 2.2. The Tools panel holds all the tools you need to draw in Illustrator. The Tools panel on the left is the single-column version that you see by default in Illustrator, while the one on the right is the double-column version.
Panels allow you to control virtually every aspect of the Illustrator drawing environment. Illustrator has 34 standard panels and an unlimited number of library panels (for swatches, symbols, brushes, styles, and more), all of which can remain open while you work on your document panel. Technically speaking, a panel is a modeless window. The big difference between a modeless window and a dialog box is that you don't have to close the modeless window to perform other tasks. Therefore, you can work with the features on one panel without having to close another panel.
Unlike windows, panels are never really active. Instead, the one you're working in is in the front. If the panel has editable text fields, Illustrator highlights the active one or makes the text cursor blink. To bring a panel to the forefront — that is, bring it into focus — simply click in it anywhere.
Panels are like regular windows in many ways. Each panel has a title bar that you can click and drag to move it. The title bar also has buttons for minimizing a regular panel or zooming (back to regular size) a minimized one and closing the panel. Each panel also has a tab with the name of the panel within it.
Tip
You can use the title tab to toggle between the minimized state (showing only the title tab) and the maximized state (showing the entire panel) by double-clicking the title tab.
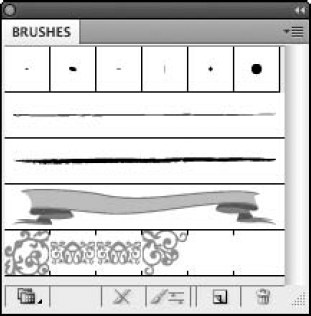
Occasionally, a panel has a handle on the lower-right corner that looks like a triangle made up of dots, as seen in Figure 2.3. You can use this handle for changing the panel's size by clicking and dragging the corner containing the handle.
Tip
For some panels (such as the Color panel), a double-arrow icon appears to the left of the title name. Clicking this icon toggles the panel size among several different sizes.
You can place panels together in different combinations by tabbing and docking them. Tabbing stacks the tabs for several panels into a single panel. Docking aligns the panels without stacking them into the same space.
Each panel (except for the Tools panel) has a tab on it. Clicking the tab of a panel brings it to the front. Dragging a tab from one panel to another moves that panel into another panel. Dragging a tab out of a panel makes the panel separate from the previous panel. Figure 2.4 includes a set of panels that have been tabbed together. When you create a set of panels like this, it stays grouped together even if you quit Illustrator and relaunch.
If you drag a floating panel to the right side of the screen, it becomes a docked panel. If you drag a docked panel into the document window, it becomes a floating panel.
Note
By default, Illustrator tabs certain panels together. You can drag them apart and then tab others together to suit your method of working.
Tip
To restore the default panel layout, choose Window
You can dock panels together by dragging the tab of one panel to the bottom of another panel. When the bottom of the other panel darkens, releasing the mouse button docks the moved panel to the bottom of the other one. Then, when you move the other panel, the docked panel moves with it. To separate a panel from the others, click and drag the tab away from the original panel.
Panels are even more useful when you can reveal and hide them to suit your needs. Under the Window menu, you can choose which panels show and which ones hide. Simply click the check box next to a panel to show it, and deselect the check box next to the panel to hide it. Some panels use a keyboard shortcut to access them, and others are accessed through the Window menu. To see the shortcuts, look to the right of the panel name. Under the Window menu, you can see what panels are visible by the check mark next to them.
The panels are discussed throughout this book in various chapters. Here are some of the available panels:
Actions: Use this panel to record a sequence of events to play at any time.
Align: This panel lets you align objects (Shift+F7).
Appearance: Use this panel to check the attributes of a selected object (Shift+F6).
Attributes: Use this panel to view the overprinting and any URLs associated with the selected object (Ctrl+F11/
Brushes: Use this panel to choose a brush type (F5).
Color: This panel lets you apply color to your illustrations (F6).
Color Guide: This panel lets you access the Live Color feature (Shift+F3).
Control: This is the panel along the top edge of the document window.
Document Info: This panel shows information about the document, such as color mode, Artboard dimensions, and other options.
Flattener Preview: Use this to see certain areas of flattened artwork. You can also adjust the Flattener options here.
Gradient: This panel is used for changing and applying gradients (Ctrl+F9/
Graphic Styles: This panel lists the default graphic styles and lets you save graphic styles (Shift+F5).
Info: This panel displays information on the selected object. It's used for measuring objects or distance (F8), among other things.
Layers: This panel lets you put objects on different layers for easier organization (F7).
Links: This lists the placed objects that are linked to the document.
Magic Wand: Use this to adjust the settings for the Magic Wand tool.
Navigator: Use this to quickly move around a large document.
Pathfinder: Use this to combine, split, divide, and do more to multiple paths (Shift+Ctrl+F9/Shift+
Separations Preview: Use this to view the individual printing plates in your document.
Stroke: This panel lets you adjust the width and style of the stroke (Ctrl+F10/
SVG Interactivity: Use this panel to set options for Scalable Vector Graphics.
Swatches: This panel houses preset colors, gradients, and patterns.
Symbols: This panel houses preset symbols and lets you define new symbols (Shift+Ctrl+F11/Shift+
Tools: This panel contains all of Illustrator's tools.
Transform: This panel lets you move, scale, and apply other transformations (Shift+F8).
Transparency: Use this panel to adjust the opacity of objects (Shift+Ctrl+F10/ Shift+
Type: Use this panel to adjust a variety of type options, including:
Character (Ctrl+T/
Character styles
Glyphs
OpenType (Alt+Shift+Ctrl+T/Option+Shift+
Paragraph (Alt+Ctrl+T/Option+
Paragraph styles
Tabs (Shift+Ctrl+T/Shift+
Variables: This panel is used to set the options for data-driven graphics.
Although Adobe places more emphasis on Illustrator's panels and other elements, such as its Tools panel, you still find many important and useful features in Illustrator's menus.
Some general rules apply to Illustrator menus:
To choose a menu item, pull down the menu, choose the menu item you want, and then release or click the mouse button. If the cursor is not on that item but is still highlighted, the command can't take effect.
Whenever an ellipsis appears (three little dots that look like this ...), choosing that menu item displays a dialog box where you must verify the current information by clicking OK or by typing more information and then clicking OK. If the option has no ellipsis, the action you choose occurs immediately.
When you see a key command listed on the right side of the menu, you can press that key instead of using the mouse to pull down a menu. Using key commands for menu items works just like clicking the menu bar to choose that item.
If you see a little triangle next to a menu item, it means the menu possesses a submenu. You can choose items in the submenu by scrolling over to the menu and then scrolling up or down to choose the menu item needed. Submenus usually appear on the right side of the menu, but due to space limitations on your monitor, submenus may appear on the left side for certain menus.
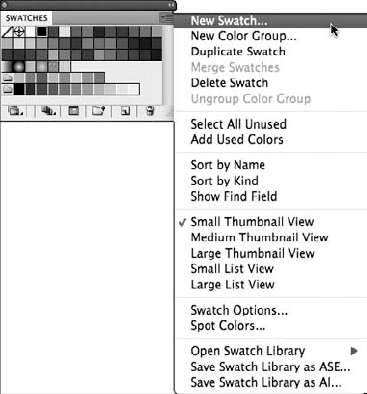
Not only does the main document window have menus, but panels have menus too. You can find a variety of features and options to meet your creative needs. To open these menus, simply find and click the triangle located in the top-right corner of most panels. Figure 2.5 gives an example of the options you have available when you access the Swatches panel's menu. These options and features change with each panel.
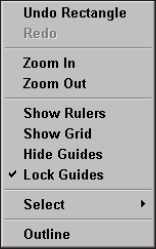
Illustrator provides context-sensitive menus that appear right under your cursor as you work. Right-click (Ctrl+click) anywhere in a document window to open a context-sensitive menu. These menus contain commands that relate to the type of work you're doing and the specific tool you have. Figure 2.6 shows a context-sensitive menu that opens in a document when a rectangle shape is created and selected. This menu looks different if another object is selected.
Note
Context menus in Illustrator tend to be less useful than other programs that rely heavily on contextual menus to accomplish tasks. There are very few commands that only appear in the context-sensitive menus, such as Isolate selected group and Send to current layer. Don't fall into the trap of right-clicking to see what you can do; Illustrator relies much more heavily on panels, tools, and the menu bar options (as well as numerous keyboard shortcuts) than it ever does on context menus.
Keyboard commands are shortcuts for common activities that you perform in Illustrator. These shortcuts typically use the Ctrl (
Keyboard commands are as important to an Illustrator artist as the mouse is; with a little practice, you can learn them quickly. Besides, many of the default keyboard commands are the same from program to program, which makes you an instant expert in software that you haven't used yet! Good examples of this are the Cut/Copy/Paste, Select All, and Save commands:
Cut/Copy/Paste: You activate these by pressing Ctrl+X (
Select All: You can select everything in a document by pressing Ctrl+A (
Save: You can quickly save your work by pressing Ctrl+S (
The status bar, located on the lower left of your document window, has a Zoom popup list and a button that displays useful and otherwise difficult-to-find information. To change the item shown in the status bar, click the triangle to the right of Show and then choose a different item. Although the default for this button displays the tool that you're currently using, you can change the information to display one of the following instead:
Version Cue Status: Choose this to see the Version Cue information for shared files. This option is available only if you have Adobe Creative Suite installed.
Current Tool: Choose this to show the selected tool's name.
Date and Time: Use this to show the current date and time.
Number of Undos: This is a handy option that shows the number of queued undos and redos.
Document Color Profile: This shows the current Color Profile.
Being able to move through a document easily is a key skill in Illustrator. Rarely can you fit an entire illustration in the document window at a sufficient magnification to see much of the image's detail. Usually, you're zooming in, zooming out, or moving off to the side, above, or below to focus on certain areas of the document.
The most basic navigational concept in Illustrator is the ability to zoom to different magnification levels. Illustrator's magnification levels work like a magnifying glass. In the real world, you use a magnifying glass to see details that aren't readily visible without it. In the Illustrator world, you use the different magnification levels to see details that aren't readily visible at the 100% view.
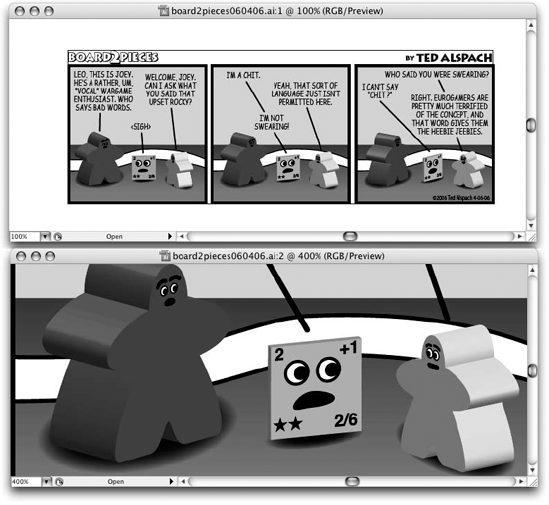
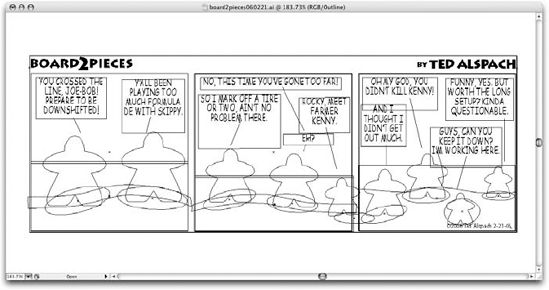
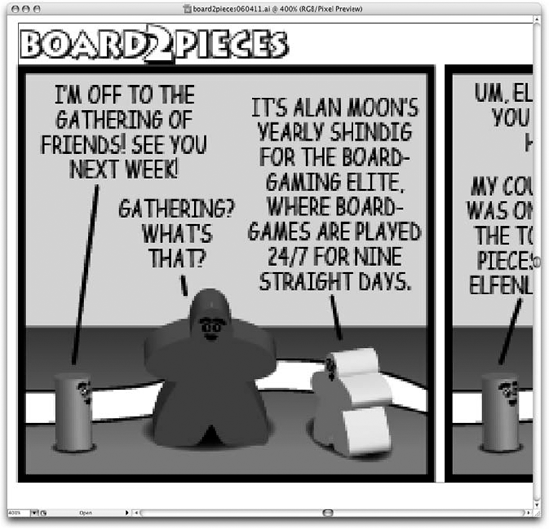
Changing the magnification levels of Illustrator doesn't affect the illustration. If you zoom in to 400% and print, the illustration still prints at the size it would if the view were 100% (you can adjust the printing size in the Print dialog box). It doesn't print four times as large. Figure 2.7 shows the same Illustrator document at 100% and 400% magnification.
In Illustrator, 100% magnification means that the artwork you see on the screen has the same physical dimensions when it prints. If you place a printout next to the on-screen image at 100% magnification, it appears at about the same size, depending on your monitor resolution (the higher the resolution, the smaller the document looks on-screen). Over time, monitor pixels per inch have increased from the standard 72 pixels per inch (ppi) of 1990s models to today's 96 ppi to 120 ppi versions, so if you have a flat-screen monitor, the on-screen version looks noticeably smaller than the printed version.
Tip
For those of you who plan to use Illustrator with Photoshop, remember that in Photoshop, the 100% view is different. In Photoshop, each pixel on-screen is equal to 1 pixel in the image. Unless the ppi of the image matches that of the screen (and it would if Web graphics were being designed), the 100% view tends to be larger than the printed dimensions of the image when you're using Photoshop.
Perhaps the easiest way to control the magnification of your artwork is with the Zoom tool. This tool (which is located in the right column of the Tools panel) can magnify a certain area of artwork and then return to the standard view.
To use the Zoom tool to magnify an area, choose it from the Tools panel by clicking it once. The Zoom cursor takes the place of the Arrow cursor (or whatever tool was previously selected). It looks like a magnifying glass with a plus sign in it. Clicking any spot in the illustration enlarges the illustration to the next magnification level, with the place you clicked centered on your screen. The highest magnification level is 6400% — which, as all you math aficionados know, is 64 times (not 6,400 times!) bigger than the original. Where you click with the Zoom tool is very important:
Clicking the center of the window enlarges the illustration to the next magnification level.
Clicking the edges (top, bottom, left, or right) of the window makes the edges that you didn't click (and possibly some or all of your artwork) disappear as the magnification increases.
Clicking the upper-right corner hides mostly the lower-left edges and so forth.
If you're interested in seeing a particular part of the document close up, click that part at each magnification level to ensure that it remains in the window.
If you zoom in too far, you can use the Zoom tool while pressing Alt (Option) to zoom out (you see a minus sign in the middle of the magnifying glass to indicate this). Clicking with the Zoom tool while pressing Alt (Option) reduces the magnification level to the next-lowest level. You can zoom out to 3.13% (1/32 actual size). Releasing Alt (Option) causes the Zoom tool to zoom in instead of out.
When you use the Zoom tool, you magnify everything in the document, not just the illustration. You magnify all paths, objects, the Artboard, and the Page Setup boundaries equally. However, the way certain objects appear (the thickness of path selections, points, handles, gridlines, guides, and Illustrator user interface components, such as panels and windows) doesn't change when you zoom in.
If you need to zoom in to see a specific area in the document window, use the Zoom tool to draw a marquee by clicking and dragging diagonally around the objects that you want to magnify. The area thus magnifies as much as possible so that everything inside the box just fits in the window that you have open. If you drag a marquee box as you press and hold Alt (Option), you do the same thing as if you had just clicked to zoom out.
Tip
To move a zoom marquee around while you're drawing it, press and hold the spacebar after you begin drawing the marquee but before you release the mouse button. When you release the spacebar, you can continue to change the size of the marquee by dragging.
You also can zoom in and out by using commands in the View menu. Choose View
Although Illustrator can zoom to any level, it uses 23 default zoom levels when you click the Zoom tool or when you access the Zoom In and Zoom Out menu items (or their respective keyboard commands). Table 2.1 lists each of the default Zoom In and Zoom Out default levels.
Tip
You can quickly zoom in or out using the scroll wheel on your mouse. Press Alt (Option) and then rotate the wheel to zoom in and out.
You can use different methods to automatically zoom to 100% view. The first method is to double-click the Zoom tool in the Tools panel. This action changes the view to 100% instantly. Your other choices are as follows:
Using the Zoom feature in the status bar: To do this, simply click the dropdown arrow in the left corner of the status bar and then choose 100% or type 100 in the field there.
Using the View menu: This is the best way to zoom to 100% magnification because it not only changes the image size to 100%, but it also centers the page in the document window. Simply choose View
Fit in Window instantly changes the magnification level of the document so that the entire Artboard (not necessarily the artwork, if it isn't located on the page) fits in the window and is centered in it. You can choose from two different methods to change the document view to the Fit in Window size:
Use the View menu: One way to automatically change to the Fit in Window view is to choose View
Use the Hand tool slot: Simply double-click the Hand tool.
Tip
You can quickly go to 3.13% by pressing Ctrl (
If you want to view a document at a specific zoom level, double-click the view area at the bottom-left corner of the active document window, type the magnification you want to zoom to, and then press Enter or Return.
Note
When you specify a magnification, you don't change the document. Rather, you change how you view the document. For this reason, you can never undo any type of magnification-level change. Choosing Edit
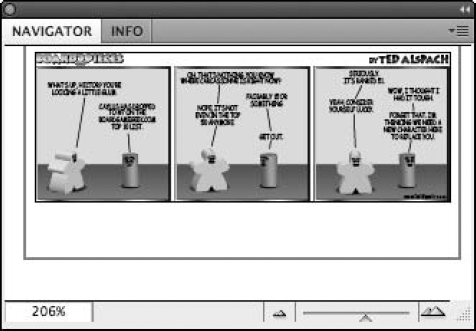
Of course, being able to zoom in very closely to your artwork does have a pitfall. The more you zoom in on an illustration, the less of that illustration you see at one time. The Navigator panel (shown in Figure 2.8), which you access by choosing Window
The red rectangle: You can stay zoomed in and move easily to another section by dragging the red rectangle (which actually scrolls), located in the center of the Navigator, to another area.
The popup menu: You access this menu by clicking the triangle located on the upper-right corner of the panel. The Navigator panel's popup menu includes a View Artboard Only option. This option sets the thumbnail in the Navigator panel to show only the extent of the Artboard. If this option isn't set, the thumbnail shows all objects included in the document.
The magnification level box: You can type an exact magnification level in the box in the lower-left corner of the Navigator panel.
The slider: Located at the bottom of the Navigator panel is a slider that gives you yet another way to zoom in and out by dragging the slider to the left or right.
The Zoom In and Zoom Out tools: The Zoom In and Zoom Out tools look like little triangles and big triangles on either side of the slider triangle. You can zoom in and out a preset amount (using the same amounts used by the Zoom In and Zoom Out tools and menu items) by pressing the Zoom In or Zoom Out icons.
Warning
The Navigator panel can slow down Illustrator if your artwork contains many patterns, gradients, and gradient mesh objects. To avoid this slowdown, you can close the Navigator panel by choosing Window
Sometimes, after you zoom in to a high magnification, part of the drawing that you want to see is outside the window area. Instead of zooming in and out repeatedly, you can use the scroll bars on the right side and bottom edges of the document window to move around inside the document. The right scroll bar controls where you are vertically in the document window. The bottom scroll bar controls where you are horizontally in the document window.
The scroll bars contain three elements: up and down arrows, a gray area (or bar), and a thumb, also called the elevator box, which is a gray square (in Windows) or a blue oval (on a Mac) that rides along the scroll bar. The gray area of the right scroll bar is proportionate to the vertical size of the work area (the space around the Artboard). If the little elevator box is at the top of the scroll bar, you're viewing the top edge of the work area. If it's centered, you're viewing the vertical center of the work area. The techniques are as follows:
Using the up and down arrows: When you click the up arrow, you display what is above the window's boundaries by pushing everything in the window down in little increments. Clicking the down arrow displays what is below the window's boundaries by pushing the document up in little increments.
Using the thumbs: Dragging the thumb up displays what is above the window's boundaries proportionately by whatever distance you drag it. Dragging the thumb down displays what is below the window's boundaries proportionately by whatever distance you drag it.
Using the gray bar: Clicking the gray bar above the thumb and between the arrows displays what is above the window's boundaries in big chunks. Clicking the gray bar below the thumb and between the arrows displays what is below the window's boundaries in big chunks.
Warning
Be careful not to drag too far or you preview beyond the top of the Artboard.
Note
On a Mac, if you want to specify how far Illustrator scrolls when you click the gray bar, you can set this in the System Preferences. Also on a Mac, the default is for the up and down arrows to be together. You can change this in your system's General preferences to place the scroll bars together or at the top and bottom.
The Hand tool improves on the scroll bars. The Hand tool — which looks like a hand — is located at the bottom of the first column of the Tools panel, just above the color options.
Instead of being limited to only horizontal and vertical movements, you can use the Hand tool to scroll in any direction, including diagonally. The Hand tool is especially useful for finding your way around a document when you're viewing it at a high magnification level. The higher the magnification level, the more you're likely to use the Hand tool.
Tip
To quickly access the Hand tool, press H or press and hold the spacebar. Clicking and dragging the page moves the document around inside the document window while the spacebar is pressed. If you release the spacebar, you return to the previous tool. This works for all tools, but the Type tool works a little differently. If you're currently using the Type tool in a text area, press Ctrl+spacebar (
When you click in the document, be sure to click the side that you want to see. Clicking at the top of the document and then dragging down allows you to scroll down through almost an entire document at a height of one window. Clicking in the center and then dragging allows you to scroll through only half a window's size at a time.
The best thing about the Hand tool is that it works live. As you drag, the document moves under the Hand. If you don't like where it's going, you can drag it back, still live. The second best thing is that accessing it requires only one keystroke: either pressing H or pressing and holding the spacebar.
Note
You can't use Undo to reverse scrolling that you've done with the scroll bars or the Hand tool.
Use the red rectangle in the Navigator panel to quickly scroll to another location within a document. Clicking and dragging within the red rectangle moves the viewing area around live, whereas clicking outside the rectangle snaps the view to a new location.
Tip
You can change the red rectangle to another color by choosing Panel Options from the Navigator panel's popup menu.
So, now you've learned how to zoom and pan around the document window, and you probably have many different sections of your artwork that you want to focus on. Illustrator lets you create a number of windows for the current artwork by choosing Window
This option creates a new window that's the same size as the current window. You can then zoom and pan within this new window while maintaining the previous window. You can place these windows side by side to see the artwork from two unique perspectives. Illustrator gives each new window a different reference number, which appears in the title bar.
Illustrator offers several options when it comes to how you view your illustrations. This section explains how to discover these views as well as create and customize your own views.
In the old days, everyone worked in Outline mode (originally called Artwork mode). In Outline mode, you see only the guts of the artwork — the paths without the fills and strokes applied, as shown in Figure 2.9. To see what the illustration looked like with the fills and strokes applied, you had to switch to Preview mode. Usually, the preview was not quite what you had in mind, but to make changes, you had to switch back to Outline, then to Preview again to check, and so forth. Many users of Illustrator from that time refer to it as the golden age — with not a little trace of sarcasm.
Today, Illustrator allows you to edit your work in both Outline and Preview modes. You can also print a document from either mode. Saving the document while you're in Outline mode doesn't affect anything in the document, but the next time you open it, it displays in Outline mode. The same thing applies to Preview mode: Whatever mode you're in is saved with the artwork.
You can't undo a Preview or Outline mode change (for example, going from Preview to Outline). If you make a Preview or Outline mode change and then close your document, Illustrator asks you if you want to save changes, which in this case refers only to the view change. The current view mode is always displayed in the title bar next to the document name.
You may find working with a drawing in Outline mode significantly faster than working with it in Preview mode. In more complex drawings, the difference between Outline mode and Preview mode is significant, especially if you're working on a very slow computer. This is even more noticeable when the artwork contains gradients, patterns, placed artwork, and blends. Outline mode is much closer to what the printer sees — as paths. Paths define the edges of the objects with which you're working.
Getting used to Outline mode can take some time. Eventually, your brain can learn to know what the drawing looks like from seeing just the outlines, which show all the paths. The one big advantage of Outline mode is that you can see every path (a single entity in your drawing made up of one or more straight or curved lines) that isn't directly overlapping another path. In Preview mode, many paths can be hidden. In Outline mode, invisible masks are normally visible as paths, and you can select paths that were hidden by the fills of other objects. To select paths in Outline mode, you must click the paths directly or draw a marquee across or around them.
To change the current document to Outline mode, choose View
Note
You can change how a placed image displays in Outline mode by selecting or deselecting the Show Images in Outline Mode option in the Document Setup dialog box. To display the Document Setup dialog box, choose File
In Preview mode, you can see which objects overlap, which objects are in front and in back, where gradations begin and end, and how patterns are set up. In other words, the document looks just the way it will look when you print it.
Note
In Preview mode, the color you see on-screen only marginally represents the actual output because of the differences between the way computer monitors work (red, green, and blue colors — the more of each color, the brighter each pixel appears) and the way printing works (cyan, magenta, yellow, and black colors — the more of each color, the darker each area appears). Monitor manufacturers make a number of calibration tools that decrease the difference between what you see on a monitor and the actual output. You can also use software solutions. One software solution, CIE calibration, is built in to Adobe Illustrator (choose Edit
Choosing View
The biggest disadvantage of Preview mode is that Illustrator begins to draw and fill in the various parts of your image, which can take some time, especially if your computer is slow. When you change the image, the screen redraws. You can stop screen redraw by pressing Ctrl+Y (
Another disadvantage of Preview mode is being unable to select the path you want to change in the image. Sometimes, so much stuff appears on your screen that you don't know what to click! This problem can become more complicated when you include fills in the mix because the strokes on those paths are also visible. Instead of selecting a path by clicking it, you can select entire paths by clicking the insides of those paths in a filled area.
Drawing in Illustrator often results in one or more objects overlapping each other, meaning that the colors of these objects also overlap. When you print these objects, the top color blocks, or knocks out, anything below it. The advantage of using this feature is that your illustration becomes cheaper and easier for a printer to generate. To see how your overprint will look after you've set the Overprint feature, you can view it in Overprint Preview mode by choosing View
Because most Web page graphics are pixel-based, Pixel Preview mode is specifically intended for graphics that designers want to place on Web pages. This mode lets you view images before converting them to a Web graphics format. Choose View
Note
For more on color and overprinting, see Chapters 7 and 18. For more on creating Web graphics, see Chapter 19.
Illustrator has a special feature called custom views that allows you to save special views of an illustration. Custom views contain view information, including magnification, location, and whether the illustration is in Outline mode or Preview mode. If you have various layers or layer sets in Preview mode and others in Outline mode (layers in Preview mode are indicated by regular eyeballs to the left of their names in the Layers panel, while layers in Outline mode show an outlined eyeball), custom views can also save that information. Custom views, however, don't record whether templates, rulers, page tiling, edges, or guides are shown or hidden.
If you find yourself continually going to a certain part of a document, zooming in or out, and changing back and forth between the Preview and Outline modes, that document is a prime candidate for creating custom views. Custom views are helpful for showing clients artwork that you created in Illustrator. Instead of fumbling around in the client's presence, you can, for example, show the detail in a logo instantly if you've preset the zoom factor and position and have saved the image in a custom view.
To create a new view, set up the document in the way that you want to save the view. Then, choose View
So, you've been working on an illustration for an important client (actually, they all are important), and the client scheduled an appointment to see your progress, but the best part of the work is hidden behind the panels and the Tools panel. You can turn off the panels and the Tools panel or you can switch between the different screen modes.
Illustrator uses three screen modes represented by the three buttons at the bottom of the Tools panel. They are Standard Screen Mode, Full Screen Mode with Menu Bar, and Full Screen Mode. In addition to clicking the screen mode buttons in the Tools panel, you can also press F to switch between the three modes.
In most programs, including Illustrator, many basic functions of the Edit menu work the same way. If you've used the Edit menu in Photoshop or Microsoft Word, for example, you should have no trouble using the same functions in Illustrator because the menu options are located in the same place in each program, as shown in Figure 2.11.
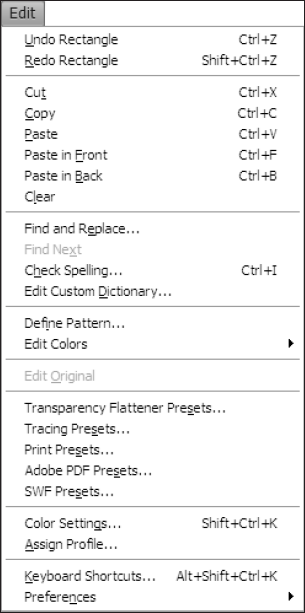
Figure 2.11. The various commands under the Edit menu help you to quickly cut, copy, and paste objects from place to place as well as help you undo and redo previously applied commands.
The most simplistic Edit command is Clear. In Illustrator, it works almost exactly like Backspace (Delete). When something is selected, choosing Clear eliminates what is selected.
You're probably asking yourself, "If Backspace (Delete) does the same thing, why do we need Clear?" or "Why didn't they just call the Clear command Backspace (Delete)?" Ah, the makers of Illustrator are a step ahead of you in this respect. Note that I said "almost" the same way; there's a subtle yet important difference in what the Clear command does and what Backspace (Delete) does, due to Illustrator's abundant use of panels.
If you're working on a panel and have just typed a value in an editable text field, Backspace (Delete) deletes the last character typed. If you tabbed down or up to an editable text field and highlighted text or if you dragged across text in an editable text field and highlighted text, then Backspace (Delete) deletes the highlighted characters. In all three situations, the Clear command deletes anything that's selected in the document.
The Cut, Copy, and Paste commands in Illustrator are very handy. Copying and cutting selected objects places them on the Clipboard, which is a temporary holding place for objects that have been cut or copied. After you place an object on the Clipboard, you can paste it in the center of the same document, the same location as the cut or copied object, or another document, such as Illustrator, InDesign, or Photoshop.
Choosing Cut from the Edit menu deletes the selected objects and copies them to the Clipboard, where they're stored until you cut or copy another object or until you shut down or restart your computer. Quitting Illustrator doesn't remove objects from the Clipboard.
Choosing Copy from the Edit menu works like Cut, but it doesn't delete the selected objects. Instead, it just copies them to the Clipboard, at which time you can choose Paste and slap another copy into your document.
Choosing Paste from the Edit menu places any objects on the Clipboard into the center of the document window. Paste is not available if nothing is on the Clipboard.
Tip
Alternatively, you can use the Paste in Front and Paste in Back options to position the object you're pasting relative to other objects.
Now, here's the really cool part: Just because you've pasted the object somewhere doesn't mean it isn't on the Clipboard anymore. It is! You can paste again and again — and keep on pasting until you get bored or until your page is an indecipherable mess, whichever comes first. The most important rule to remember about Cut, Copy, and Paste is that whatever is currently on the Clipboard is replaced by anything that subsequently gets cut or copied to the Clipboard.
Cut, Copy, and Paste also work with text that you type in a document. Using the type tools, you can select type, cut or copy it, and then paste it. When you're pasting type, it goes wherever your blinking text cursor is located. If you have type selected (highlighted) and you choose Paste, the type that was selected is replaced by whatever you had on the Clipboard.
You can cut or copy as much or as little of an illustration as you choose; you're limited only by your hard drive space (which is used only if you run out of RAM).
Tip
If you ever get a message saying you can't cut or copy because you're out of hard drive space, it's time to start deleting stuff from your hard drive. Or simply get a bigger hard drive.
Thanks to the Adobe PostScript capability on the Clipboard, Illustrator can copy paths to other Adobe software, including InDesign and Photoshop. Paths created in those packages (with the exception of InDesign) can be pasted into Illustrator. With Photoshop, you have the option of pasting your Clipboard contents as rasterized pixels instead of as paths.
You have the ability to drag Illustrator artwork from an Illustrator document right into a Photoshop document. In addition, because Adobe lets you move things in both directions, you can drag a Photoshop selection from any Photoshop document right into an Illustrator document.
You can keep undoing in Illustrator until you run out of either computer memory or patience. After you undo a bunch of times, you can redo by choosing Redo a bunch of times, which is found right below Undo in the Edit menu. And guess what? You can redo everything you've undone. So, if you undo 20 times, you can then immediately redo 20 times, and your art looks just like it did before you started undoing.
Choosing Undo from the Edit menu undoes the last activity that was performed in the document. Successive undos undo more and more activities, until the document is at the point where it was opened or created or you've run out of memory.
Choosing Redo from the Edit menu redoes the last undo. You can continue to redo undos until you're back to the point where you started undoing or you perform another activity, at which time you can no longer redo any previous undos. You have to undo the last thing you did and then actually do everything again. In other words, all the steps that you undid are gone. It's fine to use the Undo feature to go back and check out what you did, but after you've used multiple undos, don't do anything if you want to redo back to where you started undoing from. Got that?
In this chapter, you learned the following:
Illustrator may seem difficult to learn at first, but with this book and a bit of dedication, you can master it.
Illustrator has many keyboard shortcuts that increase productivity.
Adobe has kept the interface similar across its products.
The document window, Tools panel, panels, menus, and status bar look the same in many Adobe applications.
You can view Illustrator documents at virtually any magnification level without actually changing them.
Use the Hand tool to scroll around your document.
Illustrator's Outline mode lets you see paths without their strokes and fills.
Cut, Copy, Paste, Undo, and Redo are under the Edit menu.
Illustrator provides virtually unlimited undos and redos.