Working with graphic styles
Using the Appearance panel
Working with effects
Experiencing the new Scribble effect
Probably some of the most amazing illustrations you see in Illustrator come from using graphic styles and effects. Graphic styles can increase your productivity with any type of repeating symbol or set of attributes that you use daily. Set as a style, you can use it over and over again.
Those of you looking to create special effects, look no further. In this chapter, you discover when to use effects.
Along with effects, you also see a variety of artwork that combines effects with graphic styles.
Graphic styles have brought Illustrator to the front of the pack in illustration software. Graphic styles give you the ability to save all of an object's attributes in a panel. You can use the Graphic Styles panel to quickly add the attributes, such as transparency, effects, strokes, and fills, to another object. Creating a style is pretty darn easy. Simply create the look you want on an object. Then, with your object selected, choose New Graphic Style from the Graphic Styles panel's popup menu. That's it! Now you can use that style anytime you want. It seems like a breeze, but before diving headfirst into the Graphic Styles panel, first check out the Appearance panel.
The Appearance panel houses all the information about a selected object. The information includes the stroke information, fill information, any effects from the Effect menu, and transparency information. In this Appearance panel, you can continually edit, rearrange, and delete this style information.
Note
You can't apply graphic styles to type unless you change the type to outlines. For more on changing type to outlines, see Chapter 9.
The Appearance panel shows all strokes, fills, transparency, multiple fills, and any effects or transformations applied to that selected object. You open the Appearance panel by choosing Window
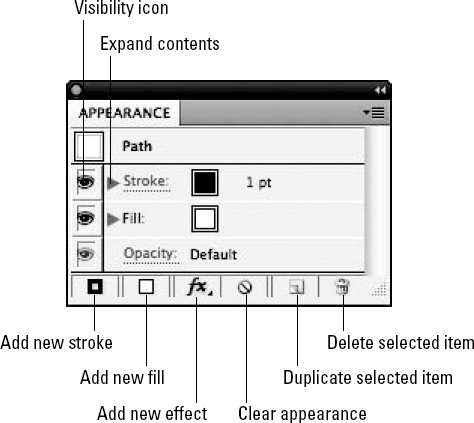
The panel area shows the sequential order of the attributes that make up the object. Each time you add to the object, it becomes listed above the previous entry. With this stacking order, you can drag other information, such as stroke weight, above or below the other entries, creating a different look to the object.
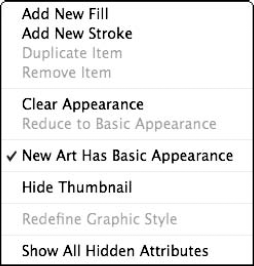
The Appearance panel's popup menu, as shown in Figure 15.2, has a few options from which to choose. To access this menu, simply click the triangle on the upper right of the panel. Under this menu, you can find the following: Add New Fill, Add New Stroke, Duplicate Item, Remove Item, Clear Appearance, Reduce to Basic Appearance, New Art Has Basic Appearance, Hide Thumbnail, Redefine Graphic Style, and Show All Hidden Attributes. Each of these items is discussed in detail later in this chapter.
Editing an item is as easy as clicking. Click the item you want to edit and then make your changes, and the object immediately updates to your edits. When you click an effect in the Appearance panel, Illustrator displays the dialog box for that particular effect.
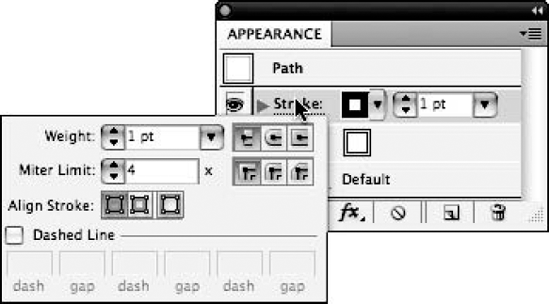
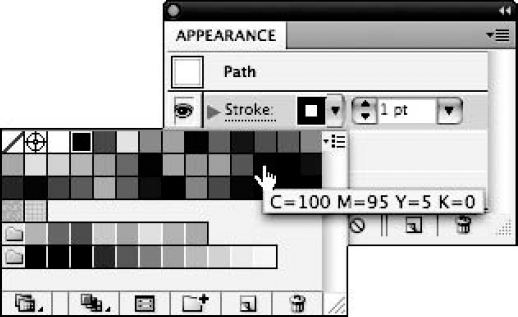
You can click a stroke or a fill in the Appearance panel and then make edits in the miniature Stroke or Fill panel that opens, as shown in Figure 15.3. To edit a stroke or a fill, click one time in the Appearance panel to select the stroke or fill and then change the color of the stroke or fill and the stroke weight.
To edit the stroke weight and color by using the Appearance panel, follow these steps:
Select the object with the Selection tool. For more on the Selection tool, see Chapter 6.
In the Appearance panel, change the stroke weight by clicking and holding it and then choosing a new stroke width and other stroke attributes in the miniature Stroke panel.
In the Appearance panel, choose a new color by clicking and holding on the dropdown arrow to display the Color/Swatch miniature panel, as shown in Figure 15.4. The color is automatically updated for the object.
Under the Appearance panel's popup menu is a menu item you can use to remove an item — such as the stroke or the fill — in the object's list. Click the item to select it and then choose Remove Item from the popup menu (or click the Delete Selected Item button at the bottom of the panel). The item is removed from the list and the object. Use this to edit a preset style to customize it.
You can also duplicate an object in the Appearance panel. Select the item you want to duplicate in the list in the Appearance panel and then choose Duplicate Item from the popup menu or click the Duplicate icon at the bottom of the panel. This comes in handy when you want to use some of the item's attributes but not all. Duplicate the item and then edit it as you want.
Clearing an appearance removes the effects and changes the stroke and fill to None. If there are multiple fills or strokes, all are reduced to one stroke and one fill. You find the Clear Appearance option in the popup menu.
Choosing Reduce to Basic Appearance from the Appearance panel's popup menu removes all but one stroke and one fill and all the effects. The remaining stroke and fill are assigned the default attributes (typically the bottommost stroke and fill color and the stroke weight of the bottommost stroke). If you didn't use a stroke, Illustrator reduces the object to the original fill color only. Similarly, if you didn't use a fill, Illustrator reduces the object to the original stroke color and weight. Figure 15.5 shows the object before and after applying Reduce to Basic Appearance. The end result looks a bit bland compared to the original.
Clicking the eyeball to the left of any Appearance panel attribute, such as fill, stroke, opacity, and any applied effect, allows you to temporarily hide that attribute. Click it again to show the hidden attribute.
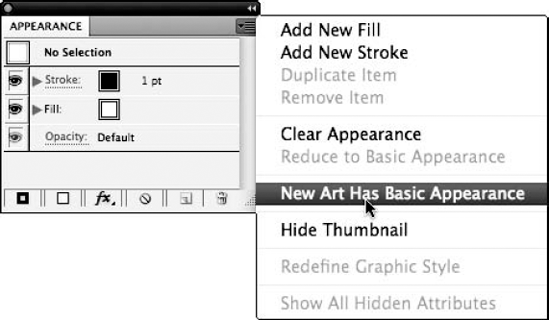
If you select the New Art Has Basic Appearance option (from the Appearance panel's popup menu), all art created afterward has a basic appearance of a white fill and a black stroke. If you don't select this option, as shown in Figure 15.6, all art created after using a style has the appearance of the last used style.
In the Appearance panel, you have the option to view a small thumbnail of the selected object's style. The thumbnail appears in the upper left of the Appearance panel. If you don't want to see this little thumbnail, choose Hide Thumbnail from the Appearance panel's popup menu. To see the thumbnail again, choose Show Thumbnail from the menu. I can't think of a good reason to hide the thumbnail, but the option is available if you want to use it.
The Redefine Graphic Style option is available only when you apply one of the preset styles from the Graphic Styles panel. When you use the Redefine Graphic Style option, your new changes overwrite the original, and any objects that use that style immediately update to your new changes.
In order to redefine a graphic style, you must first select the style you want to redefine in the Graphic Styles panel. Then, select an object that has the characteristics that you want to apply to the style. Finally, choose Redefine Graphic Style from the Appearance panel's popup menu.
Warning
Redefining a style completely replaces that style with the new style. The existing name is retained, but all other attributes are replaced. Unless you're absolutely sure that you want to replace all the style's attributes, it's probably safer to simply create a new graphic style by using the Graphic Styles panel.
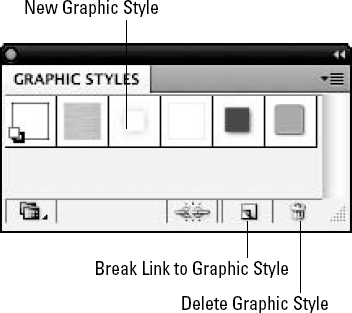
Now that you understand the Appearance panel, it's time to dive headfirst into the Graphic Styles panel. This magnificent little panel contains lots of creativity and amazing preset effects. The Graphic Styles panel, as shown in Figure 15.7, has but a few buttons: Break Link to Graphic Style, New Graphic Style, and Delete Graphic Style. You find the guts of the panel in the popup menu, which you access by clicking the triangle on the upper right of the panel. The following sections explain all the options found in the Graphic Styles panel's popup menu.
Click the New Graphic Style button to make your selected object's attributes into a new style in the Graphic Styles panel. You can also create a new style by choosing New Graphic Style from the popup menu in the Graphic Styles panel. To create a new style, follow these steps:
Create an object. For more on creating objects, see Chapter 5.
Add color to the fill and/or stroke, a stroke weight, and a dash pattern if desired.
Add effects from the Effect menu. You can include transformations, twists, distortions, or anything you want.
After the object looks just right, select the whole object.
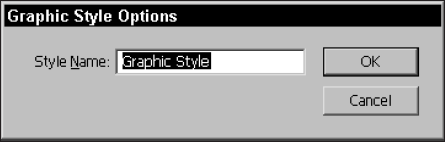
Choose New Graphic Style from the popup menu in the Graphic Styles panel. This displays the Graphic Style Options dialog box, as shown in Figure 15.8, so that you can name the new style. Clicking the New Graphic Style button bypasses the Graphic Style Options dialog box (unless you Alt (Option)+click the button) and simply gives the new style a default name of Graphic Style x, where x is a number starting with 1.
Type a name for the New Graphic Style and then click OK. This adds the new style to the Graphic Styles panel. The new graphic style now appears in the Graphic Styles panel.
You can apply that new graphic style to any object you create.
Tip
Another way to create a new graphic style is to drag the object thumbnail from the Appearance panel into the Graphic Styles panel. This automatically creates a new graphic style. If you want to name it, you can either double-click it in the Graphic Styles panel or select it and then choose Graphic Style Options from the popup menu.
Using the Graphic Styles panel's popup menu, you can duplicate a style. Select a style in the panel and then choose Duplicate Graphic Style from the popup menu in the panel. This creates a duplicate swatch at the end of the list of graphic style swatches. Use this to alter and create your own custom style. You use Duplicate Graphic Style to duplicate a default swatch so that you don't overwrite the original swatch.
You can also take two different styles and combine them as one. Use the Merge Graphic Styles command found in the Graphic Styles panel's popup menu. To combine two or more graphic styles, follow these steps:
Press and hold Shift.
Click the graphic styles that you want to combine in the Graphic Styles panel. To select noncontiguous graphic styles, press Ctrl (

Choose Merge Graphic Styles from the popup menu in the Graphic Styles panel. The new combined graphic style is added to the end of the swatches in the Graphic Styles panel.
To delete a graphic style, select the graphic style in the Graphic Styles panel and then choose Delete Graphic Style from the popup menu. Alternatively, you can click the Delete button (the trash icon) at the bottom of the panel. A warning message appears asking "Delete the Style Selection?" Click Yes to delete the style or No to cancel the action.
You use the Break Link to Graphic Style option to break the graphic style from the object. The object still retains the appearance of the graphic style, but changes to the graphic style's definition no longer alter the object's appearance. A good use of this option is to find a graphic style that you like but want to change. Fill an object with that graphic style, click the Break Link to Graphic Style button, and then alter the object as you want. When you have an object as you like it, you can turn its attributes into a new style. Another good use for this option is when you want several objects to have the same basic style, but you want to make some subtle changes to some of them. If you break the link to the style for the objects that you don't want to change, you can quickly modify the remaining objects simply by modifying the style.
Choosing Select All Unused selects all graphic styles that aren't used in the document. You can then choose to delete the unused graphic styles from the Graphic Styles panel.
Sort by Name sorts the graphic style swatches alphabetically. You probably won't find this very useful unless you choose one of the list views.
In the Graphic Styles panel, you can choose how you view the graphic style swatches. Choosing Thumbnail shows you a swatch of the graphic style. Choosing Small List View displays a small swatch next to the name of the graphic style. The Large List View displays a larger swatch next to the name of the graphic style.
The Override Character Color option overrides the object's original color with the graphic style. If you want to retain the original color qualities, deselect the Override Character Color option in the Graphic Styles panel's menu.
The Graphic Style Options lets you name or rename a graphic style swatch. You may not want to rename the standard swatches because doing so makes it harder to remember if you have a particular swatch open when you're looking at the names in a library.
After you create a bunch of cool styles, you should save them as a library for future use. To save a Graphic Style Library, follow these steps:
Choose Save Graphic Styles as Library from the Graphic Styles panel's popup menu. The Save Graphics Styles as Library dialog box, as shown in Figure 15.9, opens. (Your dialog box may look a little different if you choose to display the standard dialog box instead of the Adobe dialog box.)
Type a name for the library in the File name text box.
Click Save to save the file.
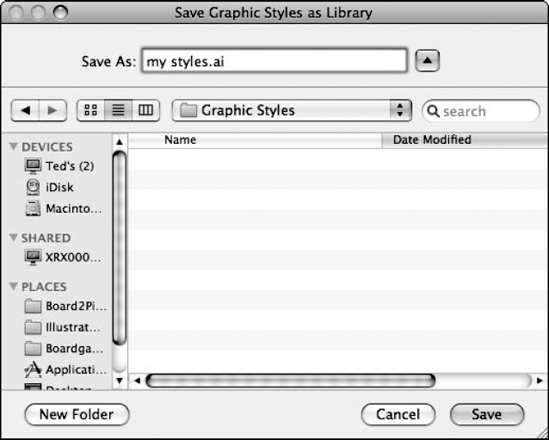
Figure 15.9. Use the Save Graphics Styles as Library dialog box to save your graphic styles in your own library.
To open a saved library, follow these steps:
Choose Other Library from the Open Graphic Style Library under the Graphic Styles panel's popup menu. The Open dialog box opens.
Choose the saved file.
Click Open to open the library file.
Effects are an intense set of commands. They apply their magic to any of the appearance attributes. Effects are fully editable at any time, and any effect you apply shows up in the Appearance panel, where you can also edit any of the applied effects.
To quickly apply the last used effect to another object, choose Effect
Effects aren't limited to vector-based objects. You can also apply effects to raster images.
One of the biggest features in Illustrator is three-dimensional abilities. Because this is such a cool and intense feature, it's being covered in its own chapter.
Note
For more on creating 3-D effects, see Chapter 16.
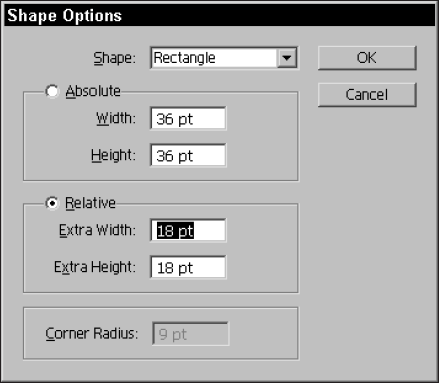
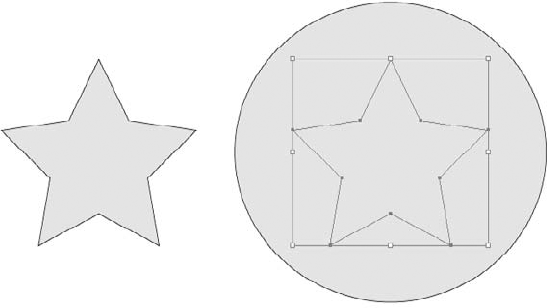
The Convert to Shape effects take any selected object and fit it into a rectangle, a rounded rectangle, or an ellipse. The Convert to Shape effect puts a frame around your selected object. The frame is in one of the shapes that you choose (rectangle, rounded rectangle, or ellipse). Convert to Shape creates a new shape based on the original object's dimensions. Setting a negative value in the relative area decreases the size of the frame, and a positive number increases the size of the frame relative to the original size. To set the new size of the shape, type the height and width values.
Figure 15.10 shows the Shape Options dialog box that opens when you choose any of the Convert to Shape effects. In this dialog box, you can choose the type of shape that you want to create from the Shape dropdown list (popup menu). You can also choose to create a shape that's set to a specific size by clicking the Absolute radio button or a shape that's resized by clicking the Relative radio button. The Corner Radius text field is used to specify the amount of corner-rounding for rounded rectangles.
Figure 15.11 shows an example of applying the Effect
The Distort & Transform effects include Free Distort, Pucker & Bloat, Roughen, Transform, Tweak, Twist, and Zig Zag. You may wonder why Transform effects appear in the Effect menu when you can do transformations in the Object menu. The big reason for applying a transformation under the Effect menu is that you can go back and edit that particular transformation at any time.
Note
For more on distortions and transformations, see Chapter 11.
The Path effects that you can apply are Offset Path, Outline Object, and Outline Stroke. As with the Transform options, the Path options are the same as under the Object menu. The Path effects under the Effect menu are exactly the same as under the Object menu, except that the effects are live and editable at any time. This means that you can go back at any time and change any of the Path effects that you've applied.
Note
For more on Path effects, see Chapter 6.
The Rasterize effect has the same effect as the Object
The Photoshop effects are on the bottom half of the Effect menu. These effects can be applied only to a rasterized image. To use these effects, first choose Effect
In the Rasterize dialog box, you can set the resolution (from low to high or set your own). Choose from white or transparent background and the type of anti-aliasing. Other options are clipping mask or adding space around the object.
Under the Stylize effects are options that you can use to embellish paths and add effects to objects. The Stylize options are Add Arrowheads, Drop Shadow, Feather, Inner Glow, Outer Glow, Round Corners, and Scribble.
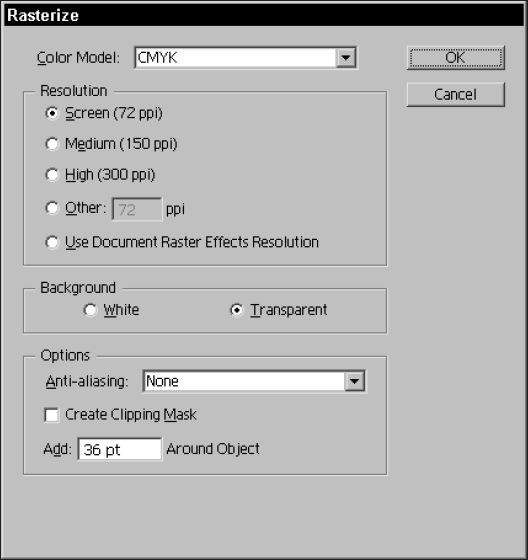
Figure 15.12. The Rasterize dialog box allows you to convert objects to raster objects by using an effect that can be edited later.
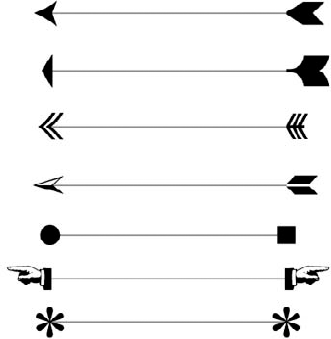
The Add Arrowheads effect is a boon to technical artists, sign makers, and anyone in need of a quick arrow. The number one complaint about the Add Arrowheads effect is that Illustrator offers too many arrowheads from which to choose. Some complaint!
Choose Effect

Figure 15.14 shows customized arrowheads created in Illustrator.
Note
Add Arrowheads doesn't work on closed paths.
Arrowheads are grouped to the paths that were selected when they were created; it's sometimes necessary to rotate the arrowhead by either ungrouping it or choosing it with the Direct Selection tool.
The size of the arrowheads is based on the width of the stroke, but you can alter each arrowhead's dimensions in the Scale text field in the Add Arrowheads dialog box.
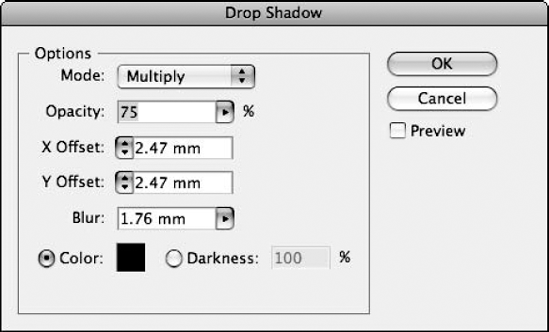
The Drop Shadow effect makes creating drop shadows for most paths a relatively simple task.
Selecting Drop Shadow affects both stroke and fill. In the Drop Shadow dialog box, as shown in Figure 15.15, you can specify the offset of the drop shadow by typing values for how far across the drop shadow should move (X) and how far up or down it should move (Y). Positive numbers move the shadow to the right and down; negative numbers move the shadow to the left and up.
You have these options in the Drop Shadow dialog box (among others):
Mode: Use this to choose the blending mode to apply.
Opacity: This lets you set how much you can see through the shadow.
X and Y Offset: The general rule in drop-shadowing is that the more the drop shadow is offset, the more elevated the original object looks. To make an object look as if it's floating far above the page, type high offset values.
Blur: This lets you type how far the blur goes outward in pixels.
Color: You choose this to set the shadow color to something other than black.
Darkness: The percentage entered here is how much black is added to the fill and stroke colors. Darkness doesn't affect any of the other custom or process colors.
Create Separate Shadows: Choose this to make the shadow separate from the object (ungrouped).
To create a drop shadow, do the following:
Create and select the artwork to which you want to give a drop shadow.
Choose Effect

Type the amount that you want the drop shadow to be offset.
Type the Opacity value. This determines how see-through Illustrator makes the shadow.
You can also set the mode for the shadow. I chose Multiply. For more on various modes, see Chapter 7.
Type a value for Darkness. The value that you type in the Darkness field determines how much black Illustrator adds to the shadow to make it appear darker. Alternatively, you can choose a color for the shadow.
Click OK. If the shadow isn't what you want, click the underlined Drop Shadow link on the Appearance panel and then change the settings.
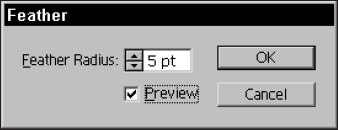
The Feather effect adds a fade out to the selected object. Feather fades the object to transparent over a specified distance in points. To add a Feather effect to an object, follow these steps:
Select the object to which you want to apply the Feather effect.
Choose Effect
Type the Feather Radius in points that you want in the Feather dialog box.
Click OK to see the Feather effect, as shown in Figure 15.17.
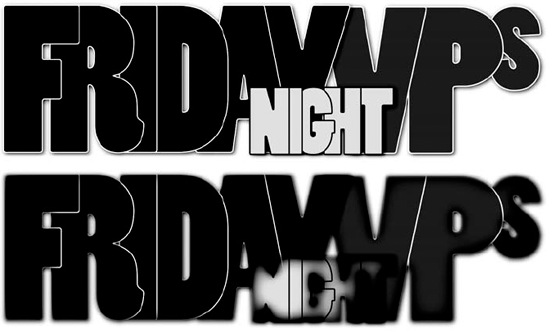
The Inner Glow and Outer Glow effects create a softened glow on the inside or outside edge of an object. Choose Effect
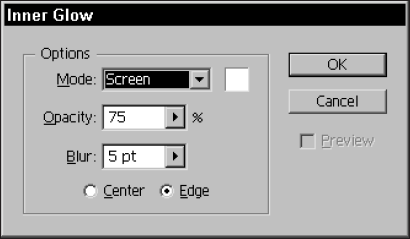
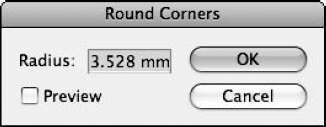
Choose Effect
In the Round Corners dialog box, as shown in Figure 15.19, you specify what the radius of the Round Corners should be. The larger the number you type for the radius, the bigger the curve is.
Note
Don't apply the Round Corners effect to a rounded rectangle to make the corners more rounded. Instead of making the corners rounder, the flat sides of the rounded rectangle will curve slightly.
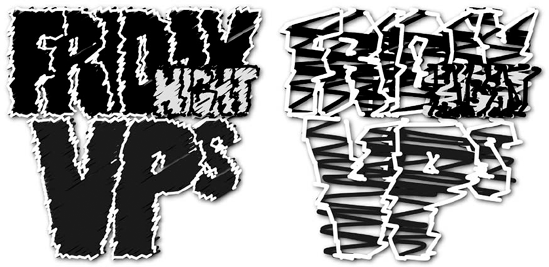
The Scribble effect adds a sketchy quality to an illustration. You can choose from a variety of presets or create your own. The scribble effect can create a mass-produced, mechanical look or a loose, flowing, childlike scrawl. The breakdown of what Scribble does is that it converts an object's stroke and fill to lines divided by transparency. The Scribble Options dialog box lets you alter the line style, density, looseness of the lines, and stroke width.
You find the Scribble effect under the Stylize submenu of the Effect menu. Figure 15.20 shows a portrait with two different Scribble effects applied. Within the Scribble Options dialog box are options that you can choose to change or customize your scribbled art or to choose from preset Scribble effects.
In the Scribble Options dialog box, you find a variety of preset options. Figure 15.21 shows the Scribble Options dialog box, which offers these presets:
Custom: Remembers the last settings you typed
Default: Applies 30° angled lines, with varying thickness to the fill and stroke
Childlike: Applies 10° loopy angled lines that look very loose and as if a child had sketched them
Dense: Applies very tight 45° angled lines, with little space between lines
Loose: Applies very loose loopy −20° angled lines, with lots of spacing between lines
Moiré: Applies tight −45° lines so close they actually create a moiré (wavy) pattern with the fill
Sharp: Applies −30° angled lines tightly, with little space between lines (similar to Dense)
Sketch: Applies −30° angled lines, with a thicker stroke for the lines but with little space between lines
Snarl: Applies 60° angled lines tightly together, with loopy lines and a thin stroke weight
Swash: Applies a figure eight loop to the object, with a thinner stroke weight and a symmetrical look to the lines
Tight: Applies a 30° angled line, with tight lines and a thin stroke weight for an even, line-filled area
Zig-Zag: Applies a −20° angled line, with a thin stroke weight for an even symmetrical look to the lines in the filled area
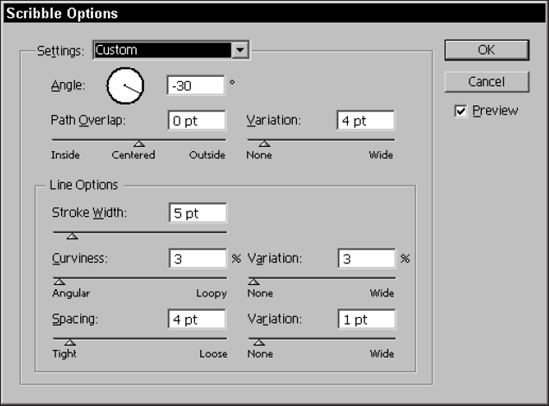
In the Scribble Options dialog box, you can find a variety of additional options to set — from Angle and Path Overlap to a Variation setting for Path Overlap. Line options are Stroke Width, Curviness, and Spacing, the latter two of which can have a Variation applied. You can choose from a preset value or click the Preview check box and type your own values to see immediate results.
You can set the following options for the Scribble effect:
Path Overlap: This sets the amount the scribble lines stay inside or go beyond the object's edge.
Variation: This sets how the scribble line lengths differ (loopy or angled) and how close together they're set.
Stroke Width: This sets the width of the scribble lines.
Curviness: This sets how far the different scribble lines curve from each other.
Variation: This sets a range for how much the curviness may vary from line to line.
Spacing: This sets the spacing amount between scribble lines.
Variation: This establishes the range in which spacing magnitudes fall.
Preview: Click this check box to see the effect before applying it.
You find SVG Filters under the Effect menu. These filters are XML-based and resolution-independent, a perfect fit for vector art.
Note
For more on XML and SVG, see Chapter 19.
To access the SVG Filters, choose Effect
Alpha: Creates transparent fluctuations
Bevel Shadow: Creates a beveled shadow that's softened
Cool Breeze: Creates fluctuations on the top edge of the object (as shown in Figure 15.22)
Dilate: Takes the fill outward to the edge of the object
Erode: Takes away the fill from the edge of the object
Gaussian Blur: Adds a soft shadow by blurring the object's edge
Pixel Play: Uses light effects on the object
Shadow: Creates a harsh shadow on the object
Static: Uses a static fill in place of the original fill color
Turbulence: Creates transparent fluctuations to the object

The Warp effects are also part of the Effect menu. Chapter 11 extensively covers these effects.
You can apply tons of Photoshop filter effects to any rasterized image. Turn your vector art into raster art, and apply effects from artistic to texturizing. The main effects are Artistic, Blur, Brush Strokes, Distort, Pixelate, Sharpen, Sketch, Stylize, Texture, and Video.
These filters are the same as the ones you find in Photoshop, but you don't have to go back and forth between the applications to access them. Use them to create more exciting rasterized artwork.
Warning
Be sure that you change the document colors space to RGB (File
Graphic styles, filters, and effects provide some very powerful tools for manipulating objects in your Illustrator documents. In this chapter, you learned about these tools and the following related topics:
Graphic Styles are where you can access saved Appearance settings.
Choose from a wide range of graphic styles from the Graphic Style Libraries.
Use the Appearance panel to edit an object's attributes.
Effects let you go back and edit at any time.
Scribble effects can add a softer, sketchy look to your illustration.
Reapply the last effect quickly by pressing Ctrl+Shift+E (Ô+Shift+E).
Access the last effect's dialog box by pressing Ctrl+Shift+Alt+E (Ô+Shift+Option+E).