Using the Pixel Preview view
Learning Web-safe colors
Using the Save for Web & Devices interface
Understanding the Web formats and vector graphics for the Web
Applying SVG effects
Image slicing
Using CSS layers
Creating interactive Web images
Using data-driven graphics variables
In concept, designing for the Web and designing for print are very similar, but in practice, they both offer special tests to the patience of an Illustrator user. In this chapter, I discuss challenges that the designer faces when attempting to present ideas graphically that appeal to the eye and get the right point across. Web design encompasses more than just converting your picas to pixels.
A Web designer faces specific issues that a print designer never even thinks about. Consider these:
A print designer chooses the specific color inks and paper with which to print, giving the designer complete control over how a reader sees it. A Web designer has no way of knowing what kind of monitor a reader is using to view his or her Web site — a strong yellow color on one screen may look orange or green on another monitor. Monitors also display at different resolutions (older machines may be set to 1024 × 768, while newer ones may be 1600 × 1080 or higher), meaning Web designers must make their Web sites work for all of them.
A Web designer is always at the mercy of the Web browser. In our ever-changing world, you can't know what a reader will use to view your Web site. When the Web first became popular, Netscape Navigator was the browser of choice. Microsoft's Internet Explorer is by far the most prevalent browser out there now. Apple introduced a browser called Safari to run specifically on the Mac platform (and now also runs on Windows). Firefox is also rapidly becoming very popular, as is Opera. Because each browser displays type, uses styles, handles animation, shows frames, and even formats links differently, a Web site in Explorer can look very different from the same Web site in Firefox, Opera, or Safari.
A Web designer must be conscious of how long it takes an average reader to download a page or graphic. Although high-speed broadband connections are more popular, this is still an issue and limits Web designers from using large full-color images or graphics. You still need to consider how many colors to use, what file types to use, and even what fonts to use.
The most alluring aspect of the Web is interactivity. Web designers can take advantage of technologies that print designers can only dream of. Examples include having graphics change when a user moves his or her mouse (rollovers), making images come alive with animation. Other advantages are utilizing advanced programming techniques (called scripting) to deliver customized graphics tailored specifically to the reader or displaying a greeting based on the time of day.
Tip
Sometimes, a Web designer actually does know what monitor or system his or her viewers are using. When creating Web sites for use on intranets, which are employee-accessible internal company or organization networks, a designer can take advantage of that knowledge and use it to his or her benefit. For example, if a designer knows that everyone has a Windows computer running Internet Explorer, he or she can design just for that browser and not worry or care what the site may look like in Netscape, Safari, Opera, or Firefox.
Illustrator is a great tool for creating Web graphics because it possesses all the necessary production tools, supports all the standard file types, and offers superb integration with other Web applications, such as Adobe Photoshop, Adobe Dreamweaver, Adobe GoLive, and Adobe Flash. Even more important, because Illustrator is a vector-based application, you can easily repurpose graphics for both print and the Web, which means that you don't have to re-create your artwork for one or the other.
Although in theory you could create an entire HTML Web page using only Illustrator, no one would mistake Illustrator as the only tool you need for Web design. Illustrator's strength is creating graphics for a Web page or designing Web pages for assembly in an HTML editor, such as GoLive or Dreamweaver. Brave designers may also utilize text-based HTML editors, such as BBEdit. Illustrator is also perfect for creating vector-based graphics that you import into Flash for creating truly interactive content.
Illustrator is well-equipped to handle Web graphics, and before you actually run off and start creating them, I want to discuss some of the fundamental tools and functions that you need to understand. The first idea to remember is that all Web graphics are in RGB mode, so when you create a new document, ensure that you choose RGB. If you forget, you can always choose File
Sometimes, you just have to face the facts.
Web graphics are always displayed in pixels. Even vector-based Web formats, such as Flash and SVG, end up displaying on a computer screen, which means that they're viewed in pixel form. Although some monitors display at 96 ppi or 105 ppi (pixels per inch), most still display graphics at 72 ppi. In either case, the resolution is much less than the 3450 dpi (dots per inch) that you see from your high-end imagesetter or even the 600 dpi that you see on printouts from your laser printer.
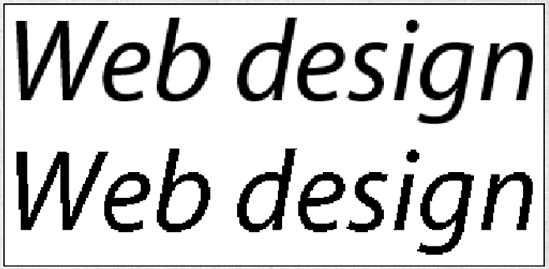
At such a low resolution, curved lines and text appear jaggy and can make your graphics look like they came from the early 1980s (Space Invaders and Asteroids come to mind). To compensate for low resolution on monitors, software programs usually employ a technique called anti-aliasing. By applying a gentle blur to the edge of your text or graphics, you eliminate the jaggedness of your image, replacing it with a smooth transition and a clean look, as shown in Figure 19.2. Illustrator uses anti-aliasing to allow you to preview your graphics and text on-screen beautifully. Don't worry; your printed output remains unaffected and your text looks crisp and sharp when you print from your laser printer or imagesetter.
Because the delivery medium for Web graphics is a computer screen, a Web designer cares very much about anti-aliasing. For one reason, although soft edges on your graphic may make large text and graphics pretty on-screen, they can also make small text fuzzy and unreadable, as shown in Figure 19.3.
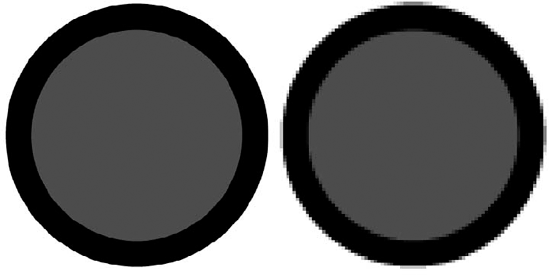
Figure 19.2. This demonstrates how art appears on a monitor with (left) and without (right) anti-aliasing.
Illustrator has a special preview mode called Pixel Preview (choose View

Figure 19.4. The title bar indicates what view mode you're in (Windows is on top and Mac is on the bottom).
Note
For more on viewing modes, see Chapter 2.
Tip
You can turn off anti-aliasing to see how it affects your display by going into the General Preferences dialog box (choose Edit (Illustrator)
Thin Black Lines versus Fat Gray Lines
Sometimes, the process of anti-aliasing produces results that are less appealing to the eye. Good J examples of this are thin lines and small text. Anti-aliasing can make a thin black line look like a fat gray line or it can make small crisp text an unreadable mush of pixels. Fortunately, Illustrator provides you with the tools to avoid these issues.
First, you should understand why these things happen. A pixel can either be on or off — you can't have a pixel that's only half-colored. By default, Illustrator always draws objects that snap to an invisible pixel grid. (You can turn off this feature by deselecting View
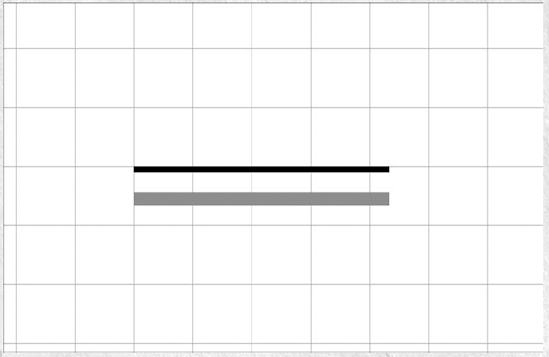
A 1-pixel black line snapped to the pixel grid appears as a 2-pixel gray line when anti-aliased.
Small text actually reads better without anti-aliasing at all. Here, you can use Illustrator's Effect menu to your advantage:
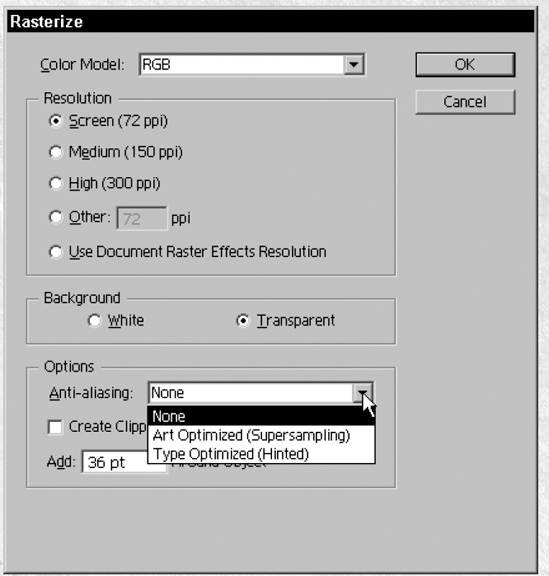
Text with (top) and without (bottom) anti-aliasing applied
Because applying Rasterize in this way is a Live Effect, you can still make edits to your text with the Text tool as normal, yet the text can never be anti-aliased, as evidenced by the last figure. You can also use this technique for thin rules and lines.
This section looks at a topic that many Web developers consider ancient history. Although the idea of Web-safe colors was quite important in the dark ages of Web development 10 years or so ago, very few people still surf the Web using the antique computers whose extreme limitations caused the need for limiting to a select few the number of colors used. Sure, Illustrator still offers support for Websafe colors, but you can probably ignore the whole issue safely and not lose any sleep over the possibility that someone visiting a Web site you designed can't see the exact color you intended.
As mentioned earlier, one of the problems that a Web designer faced in the past was choosing a color that looked consistent, no matter what computer you viewed the Web site on. First, I want to explore the way monitors displayed colors. The average monitor could display at least 256 different colors on-screen at any one time. So, what if one of the colors that you pick wasn't one of those 256 colors? In such cases, the monitor used a process called dithering to simulate that color on-screen.
Dithering is a process in which different colored pixels are placed in a pattern to match the desired color. This process is similar to four-color process printing, where dots of cyan, magenta, yellow, and black are used to simulate other colors. However, dithering can sometimes result in noticeable and ugly patterns, much like a moiré (wavy) pattern. Besides not displaying the exact color you want, dithering can make text or parts of your Web site unreadable (and you thought Web design was easy, right?).
To deal with this issue, developers came up with Web-safe colors, which are basically colors that you know display correctly without dithering on any computer. Is it magic? Believe it or not, it's actually math. Windows and Mac computers both had 256 standard system colors. But they didn't use the same 256 colors for their system palettes. When you actually matched the two standard system palettes, only 216 colors were identical; the other 40 were different. This means that you could safely specify 216 colors that were guaranteed to display without dithering on any computer.
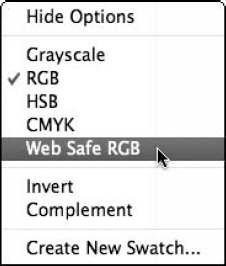
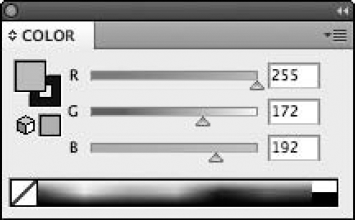
Illustrator has long had a Web-safe color palette. You access this palette by going to the Swatches panel menu, choosing Open Swatch Library, and selecting Web. All colors listed in this palette are Web-safe colors. You can also pick Web-safe colors directly from the Color panel. To do so, choose Web Safe RGB from the Color panel's popup menu, as shown in Figure 19.5. When you drag the color sliders, Illustrator snaps to Web-safe colors. Clicking the color bar in the Color panel allows you to choose a color that's outside the Web-safe color gamut, and if you do so, Illustrator displays an out-of-gamut icon that looks like a 3-D cube, as shown in Figure 19.6. Clicking that cube snaps your color to the nearest Web-safe color.
Hexa-what? No, I'm not trying to put a spell on you. In HTML-speak, colors are usually defined by hexadecimal code, which is based on a base-16 number system, where each digit is a number from 0 to F (15). Although you may not find it very intuitive to call a color FFFF00 (Red 255, Green 255, Blue 0) instead of yellow, hex values allow designers to use specific colors (after all, yellow comes in plenty of shades). When you have the Color panel set to Web Safe RGB mode, you can type hexadecimal values for a specific color. If you open the Web-safe color panel, Illustrator also displays hexadecimal codes if you mouse over the swatches, as shown in Figure 19.7. You can also type hex values directly into the Find text field to jump directly to a color.

So, you've created your lovely graphic and now it's time to save it in a format that a Web browser can understand and display. Back in the old days, Web designers were forced to export graphics with all these different settings and then open those graphics in a Web browser to see how they looked. More often than not, they ended up repeating this process until the graphics looked just right.
The exporting process is difficult because there's an important balance between file size and file appearance. In general, the more colorful and complex a graphic is, the larger its file size. But the larger the file size, the longer it takes to download the image. Average Web surfers aren't very patient, and if it takes too long to load a page, they move on to another one. So, designers are forced to find that happy medium — an image that looks good enough but that also downloads fast enough.
Note
Two kinds of compression are available to you to help make files smaller. One is called lossless, which compresses a file without losing any data. The other is lossy, which throws out data that's deemed not important (by the mercy of the compression gods). With lossy compression, you usually have control over how much information is tossed — the more data you choose to lose, the higher the compression rate and the smaller the file.
Back in the 1990s, Adobe released a product called ImageReady, which gave designers a way to preview how Web graphics look with different file types, compression settings, etc., and to obtain real-time feedback on file size. This product was so monumental that Adobe built the basic ImageReady functionality, called Save for Web & Devices, into Photoshop and Illustrator.
To use the Save for Web & Devices interface, choose File
Note
As of CS3, all ImageReady functionality was moved into Photoshop.
The most notable and most important part of the Save for Web & Devices dialog box is the Preview pane. You can choose to either view your art in Original mode, Optimized, 2 Up, or 4 Up (the latter of which I find the most useful), where you can view your image in up to four ways at once, allowing you to easily choose the best one. Here's how Save for Web & Devices works: You click one preview, choose settings, click another, choose different settings, etc., and then you compare the different versions. You can then pick the one you think is best (all without leaving the dialog box).
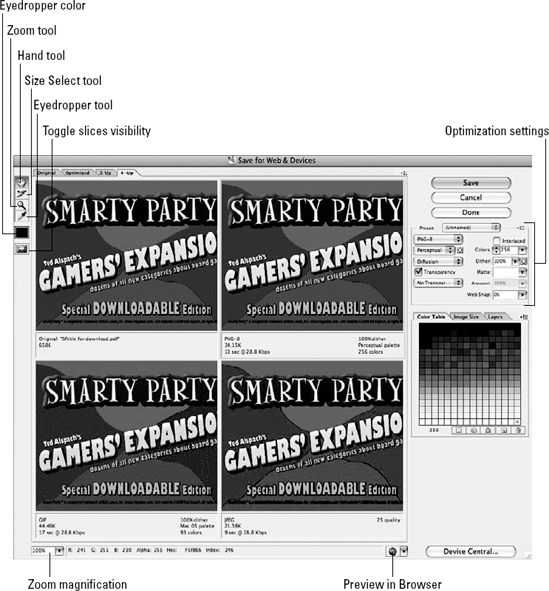
Figure 19.8. The Save for Web & Devices dialog box offers many options for optimizing your files for the Web
Tip
The Save for Web & Devices dialog box honors Illustrator's Crop Marks for clip sizes. So, if you want to easily export images for the Web in a particular size — even if you have other art on the page — you can draw a rectangle around the portion you want to export. You can then convert the rectangle to crops by choosing Object
Along the left side of the dialog box are the four tools you use in Save for Web & Devices:
Hand tool: Lets you move artwork around in the Preview pane
Slice Select tool: Allows you to choose with which slice you want to work
Zoom tool: Lets you increase or decrease the magnification of your image
Eyedropper tool: Allows you to sample or choose colors from your image (some functions in the Color Table, located in the Preview pane, require you to choose a color)
You also find two additional buttons here:
Eyedropper color: This indicates the color chosen with the Eyedropper tool or you can click it, which displays the color picker, allowing you to type in a specific color.
Slice Visibility: Clicking this button either shows or hides the slices in your Preview pane (not the art that's in them, just the slice boundaries and numbers themselves).
Located on the upper-right side of the Preview pane is a popup menu, as shown in Figure 19.9, where you can choose a connection speed. Save for Web & Devices uses this setting to approximate how long it will take your graphic to load. Figure 19.10 shows that each Preview pane lists an optimization setting along with the estimated download time in the lower left of the pane.
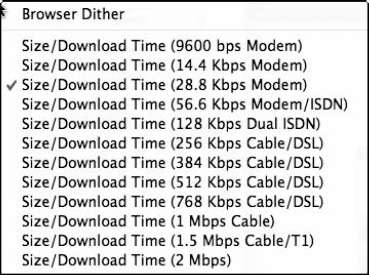
Figure 19.9. Choosing a connection speed allows you to optimize the document for different types of connections.
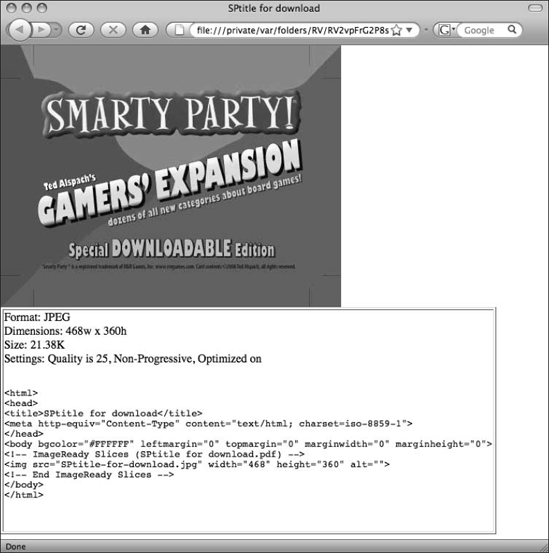
At the bottom of the panel, you have a zoom popup as well as feedback on colors and one of the handiest features — a button to preview your art in an actual Web browser of choice. Choosing this option launches a Web browser and not only displays the art but also all the information about the file, including the HTML source code to display it, as shown in Figure 19.11.
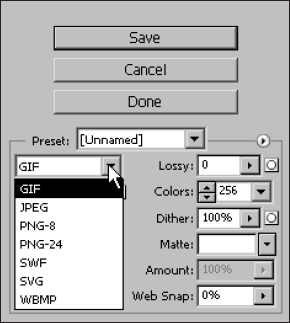
Along the right side of the Save for Web & Devices dialog box are all the settings you'd ever need (and some you'd probably never need) to customize your Web graphics to perfection. At the top are the Save, Cancel, and Done buttons (click Done if you just want to specify Web settings but don't want to export anything at that time). Pressing Alt (Option) turns the Cancel and Done buttons into Reset and Remember.
Directly below these buttons is where you set the file format options, such as choosing among GIF, JPEG, PNG-8, PNG-24, SWF, SVG, or WBMP and all the specific settings that go with them. Figure 19.12 shows the dropdown list (on a Windows computer) where you choose the file format. You also have a Color Table panel that lets you control specific colors in your image, an Image Size panel, and a Layers panel where you can specify the output of CSS (Cascading Style Sheets) layers (any top-level layer can be specified as a CSS layer here).
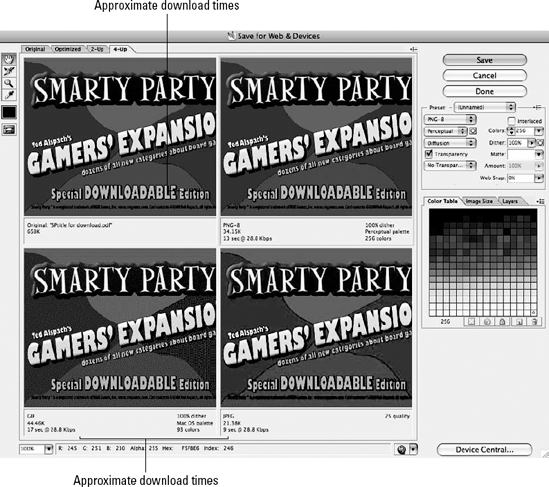
Figure 19.10. Each Preview pane lists a file-optimization setting and approximate download time in the lower-left corner of its box.
Tip
Cascading Style Sheets are part of what DHTML (or Dynamic HTML, which is now part of the HTML 4.01 specification) is all about. CSS layers give Web developers the ability to overlap images and slices and to interactively show and hide each layer. You learn more about CSS layers later in this chapter.
As stated in the previous section, you have many options for formats in the Save for Web & Devices dialog box. Which one should you use? Each of these format types has advantages and disadvantages, and understanding the difference between them helps immensely as you design and build Web pages. This section thoroughly discusses each format and walks you through the various options associated with each one.
Note
You should realize that no single setting is best suited for all Web graphics. Some settings are better suited for certain types of graphics. With experience, you'll come to understand and choose Web formats and settings with ease.
A GIF file can contain a maximum of 256 colors, and you can specify your image to have fewer colors to control file size. GIF uses a lossless compression algorithm and basically looks for large areas of pixels that are the same color to save file size. Lossless compression makes this format perfect for most flat color images, such as logos and text headlines.
GIF also has specific settings that can control how the GIF image displays in a Web browser. Because GIF supports a maximum of 256 colors, you have to choose a color-reduction algorithm, which is basically how Illustrator forces all the colors to fit within a specific table of colors. You can go a step further by also specifying exactly how many colors your GIF should contain, which can have a large impact on file size. If your image is just some black text, you can reduce your GIF to 4 or 16 colors with the same visual result — but reap major file size savings.
You can also choose different dither methods (to get colors that aren't in the Color Table to appear in your GIF). Here's where the different Preview panes can really help you choose the best setting for your graphic; GIF also supports transparency, so you can choose one color as a None color, allowing your image to have a transparent background (necessary for placing images on colored backgrounds). The Matte setting works in tandem with this. Anti-aliasing allows colors to blend into each other to create smoother transitions of color, but if you start off with art on a white background, you may see white pixels if you place that graphic on a nonwhite background. If you know the color on which you intend to display your graphic (that is, a background color), specifying that color as a matte ensures that the graphic blends perfectly into the background.
You can also interlace a GIF, which means that the image quickly appears in a browser at a low resolution and then improves in resolution and quality as it continues to load. This allows readers to start seeing graphics on-screen even while the page is still downloading. It's more of a psychological thing than anything else.
GIF files are becoming less and less common, as JPEG files have become the norm for most Web graphics.
If GIF is perfect for flat color images, the JPEG format (pronounced jay-peg) is the perfect format for photos and continuous tone graphics. JPEG was originally created to allow photographers to easily transmit photos electronically. Utilizing a lossy compression algorithm, JPEG can achieve some astonishing file size savings by allowing you to compress a 10MB file to about 1MB in most cases.
Illustrator lets you set different levels of JPEG compression either by choosing options from a popup menu (Low, Medium, High, Very High, or Maximum) or by moving the Quality slider between 0 and 100. In the Save for Web & Devices dialog box, these settings refer to quality, not compression, so a setting of Maximum means maximum quality (and less compression), not maximum compression and lower quality. Because JPEG compression can result in files that have visible artifacts or look chunky (what you end up seeing are blocks of color rather than detail), you also have the option to apply a blur to minimize such artifacts. You can specify a blur setting of up to 2 pixels using the Blur slider (located under the Quality slider).
You can also set JPEG images to progressive, which means that they load incrementally in a browser (similar to GIF's interlacing). You can also specify a matte color for JPEG images (just as with GIFs).
When GIF became popular, an issue arose with regard to the patent holder who created the compression algorithm (Unisys). To get around possible legal issues, the PNG (Portable Network Graphics) format was born. Pronounced ping, the format offers lossless compression similar to GIF but can support up to 32-bit color images and 256-level alpha channels for transparency (far more than the 256-color limit and 1-color alpha of GIF). An alpha channel is another term for the part of a file that's transparent. Save for Web & Devices allows users to save PNG images in PNG-8 and PNG-24 format, which offers support for more colors.
Because PNG can support continuous-tone color, the format is great for both flat and photographic images. The additional settings you can apply to PNG images are similar to those that you can apply to GIF images.
You use the Wireless Bitmap format specifically for graphics that you want to display on cell phones and PDA devices. The WBMP format is 1 bit, which means that pixels can be either black or white, so you're limited in choosing between different dithering methods (Diffusion, Pattern, and Noise) and a dithering amount.
Note
Dithering is a process in which different colored pixels are placed in a pattern to match the desired color.
The SWF and SVG options are covered later in this chapter.
After you decide how to optimize your graphics, you can click Save. This opens the Save Optimized As dialog box, where you can choose to save your graphics in one of three formats. These options are available in the Save as type dropdown list (Format popup menu):
Images only: Saves just the images themselves
HTML and Images: Saves the images and an HTML page that contains them
HTML only: Saves just the HTML code without the images
Not all Web designers work alone. In many cases, a Web designer works hand in hand with a Web developer or someone who either writes code or defines how it's written. Because there are so many ways of authoring HTML, many developers are very sensitive to how they write or how they build Web pages. Adobe is certainly aware of this because at the bottom of the Save Optimized As dialog is a dropdown list (popup menu) called Settings. If you choose Other from the list, as shown in Figure 19.13, you'll be rewarded with the Output Settings dialog box, which is a dream come true for even the pickiest developer.
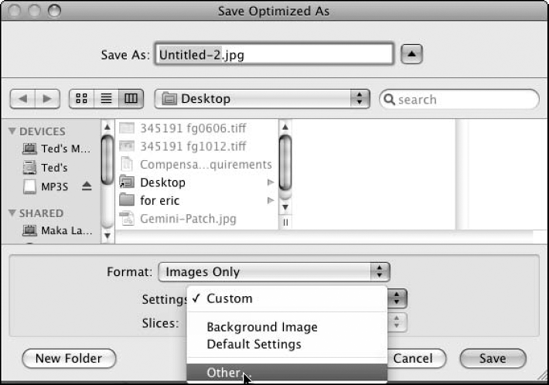
Figure 19.13. Choosing Other from the Settings dropdown list (popup menu) gives you additional options.
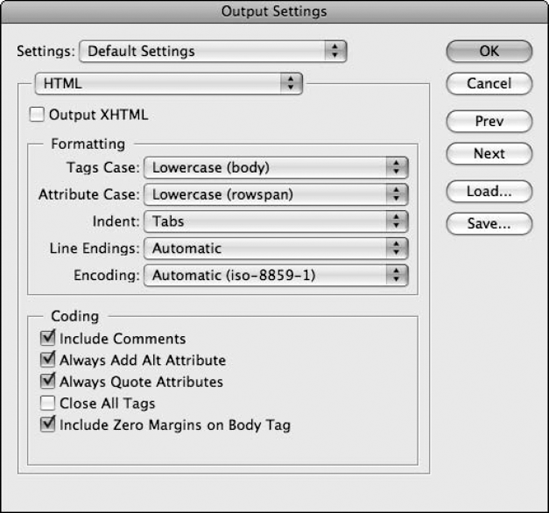
The Output Settings dialog box has four panes, each of which offers a wealth of options:
HTML: Shown in Figure 19.14, this pane allows you to specify exactly how the HTML code is formatted, including options for better integration with other Adobe products. The Always Add Alt Attribute option includes Alt attributes in all img tags, even where you don't specify them, which is a Section 508 requirement (a federal regulation to provide accessibility for those with disabilities) as well as a requirement to pass an HTML 4 or XHTML validation check.
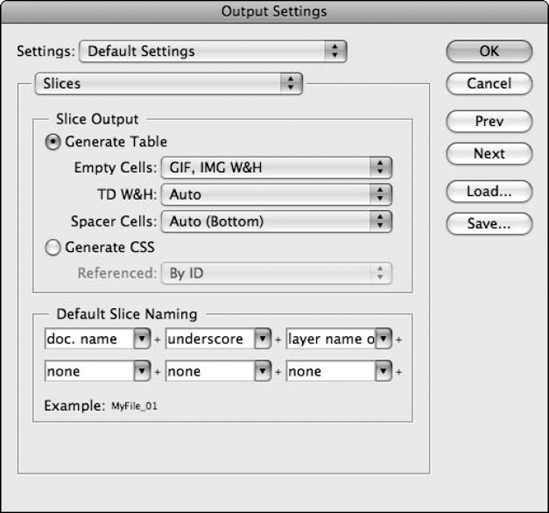
Slices: Shown in Figure 19.15, this pane gives you control over how tables are coded in HTML and whether CSS layers are generated. You can also choose exactly how each slice is named. Slicing is covered later in this chapter.
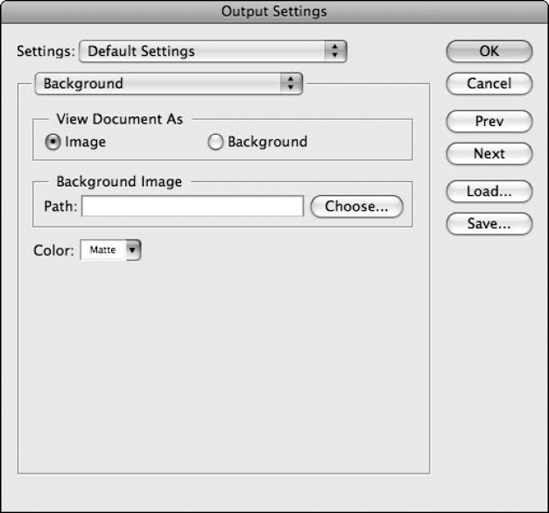
Background: HTML allows you to specify a background color or a background image for the entire page (images tile, or repeat, to fill the entire page). In this pane, shown in Figure 19.16, you can specify what color or image you want for the background of your HTML page.
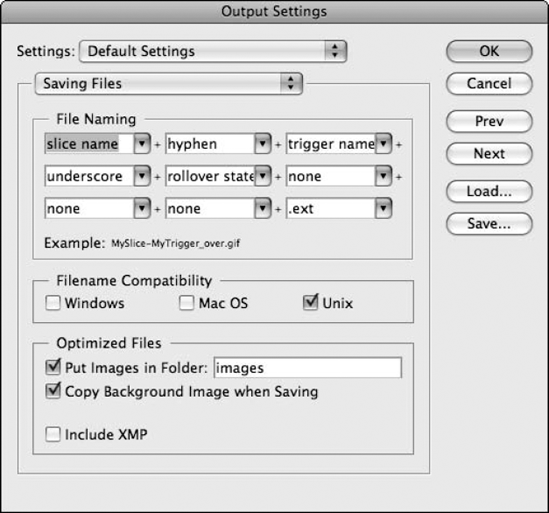
Saving Files: Shown in Figure 19.17, this pane lets you specify exactly how to name your files as well as where you want to save them. The Include XMP option allows you to save metadata along with the files. XMP metadata comes from the File Info dialog box found under the File menu in Illustrator.
Sure, the Web is a place where pixels abound, but that doesn't mean there's no room for vectors to play. In fact, vector-based Web graphics have become quite popular. They add the benefit of enlarging Web graphics without getting the jaggies and allow you to print better Web graphics from a browser. There are other benefits that I also talk about as I discuss the two most popular vector Web formats — Flash and SVG.
Once upon a time, a company called FutureWave developed a program called FutureSplash Animator that created vectors that you could display in a Web browser. The program let you animate vector shapes and place some cool animation in a Web page. The downside was that very few people knew about it, and to play the animations in a Web browser, you had to install a special plug-in.
One day, a company called Macromedia bought FutureWave and renamed FutureSplash to Flash. It also provided a browser plug-in for Flash to go along with its already-popular Shockwave plug-in, calling it Shockwave Flash (SWF). Then, Adobe acquired Macromedia, and suddenly, the world now uses Adobe Flash. The Flash plug-in is now installed by default in every mainstream Web browser, and it has become the standard for creating interactive and engaging Web sites. Flash support is now even built into Apple's QuickTime video player, many cell phones, and PDAs.
Although Illustrator can't do anywhere near the kinds of things that Adobe Flash can do, it can export graphics in the SWF format. In fact, many designers who use Flash also use Illustrator to create their graphics and then import them into Flash to make them interactive.
To export graphics in the SWF format, choose File
For export options, you can choose from three settings:
AI File to SWF File: This option creates a single static SWF file from whatever is in your Illustrator file. This is perfect for when you want to display a static SWF image in your Web page.
AI Layers to SWF Frames: This option creates a single animated SWF file from the layers in your Illustrator file. Each Illustrator layer becomes its own frame, allowing you to export animations right out of Illustrator. When you choose this option, you can choose a frame rate as well as whether you want the animation to loop (see the next bulleted list for more on these options).
AI Layers to SWF Files: This final option creates separate SWF files, each containing the contents of one layer in your Illustrator file. This is useful for designers who want to import individual art pieces into a Flash project.

Figure 19.18. The SWF Options dialog box allows you to save Illustrator documents in the SWF format.
You can also save SWF files directly from the Save for Web & Devices dialog box — the benefit being that you can preview your art before you save.
Tip
Although the Save for Web & Devices dialog box can't preview SWF animations, you can use the Preview in Browser feature to see what your animation looks like before actually saving the file.
Note
Illustrator uses Apple's QuickTime plug-in to preview SWF files in Save for Web & Devices. If you can't see a preview of your image when you choose SWF in the Save for Web & Devices dialog box, ensure that you have QuickTime installed.
SVG stands for Scalable Vector Graphics and is an open standard format based on XML. To view SVG files in a Web browser, a plug-in is required, although future versions of Web browsers (Explorer, Opera, Safari, etc.) will most likely provide built-in SVG support because the format is becoming increasingly popular. One cool aspect of SVG is that you can edit it in any text editor and change values easily, thus changing the look of your graphic.
Illustrator is actually one of the most robust tools available for creating SVG graphics. Not only can Illustrator save files in the SVG format, but it can also open SVG files — even if they weren't created in Illustrator.
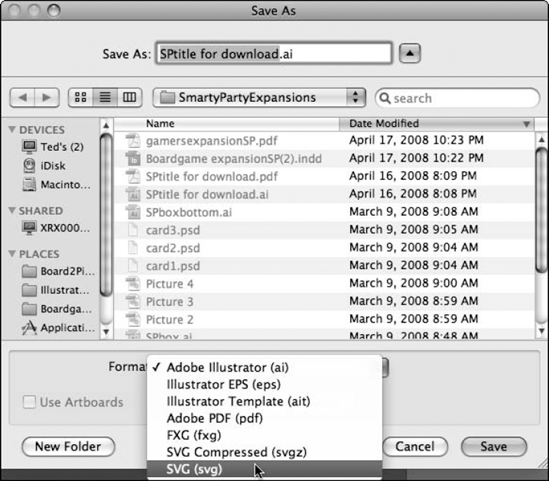
You can save SVG files directly out of Illustrator by choosing File
When you save an SVG file, you can choose to embed fonts (where the font license agreement allows), and you can also choose whether to include linked images as separate links or to embed them and include them inside the SVG file. An option appears in the SVG Options dialog box (which opens when you click Save after choosing SVG from the Save as type dropdown list [popup menu]), as shown in Figure 19.20, to Preserve Illustrator Editing Capabilities. Clicking this check box allows you to convert the file back into Illustrator without losing any native information. Because the option adds data into the file that only Illustrator can use, it increases the file size, so deselect this option if you don't need to edit the file later. Of course, saving a copy of the file as a regular file is always a good idea so that you don't lose any work.
In the SVG Options dialog box, you also find a More/Less Options button, which allows you to specify even more details about your SVG files. You can specify CSS Properties settings, choose how precisely vectors are calculated (Decimal Places), and choose text-encoding formats. Optimize for Adobe SVG Viewer, which installs along with Illustrator, allows you to take advantage of certain features that only the Adobe SVG Viewer plug-in can offer. (This is currently the standard, so using it is a safe choice.) Include Slicing Data does exactly what it says: It includes Web-slice data in the file. (Web slicing is covered later in this chapter.)

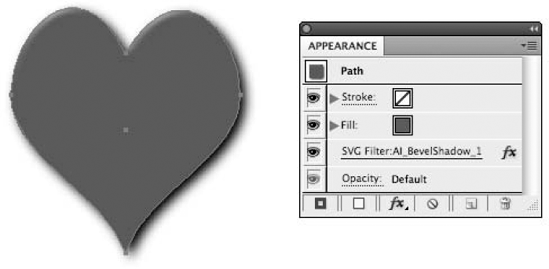
SVG effects are cool because they're attributes you can apply to your art in real time as they display in a Web browser. If you apply a drop shadow to text as an SVG effect, that text is still live and editable in your Web browser (you can select, copy, and paste it, and a search engine can see the text), yet it has a drop shadow applied to it when it displays on the Web page. Because you can zoom in on vector graphics in a Web browser, you can enlarge the SVG text as much as you want, and the drop shadow renders each time, ensuring a smooth drop shadow. (You won't get the jaggies.)
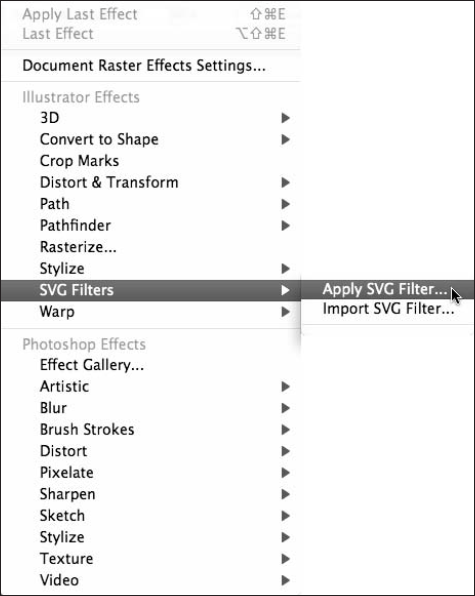
Applying an SVG effect is similar to applying any other effect. Figure 19.21 shows the SVG Filters submenu. Make your selection, choose Effect
Note
For more on effects, see Chapter 15.
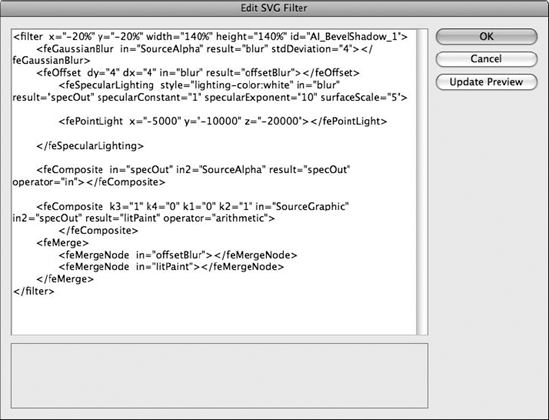
Illustrator comes with several SVG effects. However, if you know SVG, you can also create your own effects by choosing Effect
In reality, SVG is JavaScript-driven XML code. Illustrator allows you to add interactive options to graphics that you can save as SVG via the SVG Interactivity panel. Doing so requires the knowledge of JavaScript because you must select an object, choose an event from the dropdown list (popup menu) shown in Figure 19.24, and write or reference a JavaScript to perform a specific function (change color, animate, resize, etc.).

Throughout this chapter, the term slicing comes up. It refers to the process of cutting up Web graphics into smaller pieces to achieve several goals:
Rather than waiting for one large graphic to load in a Web page, loading several different smaller pieces makes the graphic load faster.
You don't have to force a graphic with several different parts or styles to use just one file format or compression setting. For example, if you have a graphic that has some text or a logo on one side and a photo or gradation of color on another side, rather than force the entire graphic to a larger size to ensure the gradient looks good, you can split the image into pieces and optimize the text and gradient differently, saving on overall file size.
You can assign links to a slice. By creating different slices, you can allow users to click different parts of a graphic, which link to different locations or pages on the Internet.
You can assign rollovers to a slice. Rollovers are actually created outside of Illustrator, but you can still assign the slices right in Illustrator to save time in the workflow process. A rollover swaps one graphic for another when a user performs an action, such as moving the mouse over the slice. For example, you can make a graphic of a button look lit up when the user rolls the mouse over the button.
What the slicing process really does is divide your image into different pieces, which are described in HTML as a table. Figure 19.25 shows an example of such a table. Each cell of the table contains a different image, optimized as you specify with or without a link. Because a cell must be rectangular, you must also make all slices rectangular. When the table is rendered in a Web browser, the image looks like a complete graphic.

Illustrator has two ways of applying slices. The traditional way is to choose the Slice tool from the Tools panel and then draw slices over your graphics. Figure 19.26 shows what a graphic might look like sliced. Numbered slices appear on your screen as you create the slices, and auto slices are also created. (User slices are those that you create; auto slices are those that are automatically created to fill the rest of the table.) Slices don't print — they just indicate how the slice table is going to be created. The downside of using this method is that if you ever want to edit your art, you may also need to update or redraw the slices.
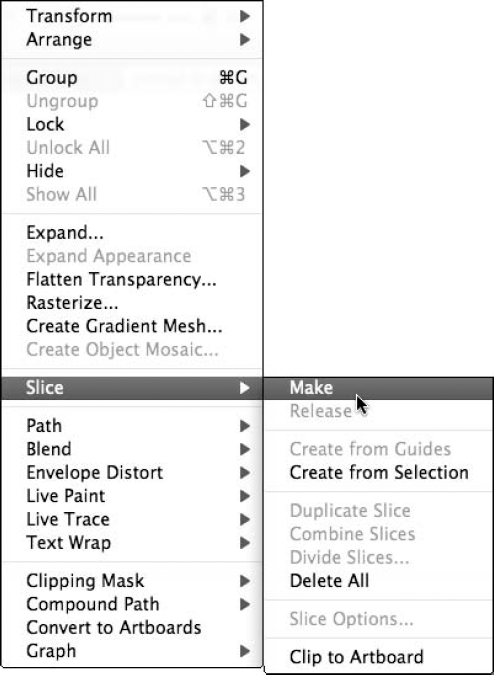
Illustrator includes a second way to create slices called object-based slicing. By applying slices as an attribute to an object rather than just drawing a separate shape, Illustrator creates a dynamic slice that moves and resizes itself based on the shape or selection to which it's assigned. You do this by first making a selection and then choosing Object
Object-based slices don't need modifying — they're basically maintenance-free slices. But if you draw slices with the Slice tool, you can edit those slices using the Slice Selection tool, which allows you to move the slices as well as to resize them. The Slice Selection tool also allows you to select slices so that you can apply settings to them. You find the Slice Selection tool behind the Slice tool. Selecting a slice and then choosing Object
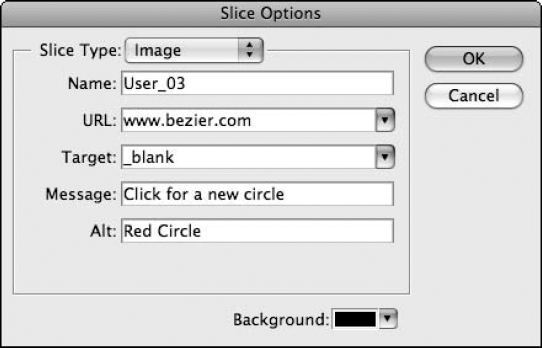
The dropdown list (popup menu) at the bottom of the dialog box allows you to specify a background for that slice — each slice can have its own background color or image — and there's a Slice Type dropdown list (popup menu) that lets you specify the slice in one of three states:
Image: The contents of the slice, or table cell, are an image — GIF, JPEG, etc. — that you specify.
No Image: The content of the table cell is an HTML statement, which you can specify directly in the dialog box. This is useful if the graphic you have is just a placeholder for something else, such as a QuickTime video clip or a script that loads a graphic.
HTML Text: If the contents of the slice are displayed as text, this option becomes available, and Illustrator basically codes the HTML to display text rather than an image in the table cell.
Tip
Specifying slice options in Illustrator can save you time down the road if you're also using Photoshop, as the options that you specify in Illustrator are stored and recognized there.
Other functions from the Object
After you create all your slices, you can open the Save for Web & Devices dialog box and then use the Slice Select tool to choose individual optimization settings. You can press Shift+click to select multiple slices. If you're exporting HTML directly from Illustrator, click Save.
In HTML, you can describe only one layer, which means that text and images can't overlap each other. You can't overlap images either. When CSS layers were added to the HTML specifications, Web designers finally had the ability to specify layers of information in a single HTML page. CSS gives designers and developers the ability to lay out elements of a page with pixel-by-pixel accuracy. It allows images and text to overlap each other.
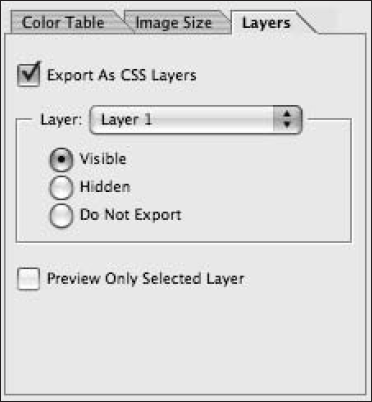
The catch is that Web browsers don't always support CSS layers in the same way, so use this feature with caution and lots of testing. Basically, Illustrator allows all top-level layers to be described as CSS layers. You can turn this option on in the Layers panel of the Save for Web & Devices dialog box, as shown in Figure 19.29. You can then choose what state you want each layer to assume (Visible, Hidden, or Do Not Export).
As mentioned earlier in this chapter, adding interactivity to a Web site is a great way for designers to add interest to sites as well as to add a functional element. Be it a cool animation or a navigation bar, Illustrator can help turn a static Web site into something that adds flair and value. Although Illustrator isn't Flash, it can still hold its own when creating these kinds of elements.
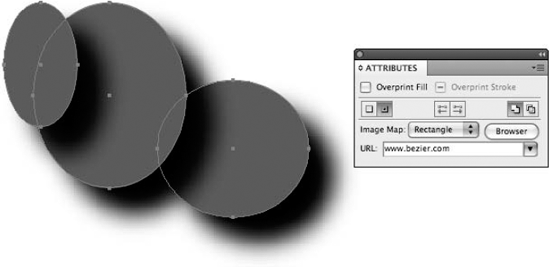
Some Web sites feature a graphic that links to different pages or places depending on what part of the graphic you click. An image map is basically a set of coordinates (sometimes called hotspots) that you can apply to a Web graphic — with each coordinate taking the user to a link of your choice. Setting up an image map is really easy in Illustrator if you follow these steps:
Select an object and then open the Attributes panel. For more on selecting an object, see Chapter 6. To open the Attributes panel, choose Window

From the Image dropdown list (popup menu), choose Rectangle or Polygon. You want to choose the latter for nonuniform shapes.
Type the full link in the URL text field, as shown in Figure 19.30. Illustrator stores each URL you use in a single file so you don't have to repeatedly type the URL if you're using it again.
Click Browser. The Browser button that appears in the Attributes panel lets you quickly test your URL to ensure that it works.
Note
Image maps are used less these days because slicing can achieve the same functionality and also add fancy effects, such as rollovers. However, there are still times when image maps are useful, such as when creating nonrectangular links. (Remember that slices are always rectangular.)
Image maps are written in several ways, and you should speak to a Web developer or a technical contact at your Web-hosting company to find out which image map is best to use for your particular needs and configurations. Client-side image maps reside inside the HTML code itself; server-side image maps reside in a separate file that links to the HTML file.
Creating animations for the Web in Illustrator can be fun and is actually easy too! Creating animations basically involves creating multiple images and playing them consecutively to give the appearance of motion. Each image in an animation is called a frame. In Illustrator, you animate by using each layer in your file as a frame. You can then export your file as an SWF file and choose the AI Layers to SWF Frames option at export time to create your animation.
You can create unique and interesting animations when you combine blends along with effects, such as 3-D and Scribble. Animating blends is easy because Illustrator has a feature called Release to Layers that automatically places each step of a blend onto its own layer — ready for exporting as an animated SWF.
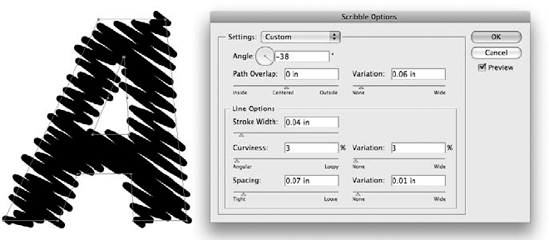
The Release to Layers commands are found in the Layers panel menu, and you can choose between sequence and build. A sequence is much like traditional animation in that each frame contains a single image that moves from frame to frame. A build allows you to keep art in multiple frames and is useful for animating text, where you want letters to stay on the screen while others appear. For example, the animated word "Hello" would contain "H" in the first frame, "He" in the second frame, "Hel" in the third, etc. When you blend effects, Illustrator actually calculates each step of the blend individually, allowing you to create some spectacular effects, such as this one with the Scribble effect:
Type the letter A. Scale it so that it's good and big (there's no need for you to squint at the screen).
Choose Type
Choose Effect
Choose Sketch from the Settings dropdown list (popup menu).
Click OK to apply the effect shown in Figure 19.31.
Choose a color for the letter A.
Copy it by pressing Ctrl+C (

Paste in Front by pressing Ctrl+F (
With the new A still selected, give it a different fill color.
Use the Selection tool to select both letters. For more on the Selection tool, see Chapter 6.
Choose Object
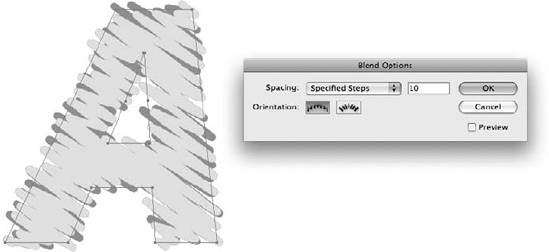
With the blended object still selected, choose Object
Change the selection in the Spacing dropdown list (popup menu) to Specified Steps and then choose 10 for the number of steps, as shown in Figure 19.32.
Now that you've created your blend, head over to the Layers panel and then click the little triangle to expose the contents of Layer 1.
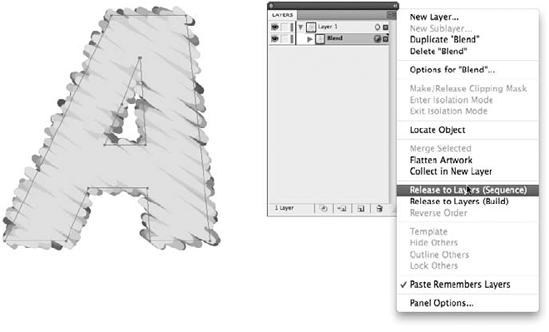
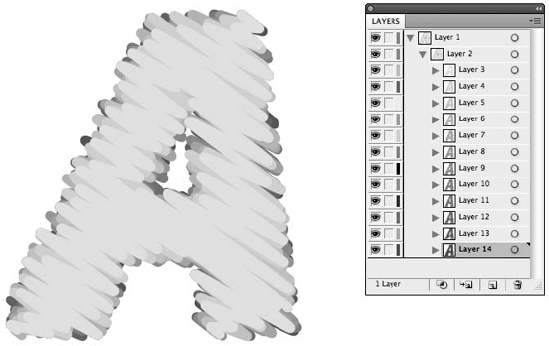
Select the Blend layer and then choose Release to Layers (Sequence) from the Layers panel's popup menu, as shown in Figure 19.33. The Layers panel now lists many more layers — and each layer now contains one step of the blend that you created in step 13, as shown in Figure 19.34.
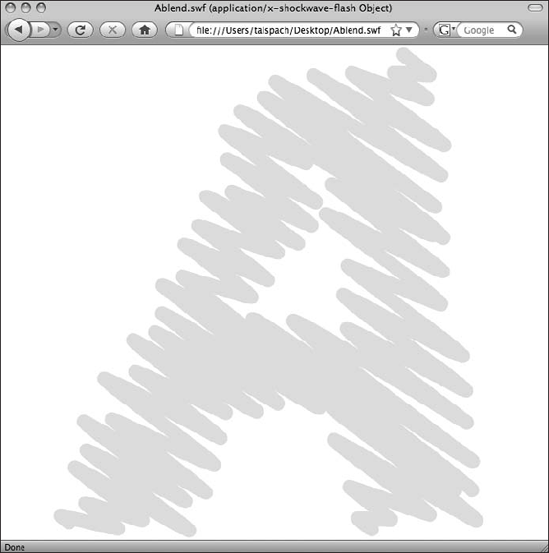
Choose File
Choose Layers to SWF Frames in the Type of export dropdown list (popup menu).
To see what the animation looks like, click the Preview in Browser button. If you're happy with the results, as shown in Figure 19.35, go back to the Save for Web & Devices dialog box and then click Save.
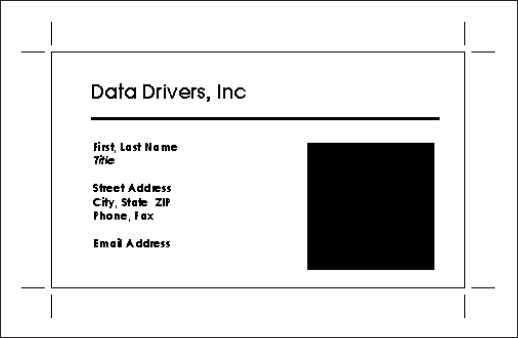
Designing a business card can be fun. It's challenging to come up with a cool and clean design that gets the message across in a readable and usable format. What isn't fun is copying that card over and over and typing different information for each employee in the company. Wouldn't it be great if you could do all the fun stuff yourself and then let the computer do all the tedious, boring stuff? That's where data-driven graphics come into play. Sure, it's a mouthful to say, but it can save lots of time. You start off by creating a regular Illustrator file, which you use as a base file, or template. Figure 19.36 shows a business card template. This template contains your design, but you tag the content as variables. You then have a script fetch data from an external file, such as a text file or any ODBC-compliant database, and the script automatically generates customized files for you while you search for a cold beverage to enjoy. Now that you know the basic steps for creating data-driven graphics, the rest of the sections in this chapter walk you through how to perform those steps.
Tip
The data-driven graphics feature was originally created for Web graphics because that medium demands instant updates and graphics that are generated on the fly. However, it can also prove very beneficial to print workflows.
A variable is something that changes. In Illustrator, defining something as a variable means that "this will change." For example, when you type the name Joe Smith on a business card and then define it as a variable called Name, running the appropriate script replaces the words Joe Smith with whatever you have in the Name text field of your database.
You can set four kinds of variables in Illustrator:
Text: A text variable is simply a string of text, either point text or area text, that's replaced with new text. The font and style applied to that text remains. Only the characters themselves change — as in the example of the names on business cards.
Visibility: You can apply visibility to any kind of object in Illustrator and control whether that object is shown or hidden. For example, you can show a starburst graphic in certain cases but not others.
Linked image: This kind of variable is specific to replacing linked images (any format). For example, if your business card design contains a picture of the employee, setting the image as a variable allows you to create business cards with each employee's photo on his or her card by replacing the value of the variable with the correct link.
Graph data: Creating a graph in Illustrator is easy enough (see Chapter 5), and by defining a graph as a variable, you can replace the data of that graph to generate customized graphs automatically. For example, you can automatically generate a weather chart by retrieving the latest weather forecasts from the Internet.
You define Variables in Illustrator via the Variables panel (accessed by choosing Window

You define a visibility variable by making a selection and then clicking the Make Visibility Dynamic button (it looks like a gear/eyeball). Likewise, you define other variables by making a selection and then clicking the Make Dynamic button. These are context-sensitive, so if you select text, the button is labeled Make Text Dynamic, and if you select a graph, the button is labeled Make Graph Dynamic.
Clicking the little camera icon in the upper left of the panel allows you to capture a data set. Data sets are stored in Illustrator as XML data, and you can both import and export variables and data sets from the Variables panel menu. Because XML is a standard format, Illustrator can very easily integrate into complex workflows and back-end systems.
A script is a list of commands that are contained in a single file. When you run a script, your computer follows the commands that are contained within the script. In reality, a script is much like computer-programming code, except that it's what's called a high-level language in that it controls existing programs rather than actually being a program itself. A script tells applications what to do. In fact, most scripting languages read almost like English — making them easier to learn and use.
Illustrator supports three scripting languages:
If you've been paying attention, you remember a discussion about something called actions back in Chapter 17. Because you're a smart person, you're probably wondering why you need scripting if you already have actions.
There are several big differences between actions and scripts:
An action is simply a recorded sequence of events that you can play over and over, performing exactly the same way each time. A script can contain logic and therefore perform different steps depending on the situation.
An action is a task that can be completely performed only within Illustrator. A script can involve multiple applications, not just Illustrator.
An action is easy to create right in Illustrator. A script requires the knowledge of at least one of the scripting languages (AppleScript, VBScript, or JavaScript). So, although scripts are far more powerful, they're also far more difficult to create.
For example, you can write a script to automatically create a forecast graphic by going to a weather site on the Internet, retrieving temperature information for a particular city, and drawing a graphic. You can code the graphic so that temperatures below 32° are colored blue, temperatures over 90° are colored red, and temperatures between 75° and 85° have a smiley face with sunglasses. The script brings that information into Illustrator from another application (your Web browser) and then makes decisions within Illustrator based on that data. Actions are cool but nowhere near as cool as scripts.
It takes much more work to write a script than it does to record an action, but a script can do much more and is more powerful than an action is.
Note
Not everything in Illustrator is actionable, and not everything in Illustrator is script- able. There are even some things that you can do with AppleScript or VBScript that you can't do with JavaScript. With each new version of Illustrator, you can record more and more features and commands of the application as actions or scripts.
Don't let all this talk about scripting scare you. Just because a script is a necessary step in the data-driven graphics process, it doesn't mean that you (the designer) have to do it. Some companies have developers on staff who know how to script, and you can have them write the required scripts for you. You can also hire a developer or consultant on a freelance basis to write your scripts. Because of the potential time savings you gain when you utilize a script, this method can also prove very economical.
It's beyond the scope of this book to learn how to write a script to automatically fill a template, but it's easy to set up a template and create some sample data sets, which allow you to preview what your files will look like when they're filled with data:
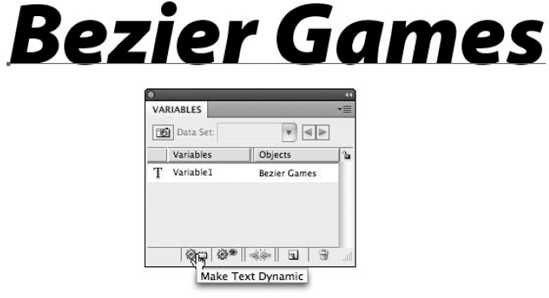
Using the Text tool, click an empty part of the Artboard to create some point text. The example uses the words Bezier Games. Be creative and choose a good font and even a drop shadow if you want.
Click the Selection tool and then choose the type you just created. For more on the Selection tool, see Chapter 6.
Choose Window
Click the Make Text Dynamic button at the bottom of the panel, as shown in Figure 19.38. Alternatively, you can choose the Make Text Dynamic option from the Variables panel's popup menu. A variable called Variable1 is thus created.
Double-click the Variable1 item in the Variables panel to open the Variable Options dialog box.
Type a name for the variable. Change the name of the variable so that you (or a script) can readily identify it. In the example, the name is changed to Company_Name, as shown in Figure 19.39.
Click OK.
Click the little camera button (this is the Capture Data Set button in the upper left of the Variables panel) to create Data Set 1.
Using the Text tool, edit the text on your Artboard to have it read something else.
Click the Capture Data Set button. This creates Data Set 2.
Edit the text on your Artboard to change it again. The example was changed to Alspach Inc.
Click the Capture Data Set button again, as shown in Figure 19.40. You now have three data sets in your Illustrator file.
Using the left and right arrows in the Variables panel, click to step through all three of the data sets. As you switch among data sets, the text on your screen changes. This is extremely helpful when you create templates because it allows you, as a designer, to create a design that works well with different data. For example, a long word or name takes up more space than a short word does. Setting up several different data sets in your file allows you to preview how your design looks with different sets of data.


Adobe GoLive has support for working with dynamically generated content, while Dreamweaver doesn't (yet). You can also use the variable feature in Illustrator to create those graphics in GoLive yourself — and it's really easy! Follow these steps:
Start by creating a template in Illustrator. Design your art and then assign some variables.
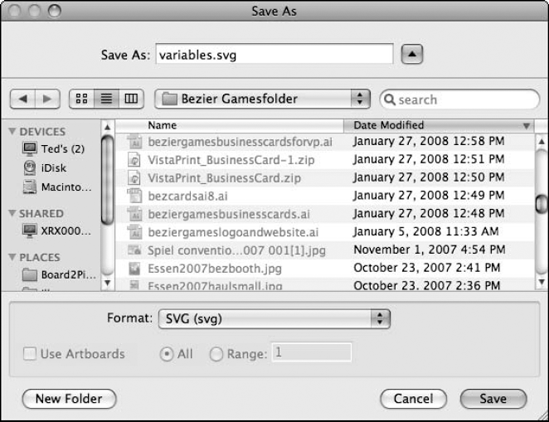
Choose File
Choose SVG for the format, as shown in Figure 19.41. The SVG Options dialog box opens. The reason for choosing this format is that SVG can contain variable content.
Click Save As to display the SVG Options dialog box.
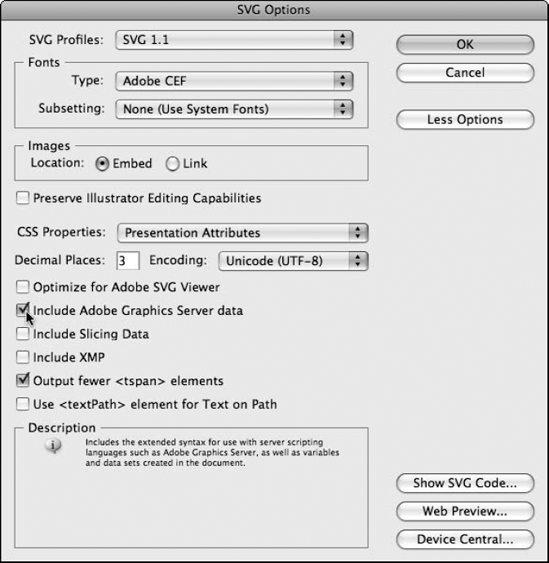
Click the Preserve Illustrator Editing Capabilities check box. This allows you to reopen the SVG file in Illustrator later.
Click More Options to display the advanced options section of the dialog box.
Ensure to click the Include Adobe Graphics Server data check box, as shown in Figure 19.42.
Click OK.
In GoLive, open or create an HTML file.
From the Object panel in GoLive, drag an Illustrator Smart Object (from the GoLive Tools panel) onto your page.
Using the point-and-shoot icon (drag from the Illustrator Smart Object to the SVG graphic directly), load the SVG graphic that you created in Illustrator. Because GoLive sees the variable content in the Illustrator SVG file, GoLive prompts you with a dialog box listing all the variables. Here, you can choose to replace text or change attributes of your variables.
You can change these variables at any time in GoLive by clicking the Variables button in the GoLive Inspector panel. It's a powerful way to quickly update your graphics without even launching Illustrator!
In this chapter, you learned the following:
Pixel Preview mode displays graphics as they would appear in a Web browser.
The Save for Web & Devices dialog box lets you optimize graphics in one easy step.
You can both open and save SVG files in Illustrator.
Illustrator can export animated SWF files.
Data-driven graphics can streamline repetitive tasks and help save time.
Illustrator can define four kinds of variables in the Variables panel.
Many variables are stored in XML.
Illustrator supports AppleScript (Mac), VBScript (Windows), and JavaScript.
Scripting is far more powerful than actions.