Creating new documents
Changing the document setup
Opening and closing Illustrator files
Saving files
Using the Export command
Placing art
Understanding vector-based and pixel-based images
Placing raster images
Working with rasterized Illustrator artwork
Using raster images
When you create an illustration in Illustrator, you're actually creating a document that you can place on the Web, send to a printer, or simply save on your computer. This chapter covers how to set up and change a document, how to open and save files, and how to export and place files. You also find out the difference between pixel-based documents and vector-based documents.
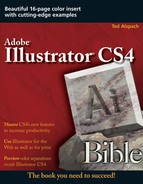
When you first load Illustrator, you see the Illustrator Welcome Screen, as shown in Figure 3.1, which allows you to choose to create a new document from scratch or from an existing Illustrator template. Alternatively, you can choose to open an existing document so that you can do some additional work with that document.
Note
The Illustrator Welcome Screen lists recently opened files, allowing you to open them directly with a single click on the name of the file and also allowing new documents to be quickly created from the list of document profiles on the right.
If you have Illustrator already up and running without the Welcome Screen showing, you can create a new document by choosing File
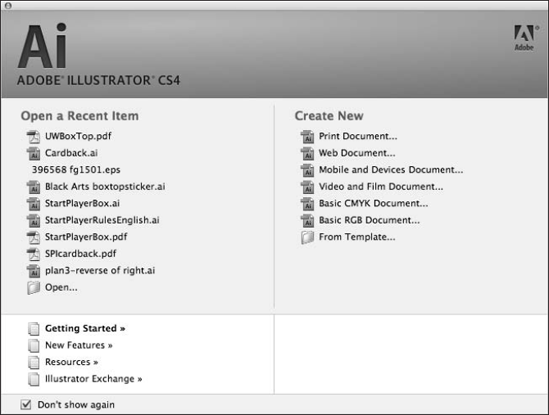
Figure 3.1. Illustrator's Welcome Screen allows you to create a new document or open an existing one.
The New Document dialog box, as shown in Figure 3.2, offers several settings you can set before you start working on a new document:
Name: You can type a name for your new document.
New Document Profile: This is a named set of all the settings in this box. By choosing a different named set, all the values below will update.
Number of Artboards: The first field lets you set how many Artboards will appear initially when you create your document. The buttons to the right of this field control how the Artboards are positioned relative to each other.
Size: This allows you to choose standard preset dimensions, such as Letter or Legal, for your document.
Width and Height: Instead of selecting a preset size, you can specify exact dimensions in the Width and Height text fields.
Units: You can select the units you prefer to work in. Most artists choose points, but some prefer working in picas, inches, millimeters, centimeters, or pixels.
Orientation: You can choose the orientation of the page. The orientation options are portrait (meant to be viewed vertically) and landscape (meant to be viewed horizontally).
Bleed: This controls the bleed settings for the document (how far outside the edges of the defined document artwork will print).
Color Mode: You can choose from the CMYK and RGB color modes.
Note
For more on CMYK and RGB, see Chapter 7.
Raster Effects: This is the resolution that raster-based effects (like drop shadows) will use. Print documents should have at least 150 (although 300 is preferred), while Web-based documents should use 72.
Preview Mode: You can choose to automatically preview your document in Pixel Preview mode (showing pixels at 100% or closer) or Overprint Preview mode (showing the results of objects set to Overprint).
The document window initially appears at Fit in Window size. In the title bar at the top of the window, you see Untitled-1 (or another number, depending on how many new documents you have started during this particular session of Illustrator) and the percentage zoom the document is displayed at. As soon as you save the document, the title bar contains the name of the document.
You can't change the way that some of the panels or presets appear when you first start Illustrator. For example, the Selection tool is always selected in the Tools panel. Another unchangeable item is the initial paint style with which you begin drawing: a fill of White and a stroke of 1-point Black. The character attributes are always the same: 12-point Myriad Roman, auto leading, flush-left alignment.
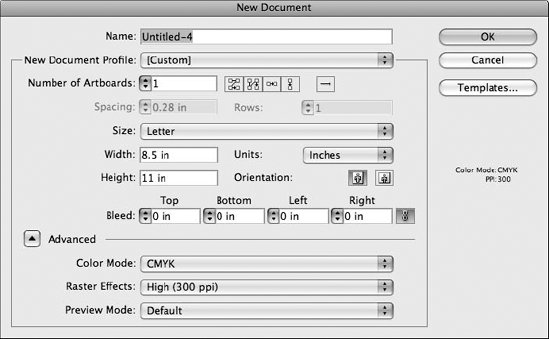
After you create a document, you need to go to the Document Setup dialog box (shown in Figure 3.3) to change almost anything about the document structure and how you work with that document by choosing File
Figure 3.3. The Document Setup dialog box provides options for controlling your document's settings.
At the top of this dialog box is a list box (a popup menu on the Mac) that includes sections of options for Bleed and View, Transparency, and Type.
Note
Document Setup no longer contains Artboard options. Instead, you need to either click Edit Artboards in the Document Setup dialog box or select the Artboard tool from the Tools panel.
At the top of the Document Setup dialog box is a section called Bleed and View Options, although it could just as easily have been called miscellaneous options we didn't know where else to put. This section contains the following settings:
Units: This sets the unit of measurement for this document. All basic measurements that are displayed in Illustrator use this setting for the current document.
Edit Artboards: This button is a little unusual. It simulates choosing the Artboard tool. It's most likely here for those of us who instinctively press Ctrl+Alt+N (

Note
To quickly access the Artboard tool (and thus the Control panel options to let you quickly change the page), press Shift+O, which selects the Artboard tool and throws you instantly into Artboard mode so you can access the Control panel.
Bleed: This sets the amount of outside gutter around the edge of the printed page (or PDF) that appears. It's useful for projects where backgrounds and artwork extend off the edges of the page.
Show Images In Outline Mode: Instead of seeing the glorious detail in your placed images, selecting this option puts a very neat late-1980s box frame in its place, as shown in Figure 3.4.
Highlight Substituted Fonts: When a font isn't available, Illustrator substitutes another font for it. This highlights those substituted fonts.
Highlight Substituted Glyphs: When a glyph isn't available, Illustrator substitutes another character or a space for it. Selecting this option highlights those temporarily changed characters.
Transparency options refer to making a transparent background screen. Many users like to use a transparent grid to see the opacity of their objects. On a white background, the opacity isn't easy to see. Just as in Photoshop, you can see a checkered grid that shows the opacity of the objects in front. The Flattener settings let you pick a resolution for the object when you change it to a rasterized (pixel) object when it's flattened — that is, converted into a single layer with all overlapping objects combined. The Transparency options are also found in the Document Setup dialog box.
Grid Size: This list box (popup menu) lets you can change your grid size to small, medium, or large.
Grid Colors: You can customize your own grid colors.
Simulate Colored Paper: Selecting this check box makes the Artboard color match the grid color you've chosen.
Preset: Select a preset (high, medium, or low resolution) from the Preset list box (popup menu) or choose a Custom setting.
In the Document Setup dialog box, you can also change these Type options:
Use Typographer's Quotes: Select this option to use smart (curved) quotes rather than the dumb (straight) ones.
Language: Choose a desired language from the menu. You can choose from a variety of languages, including English, French, Finnish, but you must have the language set up on your system to be able to use that language.
Double Quotes: Choose the style from the dropdown list (popup menu). You have a variety of quotes to choose from. Some users like the curved quotes rather than the straight ones.
Single Quotes: Choose the style from the dropdown list (popup menu). The choices of single quotes are the same as the double quotes.
Superscript, Subscript, and Small Caps: Choose the Size and Position for Superscripts, Subscripts, and Small Caps as a percentage of the original size.
Export: In this list box (popup menu), choose from Preserve Text Editability and Preserve Text Appearance. In this case, you can either choose to be able to edit the text (but it may not look like you intended) or let the text look like it should (but make it so you can't edit it).
In Illustrator, the Artboard defines the maximum drawing area that you can print. The Artboard is useful as a guide to where objects on a page belong. The maximum printable size is 227 × 227 inches or 358 square feet (provided that you can find a printer to print that big). You can define any number of Artboards, each can be any size, and when it comes time to print, you can print them independently or any combination of them.
Commercial printers print colored artwork using separate plates for each of the different primary colors (typically, they use four different plates). An application such as Illustrator can break down color images into the separations that are used to create these plates. Crop marks are lines that are printed as an aid to determining where to trim (or crop) the printed page when the document is printed on oversized paper.
Illustrator's separation setup ignores the Artboard and places crop marks around the entire image-able area. The imageable area is only the area where artwork exists. It may be within the Artboard, but it also may extend onto the Pasteboard. When you export an illustration to another program, such as QuarkXPress or InDesign, the Artboard is ignored entirely.
You can view a document in points, picas, inches, centimeters, millimeters, or pixels. The measurement units affect the numbers on the rulers and the locations of the hash marks on those same rulers. The measurement system also changes the way measurements display in the Info panel and in all dialog boxes where you type a measurement other than a percentage.
You change the measurement system in one of three ways:
Using the Preferences dialog box: Use this method if you want to change all documents. To do so, choose Edit (Illustrator)

Press Ctrl+Alt+Shift+U (
Using the Document Setup dialog box: Use this method for the currently active document. You open this dialog box by choosing File
The Artboard tool allows you to change existing Artboards and create new Artboards. The Artboard tool is in the lower half of the Tools panel, as shown in Figure 3.5.
As soon as you select the Artboard tool, the screen changes, making everything outside the Artboard area darkened and putting a big dashed line around the Artboard. The Control panel also changes, displaying the options shown in Figure 3.6.


From this view of the Control panel, you can quickly change to preset page sizes (left side) and type specific dimensions for your existing Artboard. You can also quickly add a new Artboard by clicking the New Artboard button.
But what's great about this tool is that you can now modify an existing Artboard or create new ones with the tool. Just click and drag outside of the existing Artboard to create a new Artboard. Click once on any existing Artboard to select it and then grab one of its handles to modify it.
Choose the size of the Artboard by selecting one of the following preset sizes in the Size dropdown list (popup menu) on the left edge of the Control panel, as shown in Figure 3.7:

Custom: Any size you type into the Width and Height fields of the Document Setup dialog box automatically changes the Size dropdown (popup) to Custom.
Fit Artboard to Artwork bounds: Choosing this option instantly changes the size of the Artboard to the size of all the artwork in your document.
Fit Artboard to selected art: Choosing this option instantly changes the size of the Artboard to the size of all the artwork you currently have selected.
Letter: 8.5 × 11 inches
Legal: 8.5 × 14 inches
Tabloid: 11 × 17 inches
A4: 8.268 × 11.693 inches (21 × 29.7 centimeters)
A3: 11.693 × 16.535 inches (29.7 × 42 centimeters)
B5: 7.165 × 10 inches (18.2 × 25.4 centimeters)
B4: 10.118 × 14.331 inches (55.7 × 36.4 centimeters)
Note
A4, A3, B5, and B4 are paper sizes used outside the United States.
NTSC and so on: The options in this section change the Artboard to the size (in pixels) of these video-centric choices.
176 × 208 and so on: Makes your Artboard 176 × 208 pixels or the dimension you choose in this section
VGA and so on: Makes your Artboard the appropriate screen size
You define the orientation of your Artboard by choosing one of the two Orientation pages. On the left is Portrait orientation, and on the right is Landscape orientation:
Portrait orientation: You use this when the document is taller than it is wide. You can also think of portrait orientation as the vertical view.
Landscape orientation: You use this when the document is wider than it is tall. You can also think of landscape orientation as the horizontal view.
Clicking the Artboard Options button displays the Artboard Options dialog box, as shown in Figure 3.8. This dialog box is really useful if you don't have the Control panel displayed, but I'm sure you do, so the Artboard Options dialog box becomes much, much less useful. In fact, the only thing you can change here that you can't change in the Control panel is the Fade option (in the oddly named Global section). If you have a pre-Intel processor Mac, you might want to deselect this option with complex documents, but otherwise, you can safely ignore these options.

You can open many types of files in Illustrator. To open a file, choose File
To close the active Illustrator file, choose File
If you saved the file prior to closing it, the file just disappears. If you've modified the file since the last time you saved it, a message box appears asking whether you want to save changes before closing. If you've not saved the file at all, the Save As dialog box opens so that you can name the file and choose a location for it. If you click Don't Save (or press D while the message box is showing), then any changes that you made to the document since you last saved it (or if you've never saved it, all the changes you made since you created it) are lost. Clicking Cancel or pressing Esc takes you back to the drawing, where you can continue to work on it.
Saving and backing up Illustrator documents are some of the most important Illustrator tasks you can perform.
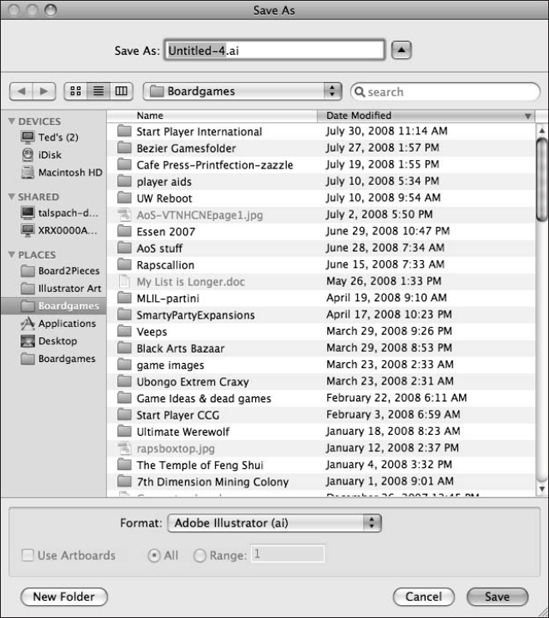
To save a file, choose File
When saving files, remember these tips and tricks:
Decide where to save the file: Ensure that the name of the folder where you want to save the file is displayed above the file list window. Saving your working files in a location other than the Illustrator folder is a good habit. Otherwise, you can have trouble figuring out which files are yours, which files are tutorial files, etc.
Name the file something distinctive: If you look for a file six months from now, you may not recognize it. Avoid using Untitled-1, Untitled-2, etc. Such names are nonde-scriptive, and you can too easily replace the file at a later date with a file of the same name. For the same reasons, don't use Document 1, Document 2, etc.
Here are your formatting choices for saving an Illustrator file:
Adobe Illustrator Document: For use when passing between users who have Adobe Illustrator.
Illustrator EPS (eps): For use when sending or passing files between users who may not have Illustrator but can place or open the files in another program, such as InDesign or Photoshop.
Illustrator Template (ait): For use in creating templates that you can use as guides for future drawings
Adobe PDF (pdf): For use in sending the file to anyone who has or can download Adobe Reader or Acrobat Standard or Professional
SVG Compressed (svgz): For use when creating a Web page. This option generally produces smaller files than the uncompressed SVG format.
SVG (svg): For use when creating a Web page. SVG stands for Scalable Vector Graphics and is an XML-based format that can produce much smaller file sizes than the typical bitmap formats, such as JPEG and TIF.
When Should I Save?
You really can't save too often. Whenever I put off saving for just a few minutes, that's when the application aborts or unexpectedly quits. Depending on your work habits, you may need to save more frequently than other people do. Here are some golden rules about when to save:
Save as soon as you create a new file. Get it out of the way. The toughest part of saving is deciding how and where you're going to save the file and naming it. If you get those things out of the way in the beginning, pressing Ctrl+S (
Save before you print. It's just a good idea in case your program quits when you print.
Save before you switch to another application. This is another good idea in case you forget that you still have the application running or another application forces you to restart, such as when you're loading new programs.
Save right after you do something that you never want to have to do again. For example, you want to save after getting the kerning just right on a logo or matching all the colors in your gradients so that they meet seamlessly.
Save after you use an Effect command that takes more than a few seconds to complete.
Save before you create a new document or go to another document.
Save at least every 15 minutes. This is just a good, basic rule; that way, you're sure to have the latest version in case of a power outage that can shut your system down immediately.
Choosing File
Warning
You can't undo a Revert action, and you can't redo anything you've done up to that point with the document.
Saving an Illustrator file for the Web is an easy step that ensures Illustrator properly saves your file for Web usage. This option allows you to choose various settings, such as the amount of compression that's applied to your document in order to reduce the file size so that your Web pages load faster. Choose File
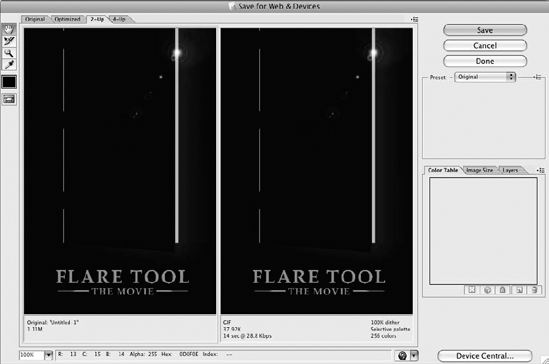
Figure 3.10. The Save for Web & Devices dialog box allows you to save your document in a format suited for use on the Web.
The tabs you see in the Save for Web & Devices dialog box are Original, Optimized, 2-Up, and 4-Up. The first tab, Original, shows the file in its original state. The second tab, Optimized, shows the file in the optimized settings you chose at the right of the Save for Web & Devices dialog box. The third and fourth tabs, 2-Up and 4-Up, respectively, show the figure in the original state along with one or three of the other default options so you can decide which option best suits your needs.
Note
For more on the Save for Web & Devices dialog box, see Chapter 19.
You can save and export Illustrator files in several ways. Actually, you can save in and export them to many different formats using the File
Saving an Illustrator file with the wrong options can dramatically affect whether you can place or open that file in other software as well as what features Illustrator includes with the file when Illustrator reopens it. Saving a document as an older version of Illustrator may alter the document if the older version is missing features you used in your document.
As a rule, unless you're going to take your Illustrator document into another program, you can save it as an Adobe Illustrator (.ai) file without any problems. This keeps the file size down and makes saving and opening the file much quicker.
Most software packages are forward-compatible for one major version, but Illustrator is novel in that you can open an Illustrator 1.1 file in the CS4 version of the software, even though many years have passed between those product versions.
If necessary, you can also export an Illustrator document to certain older Illustrator formats using the Illustrator Options dialog box. To open this dialog box, select File
The only real reason to save illustrations in older versions of Illustrator is to exchange files with Illustrator users who haven't upgraded from an old version. This is pretty much always a bad idea, as saving as a legacy version may remove useful information from your Illustrator file. Within a few months after the release of Illustrator, most users will be upgrading. If they aren't, they probably don't understand the new features and usefulness of the latest version (or in the case of many printers/service providers, they just don't want to deal with the hassle of upgrading). Regardless of why people aren't upgrading, it's going to cause compatibility issues for you, so encourage them to upgrade as soon as possible. If they're truly serious about using Illustrator, they need to be using the most current version. I won't deal with printers who aren't on the most current version of Illustrator because they tend to be technically incompetent when it comes to working with my files correctly, which almost always results in printer-specific errors. The following list provides information about saving files in each version:
Illustrator CS3: Saves the file with all Illustrator CS3-compatible features intact
Illustrator CS2: Saves the file with all Illustrator CS2-compatible features intact
Illustrator CS: Saves the file with all Illustrator CS-compatible features intact
Illustrator 10: Saves the file with transparency, color profiles, and embedded fonts
Illustrator 9: Saves the file with transparency and color profiles
Illustrator 8: Saves the file in a cross-platform (Mac and Windows) Illustrator 8 format. Illustrator 8 added support for EMF file format and drag-and-drop to Microsoft Office products (Windows), Japanese format FreeHand files, and DXF file formats.
Illustrator 3: Saves the file in the Illustrator 3 format. In fact, you can use the Illustrator 3 format for lots of cheating — doing things that Illustrator normally doesn't allow you to do (like opening up a file in Illustrator 3, 4, 5, 5.5, 6, or 7). For example, technically, you can't place gradients or masks into patterns. But if you save a gradient as an Illustrator 3 file and reopen it in Illustrator 7, the gradient becomes a blend, which you can use in a pattern (although Illustrator's Expand feature is quicker for this sort of thing).
Japanese Illustrator 3: Saves the file in the Japanese Illustrator 3 format, which preserves the Japanese type options.
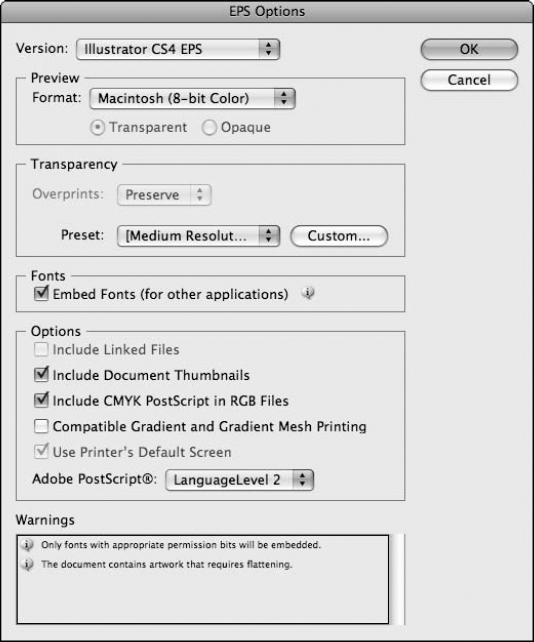
If you do have to place your Illustrator document in a non-Adobe program, such as QuarkXPress, you may want to save the file as Illustrator EPS (Encapsulated PostScript). First, choose File
The following Preview options affect the way that other software programs see Illustrator files when you save them as Illustrator EPS files:
None: This option lets most software programs recognize the Illustrator document as an EPS file, but instead of viewing it in their software, you see a box with an X in it. Usually, this box is the same size as the illustration and includes any stray anchor points or control handles. The file prints fine from other software.
TIFF (Black & White): This option saves the file with a preview for Windows systems. Page-layout or other software programs for PCs that can import EPS files can preview illustrations that you save with this option.
TIFF (8-bit Color): This option saves the file with a color preview for Windows systems. Page-layout and other software programs display this file in 8-bit color (256 colors) when you place it in a document. An Illustrator file that you save with a color preview takes up more file space than a file saved with any other option.
Note
Two additional preview options are available on a Mac. Macintosh (8-bit color) maps to a selected 256-color panel. In Macintosh (Black & White), anything at 50% or higher intensity maps to black, while everything else maps to white.
In addition to the Preview options, you can choose from several other options that affect how the EPS file is saved:
Transparency: You can Preserve or Discard Overprints. Overprinting allows underlying colors to appear through transparent areas of the drawing.
Fonts: Choose to embed the fonts with the file (although this makes the file larger) so you don't have to worry about font substitution if someone else doesn't have your font.
Options: These let you include linked files to ensure that any necessary files are included. Click the following check boxes to ensure you gain the best results when saving as an EPS:
Include Document Thumbnails: Allows someone to determine the file contents without opening the file
Include CMYK PostScript in RGB Files: Allows for more accurate color printing
Compatible Gradient and Gradient Mesh Printing: Allows older (10+ years) printers to do a better job of printing gradients, but decreases the quality of gradients in most printers
Adobe PostScript®: Allows for compatibility with applications that don't support newer PostScript versions (you can choose from Level 2 or Level 3 here)
Note
The Mac version also provides a Use Printer's Default Screen check box. It instructs Illustrator to use any default screen defined in the printer's PPD file.
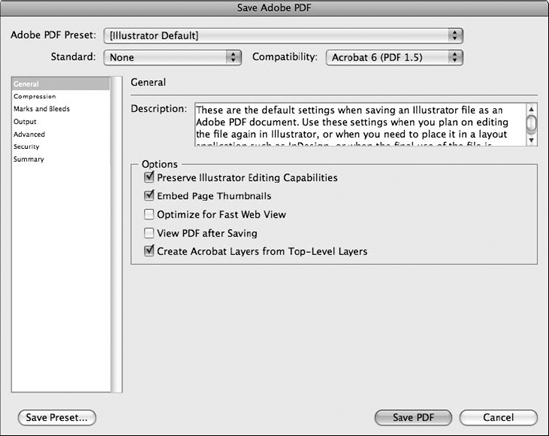
One reason for saving a file in Illustrator as PDF (Portable Document Format) is because anyone can load Adobe Reader for free and view the file. But the better reason is that all applications you will probably ever deal with can open, view, and place PDF files. To save your document in PDF, first choose File
This dialog box includes seven areas that you can use to set options. You select the settings by choosing from the list on the left side of the dialog box. The following lists the areas and their options:
General: Under this category, you can set the Compatibility ranging from Acrobat 7 (PDF 1.6) to Acrobat 4 (PDF 1.3). If a user has an older version of Acrobat, you may need to save with backward-compatibility so the user can read the file. Depending on the PDF version you select, the following options may also be available:
Preserve Illustrator Editing Capabilities: Saves all Illustrator data in the PDF file so that you can reopen and edit the PDF file in Illustrator
Embed Page Thumbnails: Includes a thumbnail image that appears in the Open or Place dialog boxes
Optimize for Fast Web View: Creates a file that can be viewed more quickly in a Web browser
View PDF after Saving: Opens the document in your PDF viewing application after it's saved
Create Acrobat Layers from Top-Level Layers: Creates layers in the PDF file (useful for multilanguage versions of your file, for example)
Create Multi-page PDF from Page Tiles: Combines all pages of your document into a multipage PDF file
Compression: In this area, you can change compression settings for Color Bitmap Images, Grayscale Bitmap Images, and Monochrome Bitmap Images. You also have a check box that determines whether to compress text and line art. This makes for a smaller file for e-mailing or uploading files to other users. These image types offer similar options, but you can choose different compression settings for each of them. These options are available:
Downsampling: Reduces the file size by reducing the number of pixels in the image
Compression type: Allows you to choose from no compression, JPEG, JPEG2000, and ZIP compression. You may need to experiment with the various options to see which type of compression produces optimal results for your particular document.
Image Quality: Allows you to choose the level of quality for JPEG and JPEG2000 image files. Lower-quality files are smaller but may not result in quite the appearance you want.
Marks & Bleeds: In this area, you set the Printer's Marks — lines printed outside the image area that show how to trim the drawings once you get them back from the printer or how to register the multiple color pages — Printer Mark Type, Trim Mark Weight, and how far to offset it from the artwork. The Bleeds for the top, bottom, left, and right of the page are set here. Bleeds are used to print images slightly oversize so that white edges won't appear once the images are trimmed.
Output: You use this category to specify how colors are converted between the RGB and CMYK color profiles when the file is saved. RGB is typically used for on-screen display, while CMYK is generally considered a more accurate profile for printed documents.
Advanced: The Advanced PDF settings are Fonts and Overprint and Transparency Flattener Options. Use these options to embed fonts for use in other applications and to set your transparency and overprinting abilities in other applications (if you're saving the file in PDF version 1.3). The transparency and overprinting options control the way underlying colors appear through transparent areas of the drawing.
Security: Under this area, you set whether the document requires a password for a user to open it and whether the password restricts editing. You also set the Security Permissions and the Acrobat Permissions (printing allowed, changes allowed, copying of text, images, or other content and enabling text access of screen-reader devices for the visually impaired).
Summary: In this area, you can see all the other options that Illustrator saves with the file.
Tip
You can save all the options under the Adobe PDF dialog box as presets by clicking Save Preset. This makes it easier for you to reuse the same settings in the future.
Scalable Vector Graphics, or SVG, is a vector-based image format based on XML (eXtensible Markup Language), and it's one of the formats supported by Illustrator. Vector-based formats often have smaller file sizes than do bitmap image formats, so utilizing vector-based images for the Web can offer some important advantages in keeping Web page load times to a minimum. Figure 3.13 shows the SVG Options dialog box.
To save Illustrator documents in SVG format, choose File
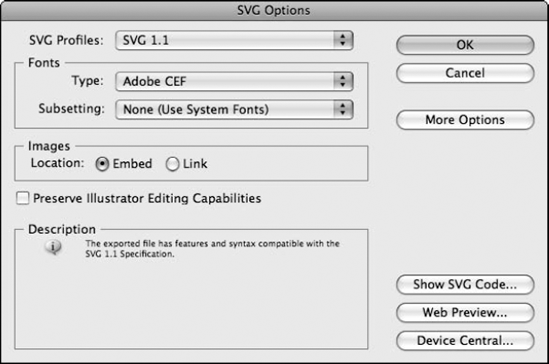
These are the SVG options:
Profiles: This option allows you to specify the Document Type Definition level for your XML file. Older browsers may not support all features of newer DTD levels, but you generally want to choose SVG 1.1 for maximum flexibility.
Fonts Type and Subsetting: These options allows you to specify the type of fonts to embed and to choose which characters are included — such as the characters that are actually used rather than the entire font set. You can choose None, Only Glyphs used, Common English, Common English and Glyphs used, Common Roman, Common Roman and Glyphs used, and All Glyphs.
Images Location (Embed or Link): If you choose Embed, the file size is larger because it includes the placed image as part of the file. If you choose Link, it looks for the file on the system and accesses it that way (smaller file size).
Preserve Illustrator Editing Capabilities: This option lets you choose to keep the editing capabilities in Illustrator. That way, you can use Illustrator to do any edits on the file.
Note
The more advanced options are the CSS Properties, Decimal Places, Encoding, Optimize for Adobe SVG Viewer, Include Extended Syntax for Variable Data, and Include Slicing Data. These options are covered in depth in Chapter 19.
Adobe Illustrator allows you to export to several file formats. Most of the export formats are bitmap formats, such as TIFF and JPEG. You can also export in PDF so that you can read Illustrator documents with Adobe Reader. When you choose the Export option, these formats are available:
AutoCAD Drawing (dwg): This is the standard format for vector drawings created in AutoCAD.
AutoCAD Interchange File (dxf): This is the tagged data of the information in an AutoCAD file.
BMP (bmp): This is the standard Windows format. In BMP format, you choose the color model, Resolution, Anti-alias (jaggy edges), File format, Depth (number of colors or gray), and Compression.
Enhanced Metafile (emf): Windows users use this format for exporting vector data.
JPEG (jpg): You use this format mainly to show photographs on the Web.
Macintosh PICT (pct): You use this format with Macintosh graphics and page-layout programs for transferring files.
SWF: Adobe Flash uses this format for animated Web graphics.
Note
For more on the various options in the SWF Options dialog box, see Chapter 19.
PCX (pcx): This is an older bitmap format that's not used very often because better options, such as JPEG, exist.
Photoshop (psd): You use this format for taking the file into Photoshop by saving it as a raster image in the Photoshop format.
Pixar (pxr): This is an older format developed by Pixar.
PNG (png): This is the alternative to GIF and JPEG. Use this for lossless compression. However, not all older Web browsers support PNG.
Targa (tga): You use this format for systems that use the Truevision video board.
Text Format (txt): Use this format to export text into a plain text format.
TIFF (tif): You use this format to move files between different programs and different computer platforms.
Windows Metafile (wmf): You mainly use this on Windows applications for 16-bit color. WMF is supported by most Windows layout and drawing applications.
When you choose a format type, a specific dialog box that relates to that particular format appears. For example, Figure 3.14 shows the SWF Options dialog box that opens when you export an Illustrator document as an SWF file.

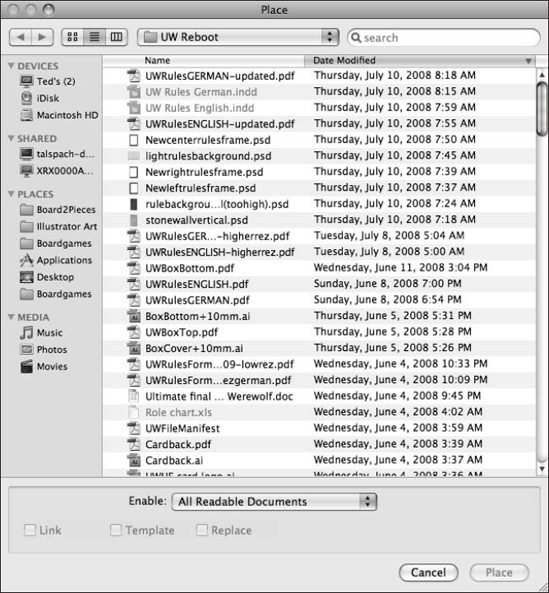
It's not necessary to create your entire Illustrator document from scratch if you already have some existing artwork that you want to use. You can use most types of image files in an Illustrator document, including both bitmap and vector-based images.
To place files into an Illustrator document, follow these steps:
Choose File
Navigate to the folder containing the file. You can click the dropdown arrows on the popup menu to navigate to your file.
Select the files that you want to place. Only files that you can place appear in the file window. Because you can also place text files, be sure that the file you've selected is indeed an image document.
Choose how you want to place the art. You have three options:
Link: Normally, the option is unselected. Illustrator places the art within the Illustrator file. You generally don't want to select this option because it prevents the two files from being separated; if you have one but not the other, you're out of luck. However, there are several good reasons to link the file. First, placed art can be huge and may make your Illustrator file too large. Second, if you need to make changes to a placed art file included in an Illustrator file that you've saved with a preview, you must replace the placed art in the preview file with the new version. Preview shows the actual placed image and Outline shows a box with an X through it. If you link the placed art instead of including it, the art is automatically updated when you make changes. And, finally, you can share placed art that you've linked across multiple files. For example, you can place a business letterhead or logo in all your company files.
Template: The template option makes your placed file a template. When you make a placed file a template, it automatically locks in on a template layer in the Layers panel and dims the image so that you can use it to trace over.
Replace: You may want to replace placed art with new versions or completely different artwork. Illustrator has made this process painless. If you select placed artwork, a dialog box appears asking if you want to replace current artwork or place new artwork, not changing the selected artwork. Use this to keep a certain size or transformation that you used in another placed image. Simply select Replace, and the selected image replaces the existing one, transformation and all.
Click Place at the bottom of the Place dialog box. After you place art into Illustrator, you can transform it (move, scale, rotate, reflect, and shear it) in any way.
Tip
The really cool part about changing placed art this way is that if you've placed transformed artwork, the artwork you exchange with it via the Place command has the exact same transformation attributes. For example, if you scale down placed artwork to 50% and rotate it 45°, artwork that you exchange also scales down 50% and rotates 45°.
Warning
Be careful when importing artwork other than EPS images into Illustrator because TIFF and most other bitmap formats increase the size of your document dramatically.
The main use of the Place command is to import raster-based images into Illustrator. These can be photographic images used within your design or images that you can trace, but this raises a critical question, the answer to which will help you understand how images created with a paint program like Photoshop differ from Illustrator: What is the difference between raster and vector images?
In its original version, Illustrator was a pure vector piece of software. But since Version 8, the border has been crossed, and Illustrator is just this side of the pixel border. What does this mean? It means that you can do things to pixels in Illustrator that you can't do in Photoshop. (Ah, now I've got your attention!) For example, you can use Photoshop filters in Illustrator, but you can't apply these filters to vector images. Because Photoshop filters work only on pixel-based images, you can rasterize — that is, convert your paths into a pixel-based image — or simply use the Effect menu to get some amazing effects.
Note
For more on the Effect menu see Chapter 15.
You can move between Photoshop and Illustrator in one of three ways:
Place the raster image using the File
Use the Clipboard to transfer images.
Drag and drop your art between the two programs.
But before you get into the ins and outs of moving Photoshop art to Illustrator, and vice versa, you need to understand the difference between vectors and pixels.
The essence of Illustrator is the ability to manipulate outlines. When you think vectors, think Illustrator's paths. Illustrator's paths consist of outlines, which you can resize and transform into any imaginable shape and fill with various colors and gradients. You can stretch vector-based images, and they won't look any worse — unless you scale blends and gradients too large. This means that when you create a curve in Illustrator, it's really a curve — not a jagged mass of pixels.
When you think pixels, think Photoshop's little teeny-tiny squares of color — squares that don't ever change position and that you don't add to or subtract from. The only characteristic you change about pixels is their color. Pixels can only be square, and they take up space. Pixels exist on an immobile grid. Enlarging a pixel-based image results in giant, ugly squares of color.
Even with its pixel capabilities, Illustrator is no Photoshop. There are tools and features in Photoshop that are invaluable for adjusting pixel-based artwork. Adobe recognizes this, so it has provided several methods for moving pixels to Photoshop from Illustrator and from Photoshop to Illustrator.
The most rudimentary way, which has existed for several versions of both software packages, is to save art in a format the other program can read and then to open or place the art in the other program. To place Illustrator art into Photoshop, save the art in Illustrator format and then open the art in Photoshop. To place Photoshop art into Illustrator, save in Photoshop as a format that Illustrator can read, such as TIFF, and then in Illustrator, choose File
The next way is through Adobe's wonderful PostScript on the Clipboard process, which allows for transferring artwork between Adobe software programs by simply copying in one program and pasting in another. To place Illustrator art in Photoshop, copy the art in Illustrator, switch to Photoshop, and paste the art into any open document. To place Photoshop art in Illustrator, copy the art in Photoshop, switch to Illustrator, and paste the art into an open document. This process works best for smaller files.
The easiest way to move art between these programs is to drag it from one program to the other. To drag art from Illustrator to Photoshop, select the art in Illustrator and then drag it out of the Illustrator window into a Photoshop window. To drag art from Photoshop to Illustrator, select the art in Photoshop and then drag it out of the Photoshop window into an Illustrator window.
Tip
You must have a window from the drag-to application open when you start dragging for drag-and-drop to work between programs. If the window is hidden behind other windows, drag to the destination application's taskbar button, pause while the window is displayed, and then drop into the destination window.
Running Mac OS X 10.3 (Panther) or later, press F9 to invoke Exposé and tile all the windows of all running applications. Select the one containing the item you want to drag, select the item in that window, and start the drag. While keeping the mouse button down, press F9 again and continue the drag to the window where you want to drop your selection.
To place paths from Photoshop into Illustrator, select the paths in Photoshop with the Path Selection tool, copy the paths, and then paste them into Illustrator.
All files have information that's recorded when you save a file. You can see most of the information about a file by looking at the Document Info panel, as shown in Figure 3.16. You can use this information to see the graphic styles, patterns, gradients, custom colors, fonts, and placed art. Knowing what the file consists of when saving it or choosing an option to save or export is helpful. Another option is to save the document information as its own file.
Document Info and File Info are two different things. Document Info is a panel found under the Window menu. File Info is found under the File menu, and you can make additions to the information.
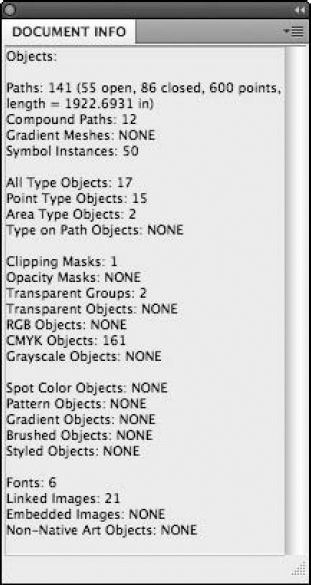
You find general file information in the Document Info panel. You can use the Document Info feature in any document by choosing Window
Document: Lists the Color Mode, Color Profile, Ruler Units, Artboard Dimensions, Show Images in Outline mode (off or on), Highlight Substituted Fonts (off or on), Highlight Substituted Glyphs (off or on), Preserve Text Editability, and Simulate Colored Paper (off or on)
Objects: Lists the Paths, Compound Paths, Gradient Meshes, Symbol Instances, All Type Objects, Individual Type Objects, Area Type Objects, Type on Path Objects, Clipping Masks, Opacity Masks, Transparent Groups, Transparent Objects, RGB Objects, CMYK Objects, Grayscale Objects, Spot Color Objects, Pattern Objects, Gradient Objects, Brushed Objects, Styled Objects, Fonts, Linked Images, Embedded Images, and Non-Native Art Objects
Graphic Styles: Lists the graphic styles used by name
Brushes: Lists the brushes used by name
Spot Color Objects: Lists any objects that have a spot color applied by name
Pattern Objects: Lists any objects with a pattern by name
Gradient Objects: Lists any objects with a gradient by name
Fonts: Lists all fonts used
Linked Images: Lists any images that are linked by Location, Name, Type, Bits per Pixel, Channels, Size, Dimensions, and Resolution
Embedded Images: Lists any images that are embedded by Type, Bits per Pixel, Channels, Size, Dimensions, and Resolution
Font Details: Lists more information, such as PostScript name, Language, and Font type
Tip
If you select the Selection Only option in the Document Info panel menu, the panel contains only information about the document's selected objects.
The last option in the Document Info panel's menu is the Save option. You select this option to save the information in a text file that you can view in any text editor. This method of viewing the document information offers the advantage of being able to see all the various pieces of information at once without needing to select different menu options.
Understanding Illustrator's documents is one of the basic yet most important areas of Illustrator. The main thing to keep in mind is to save and save often. This chapter covered the following topics:
Choose File
You can change the document setup at any time by accessing the Document Setup dialog box. Access this box quickly by choosing File
You can modify the existing Artboard and add new ones using the Artboard tool.
You can add a variety of files to an Illustrator document with the Place command.
Illustrator files are best saved as AI files.
You can also export Illustrator files into a variety of formats. If you want to retain editing capabilities, save a version as an Illustrator file too.
Document Info and File Info are two different things. The Document Info is a panel found under the Window menu. The File Info is found under the File menu, and you can make additions to this information.