
Understanding Live Paint
Setting the Live Paint options
Using Live Paint
Illustrator does its best to prove it's indeed much smarter than you with the Live Paint feature. Instead of requiring you to create the specific shape you want to fill with color, Live Paint does this intelligently, secretly creating those shapes so you don't have to. It sounds really easy, right?
Bitmap-image editing and creation programs have long had a fun yet often frustrating tool that's typically called Paint Bucket. With just a click of the Paint Bucket tool, you can fill an enclosed area with a solid color. The Paint Bucket tool icon is always some variation on paint spilling out of a paint can, which seems like a very good icon for something that can be so hard to control. A single missing pixel around the perimeter of the area that you want to fill provides an escape route so that the fill spills out into areas you don't intend to paint. It's almost like trying to paint a room when a nosy cat is prowling around just waiting for a chance to cause some mischief.
When vector-based graphics applications, such as Illustrator, took on the paint bucket metaphor, things were considerably different than they had been in the bitmap world. For one thing, in a vector-based application, objects are typically treated as a unit. If you want to change the fill color of an object, you typically don't have to worry about the dreaded missing pixel paint spill because each object is independent.
So, at this point, you're probably wondering how the Live Paint Bucket tool improves on the Paint Bucket tool in previous versions of Illustrator. This tool is better in a couple of subtle but very helpful ways. First, with the Live Paint Bucket tool, it's much easier to modify specific areas of an object, such as an image you traced with the Live Trace tool. That's because the Live Paint Bucket tool automatically detects the various independent regions as you move the tool over an object. As it detects each region, the Live Paint Bucket tool highlights the detected region, as shown in Figure 14.1. In this image, I used the Live Trace tool to trace an old greeting card that I scanned. The highlighted areas are surrounded with a bright contrast to show the detected regions.
The Live Paint Bucket tool allows you to easily fill individual regions within an object rather than the object as a whole. Also, because the paint remains live, any changes you make to the regions are also reflected in the paint fill.

Figure 14.1. This image shows how Live Paint highlights a region (in this case, her right lapel) as it's detected.
Note
Clicking a Live Trace object with the Live Paint Bucket tool converts the object into a Live Paint object. This precludes making additional changes to the object using Live Trace, so it's important to complete all your Live Trace adjustments before you use the Live Paint Bucket tool.
In addition to the Live Paint Bucket tool, Illustrator offers the Live Paint Selection tool. This tool allows you to select Live Paint regions without making any changes to those regions. In effect, the Live Paint Selection tool could be called the selection-only portion of the Live Paint Bucket tool. Using the Live Paint Selection tool, you can select more than one Live Paint region at a time, as shown in Figure 14.2 (the selected regions are filled with a dotted pattern to show that they're selected). The highlighted area indicates the current region that's added to the selection.

You should probably become familiar with the options that are available for controlling how the Live Paint Bucket tool works before you use the tool. It has only a few options, but they can have quite an effect on how well the tool meets your expectations.
The first set of Live Paint Bucket tool options are contained in the Live Paint Bucket Options dialog box, as shown in Figure 14.3. Double-click the Live Paint Bucket tool in the Tools panel to display the dialog box.

Figure 14.3. The Live Paint Bucket Options dialog box allows you to choose basic settings for the Live Paint Bucket tool.
These settings are available in the Live Paint Bucket Options dialog box:
Paint Fills: When selected, this option allows the Live Paint Bucket tool to add the current fill color or pattern to the fill of a region you click.
Paint Strokes: When selected, this option allows the Live Paint Bucket tool to add the current stroke color to the stroke of a region you click.
Highlight: When selected, this option outlines the region that's automatically detected as you move the mouse pointer over a Live Paint object.
Color: This setting allows you to choose the color of the outline.
Width: Use this setting to set the width of the outline that the Live Paint Bucket tool draws around the region.
By default, the Paint Fills option is selected and the Paint Strokes option is deselected. Selecting both options and using a contrasting color for the stroke color can produce some interesting effects.
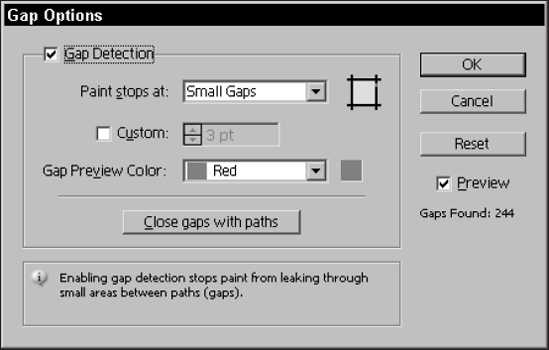
In addition to the options shown in the Live Paint Bucket Options dialog box, you can also control how the Live Paint Bucket tool responds to gaps. Set the gap options in the Gap Options dialog box, as shown in Figure 14.4. Choose Object
These settings are available in the Gap Options dialog box:
Gap Detection: Click this check box to turn on gap detection. This option is off by default.
Paint stops at: Choose Small Gaps, Medium Gaps, or Large Gaps from the dropdown list (popup menu). Illustrator finds fewer gaps when you choose a larger setting.
Custom: Click this check box if you want to specify the size of the gap rather than using one of the preset options. If you select this option, use the text box to specify the size of gap you want to detect.
Gap Preview Color: Choose a contrasting color to make the detected gaps stand out from your artwork.
Close gaps with paths: Click this button to remove the gaps by inserting paths in place of the gaps.
Depending on the result that you're attempting to produce, using gap detection improves the smoothness of the Live Paint Bucket tool's results. With fewer gaps to contend with, the Live Paint Bucket tool generally finds simpler paths than it would in a drawing with many gaps.
You can use the Live Paint Bucket tool to fill objects that you've drawn or you can use it to fill images that you created using the Live Trace tool. Either way, you begin by creating a Live Paint group so that Illustrator knows which objects you want to modify.
To create a Live Paint group, use the Selection tool to select the object (or objects) that you want to include in the group. Then, click the selected object with the Live Paint Bucket tool. After an object is part of a Live Paint group, Illustrator displays outlines around the detected regions as you move the Live Paint Bucket tool over the group. If the Paint Strokes check box is selected in the Live Paint Bucket Options dialog box, the Live Paint Bucket tool's icon changes when the tool is over a stroke. Clicking the Live Paint Bucket tool over a stroke fills the stroke with the current stroke color. Figure 14.5 shows an entire illustration that's been converted to a Live Paint group and then selected.
You can also click a region in a Live Paint group by using the Live Paint Selection tool to pick up the color from that region. You may, for example, decide that you want to pick up a color from one area to use to fill several other areas to reduce the clutter in a vector image traced by the Live Trace tool.

The Live Paint Bucket tool provides you with a flexible vector-based paint tool that's considerably more powerful than the paint bucket tools you find in bitmap-image editors. In this chapter, you learned the following:
The Live Paint Bucket tool is the replacement for the Paint Bucket tool found in earlier versions of Illustrator.
Live Paint groups remain live so that any changes you make to the paths are reflected in the fill you added using the Live Paint Bucket tool.
Live Trace objects must be converted to Live Paint groups before you can use the Live Paint Bucket tool on them. This prevents you from making further modifications with the Live Trace tool.
You can use the gap detection options to control how the Live Paint Bucket tool deals with gaps in the paths.
You can choose to have the Live Paint Bucket tool paint fills, strokes, or both.