In the previous chapter, we have seen the interfacing of some actuators for our service robot. The next important section that we need to cover is about the robotic sensors used in this robot.
We are using sensors in this robot to find the distance from an obstacle, to get the robot odometry data, and for robotic vision and acoustics.
The sensors are ultrasonic distance sensors, or IR proximity sensors are used to detect the obstacles and to avoid collisions. The vision sensors such as Kinect to acquire 3D data of the environment, for visual odometry; object detection, for collision avoidance; and audio devices such as speakers and mics, for speech recognition and synthesis.
In this chapter, we are not including vision and audio sensors interfacing because in the upcoming chapter we will discuss them and their interfacing in detail.
One of the most important features of a mobile robot is navigation. An ideal navigation means a robot can plan its path from its current position to the destination and can move without any obstacles. We use ultrasonic distance sensors in this robot for detecting objects in close proximity that can't be detected using the Kinect sensor. A combination of Kinect and ultrasonic sound sensors provides ideal collision avoidance for this robot.
Ultrasonic distance sensors work in the following manner. The transmitter will send an ultrasonic sound which is not audible to human ears. After sending an ultrasonic wave, it will wait for an echo of the transmitted wave. If there is no echo, it means there are no obstacles in front of the robot. If the receiving sensor receives an echo, a pulse will be generated on the receiver, and it can calculate the total time the wave will take to travel to the object and return to the receiver sensors. If we get this time, we can compute the distance to the obstacle using the following formula:
Speed of Sound * Time Passed /2 = Distance from Object.
Here, the speed of sound can be taken as 340 m/s.
Most of the ultrasonic range sensors have a distance range from 2 cm to 400 cm. In this robot, we use a sensor module called HC-SR04. We can see how to interface HC-SR04 with Tiva C LaunchPad to get the distance from the obstacles.
The following figure is the interfacing circuit of the HC-SR04 ultrasonic sound sensor with Tiva C LaunchPad:
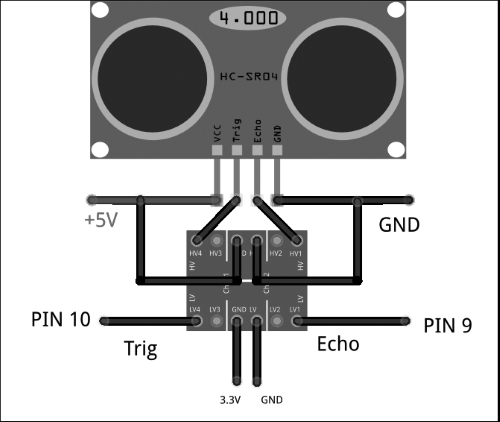
Interfacing diagram of Launchpad and HC-SR04
The working voltage of the ultrasonic sensor is 5 V and the input/output of this sensor is also 5 Volt, so we need a level shifter on the Trig and Echo pins for the interfacing into the 3.3 V level Launchpad. In the level shifter, we need to apply high voltage, that is, 5 Volt, and low voltage, that is, 3.3 Volt, as shown in the figure, to switch from one level to another level. Trig and Echo pins are connected on the high voltage side of the level shifter and the low voltage side pins are connected to Launchpad. The Trig pin and Echo pin are connected to the 10th and 9th pins of Launchpad. After interfacing the sensor, we can see how to program the two I/O pins.
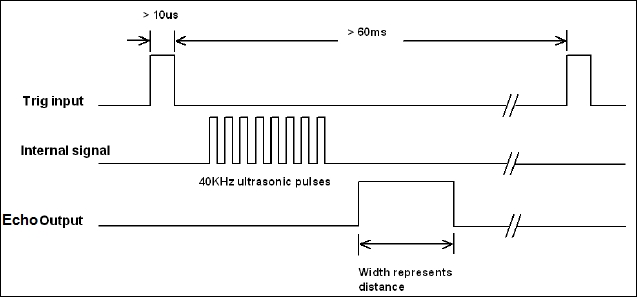
The timing diagram of waveform on each pin is shown in the following diagram. We need to apply a short 10 µs pulse to the trigger input to start the ranging and then the module will send out an eight cycle burst of ultrasound at 40 KHz and raise its echo. The echo is a distance object that is pulse width and the range in proportion. You can calculate the range through the time interval between sending trigger signals and receiving echo signals using the following formula:
Range = high level time of echo pin output * velocity (340 M/S) / 2.
It will be better to use a delay of 60 ms before each trigger, to avoid overlapping between the trigger and echo:
The following Energia code for Launchpad reads values from the ultrasound sensor and monitors the values through a serial port.
The following code defines the pins in Launchpad to handle ultrasonic echo and trigger pins and also defines variables for the duration of the pulse and the distance in centimeters:
const int echo = 9, Trig = 10;
long duration, cm;
The following code snippet is the setup() function. The setup() function is called when a sketch/code starts. Use this to initialize variables, pin modes, start using libraries, and so on. The setup function will only run once, after each power up or reset of the Launchpad board. Inside setup(), we initialize serial communication with a baud rate of 115200 and setup the mode of ultrasonic handling pins by calling a function SetupUltrasonic();
void setup()
{

  //Init Serial port with 115200 buad rate
  Serial.begin(115200);
  SetupUltrasonic();
}
The following is the setup function for the ultrasonic sensor; it will configure the Trigger pin as OUTPUT and the Echo pin as INPUT. The pinMode() function is used to set the pin as INPUT or OUTPUT.
void SetupUltrasonic()
{
 pinMode(Trig, OUTPUT);
 pinMode(echo, INPUT);

}
After creating a setup() function, which initializes and sets the initial values, the loop() function does precisely what its name suggests, and loops consecutively, allowing your program to change and respond. Use it to actively control the Launchpad board.
The main loop of this is in the following code. This function is an infinite loop and calls the Update_Ultra_Sonic() function to update and print the ultrasonic readings through a serial port:
void loop()
{
    Update_Ultra_Sonic();
    delay(200);
}
The following code is the definition of the Update_Ultra_Sonic() function. This function will do the following operations. First, it will take the trigger pin to the LOW state for 2 microseconds and HIGH for 10 microseconds. After 10 microseconds, it will again return the pin to the LOW state. This is according to the timing diagram. We already saw that 10 µs is the trigger pulse width.
After triggering with 10 µs, we have to read the time duration from the Echo pin. The time duration is the time taken for the sound to travel from the sensor to the object and from the object to the sensor receiver. We can read the pulse duration by using the pulseIn() function. After getting the time duration, we can convert the time into centimeters by using the microsecondsToCentimeters() function, as shown in the following code:
void Update_Ultra_Sonic()
{
  digitalWrite(Trig, LOW);
  delayMicroseconds(2);
  digitalWrite(Trig, HIGH);
  delayMicroseconds(10);
  digitalWrite(Trig, LOW);

  duration = pulseIn(echo, HIGH);
  // convert the time into a distance
  cm = microsecondsToCentimeters(duration);

  //Sending through serial port
  Serial.print("distance=");
  Serial.print("	");
  Serial.print(cm);
  Serial.print("
");

}
The following code is the conversion function from microseconds to distance in centimeters. The speed of sound is 340 m/s, that is, 29 microseconds per centimeter. So we get the total distance by dividing the total microseconds by 29/2:
long microsecondsToCentimeters(long microseconds)
{
return microseconds / 29 / 2;
}
After uploading the code, open the serial monitor from the Energia menu under Tools | Serial Monitor and change the baud rate into 115200. You can see the values from the ultrasonic sensor, like this:
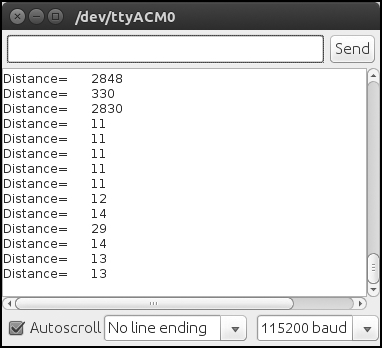
Output of the energia serial monitor
In this section, we can see how to connect Tiva C LaunchPad with Python to receive data from Launchpad.
The PySerial module can be used for interfacing Launchpad to Python. The detailed documentation of PySerial and its installation procedure for Window, Linux, and OS X is on the following link:
http://pyserial.sourceforge.net/pyserial.html
PySerial is available in the Ubuntu package manager and it can be easily installed in Ubuntu using the following command in terminal:
$ sudo apt-get install python-serial
After installing the python-serial package, we can write a python code to interface Launchpad. The interfacing code is given in following section.
The following code imports the python serial module and the sys module. The serial module handles the serial ports of Launchpad and performs operations such as reading, writing, and so on. The sys module provides access to some variables used or maintained by the interpreter and to functions that interact strongly with the interpreter. It is always available:
#!/usr/bin/env python
import serial
import sys
When we plug Launchpad to the computer, the device registers on the OS as a virtual serial port. In Ubuntu, the device name looks like /dev/ttyACMx. Where x can be a number, if there is only one device, it will probably be 0. To interact with the Launchpad, we need to handle this device file only.
The following code will try to open the serial port /dev/ttyACM0 of Launchpad with a baud rate of 115200. If it fails, it will print Unable to open serial port.
try:
    ser = serial.Serial('/dev/ttyACM0',115200)
except:
    print "Unable to open serial port"
The following code will read the serial data until the serial character becomes a new line ('
') and prints it on the terminal. If we press Ctrl + C on the keyboard, to quit the program, it will exit by calling sys.exit(0).
while True:
    try:
        line = ser.readline()
        print line
    except:
        print "Unable to read from device"
        sys.exit(0)
After saving the file, change the permission of the file to executable using the following command:
$ sudo chmod +X script_name
$ ./script_name
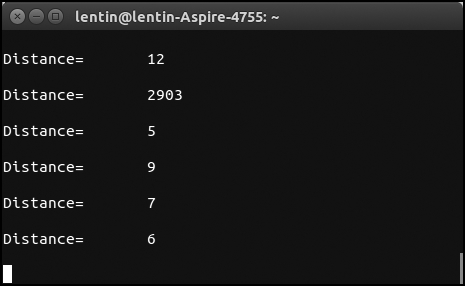
The output of the script will look like this: