
We have discussed interfacing of individual sensors that we are going to use in ChefBot. In this section, we will discuss how to integrate sensors into the Launchpad board. The Energia code to program Tiva C LaunchPad is available on the cloned files at GitHub. The connection diagram of Tiva C LaunchPad with sensors is as follows. From this figure, we get to know how the sensors are interconnected with Launchpad:
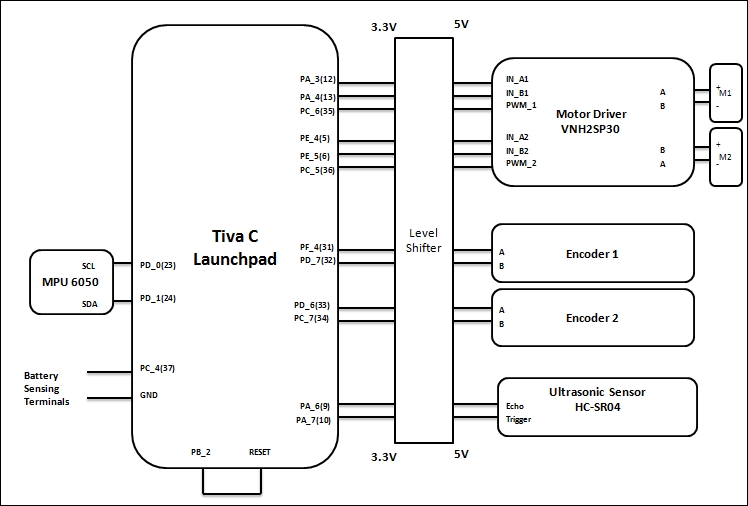
Sensor interfacing diagram of ChefBot
M1 and M2 are two differential drive motors that we are using in this robot. The motors we are going to use here is DC Geared motor with an encoder from Pololu. The motor terminals are connected to the VNH2SP30 motor driver from Pololu. One of the motors is connected in reverse polarity because in differential steering, one motor rotates opposite to the other. If we send the same control signal to both the motors, each motor will rotate in the opposite direction. To avoid this condition, we will connect it in opposite polarities. The motor driver is connected to Tiva C LaunchPad through a 3.3 V-5 V bidirectional level shifter. One of the level shifter we will use here is available at: https://www.sparkfun.com/products/12009.
The two channels of each encoder are connected to Launchpad via a level shifter. Currently, we are using one ultrasonic distance sensor for obstacle detection. In future, we could expand this number, if required. To get a good odometry estimate, we will put IMU sensor MPU 6050 through an I2C interface. The pins are directly connected to Launchpad because MPU6050 is 3.3 V compatible. To reset Launchpad from ROS nodes, we are allocating one pin as the output and connected to reset pin of Launchpad. When a specific character is sent to Launchpad, it will set the output pin to high and reset the device. In some situations, the error from the calculation may accumulate and it can affect the navigation of the robot. We are resetting Launchpad to clear this error. To monitor the battery level, we are allocating another pin to read the battery value. This feature is not currently implemented in the Energia code.
The code you downloaded from GitHub consists of embedded code. We can see the main section of the code here and there is no need to explain all the sections because we already discussed it.
The main sections of the Launchpad code is discussed here. The following are the header files used in the code:
//Library to communicate with I2C devices
#include "Wire.h"
//I2C communication library for MPU6050
#include "I2Cdev.h"
//MPU6050 interfacing library
#include "MPU6050_6Axis_MotionApps20.h"
//Processing incoming serial data
#include <Messenger.h>
//Contain definition of maximum limits of various data type
#include <limits.h>
The main libraries used in this code are for the purpose of communicating with MPU 6050 and process the incoming serial data to Launchpad. MPU 6050 can provide the orientation in quaternion or Euler values by using the inbuilt Digital Motion Processor (DMP). The functions to access DMP is written in MPU6050_6Axis_MotionApps20.h. This library has dependencies such as I2Cdev.h and Wire.h; that's why we are including these headers as well. These two libraries are used for I2C communication. The Messenger.h library allows you to handle a stream of text data from any source and helps to extract the data from it. The limits.h header contains definitions of maximum limits of various data types.
After we include the header files, we need to create an object to handle MPU6050 and process the incoming serial data using the Messenger class:
//Creating MPU6050 Object
MPU6050 accelgyro(0x68);
//Messenger object
Messenger Messenger_Handler = Messenger();
After declaring the messenger object, the main section is to assign pins for the motor driver, encoder, ultrasonic sensor, MPU 6050, reset, and battery pins. After assigning the pins, we can see the setup() function of the code. The definition of the setup() function is given here:
//Setup serial, encoders, ultrasonic, MPU6050 and Reset functions
void setup()
{
  //Init Serial port with 115200 baud rate
  Serial.begin(115200);
  //Setup Encoders
  SetupEncoders();
  //Setup Motors
  SetupMotors();
  //Setup Ultrasonic
  SetupUltrasonic();
  //Setup MPU 6050
  Setup_MPU6050();
  //Setup Reset pins
  SetupReset();
  //Set up Messenger object handler
  Messenger_Handler.attach(OnMssageCompleted);
}
The preceding function contains custom routine to configure and allocate pins for all the sensors. This function will initialize serial communication with 115,200 baud rate and set pins for the encoder, motor driver, ultrasonic, and MPU6050. The SetupReset() function will assign a pin to reset the device, as shown in the connection diagram. We have already seen the setup routines of each sensors in the previous chapters, so there is no need to explain the definition of each functions. The Messenger class handler is attached to a function called OnMssageCompleted(), which will be called when a data is input to the Messenger_Handler.
The following is the main loop() function of the code. The main purpose of this function is to read and process serial data and send available sensor values as well:
void loop()
{
    //Read from Serial port
    Read_From_Serial();
    //Send time information through serial port
    Update_Time();
    //Send encoders values through serial port
    Update_Encoders();
    //Send ultrasonic values through serial port
    Update_Ultra_Sonic();
    //Update motor speed values with corresponding speed received from PC and send speed values through serial port
    Update_Motors();
    //Send MPU 6050 values through serial port
    Update_MPU6050();
    //Send battery values through serial port
    Update_Battery();
}
The Read_From_Serial() function will read serial data from the PC and feed data to the Messenger_Handler handler for processing purpose. The Update_Time() function will update the time after each operation in the embedded board. We can take this time value to process in the PC or take the PC time for processing.
We can compile the code in Energia IDE and can burn the code in Launchpad. After uploading the code, we can discuss the ROS nodes to handle the Launchpad sensor values.