
After completing the Hello World application in PyQt, next we can discuss a GUI for controlling ChefBot. The main use of building a GUI is to create an easier way to control the robot, for example, if the robot is deployed in a hotel to serve food, the person who controls this robot need not have knowledge about the complex commands to start and stop this robot; so building a GUI for ChefBot can reduce the complexity and make it easier for the user. We are planning to build a GUI using PyQt, ROS and Python interface. The ChefBot ROS package is available on GitHub on the following link:
https://github.com/qboticslabs/Chefbot_ROS_pkg.git
If you haven't cloned the code yet, you can do it now using following command:
$ git clone https://github.com/qboticslabs/Chefbot_ROS_pkg.git
The GUI code named robot_gui.py is placed in the scripts folder, which is inside the chefbot_bringup package.
The following screenshot shows the GUI that we have designed for ChefBot:
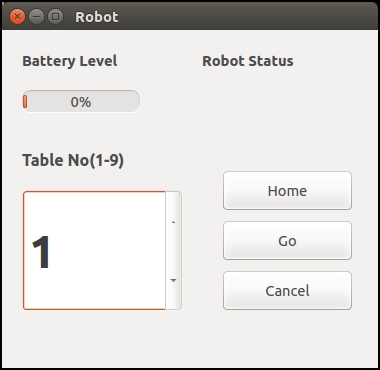
The GUI has the following features:
- It can monitor robot battery status and robot status. Robot status indicates the working status of the robot, for example, if the robot encounters an error, it will indicate the error on this GUI.
- It can command the robot to move into a table position for delivering food. There is a spin box widget on the GUI to input the table position. Currently, we are planning this GUI for a nine table room, but we may expand it into any number according to requirement. After inputting the table number, we can command the robot to go to that table by clicking on the Go button; the robot will get into that position. If we want to return the robot to the initial position, we can click on the Home button. If we want to cancel the current robot movement, click on Cancel to stop the robot. The working of this GUI application is as follows:
When we have to deploy ChefBot in a hotel, the first procedure that we have to do is to create a map of the room. After mapping the entire room properly, we have to save the map on the robot's PC. The robot does the mapping only once, after mapping we can run the localization and navigation routines, and command the robot to get into a position on the map. The ChefBot ROS package comes with a map and simulation model of a hotel-like environment. We can run this simulation and localization now for testing the GUI and in the next chapter, we can discuss how to control the hardware using the GUI. If you install ChefBot ROS packages on your local system, we can simulate a hotel environment and test the GUI.
Start the ChefBot simulation in a hotel-like arrangement using the following command:
$roslaunch chefbot_gazebo chefbot_hotel_world.launch
After starting the ChefBot simulation, we can run the localization and navigation routines using an already built map. The map is placed on the chefbot_bringup package. We can see a map folder inside this package. Here, we will use this map for performing this test. We can load the localization and navigation routine using the following command:
$ roslaunch chefbot_gazebo amcl_demo.launch map_file:=/home/lentin/catkin_ws/src/chefbot/chefbot_bringup/map/hotel1.yaml
The path of the map file can change in a different system, so use the path in your system instead of this path.
If the path mentioned is correct, it will start running the ROS navigation stack. If we want to see the robot position on the map or manually set the initial position of robot, we can use RViz using the following command:
$ roslaunch chefbot_bringup view_navigation.launch
In RViz, we can command the robot to go to any map coordinates using the 2D Nav Goal button.
We can command the robot to go to any map coordinates using programming too. The ROS navigation stack is working using the ROS actionlib library. The ROS actionlib library is for performing preemptable tasks, it is similar to ROS Services. An advantage over ROS services is that we can cancel the request if we don't want it at that time.
In the GUI, we can command the robot to go to a map coordinate using Python actionlib library. We can get the table position on the map using the following technique.
After starting the simulator and AMCL nodes, launch the keyboard teleoperation and move the robot near each table. Use the following command to get the translation and rotation of the robot:
$ rosrun tf tf_echo /map /base_link
When we click on the Go button, that position is fed to the navigation stack and the robot plans its path and reaches its goal. We can even cancel the task at anytime. So the ChefBot GUI acts as an actionlib client, which sends map coordinates to the actionlib server, that is, the navigation stack.
We can run the robot GUI now to control the robot using the following command:
$ rosrun chefbot_bringup robot_gui.py
We can select a table number and click on the Go button for moving robot to each table.
Assuming that you cloned the files and got the robot_gui.py file, we can discuss the main slots we added into the Ui_Form() class for the actionlib client and to get values of battery level and robot status.
We need to import the following Python modules for this GUI application:
import rospy
import actionlib
from move_base_msgs.msg import *
import time
from PyQt4 import QtCore, QtGui
The additional modules we require are ROS Python client rospy, and the actionlib module to send values to the navigation stack. The move_base_msgs module contains the message definition of the goal that needs to be sent to the navigation stack.
The robot position near each table is mentioned in a Python dictionary. The following code shows hardcode values of the robot's position near each table:
table_position = dict()
table_position[0] = (-0.465, 0.37, 0.010, 0, 0, 0.998, 0.069)
table_position[1] = (0.599, 1.03, 0.010, 0, 0, 1.00, -0.020)
table_position[2] = (4.415, 0.645, 0.010, 0, 0, -0.034, 0.999)
table_position[3] = (7.409, 0.812, 0.010, 0, 0, -0.119, 0.993)
table_position[4] = (1.757, 4.377, 0.010, 0, 0, -0.040, 0.999)
table_position[5] = (1.757, 4.377, 0.010, 0, 0, -0.040, 0.999)
table_position[6] = (1.757, 4.377, 0.010, 0, 0, -0.040, 0.999)
table_position[7] = (1.757, 4.377, 0.010, 0, 0, -0.040, 0.999)
table_position[8] = (1.757, 4.377, 0.010, 0, 0, -0.040, 0.999)
table_position[9] = (1.757, 4.377, 0.010, 0, 0, -0.040, 0.999)
We can access the position of the robot near each table by accessing this dictionary.
Currently, we have inserted only four values for a demonstration purpose. You can add more values by finding the position of other tables.
We are assigning some variables to handle the table number, the position of robot and the actionlib client inside the Ui_Form() class.
#Handle table number from spin box
self.table_no = 0
#Stores current table robot position
self.current_table_position = 0
#Creating Actionlib client
self.client = actionlib.SimpleActionClient('move_base',MoveBaseAction)
#Creating goal message definition
self.goal = MoveBaseGoal()
#Start this function for updating battery and robot status
self.update_values()
The following code shows the signals and slots assignment in this code for buttons and spin box widgets:
#Handle spinbox signal and assign to slot set_table_number()
QtCore.QObject.connect(self.spinBox, QtCore.SIGNAL(_fromUtf8("valueChanged(int)")), self.set_table_number)
#Handle Home button signal and assign to slot Home()
QtCore.QObject.connect(self.pushButton_3, QtCore.SIGNAL(_fromUtf8("clicked()")), self.Home)

#Handle Go button signal and assign to slot Go()
QtCore.QObject.connect(self.pushButton, QtCore.SIGNAL(_fromUtf8("clicked()")), self.Go)

#Handle Cancel button signal and assign to slot Cancel()
QtCore.QObject.connect(self.pushButton_2, QtCore.SIGNAL(_fromUtf8("clicked()")), self.Cancel)
The following slot handles the spin box value from the UI and assigns a table number. Also, it converts the table number to the corresponding robot position:
def set_table_number(self):
  self.table_no = self.spinBox.value()
  self.current_table_position = table_position[self.table_no]
Here is the definition of the Go slot for the Go button. This function will insert into the robot position of the selected table in a goal message header and send it to the navigation stack:
def Go(self):

  #Assigning x,y,z pose and orientation to target_pose message
  self.goal.target_pose.pose.position.x=float(self.current_table  _position[0])

  self.goal.target_pose.pose.position.y=float(self.current_table  _position[1])
  self.goal.target_pose.pose.position.z=float(self.current_table  _position[2])

  self.goal.target_pose.pose.orientation.x =     float(self.current_table_position[3])
  self.goal.target_pose.pose.orientation.y=   float(self.current_table_position[4])
  self.goal.target_pose.pose.orientation.z=   float(self.current_table_position[5])

  #Frame id
  self.goal.target_pose.header.frame_id= 'map'

  #Time stamp
  self.goal.target_pose.header.stamp = rospy.Time.now()

  #Sending goal to navigation stack
  self.client.send_goal(self.goal)
The following code is the Cancel() slot definition. This will cancel all the robot paths that it was planning to perform at that time.
def Cancel(self):
  self.client.cancel_all_goals()
The following code is the definition of Home(). This will set the table position to zero, and call the Go() function. The table at position zero is the home position of the robot:
def Home(self):
  self.current_table_position = table_position[0]
  self.Go()
The following definitions are for the update_values() and add() functions. The update_values() method will start updating the battery level and robot status in a thread. The add() function will retrieve the ROS parameters of the battery status and robot status, and set them to the progress bar and label, respectively:
def update_values(self):
    self.thread = WorkThread()
    QtCore.QObject.connect( self.thread,    QtCore.SIGNAL("update(QString)"), self.add )
    self.thread.start()
def add(self,text):
  battery_value = rospy.get_param("battery_value")
  robot_status = rospy.get_param("robot_status")
   self.progressBar.setProperty("value", battery_value)
     self.label_4.setText(_fromUtf8(robot_status))
The WorkThread() class used in the preceding function is given here. The WorkThread() class is inherited from QThread provided by Qt for threading. The thread simply emits the signal update(Qstring) with a particular delay. In the preceding function update_values(), the update(QString) signal is connected to the self.add() slot; so when a signal update(QString) is emitted from thread, it will call the add() slot and update the battery and status value:
class WorkThread(QtCore.QThread):
  def __init__(self):
    QtCore.QThread.__init__(self)
   def __del__(self):
    self.wait()
   def run(self):
    while True:
      time.sleep(0.3) # artificial time delay
      self.emit( QtCore.SIGNAL('update(QString)'), " " )
      return
We have discussed how to make a GUI for ChefBot, but this GUI is only for the user who controls ChefBot. If someone wants to debug and inspect the robot data, we may have to go for other tools. ROS provides an excellent debugging tool to visualize data from the robot.
The rqt tool is one of the most popular ROS tools, which is based on a Qt-based framework for GUI development for ROS. Let's discuss the rqt tool, installation procedure, and how we can inspect the sensor data from the robot.
rqt is a software framework in ROS, which implements various GUI tools in the form of plugins. We can add plugins as dockable windows in rqt.
Installing rqt in Ubuntu 14.04.2 can be done using the following command. Before installing, ensure that you have the full installation of ROS Indigo.
$ sudo apt-get install ros-indigo-rqt
After installing the rqt packages, we can access the GUI implementation of rqt called rqt_gui, in which we can dock rqt plugins in a single window.
Let's start using rqt_gui.
Run the roscore command before running rqt_gui:
$ roscore
Run the following command to start rqt_gui:
$ rosrun rqt_gui rqt_gui
We will get the following window if the commands work fine:
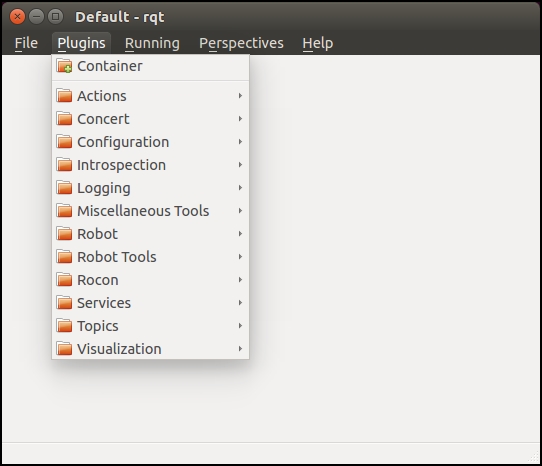
We can load and unload plugins at run time. To analyze the ROS message log, we can load the Console plugin from Plugins | Logging | Console. In the following example, we load the Console plugin and run a talker node inside rospy_tutorials, which will send a Hello World message to a Topic called /chatter.
Run the following command to start the node talker.py:
$rosrun rospy_tutorials talker.py
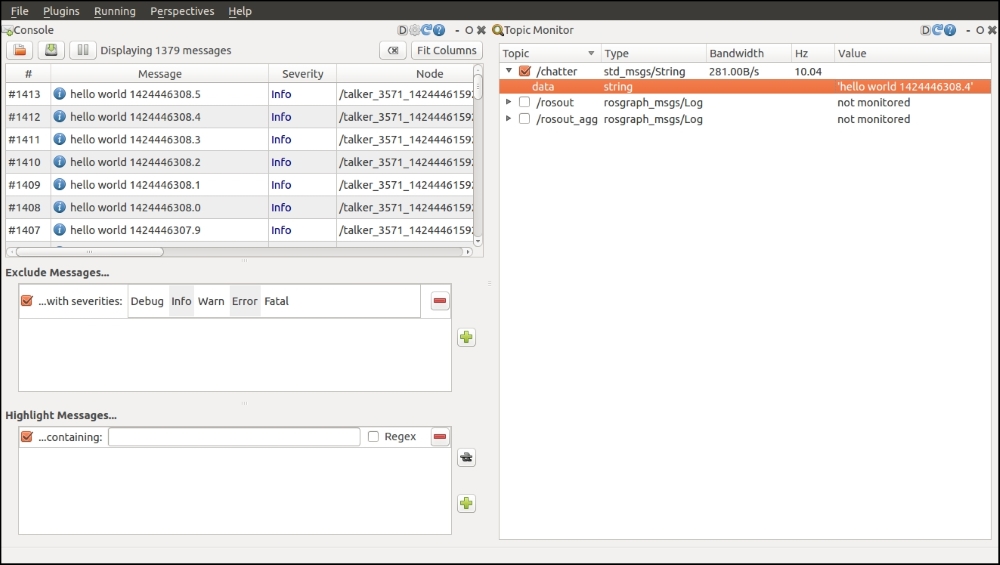
In the following screenshot, rqt_gui is loaded with two plugins named Console and Topic Monitor. The Topic Monitor plugin can be loaded from Plugins | Topics | Topic Monitor. The Console plugin monitors the messages printing on each nodes and their severity. It is very useful for debugging purposes. In the following figure, the left section of rqt_gui is loaded with the Console plugin and the right side is loaded with Topic Monitor. Topic Monitor will list the topics available and will monitor their values.
In the following figure, the Console plugin monitors the talker.py node's messages and their severity level whereas Topic Monitor monitors the value inside the /chatter Topic.
We can also visualize data such as images and plot graphs on rqt_gui. For robot navigation and its inspection, there are plugins for embedding RViz in rqt_gui. The Navigation viewer plugin views the from /map Topic. The visualization plugins are available in Plugin | Visualization.